
Managing Lending Requests
This page explains how to find specific lending requests that require your attention, and the various actions you can take during the management process of each lending request. This includes finding lending requests that require handling, viewing request parameters, handling requests for physical/digital resources, detaching lending requests from inventory and rejecting lending requests. It also includes generating print slip reports, removing alerts, managing task assignment and viewing past lending request actions.
For more information on resource sharing including locating items for resource sharing, working with resource sharing partners, managing borrowing and lending requests and contributing to the resource sharing directory, see Resource Sharing.
- Fulfillment Services Operator (for the resource-sharing library)
- Fulfillment Services Manager (for the resource-sharing library)
- Find a lending request that is ready to be fulfilled (see Finding Requests that Require Handling below).
- Retrieve the requested resource, either by moving a physical item or acquiring a digital file (see Handling Requests for Physical Resources, Handling Requests for Digital Resources, below).
- Ship the resource, as follows:
- Physical or Physical Non-Returnable Items – Send to resource-sharing desk (see Sending a Physical Resource below)
- Digital Items – Send by email (see Handling Requests for Digital Resources, below)
- Receive the item back from the borrowing institution and scan it into the library to be re-shelved. See Managing Returning Physical Resources, below.
Finding Requests that Require Handling
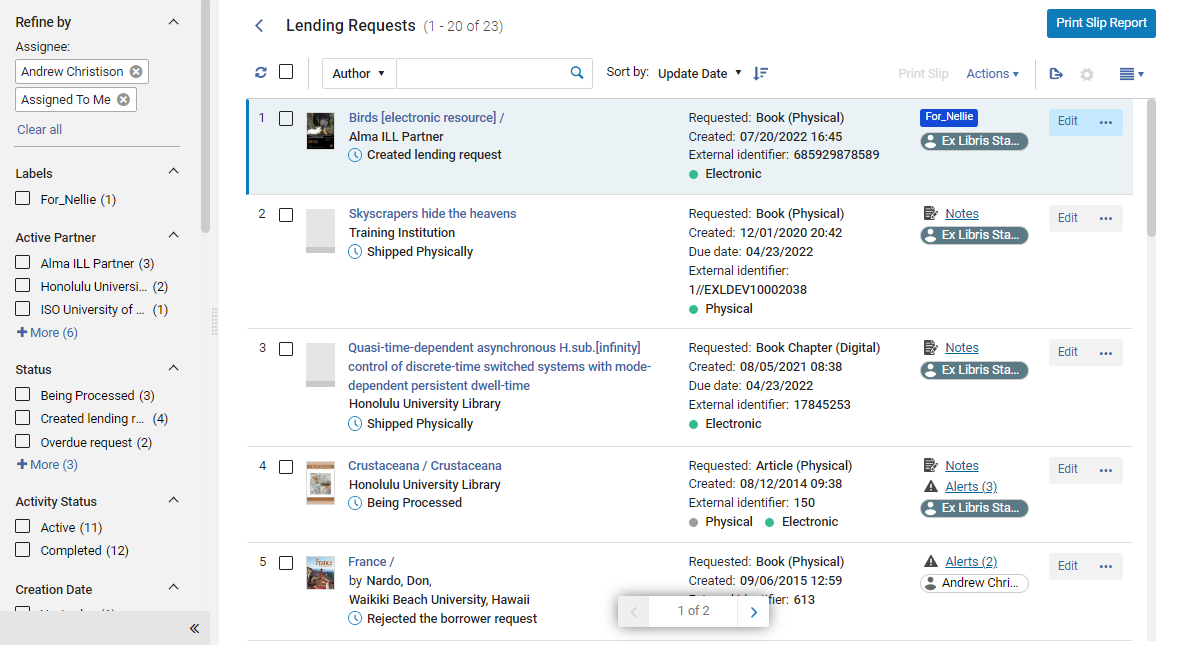
You can use the facets filtering system, the sort feature, and the secondary search to help you find the tasks you need to work with. For general information about working with the facets and sorting see New Layout 2022. You can open the Lending Requests page from one of the predefined filters in the Task Lists option of the persistent menu.
Filtering Using Facets
- Labels – Labels that are attached to requests
- Active Partner –The borrowing institution
- Status – Status of the lending request.
The following statuses indicate that the final step in the request is completed. Requests in these statuses may be removed.
- Shipped digitally
- Request completed - This is the final status before removal, and may be manually set.
The following are non-final (in-process) statuses of the request process:- Being Processed
- Borrower Recall
- Cancel Reply
- Cancelled
- Conditional
- Created lending request
- Damaged
- Expired
- Lender check in
- Locate failed
- Lost
- Non expiring
- Overdue request
- Pending auto reject
- Recalled item
- Received by partner
- Rejected the borrower request
- Renew requested
- Returned by partner
- Shipped physically
- Will supply
- Staff renewal
- Renewal response
- Patron renewal
- Activity Status – Active or Completed
- Request Reported – Requests that have been printed on the print slip report
- Creation Date – Date on which request was created. Possible values are:
- Today – Requests created on current date
- Yesterday – Requests created on day before current date
- 2-3 days ago – Requests created two or three days before current date (excluding today and yesterday)
- 4-7 days ago – Requests created between four to seven days before current date (excluding the above three options)
- 8-30 days ago – Requests created between eight days and a month before current date (excluding the above four options)
- Older – Requests created more than one month before the current date
- Update Date – Date on which the request was updated. Possible values are the same as those for the Creation Date facet.
- Requested Format – The format of the requested item. Options are: Digital, Physical, and Physical non-returnable
- Supplied Format – The format in which the requested item was supplied. Options are: Digital, Physical, Physical non-returnable and Undefined
- Due Date – The date by which the item must be delivered. Possible values are the same as those for the Creation Date facet.
- Last Interest Date – The date after which the requester has indicated that they are no longer interested in the item
- Notes from Partner – The requests with notes from the borrowing institution
- Owning Library – The library which owns the requested resource
- Level of Service – The level of service assigned to the request
- Alerts – Alerts attached to the request
- Assignee – The staff person to whom the request is assigned (including "Unassigned")
- Inventory Type – The formats available for the requested item
Secondary Search
The secondary-search feature allows you to search the current request list for requests that meet certain criteria. For example, you could search for a particular author's name in order to find all the requests in the list related to books by that author, and hide all the other requests in the list.
Unlike the primary search feature, which is always available in the persistent search box (see Searching in Alma), the secondary search does not cancel previously selected facets.
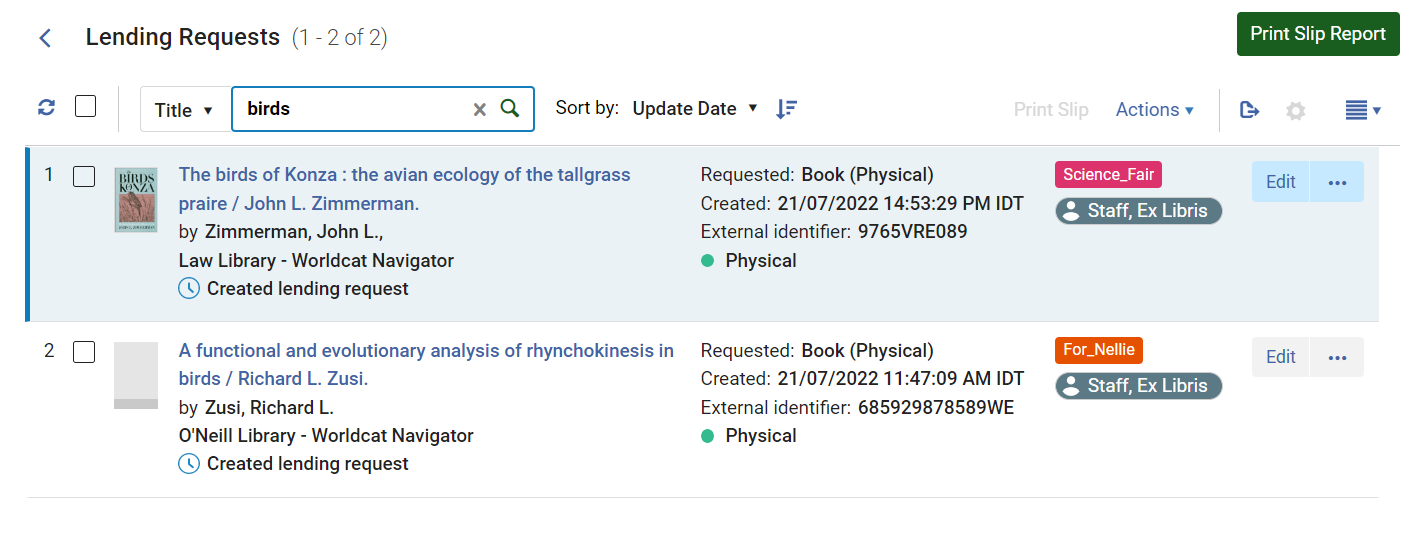
- At the top of the request list, in the secondary-search controls, in the dropdown list, select the field to search by.
- In the text box, enter the text for which you want to search.
- Press Enter or select
 . The search is performed; the request list is updated as required so that only those requests that meet the search requirements appear in it.
- In the secondary-search controls, select the x.
Predefined Task-List Filters
You can select any of the following tasks in the Tasks List (![]() ) in the persistent menu (see Tasks in the Task List) to open the Lending Requests page with a preset filter:
) in the persistent menu (see Tasks in the Task List) to open the Lending Requests page with a preset filter:
- Lending requests - New - assigned to you
- Lending requests - New - unassigned
- Lending requests - Overdue - assigned to you - Pre-filters for requests with the status Overdue Request
- Lending requests - Overdue - unassigned - Pre-filters for requests with the status Overdue Request
- Lending requests - Recalled - assigned to you - Pre-filters for requests with the status Recalled Item
- Lending requests - Recalled - unassigned- Pre-filters for requests with the status Recalled Item
- Lending requests failed locate - assigned to you - Pre-filters for requests with the status Locate Failed
- Lending requests failed locate - unassigned- Pre-filters for requests with the status Locate Failed
- Lending requests with active general messages - assigned to you - Pre-filters for requests that have a general message
- Lending requests with active general messages - unassigned- Pre-filters for requests that have a general message
- Lending requests with active notes - assigned to you - Pre-filters for requests that have a request note
- Lending requests with active notes - unassigned - Pre-filters for requests that have a request note
Viewing and Editing the Parameters of a Lending Request
You can view the complete request form of an existing lending request. Depending on its status, you may also be able to edit the request. (Editing refers to adding or modifying the parameters of a borrowing request, such as bibliographic information or information about the request. Notes, labels, and attachments can always be added to requests.)
.png?revision=1&size=bestfit&height=15) ) menu in the task list. If necessary, you can access all of the editable parameters by opening the request in the Resource Sharing Lending Requests page.
) menu in the task list. If necessary, you can access all of the editable parameters by opening the request in the Resource Sharing Lending Requests page. Working with the Details Pane
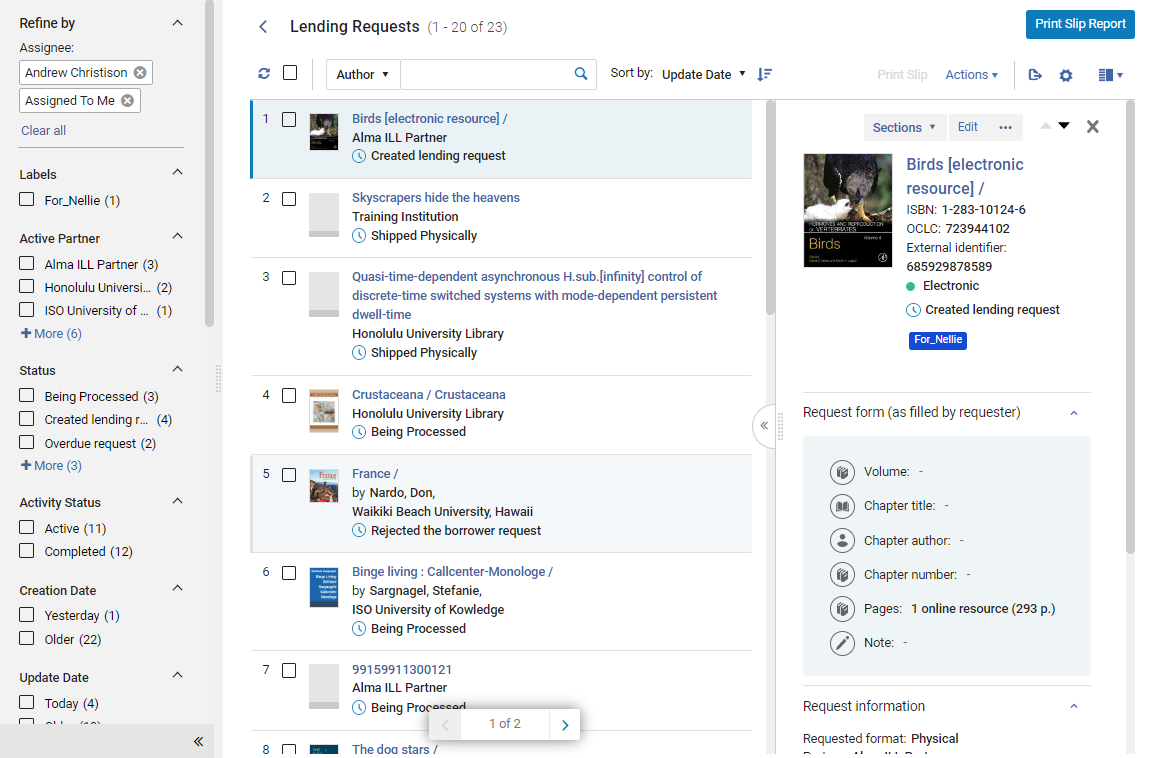
You can see many details about an existing lending request, and edit some parts of the request, in the Details pane.
- In the Lending Requests page (Fulfillment > Resource Sharing > Lending Requests), in the task list, select the request. The Details pane opens.
- Edit any of the fields in the Request form section, as required. Select Save at the bottom of the section when you are done.
Opening the Full Request Form for Viewing or Editing
You can access the entire lending-request form as required. Depending on its status and your role, you may be able to edit the form as well.
- In the Lending Requests page (Fulfillment > Resource Sharing > Lending Requests), locate the request you want to view.
- In the request's row, select Edit or View. (Or, when the task is selected, and its details are displayed in the Details pane, select Edit or View at the top of the pane.)
- View appears if the request is inactive or the user only has view permissions for lending requests. Otherwise, Edit appears.
- Selecting Edit for an unassigned task locks the task for editing by other users.
The Resource Sharing Lending Requests page opens in a sliding panel, with the General Information tab selected.
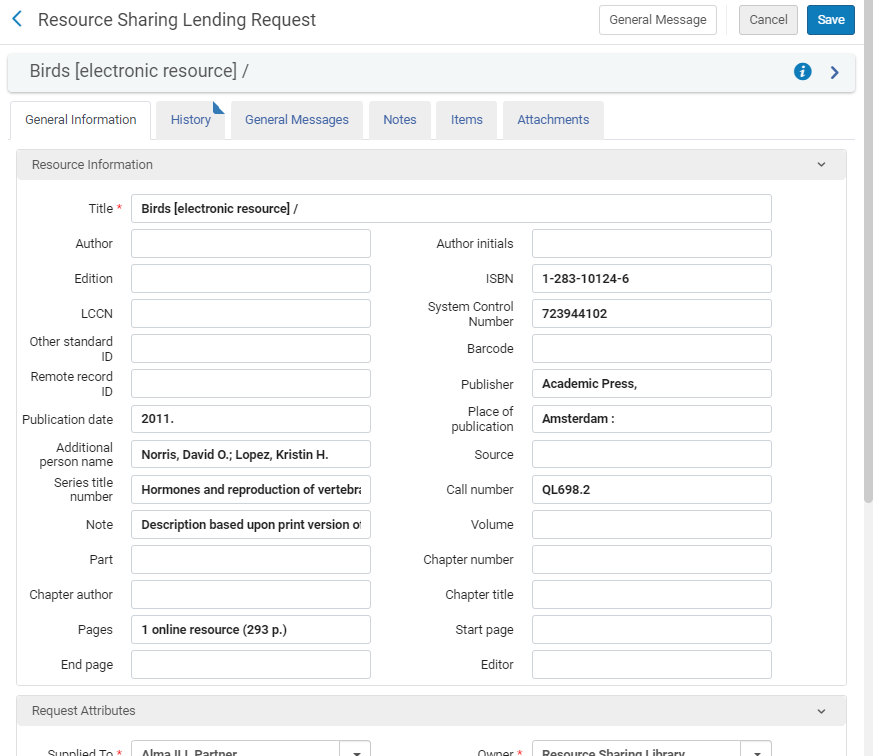 Resource Sharing Lending Requests pageFor a description of the fields, see the Resource Information Fields table in Adding a New Book or Journal Article and Lending-Request Attribute Fields table in Creating a Lending Request.
 - If you opened the form by selected Edit, edit the fields as necessary.
- If you edited the form, select Save to save your changes and close the form.
Workflow Actions for Lending Requests
- On the Lending Requests page (Fulfillment > Resource Sharing > Lending Requests), filter the request list as required in order to locate the tasks you want to manage (see Finding Requests that Require Handling, above.
-
To manage several requests simultaneously, select the checkboxes to the left of these requests (or Select all), and then select one of the following options:
- Change Status – Change the status of the specified items. Select a status from the drop-down list and select Change Status.
- Print Slip Report – Print a slip report that is sent to a printer or email address, or can be downloaded to a local machine (see Generating a Print Slip Report below.). The report lists the items and their information.
- Print Slip – Print a call slip for each of the selected items. The Ful Incoming Slip Letter, also known as the resource sharing lending slip letter, is the letter that is printed. For information about the slip, see Configuring Alma Letters.
- Remove Requests – Remove the selected requests from the task list (only for completed requests). Select Confirm in the Confirmation Message dialog box to remove the requests.
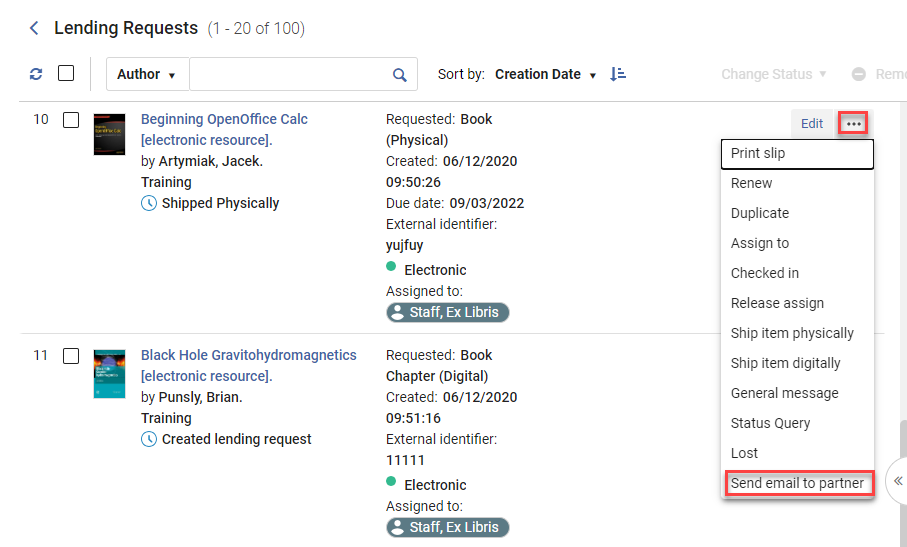
- To manage a single request, select one of the options in the More actions menu, as described in the following table:
| Link | Description |
|---|---|
| Print slip | Print a call slip for the item, containing both the external ID and barcode of the item.
For requests that have not yet been shipped, this option prints an incoming request slip, Ful Incoming Slip Letter. For requests that have already been shipped, this option prints a shipping slip, Resource Sharing Shipping Slip Letter, containing additional information specific to the item being shipped.
For information on these slips, see Configuring Alma Letters.
|
| Create Move Request | Request that a physical item be brought to your location in order to be prepared for shipping to the borrowing institution (see Sending a Physical Resource below) |
| Create Digitization Request | Request that an institutional digitization department create a digital copy of a physical item (see Sending a Physical Resource via Digitization below) |
| Download Electronic Resource | Download a digital resource from a vendor in order to send it to the borrowing institution (see Handling Requests for Digital Resources below) |
| Duplicate | Create a new task based on the existing one. The Resource Sharing Lending Request page opens, where you modify the request parameters in the Request Attribute section, as needed (see Request Attribute Fields table).
When duplicating a Resource Sharing Lending request, the values in the following fields are copied to the new request:
|
| Assign to | Assign a task to a user (see Managing Task Assignments below). |
| Detach from MMS | Detach a lending request from its inventory (see Detaching a Lending Request from its Inventory below). |
| Checked in |
The item was received back from the borrowing library. When you select this option, the status of the request is changed to Request Completed. Selecting this option is equivalent to scanning its barcode in the Scan In Items page (Fulfillment > Resource Requests > Scan In Items). See Managing Returning Physical Resources, below. |
| Locate | Displayed for items for which Resource Locate Status = No Resources Located. Alma attempts to locate the resource, either due to the resource not being located or because there are multiple resources that have been found.
When multiple resources are found, the results display on the search page, where you can either select a result or select the Change Query link to modify the search value.
It is recommended to select Edit for a resource and update relevant information before selecting Locate. When a resource is located, the status changes to Resource Located.
|
| Search | Displayed for items for which Resource Locate Status = No Resources Located. Opens the search page, which enables performing a new resource search to locate the resource. |
| Reactivate Request |
Reactivate lending request will appear when:
Select this option to reactivate a completed peer to peer resource sharing request. The shipped item's process status changes to In resource sharing and the item is relinked. The request status changes to Request Reactivated. If the item is in another process, an error is displayed. The request's original external ID is maintained. This action is available for Fulfillment Services Managers, and may be turned on for Fulfillment Services Operators by Ex Libris customer support. |
| Reject | Reject a lending request (see Rejecting a Lending Request below). |
| Release assign | Remove the assignment of the task and leave it unassigned (see Managing Task Assignments) below. |
| Renew |
For automated requests (ISO, NCIP, etc.), this action will also appear if the Request Status is Renew Requested and the workflow profile is configured as follows:
(For details on configuring workflow profiles, see Configuring Workflow Profiles.)
For non-automated requests, when Request Status is Received by Partner and Manual renew is selected as a step in the workflow profile, the action is available.
Select the option to open the Due Date dialog box. Enter a due date and select OK to create the renewal.
Optionally, you can add an Internal note and/or a Note to partner in the relevant fields. For details on these fields, see step 3 in Rejecting a Borrowing Request.
|
|
Send email to partner
|
Use this action to email a partner directly from the lending task list request. This option eases workflows, such as when a lender wants to convey limitations or for any type of messages such as a thank you note. These messages are saved in the request for future reference.
Correspondence can be initiated using the Send email to partner action or from the Start Communication button on the Communications tab (see Communicating with Partners).
|
| Ship item digitally | Add files to the lending request that are already in your possession (i.e. have not been created as part of a digitization workflow). Once the files are uploaded and the page is saved, the request is changed either to Shipped Digitally or Request Completed depending on whether "Waiting for receive digitally” is selected in the partner’s workflow profile. |
| Ship item physically | Ship the item associated with the request. The Shipping Items page opens (see Shipping Items). |
| Ship non-returnable | Send a resource, such as a scanned or photocopied portion of a book, to the borrowing library as a non-returnable copy. When you select this option, a confirmation notification appears, and the status of the request is changed to Shipped Physically for a physical resource, or either Shipped Digitally or Request Completed, depending on whether “Waiting for receive digitally” is selected in the partner’s workflow profile. |
| General Message | Send a general message with a lending request to a borrower (see Sending a General Message With a Borrowing Request). |
| Status Query | Request a status update from the lending institution. This is only applicable to ISO partners.
The returned borrower ISO status is recorded in a note. Each ISO status corresponds to the following Alma request statuses:
|
| Will Supply | Update a request that has not yet shipped with a Will Supply status. Displayed only when the request is not yet shipped and the borrowing partner’s workflow includes Will Supply (see Configuring Workflow Profiles). |
| Conditional | A pop-up window is displayed with a mandatory Reason, a Date for reply, which is the last day the lender will wait to receive an answer from the borrower, and a Note field. When the message is submitted, the request status changes to Conditional. An ISO message is sent to the borrower. When a response is received from the borrower, if the response value is No, the request is rejected. If the value is Yes, the Date for Reply field is cleared and the request status returns to Created lending request. |
- If a request is processed automatically (by ISO/NCIP) and if either no resource is found or multiple resources are found that match the input criteria, the request is created with Citation Status = Locate Failed and Resource Locate Status = No Resources Located.
- During the creation of the lending request, if a title has more than one item, the availability and requestability are not checked during the locate process. The request should be handled manually.
Handling Requests for Physical Resources
If the lending request is for a resource that your library owns in physical form, you can either fulfill the request by sending the physical item to the requesting institution, or digitize the resource and send the digitized version to the requesting institution. You can either send a digitization request to a digitization department in your institution (see Sending a Physical Resource via Digitization below) or digitize the resource yourself (see Handling Requests for Digital Resources below).
Sending a Physical Resource
Requested physical resources are shipped to the borrowing institution, which then delivers them to the patrons who requested them. Ensure that you are at a resource-sharing library before you begin the shipping process.
If the requested resource is already located in your library, you can begin the process of shipping it to the requesting institution immediately. If it is owned by your institution, but it is at a different location, you can request that it be transferred to your library, and then ship it.
- In the Lending Requests page (Fulfillment > Resource Sharing > Lending Requests), select the request in order to open the Details pane. In the Details pane, under Fulfillment request information, you can see which library manages the resource.
- If the resource is managed at a different location in your institution, in the More actions menu, select Create Move Request. The Create Move Request dialog box opens, and lists the locations at which the resource can be found in your institution.
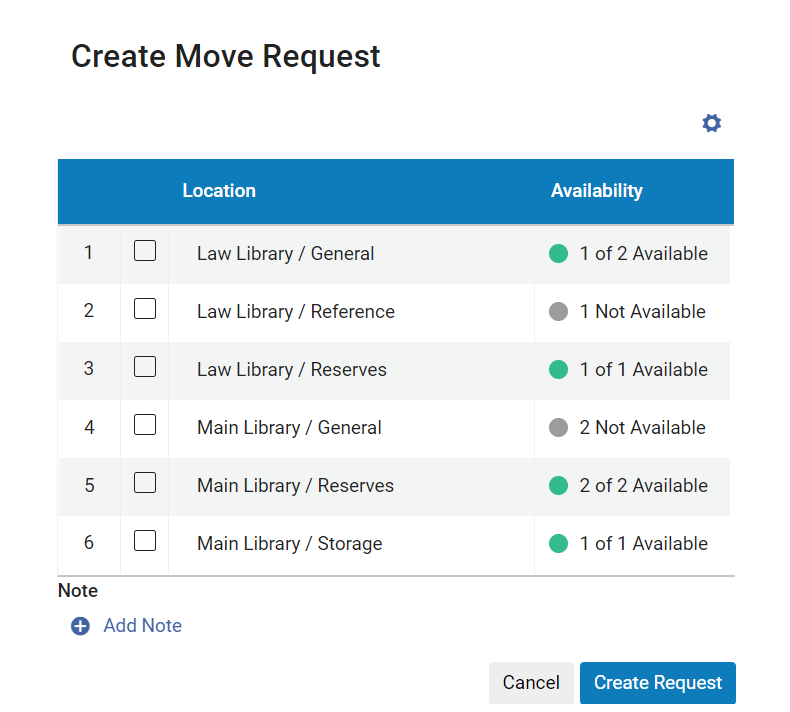
Create Move Request dialog box- If multiple locations appear, and you have a preference for which one to use, select that location. (Otherwise, the system selects a location automatically when you create the request.) The Manual Description field is added to the dialog box.
- If the request is for particular issues of a serial resource, in the Manual Description field, enter the information about which issues are required. If you fill in this field, the Move request will be converted into a General Hold Request. For additional information about General Hold Requests, see Creating a General Hold Request.
- If you want to add a note, select Add Note, and then enter the note.
- Select Create Request. The Move request is created.
- When the item arrives at your library, continue with the next step.
- In the More actions menu, select Ship item physically. The Shipping Items page opens in a sliding panel, with the bibliographic information and shipping information already entered.
- Select the Due Date. (New for May) If the due date falls on a closed date, then it will be affected by the ‘Closed Library Lending Requests Due Date Management’ policy of the relevant Lending Resource Sharing TOU. See the Lending Resource Sharing TOU description in Adding Fulfillment Policies.
- Under Location, select the location in the lending institution that will own the resource while it is lent out.
- Enter an optional Internal note and/or Note to partner, as required.
- If the requested resource consists of multiple items, select Multiple items.
- If you are only sending one item, scan the barcode of the item. The record displays at the bottom of the page, and then the sliding panel closes.
If you are sending multiple items, scan the barcodes of each of the items. The records display at the bottom of the page. Press Enter or select OK when you have scanned all of the item barcodes. The sliding panel closes.
The records are saved in a temporary location at the resource-sharing library, and the status of the request is changed to Shipped Physically. When the borrowing institution is an email partner, the Lender Ship Email Letter is sent. When the borrowing institution is an ISO partner, the ISO Ship message is sent to the partner. For lending requests before shipping, if the item was already in a temporary location, then, when returned, the item will revert back to the previous temporary location. Note that this only applies to the temporary location and not to the other temporary conditions such as Temporary call number type, Due back date, etc.
You can also ship a requested physical resource directly from the Shipping Items page (Fulfillment > Resource Sharing>Shipping Items) and, although it is not recommended, from the Scan In Items page (Fulfillment > Resource Requests > Scan In Items). To do so:
- If you are using the Scan In Items page, in the External Identifier field, select Yes. (The Automatic Print Slip option is not functional when shipping from the Scan In interface.)
- Scan the item barcode and the request ID of the resource in the relevant fields.
- Select OK.
Sending a Physical Resource via Digitization
If the requested resource is physical, but the request was for a digital copy, you can either scan the item yourself and send it (see Handling Requests for Digital Resources below), or you can send a request for digitization to a digitization department in your institution, as explained here.
- In the Lending Requests page (Fulfillment > Resource Sharing > Lending Requests), in the item's More actions menu, select Create Digitization Request. The Create Digitization Request dialog box opens and lists the locations at which the resource can be found in your institution.
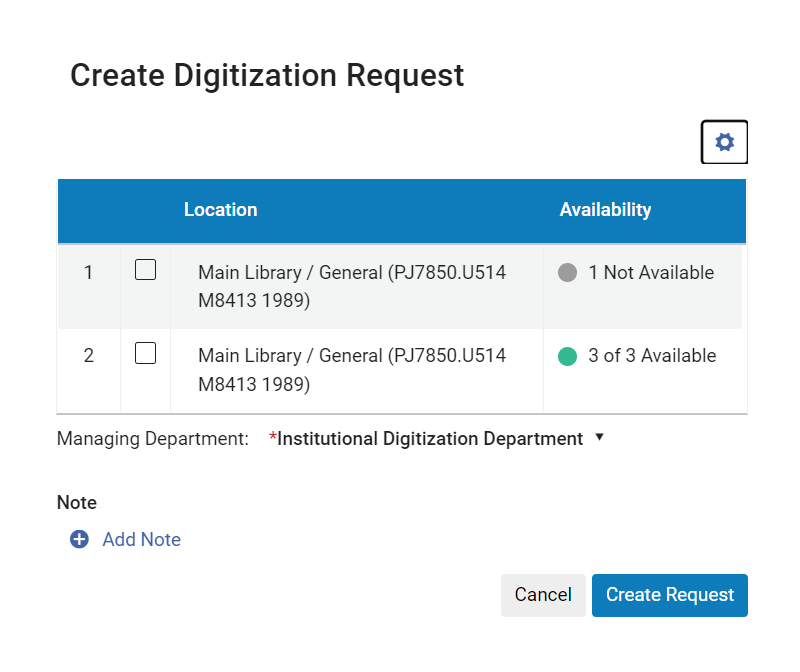
Create Digitization Request dialog box - If multiple locations appear, and you have a preference for which one to use, select that location. (Otherwise, the system selects a location automatically when you create the request.) The Manual Description field is added to the dialog box.
- If the request is for particular issues of a serial resource, in the Manual Description field, enter the information about which issues are required.
- Under Managing Department, select the digitization department that should perform the digitization.
- If you want to add a note, select Add Note, and then enter the note.
- Select Create Request. The digitization request is created. The digital version of the resource will be sent to the borrowing institution automatically once the digitization process is completed.
Managing Returning Physical Resources
When a lent physical resource is returned to the library, you can check it in.
- Do one of the following:
- In the Scan In Items page (Fulfillment > Resource Requests > Scan In Items), scan its barcode.
- In the Lending Requests page (Fulfillment > Resource Sharing > Lending Requests), in the item's More actions menu, select Checked in.
The Checked in dialog box opens.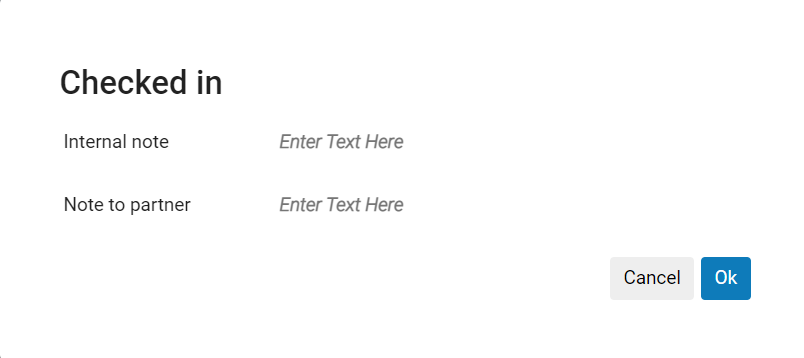
- Enter an internal note and/or a note to the borrowing partner, as required.
- Select OK. The item is checked in and the status of the lending request is changed to Request Completed.
Using the Checked in action does not change the status of the item. To ensure the item is marked as back in place or routed back to its place, the librarian should scan the item after using this action.
After you check a returned item into Alma, if the borrowing institution is an ISO partner, an ISO checked-in message is sent to the library and the request closes automatically. A checked-in ISO message is sent only if the active partner’s workflow profile includes Checked In Message as a valid option (see Configuring Workflow Profiles). If the borrowing institution is an email partner, the Lender Checked-In Email Letter is sent. For information about this letter, see Configuring Alma Letters.
If a lent resource is overdue, you can send a message to the borrowing institution requesting that they return it. The email / ISO message to send in this case is the Borrower Overdue Email Letter, see Alma Letters List. Note that the letter is only sent to email partners. ISO partners only receive an ISO message This message is sent by the Send Overdue Message to Resource Sharing Borrowing Partner scheduled job. Alternatively, you can manually send a general message to the partner.
Handling Requests for Digital Resources
Digital items are sent as email attachments or as links to the digitized material, either to the borrowing institution or directly to the requester. If you need to send multiple files, zip them into one file before sending them.
If you have immediate access to a digital resource (i.e., it is owned by your library, or you have created it by scanning a physical resource), you can send it to the recipient directly. If it is owned by a vendor, you can access it on the vendor's system, check the license details to ensure you have the right to share the resource, and then download and send it to the recipient.
- In the Lending Requests page (Fulfillment > Resource Sharing > Lending Requests), in the item's More actions menu, select Download Electronic Resource. A page listing vendors from which you may be able to download the resource and licensing information for those vendors, when available, opens in a sliding panel.
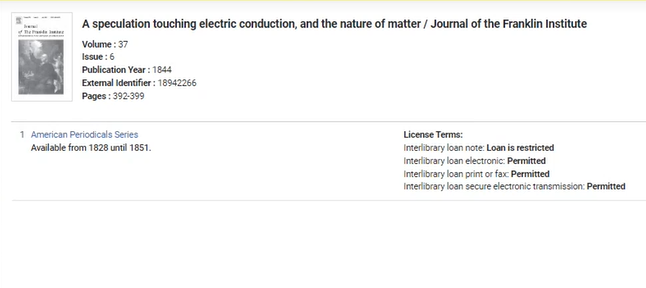
Vendor and licensing termsOnly OTB resource sharing-related license terms appear on the Download Electronic Resource page:
- Interlibrary loan electronic
- Interlibrary loan note
- Interlibrary loan print or fax
- Interlibrary loan record-keeping required indicator
- Interlibrary loan secure electronic transmission
- Select the desired vendor from the list. You are redirected to the vendor's site, where you can download the required resource to your computer.
- In the Lending Requests page (Fulfillment > Resource Sharing > Lending Requests), in the item's More actions menu, select Ship item digitally.
- Browse to select a file to upload or drop a file in the upload area.
- Select Ship to send the file.
- Lending request completion depends on the workflow profile settings of the partner.
- If a ship digitally request was created, it will be cancelled (it is possible to complete ship digitally requests by using the Deliver Digital Documents interface with the ship request ID to ship the file. This process will consult digitization and copyright rules, approval processes, and so forth...).
- To add shipping notes, manually set the complete status etc. You can use the classic Ship Item interface and set the format to Digital
Overriding Local Holding Setting
RapidILL checks for self ownership, and requests identified as owned receive the local holding status. When the checkbox Ignore Local Holding (Fulfillment > Resource Sharing > Partners > Parameters tab) is checked, libraries skip this self ownership check by RapidILL.
This configuration may be of particular interest to libraries using the Sending Borrowing Request Rules (Fulfillment Configuration>Resource Sharing>Sending Borrowing Request Rules) to stop requests from being automatically sent, if locally owned. In that case, if the request is manually sent via Rapid then rechecking for local ownership via Rapid may be redundant, and can therefore be prevented using this new option.

Detaching a Lending Request from its Inventory
You can detach a lending request from the MMS to which it is attached.
- On the Lending Requests page, locate a request that has resources attached to it (Resource Locate Status = Resource Located).
- Select Detach from MMS from the row actions list. The Lending Requests page refreshes, and the request displays with Resource Locate Status = No Resources Located.
Rejecting a Lending Request
- On the Lending Requests page (Fulfillment > Resource Sharing > Lending Requests), select Reject for a request. The Reject Request dialog box opens.
- Select a reason for the rejection in the Reject reason field.
- Optionally, add a note for the rejection in the Internal note and Note to Partner fields.
- Select Reject. The Reject reason and Internal note are added to the request as Notes.
If the request is managed using an ISO partner, an Unfill message is sent to the borrowing library, which marks the partner request as Rejected (see Rejecting a Borrowing Request). If the borrowing institution is an email partner, the Lender Reject Email Letter is sent to the partner.
Generating a Print Slip Report
You can generate a print-slip report that is sent to a printer or an email address, or can be downloaded to a local machine. The report contains the selected items and their information, including Title, Author, Location, and so forth. The letter format for this report is the Lending Requests Report Slip Letter.
- From the Lending Request page (Fulfillment > Resource Sharing > Lending Requests), select the checkboxes of the resources for which you want to generate a print slip report.
- Select Print Slip Report. The Print Slip Report dialog box appears.
 Print Slip Report dialog box
 - In the Choose Type field, select whether you want to send the print slip report to a Printer or a User.
If you select Printer, the Printer field replaces the User field and is enabled. Select the printer to which you want to send the print slip report.If you select User, the User field is enabled. Select the user to whom you want to send the print slip report by email. The letter format for this report is the Lending Requests Report Slip Letter.
- In the Format Type field, choose to send the print slip report either in Excel or XML format.
- Select Send to send the print slip report, or optionally, select Download to download the print slip report to your local machine.
Digital Requests for Partners Without Email Address Alert
When a lender ships a digital request for borrower who is an ISO partner, an alert is added to the lending request indicating that the borrower does not have an email address.


Removing Alerts
- Move Request in Process
- Move Request Canceled
- Move Request Completed
- Digitization Request in Process
- Digitization Request Cancelled
- Digitization Request Completed
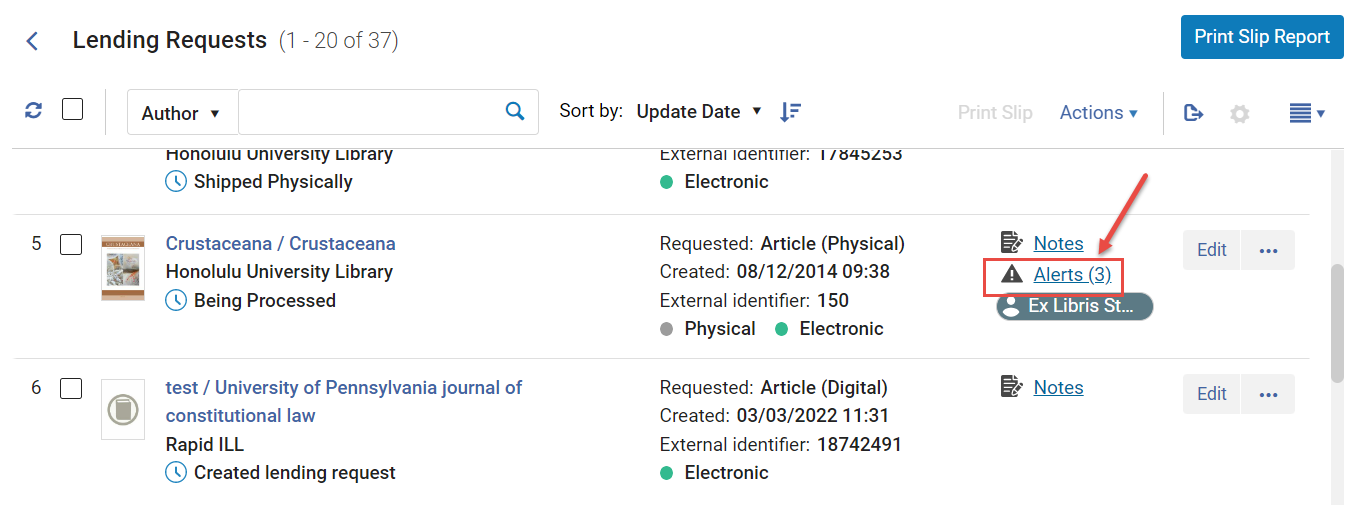

- On the Lending Requests page (Fulfillment > Resource Sharing > Lending Requests) page, do one of the following:
- In the request's row, select the Alerts link. The Details pane opens, scrolled to the Alerts section.
- In the Details pane, either select Sections > Alerts, or scroll down to the Alerts section.
-
- In the Details pane, in the Alerts section, select Remove Alerts.
Managing Task Assignment
- On the Lending Requests page (Fulfillment > Resource Sharing > Lending Requests), select Assign from the row actions list for the relevant task. The Assign To dialog box opens.
- From the Assign to drop-down list, select an operator.
The list of operators includes only those users who have the Fulfillment Services Operator role.
- Select the Send as e-mail check box to notify the operator of the new assignment.
- In the Note field, enter notes, as needed. The field is limited to 1,000 characters.
- Select Assign To. The request is assigned to the selected user.
- On the Lending Requests page (Fulfillment > Resource Sharing > Borrowing Requests), select Release assign for the relevant task. The assignment is removed, and the task becomes unassigned.
Viewing Past Lending-Request Actions
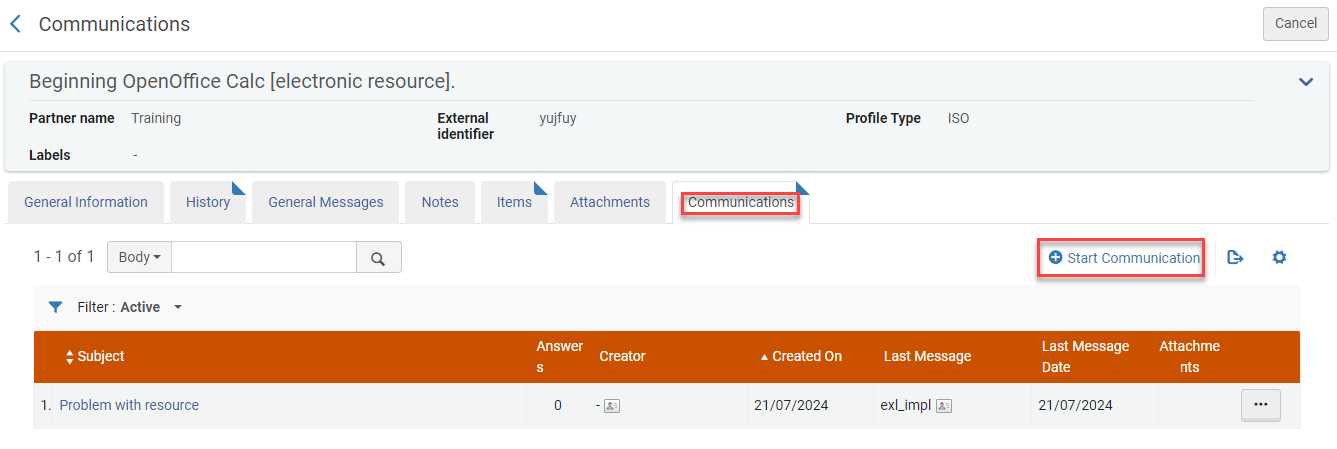
Communicating with Partners
Use this action to email a partner directly from the lending task request. This option eases workflows, such as when a lender wants to convey limitations or for any type of messages such as a thank you note. These messages are saved in the request for future reference.
Correspondence can be initiated using the Send email to partner action or from the Start Communication button on the Communications tab.


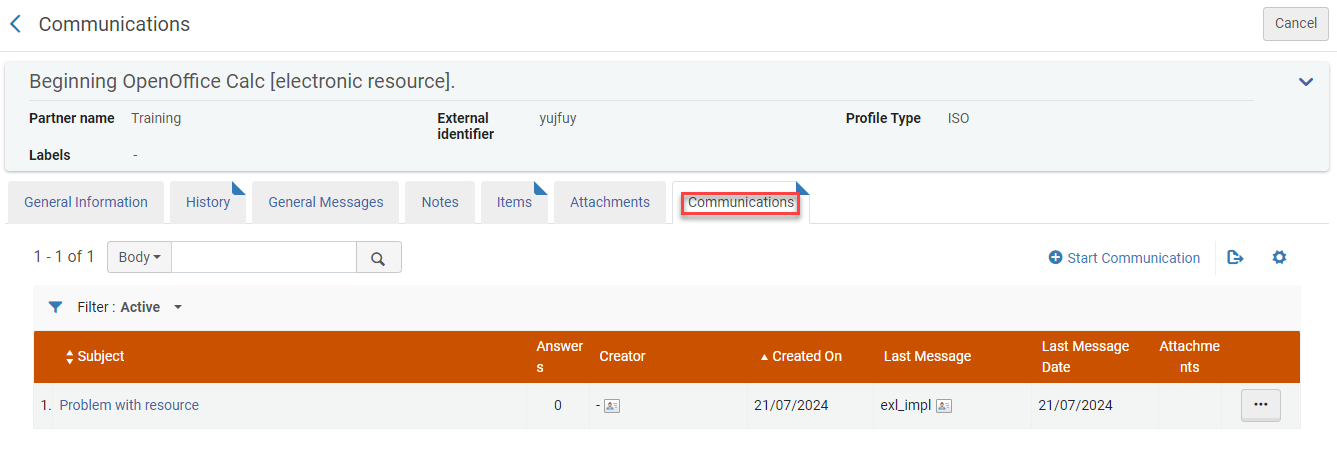
- Edit a correspondence to view the full correspondence.
- Reply to a communication to send another correspondence. Each reply increases the counter in the Communications Answers column.
- Add a Response to paste the partner's response to your correspondence.
- Close the correspondence. Note: Closing the correspondence removes the Communications indicator from the request; but the correspondence remains accessible from the Communications tab under the All or Closed filters.
