
Configuring Parameters of a Resource Sharing Library
This page describes how to configure the parameters of a resource sharing library including itemless resource sharing libraries.
For links to all the main fulfillment documentation pages see Fulfillment.
For a list of links to the main resource sharing online help pages, see Resource Sharing.
Configuring Parameters of a Resource Sharing Library
To configure parameters of a resource sharing library, you must have one of the following roles:
- General System Administrator
Libraries within an institution or campus may be configured to have relationships where they enable patrons to check in or check out resources at another location, send items back and forth, or acquire (purchase) items on behalf of each other. If a library is configured to do this for libraries at other institutions (and not only within the institution), it is known as a resource sharing library.
A resource sharing library must have its own Fulfillment Unit (see Configuring Fulfillment Units) in order to be able to configure the Borrowing Request Rules and the Lending Request Rules with the relevant Borrowing Resource Sharing Terms of Use and the Lending Resource Sharing Terms of Use.
See Adding a Library for more information about configuring libraries.
- On the Summary tab page (Configuration Menu > Fulfillment > Library Management > Opening Hours), modify the Organization Unit Name and Description fields, as necessary, and enter your ISIL code (see ISIL Code for more information).
- In the Resource Sharing Information section, select Is Resource Sharing Library. The Resource Sharing Information section fields appear.
Alma can be configured to show preference to electronic format articles in the lender side locate process. If a requested article is found in electronic format then that resource will be considered the only option for the lender. Other potential physical options are considered only if no electronic resources are found.This behavior is activated by the "Prefer Uresolver locate results" option that can be selected at the Lending Setup section of the resource sharing library.
Electronic resources are considered a match only if their coverage matches the details of the request.This affects both the automatic and the manual locate process on the lender side.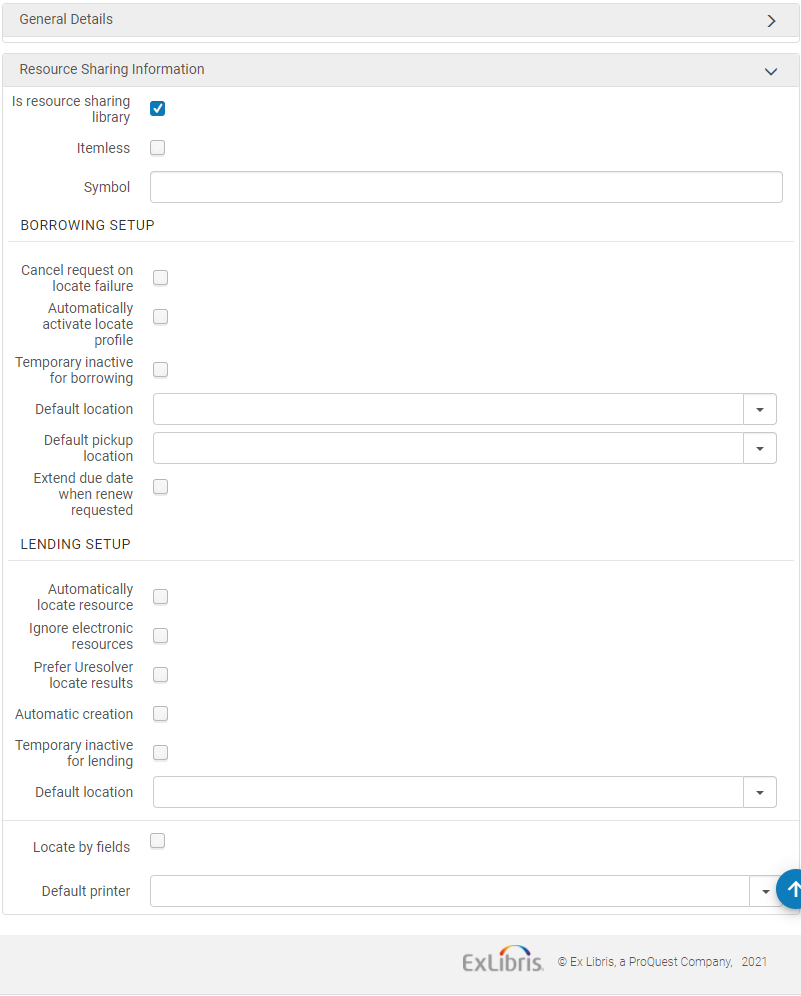 Organization Unit Details Page – Resource Sharing Information Fields
 - Select Itemless to designate the library as an itemless resource sharing library (see Configuring an Itemless Resource Sharing Library).
- Enter the ISO symbol of your resource sharing library in the ISO symbol field to indicate that the library works with ISO.
- To set up borrowing requests:
- When Cancel request on locate failure is selected, Alma automatically cancels requests for which the borrowing locate process was not able to find a potential partner (see Borrowing Locate Process).
- Select Automatically activate locate profile to indicate that when a rota assignment rule is met, a locate profile is assigned to the activated rota, based on the rota assignment rule. For details on rota assignment rules, see Configuring Rota Assignment Rules.
When selecting this option, the borrowing locate process is automatically triggered when a borrowing request is created from any interface – Alma, Primo or API (see Borrowing Locate Process).The automatic locate may be activated only if the Automatic Rota Assignment Rules have also been activated to automatically attach a rota to the request. The locate process then runs on the automatically attached rota.
- Select Temporary inactive for borrowing to indicate that this library is blocked for borrowing requests.
- When selected, the field, Inactive dates range, is displayed. Select a date range to specify that the block is only applicable during the specified time period. If the date range is left empty, the library remains inactive until the Temporary inactive for borrowing check box is deselected. This inactive status will block borrowing requests for this library whether they are created via the UI, an API, or in Primo. For Primo users, the resource sharing request link will be hidden. For Alma UI users and API processes, when requesting an item, a block message will display. The block message may be overridden in the Alma UI.
- In the Default location field, select the default temporary location to which designated inventory will be moved for fulfillment of the borrowing request.
- In the Default pickup location field, select the library that is to be the default pickup location for resource sharing requests. If the default pickup location is left blank, the resource sharing form will have a blank pickup location field.
-
To extend the loan due date of an RS loan:
When a lender is asked to renew a RS loan that is about to become overdue, the loan due date can be extended by a configurable short period (up to 9 days after the request renew date). This will prevent the loan from becoming overdue and accruing fines while the lender is contacted to arrange a renewal and new due date. Once the renewal has been confirmed with the lender, the loan and the borrowing request will be renewed to the agreed upon due date (using the existing workflow).-
Activate this option by selecting the "Extend due date when renew requested" checkbox and populating the new ''Extend due date by (days)' field on the resource sharing library configuration page.The "automatic printing rules" are not considered if the operator clicks the "Print slip" button manually.
-
-
To set up lending requests:
- Select Automatically locate resource for Alma to attempt to locate the requested resource locally. (For more information on this process, see Lending Locate Process.)
When selecting this check box, four additional check boxes will appear:
- Select the Reject request when locate fails check box to reject a lending request when the locate did not find any matching items.
- Select the Reject request when no available items check box to reject a lending request when there are no items that are available in place.
- Select the Reject request when no requestable items check box to reject a lending request when there are no items that are requestable for resource sharing, according to the applicable policy.
- Select the Reject request when only electronic available check box to automatically reject items that are only available electronically. When Reject request when only electronic available is selected, set the Electronic Rejection Rules to control automatic rejection rules based on the resource's license terms.
To customize the description and translation text of request reject reasons when received (and recorded as a request note) on the borrower side, see Configuring Request Reject Reasons. - Use the Electronic Rejection Rules to cause requests for electronic resources that are linked to licenses with any of the following terms to be automatically rejected:
- Interlibrary Loan Electronic
- Interlibrary Loan Print Or Fax
- Interlibrary Loan Record Keeping Required Indicator
- Interlibrary Load Secure Electronic Transmission
If you configure a rule to reject a request for resource that is linked to a license with any of the above terms, it will get rejected. There is no special meaning to one license term or the other as regards this automatic rejection.Watch the Electronic Rejection Rules video (5:27 min).
-
Select Ignore electronic resources for the locate process to only consider physical items.
- Ignore electronic resources for physical-only requests - If selected, then the lender locate ignores electronic matches when the lending request is for a physical resource.
-
Select Automatic creation for the partner field to be visible on the shipping items page. For details on automatic creation of lending requests from shipping items, see Shipping Items.
- Select Temporarily inactive for lending to indicate that this library is blocked for borrowing requests.
- When selected, the field, Inactive dates range, is displayed. Select a date range to specify that the block is only applicable during the specified time period. If the date range is left empty, the library remains inactive until the Temporary inactive for lending check box is deselected. This inactive status will block lending requests for this library.
-
In the Default location field, select the default temporary location to which designated inventory will be moved for fulfillment of the lending request.
- Select Automatically locate resource for Alma to attempt to locate the requested resource locally. (For more information on this process, see Lending Locate Process.)
- Select the Locate by Fields check box to filter the search in the resource sharing library. This process narrows the results available for the locate process. The page refreshes and displays the new search fields.
The page displays the search fields, as follows:Select the fields by which you want resources to be searched for in the resource sharing library.
- Title
- Author
- ISBN/ISSN
- System Control Number
- Edition
- LCCN
- Other Standard ID
- Barcode
- DOI
- Select Yes in the Locate only if all fields match field if you want the locate to be successful only when all selected fields match. If set to No, then:
- If the request has identifiers (such as ISBN, OCLC number, or LCCN), locate is successful if any of the selected identifier fields finds a match. Other fields such as Title and Author are not used for the match.
- If no identifier fields exist on the request, locate is only successful if all of the other selected fields match.
- Select the Default printer to define the printer that will be used for this resource sharing library when a user performs an action that can be done while not at a desk (such as shipping). When the user is at a desk, the default printer is based on the desk.
- Select Save.
For information on configuring a library for SLNP, please see the Developer Network.
Configuring an Itemless Resource Sharing Library
To create an itemless resource sharing library, you must have one of the following roles:
- General System Administrator
- System Administrator
- Fulfillment Services Operator (for the resource sharing library)
- Fulfillment Services Manager (for the resource sharing library)
An itemless resource sharing library does not handle items. This library serves as a broker for other resource sharing libraries, transferring requests from a lending library to a receiving library, without an actual inventory of items.
A resource sharing process that is managed by an itemless resource sharing library has the following special attributes:
- Items received as part of a resource sharing request process are not cataloged as temporary items.
- Shipping lending requests is possible without attaching a real inventory item to the shipped request.
All other aspects of the resource sharing process, such as the exchange of messages between the borrowing library and the lending library, are identical to the process that is managed by regular resource sharing libraries.
To designate a resource sharing library as itemless, select the Itemless check box on the Organization Unit Details page (see step 3 in To configure resource sharing library information:).
To use an itemless library as a broker for resource sharing requests:
- Create a resource sharing borrowing request (Fulfillment > Resource Sharing > Borrowing Requests, select Add > From Search or Add > Manually). Ensure that you select Pickup at = Resource Sharing Library and that you assign partner to the request.
- Select Send. The Request Status = Request sent to partner.
- To receive the requested resource, select Receive for the request. The Received Items page appears.
- In the Internal Note field, enter a note to indicate information that describes the purpose for which the resource is requested. The request’s status changes to Physically Received by Library.
When shipping an itemless lending request, ensure that the Scan Item Barcode field is blank on the Shipping Items page (see Shipping Items).
For more information about itemless broker requests, see the More Information About Itemless Broker Workflow video (14:44 mins).