Configuring Item Description Templates
To configure the description templates, you must have one of the following roles:
- Repository Administrator
- Catalog Administrator
- General Administrator
You can configure a template to use when generating an item description based on the ENUM/CHRON Information tab of the Physical Item Editor page. For more information, see Performing Actions on the Repository Search Results Page and Receiving Physical Material.
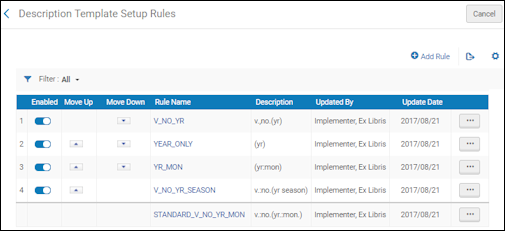
You configure description templates from the Description Template Setup Rules page (Configuration Menu > Resources > General > Description Templates).

Description Template Setup
The following actions can be performed on this page:
- Add a description template rule
- Edit a description template rule
- Duplicate a description template rule (Actions > Duplicate and edit the relevant fields)
- Delete a description template rule (Actions > Delete)
Adding Description Template Rules
The rules that you define apply to all the libraries within the institution.
To add a description template rule:
- On the Description Template Setup Rules page, select Add Rule. The Description Template Setup page appears.
To create and modify a copy of an existing description template rule, select Duplicate from the row actions list.
- Under Description Template Setup Editor, enter a name and description of the description template.
- Under Input Parameters, select Add Parameter, and specify the components of the input parameter (Name, Operator, and Value).
A set of input parameters may look like one of the following:
- Library=Art Library, EnumA=Vol. 1, ChronI=2012
- EnumA=Is Not Empty, EnumB=Is Not Empty, ChronI=Is Not Empty, ChronJ=Is Not Empty
- Select Add Parameter.
- Repeat the previous two steps to add all of the required parameters for the rule.
All the input parameters must be fulfilled in order for the rule to be applied. For multiple description templates to work, every rule must have input parameters.
- Under Output Parameters, enter the following:
- The prefix that you want to appear before the field.
- The ENUM/CHRON field for which you want to add a prefix and/or suffix.
- The suffix that you want to appear after the field.
If you want to have a space before or after a prefix, leave a space before or after the prefix that you enter in the prefix field.
For example, if you configure the following (with the hash tag representing a space):- Prefix1: v.#
- Field1: EnumA
- Suffix1: #
- Prefix 2: no.#
- Field2: EnumB
- Suffix2: #
- Prefix3: (
- Field3: ChronI
- Suffix3: #
- Prefix4:
- Field4: ChronJ
- Suffix4: )
The following is an example output:v. {EnumA} no. {EnumB} ({ChronI} {ChronJ}) - Select Save to store the new rule.
- If you have defined more than one rule, use the Move Up and Move Down arrows to set the order of the rules. The order of the rules is important since the system applies the first (and only the first) appropriate rule. If no appropriate rule is found, the system uses the default rule.
The Enabled column is not functional. All columns listed are enabled.
Editing a Description Template Rule
You can edit description template rules.
To edit a description template rule:
- On the Description Template Setup Rules page, select Edit from the row actions list for the specific rule you want to edit.
- Modify the rule name and description as required.
You cannot edit an existing set of input parameters. To modify an existing set of input parameters, first delete the existing set, and then add a new set.
- Select Delete from the row actions list for the specific set of input parameters record you want to delete.
- Add a new set of input parameters as described in Adding Description Template Rules.
- Under Output Parameters, enter the following:
- The prefix that you want to appear before the field.
- The field for which you want to have a prefix and suffix displayed.
- The suffix that you want to appear after the field.
- Select Save to store your changes.
For information on how to display an enumeration level b value as text in the item description, see the document How to Display an Enumeration Level b Value as Text in the Item Description.
Managing Item Description Rule Templates in the Network
For item description rules that are managed in the Network, these rules can be distributed to member institutions using the Distribute Network Configuration job (Resources > Advanced Tools > Distribute Network Configuration). The Distribute Network Configuration job report shows the results for distributing the item description rules.

Distribute Network Configuration Job Report
For member institutions working with the item description template configuration, the following components appear on the Description Template Setup Rules page:
- The rules precedence indicator
This shows how the network_description_templates_rules_precedence customer parameter is set. Member institutions can set this parameter in Other Settings (Configuration > Resources > General > Other Settings). See for more information. - The member institution's local item description rules
- The Network's item description rules that have been distributed
- The default item description rule

