
Searching in Alma
Search Options
- Metadata records compiled by Ex Libris or local to your institution or collaborative network (see Metadata Management and Inventory). These records include:
- Local inventory — Including holdings for physical items, electronic portfolios, and digital representations and files.
- Bibliographic titles — Including top-level collections, physical titles, electronic collections, and portfolio titles, and digital titles.
- Authority records
The results appear on the page; see Repository Search Results, below. - Depending on your role, you can also search for:
- Patron requests — The results appear on the Resource Request Monitoring page (see Requests in Alma).
- Courses — The results appear on the Courses page (see Managing Courses).
- Deposits — The results appear on the Deposits page (see Deposit).
- Users — The results appear in the Find and Manage Users page (see Managing Users).
- Acquisitions information — Including PO lines, funds, invoices, vendors, and licenses (see Acquisitions). The results appear in the relevant acquisitions page.
- Reading lists — The results appear in the Reading Lists Task List page (see Managing Reading Lists).
- Reading list citations — The results appear in the Edit Citations page (see Managing Citations).
- Borrowing Requests — The results appear in the Borrowing Resource Sharing task list.
- Lending Requests — The results appear in the Lending Resource Sharing task list.
- If your institution is working with Esploro, you can search for research assets, deposits, and files, and for researchers; see Searching in Esploro.
In the persistent search, when searching for Physical Items by the beginning of a barcode as well as Local Control Field 009, we recommend using the “Contains exact phrase starting with” option instead of “Start with” search because it does not return the desired result. This requires at least two characters to be used. For example, search for the initial characters “7L” or “Z0” and not just “7” or “Z”.
- Simple Search – Search using a single search field (see Performing a Simple Search).
- Advanced Search – Create search criteria, including search conditions, to refine your search (see Performing an Advanced Search). Advanced search is not available for citations, requests, borrowing requests, lending requests, funds, vendors, and invoices.
Only simple, free-text indexes can be active for Simple Search, whereas complex, rigid, or fixed-value indexes, such as those that are defined in code tables, are supported only for Advanced Search.

Performing a Simple Search

- Select the search type from the drop-down list. (Note that this is a fixed list of options and cannot be modified).
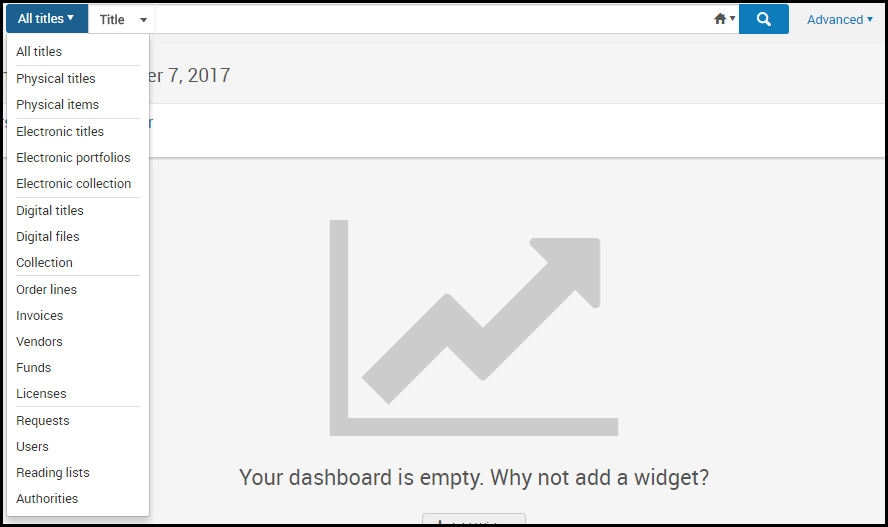 Persistent Search Drop-Down List of OptionsUsers with the following roles can perform each type of search.
User Roles for Search Types Search type User roles All titles
Physical titlesPhysical itemsPhysical holdingsElectronic titlesElectronic portfoliosElectronic collectionDigital titlesDigital filesCollectionAuthoritiesAll Order lines Invoice Manager, Invoice Operator, Invoice Operator Extended, Purchasing Manager, Purchasing Operator, Trial Manager, Trial Operator Invoices Invoice Manager, Invoice Operator, Invoice Operator Extended, Purchasing Manager, Purchasing Operator Vendors Vendor Manager Funds Fund Manager, Fund-Ledger Viewer, Ledger Manager, Purchasing Manager, Purchasing Operator Licenses License Manager, Purchasing Operator, Purchasing Manager Requests
Borrowing Requests
Lending Requests
Receiving Operator, Receiving Operator Limited, Circulation Desk Manager, Circulation Desk Operator, Fulfillment Services Manager, Fulfillment Services Operator, Requests Operator, Work Order Operator, Digital Inventory Operator (Requests only) Users User Manager, User Administrator, Circulation Desk Operator, Circulation Desk Limited, Circulation Desk Manager, Fulfillment Services Operator, Fulfillment Services Manager Reading Lists CitationsCoursesCourse Reserves Operator, Course Reserves Manager, Fulfillment Services Operator, Fulfillment Services Manager Deposits Deposit Manager, Deposit Operator, Deposit Operator Extended, General System Administrator Borrowing Requests (Resource Sharing) Fulfillment Services Manager,Fulfillment Services Operator (resource sharing library scope) Lending Requests (Resource Sharing) Fulfillment Services Manager,Fulfillment Services Operator (resource sharing library scope) Works All Available only if BIBFRAME support is enabled. For more information, see BIBFRAME support. - Select the field on which to search in the second drop-down list, or select Keywords or All (depending on the selection in the first drop-down list) for a general search on multiple fields. You can select the default field name and enter part or all of a field name to filter the list of fields. For more information, see Searchable Fields; for PO lines, see PO Line Search Fields; for vendors, see Vendor Search Fields; for reading lists, see Reading List Search Fields; for citations, see Citation Search Fields. To configure the available search fields, see Configuring What Search Indexes Are Available.
- Enter a search string in the text box.
To jump to this text field on any page that does not have any other kind of search box, press / (forward slash) on your keyboard.
- Articles (such as the, a, an) in your search are ignored.
Leading articles are not ignored when 'Title' is selected from the second drop-down list for All titles, Physical titles, or Electronic titles search types.
- The word "AND" is not treated as a Boolean operator (the simple search implicitly "AND"s all terms).
- Special characters, such as hyphen, dash, slash, and so forth, finds strings both with and without the special characters. For example, searching for a-b finds records that include either a-b or ab. Spaces separate search terms, so searching for a<space>b finds records that include both a and b anywhere (not as an exact phrase), but does not return ab. For additional special characters, see Searching for Special Characters. The exception to this is a search for course code/name or reading list code/name. See Reading List Search Fields and Citation Search Fields.
- All variants of apostrophe characters are normalized to the standard ASCII apostrophe \u0027 in various textual fields such as Subject and Title. This means that, if text in a bibliographic record contains one of the following UNICODE apostrophe characters, this text can be retrieved by searching with either the original apostrophe character or the ASCII standard one \u0027:
Note that this functionality is supported for only the default searching language configured for your system.
- \u02BB - MODIFIER LETTER TURNED COMMA
- \u02BC - MODIFIER LETTER APOSTROPHE
- \u02B9 - MODIFIER LETTER PRIME
- \u2018 - SINGLE QUOTATION MARK
- To use the asterisk ( * ) wildcard character in your search string, place it at the end of the search string. Asterisk may be used at the end of the string with Contains Keywords and Not Contains Keywords.
- The asterisk is not supported when the string contains a special character, for example dash (-), period, quote or double quote, parentheses, slash, or space, for example: $a (Aleph)003858461UCD01-Aleph.
- The question mark (?) is not supported as a wildcard character.
- Asterisk is applicable to find ALL the inventories. For example, using asterisk as a keyword to search for ALL titles finds all the resources in Alma.
- When using an asterisk instead of the entire search string, it is recommended using "Title is not Empty" or "MMS ID > 0" to find all records in the repository in an efficient way. Note: Using an asterisk is not recommended, because it is less efficient and more time consuming.
- Alma does not break numbers and letters into separate tokens. For example:
The indexing in the new version of Solr does not split the values. As a result, searching, for example, for SCR does not return 202408SCR.
This behaviour does not apply to the following indexes:- Other System Number (035a)
- Other System (035a) Exact
- OCLC Control Number (035a)
- Other System Number (035z)
- OCLC Control Number (035z)
- Other System Number (035a+z)
- OCLC Control Number (035a+z)
Note that when searching for CJK characters (if search language configuration is enabled by Ex Libris as described below), partial results are found. For example, when searching for 20240229, Alma returns results that include CJK characters, such as 年度寄贈20240229.
- Searching numbers in the "Keywords" (All) field, Alma does not split by hyphens (-), with the exception of ISSN and ISBN.
-
You may enter a phrase search by surrounding your search phrase with double quotation marks. This can be done for all search entities and index types that have the option to use phrase search in Alma's advanced search such as titles and portfolios searches.If you add other text in the search box before or after a set of words with double quotation marks around them, the text in quotation marks is not be treated as a phrase search. The phrase search functionality is limited to a single phrase in double quotation marks.When you use the phrase search capability, the words contains phrase precede the search terms in your search results to indicate the type of search that you performed. The recent searches list shows the quotation marks where you did a phrase search in the simple search box. When you enter a simple search with quotation marks and subsequently switch to the advanced search function, Alma automatically selects the Contains Phrase option.
- Alma finds characters with diacritics when you search using standard English characters.
If the users in your institution search using characters with diacritics, ensure that Ex Libris has configured that searches return matches for diacritics. Search language configuration is available for German, Norwegian, Danish, Swedish, Korean, Chinese, and Hong Kong TSVCC.
- Contact Ex Libris to enable the following enhanced search options:
- Search in traditional Chinese/Kanji or simplified Chinese/Kanji and return results in both traditional Chinese/Kanji and simplified Chinese/Kanj.
- Search in Hangul (Korean) and return results in both Hangul and Hanja.
- Search in Hiragana (Japanese) and return results in both Hiragana and Katakana.
- An administrator can configure several additional items regarding search. For more information, see Configuring Search.
- Alma saves the last 10 searches in search history for title or inventory entity searches. This list is saved indefinitely. There is currently no way to clear the list (other than to perform new searches).
- Optionally select the initial results tab using the search scope drop-down list to the left of the magnifying glass:
 Institution,
  Community, or
  Network (when available). Note that searching in the institution is not an option when searching for authorities if your institution does not manage authorities locally. For more information on these options, see Institution, Community, and Network Tabs.
 - Select the magnifying glass
 or press Return or Enter on the keyboard to perform the search. The items that match your search query appear on the page.
For locations with RFID (see RFID Support), select the RFID read icon to enter content (barcode), and select the magnifying glass.Users can erase entire text content in search fields by selecting an "X" rather than selecting the text and deleting it. This feature is only enabled for Next Generation UI.
or press Return or Enter on the keyboard to perform the search. The items that match your search query appear on the page.
For locations with RFID (see RFID Support), select the RFID read icon to enter content (barcode), and select the magnifying glass.Users can erase entire text content in search fields by selecting an "X" rather than selecting the text and deleting it. This feature is only enabled for Next Generation UI. RFID Read IconSearching for physical items when RFID is enabled displays the Security Status when it is available. The field contains either Checked Out or Available. Checked out indicates that the item is on loan and may leave the library. An item that is available cannot leave the library.
- For more information about the results, see:
- Order lines — Searching for PO Lines
- Invoices — Searching for Invoices
- Requests — Resource Request Monitoring
- Borrowing Requests — Managing Resource Sharing Borrowing Requests
- Lending Requests — Managing Resource Sharing Lending Requests
- Vendors — Managing Vendors
- Licenses — Managing Licenses and Amendments
- Users — Managing Users
- Deposits — Approving Deposits
- Market — Searching the Rialto Marketplace
- All other results (repository): Repository Search Results
- To perform an advanced search, see Performing an Advanced Search.
- To save your search, see Saving and Reusing Search Queries.
- For more information about the results, see:
- Articles (such as the, a, an) in your search are ignored.
Performing an Advanced Search
Using the Advanced Search
- Advanced search is not available for citations, requests, borrowing requests, lending requests, funds, vendors, and invoices.
- OR is not available for advanced searches for licenses, and reading lists.
- When search results are displayed, if Advanced search was used, the + on the Advanced Search icon turns green:
 . Select the icon to display your advanced search and to modify it, if needed.
- Select the type of search that supports an advanced search.
- In the persistent search box, select
 Advanced. The persistent search box expands to include the option to add additional rows of search criteria (additional fields and values).
 - You can also access the advanced search by selecting the search term in the query header.
In the new UX, you can select the Advanced Search icon in the query header to access the advanced search.


- For All Titles and electronic resources searches, select the repository to search: local (Institution Zone), Alma (Community Zone), or your collaborative network (Network Zone).
- Select the search indexes you want to search on. For information on combining multiple search indexes in the same search, see the new Advanced Search or the Classic Advanced Search.
- Select the match type in the comparison drop-down box. Comparators vary depending on the field you select. Typical match types include Contains Keywords (words in any order, separated by spaces, disregarding all punctuation including quotes), Contains Phrase (the phrase entered is searched in its entirety), Is Empty (see Searching for Items Without Specific Information), Starts With (also known as a "left anchored" or "left match" search), Equals, Not Equals, Greater Than, Greater Than or Equal To, Less Than, Less Than or Equal To, Not In, Not Contains Keywords, Not Contains Phrase, Is Not Empty, and Contains exact phrase starting with (see Search for an Exact Phrase).
- Currently, there is a known issue with conditions for Electronic Collection field searches: Not Contains, Is Not Empty, and Not Equals are not available for: CDI Search Rights, CDI Fulltext Rights, CDI Fulltext Link, CDI Types, CDI Newspapers, CDI Collection ID.
- Currently, there is a known issue with the Holdings Advanced Search. When searching using multiple search rules for the Library (Holdings) and the Permanent physical location indexes. In order to search for multiple values in these indexes, add a single search rule and use multi-select to select all desired values.
- Currently there is a known issue when doing a Contains Keywords search where the value contains a period (.). In this case, Alma matches the value if you search using the complete value, a search term matching the start of the value up to the first period (with or without the first period), or search that does not include a period. For example, if the value is aaa.bbb.ccc, searching for:
- aaa.bbb.ccc matches
- aaa bbb ccc matches (no periods in search)
- bbb matches (no periods in search)
- aaa. matches (matches the value up to and including the first period)
- aaa.bbb does not match (search includes a period but is not the full value)
- bbb.ccc does not match (search includes a period but is not the full value)
- The Starts With search does not work as expected with special characters (for example dash (-), period, quote or double quote, parentheses, slash, or space). The Contains Keywords search should be used instead in such cases. For example, instead of Starts With "Hallermann–Streiff syndrome", use Contains Keywords "Hallermann Streiff syndrome".
The Starts With operator, when used for parts of strings, works only if what follows after the string is a stop character (such as "." or "_"), or a character of a different type (letter or number). For example, when searching for a holdings record that has the following info in $852: "0_ |b CPSLO_MAIN |c stacks |h E184.M5 |i M5496 2018", starts with "E" retrieves the record because "E" is a letter followed by digits, but starts with "E1" or "E18" does not retrieve the record, because "E1" is followed by "84", and "1" is a digit, and "84" are also digits.
The Starts with operator is more useful for entire words and for title search than for call numbers and call number string parts (because when searching for 'E184', you get results where E184 is located in $h and also in $i, and you may not necessarily need that). Note that the call number indexes are stored as a list of words and tokens rather than a single long string, so the Starts with operator will return matching values for any words that are part of the call number. If accurate call number ranges are important, the recommended best practice is to use the range operators <, >, <=, >=. When using range operators, search for entire phrase and not for phrase parts (for example, search for E184, and not for E1, nor for E18).
- For institutions that have the CJK (Chinese, Hong Kong, or Korean) searching setup, there is a known issue that searches do not work properly when the Starts With and Contains Phrase operators are used and the search terms contain punctuation characters.
- The Not clauses may be counterintuitive. For example, for Title search, if a title has holdings in library A and library B, and the title search contains the clause Holdings - Not in - Library A, the title is returned by this search because there is at least one Holdings Record for the title, that is not in library A (you might have expected that it would not be returned because the title has a Holdings Record in library A).
- For information on enabling repository searches to include matches to non-preferred terms in any associated authority records, see Non-Preferred Terms in Repository Search.
- For searching call numbers, see Searching for an Exact Phrase below.
- Depending on the match type you select, enter or select the full or partial value(s) in the last field in the row. This field may be a text field to enter free text, a drop-down list, or a calendar selection tool. For certain drop-down lists, such as library and permanent physical location, you can select multiple matching values (see the example for Library above).
- Select Search or press Return on your keyboard. The results of an advanced search appear below the advanced search form. You can edit the advanced search and run a new search from the results page. Your current search logic appears at the top of the results.
All Titles and standard authority searches extract text from a field's subfields according to the alphabetical order of the subfields.
The New Advanced Search
Searches that moved to the new Alma UI support a more powerful search query builder.
To work with these searches:
Searching for Library code in Physical holdings/Library field is not supported. In Simple search, Library code can be searched as Keywords. In Advanced search, Library name appears in a drop-down for Library/Library(Holdings) field.
| Option | Description |
|---|---|
|
To add additional search condition
|
|
| To add a group of search conditions | Select  above the search query and add as many conditions as necessary. However, note that you can only add up to 3 nested levels of conditions. above the search query and add as many conditions as necessary. However, note that you can only add up to 3 nested levels of conditions. |
|
To change the relationship between groups of search conditions
|
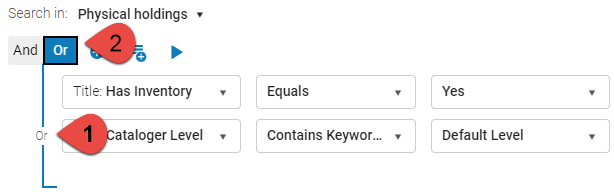
Baseline conditions default to an AND relationship, meaning that each condition must be true to retrieve the searched item. When adding a group of conditions, you can change the relationship within the group to OR. In this case, the search item is retrieved when either of these conditions is true.
Select any Boolean operator between the conditions. Parameters for AND and OR appear at the top of the list. Select a parameter to select this type of relationship. To stop displaying these parameters, select the Boolean operator again.
 While it is permissible to include multiple Boolean Operators, when many Boolean operators are selected, slower performance is likely to result. Thus, each search query should include no more than 200 Boolean operators.
|
| To remove a search condition | Select the X right of the search condition to remove it from the query. |
 above the condition to add another condition.
 The Classic Advanced Search

- To add additional rows, select the duplicate row icon or add row icon. For information, see Searchable Fields. By default, each row represents additional search criteria that must also match (AND).
- Select OR in any row (other than the first) to change the combination type to OR. Implied parentheses are added around all search rows connected by ANDs.
- To remove a row (other than the first), select the delete row icon.
Searching for an Exact Phrase
The Contains exact phrase starting with operator is available under for Physical Titles and Holdings searches with the following indexes:
- Dewey decimal class number
- Other Classification Number
- Other System Number
- Permanent call number (holdings)
- LC Call Number
- Local call numbers
- NLM-type Call Number
Note: When searching for call numbers, it is possible to search by permanent call number without specifying the type, except when searching by a call number range. When searching by call number range, you must add to the advanced search conditions the "Permanent call number type" condition. Otherwise you might not get the correct results. Permanent call number is not indexed for keywords search.
The search value Exact phrase starting with operator for the "Heading Information" index refers to the first (approximately) 55 characters of the search term. It is not a permanent number, as the system's internal, calculated search query contains more information based on the other parameters specified in the Heading Information search component.
In this case, a phrase is a block of contiguous non-space characters. For example, a call number E184.M5 M5496 2018 contains the three phrases E184.M5 and M5496 and 2018. Use Contains exact phrase starting with to search for terms that occur at the start of any of these phrases. You can search using a minimum of two characters and up to 15 characters.
For example, consider the record that contains the call number E184.M5 M5496 2018 in the relevant index. The below searches using Contains exact phrase starting with returns this record:
- Search for E184.M5 or E184.M or E184., etc.
- Search for M5496 or M549 for M54, etc.
- Search for 2018 or 201, etc.
By default, a phrase does not contain space characters. However, you can ask Ex Libris to configure your institution so that space is considered to be part of your phrases. In this case, any space within the search string is considered to be part of the string. In this case, the below searches using Contains exact phrase starting with returns this record:
- Search for E184.M5 M5496 2 (note that this search string contains 15 characters, which is the maximum length of search string for this operator)
- Search for E184.M5 M5496
- Search for M5496 2018
- After asking Ex Libris to enable (or disable) this alternative feature, Ex Libris must perform a full re-indexing for your institution.
- When enabled, spaces are considered against the length limit of 2 to 15 characters.
- This alternative feature, when enabled, does not apply to the Other System Number index.
- The Equal operator does not support special characters in call numbers.
Search Fields
| Option | Description | ||||||||||||
|---|---|---|---|---|---|---|---|---|---|---|---|---|---|
|
Access Rights (Electronic Portfolios)
|
The search index for Access Rights (Electronic Portfolios) is NOT supported. Users are to refrain from using this index. Updates or changes will be communicated as they become available.
|
||||||||||||
|
Activation Date (electronic collections, portfolios)
|
Locate electronic resources based on the date on which they were activated.
|
||||||||||||
|
Search
|
||||||||||||
|
Select the inventory management group to which this resource is restricted. See the list below for a comparative description of the available for advanced search options:
The selectable criteria vary depending on how the available settings are defined.
View the video below to see a demonstration of how this advanced search capability is implemented.
For more information, see Search Results with Restricted Access. For information on restricting availability for electronic resources, see Configuring Distributed Access to Electronic Resources.
For more information about searching for electronic resources by inventory management groups, see the Search by Available For Groups video (4:11 mins).
|
||||||||||||
| Binding Note | Search the 563 $a | ||||||||||||
| Brief Level | Select a specific brief level to search for. For more information, see Working with Brief Record Levels. | ||||||||||||
| Collection (Digital titles) | Search for a collection by collection ID. | ||||||||||||
| Collection Access Type | Select Current or Perpetual. | ||||||||||||
| Content Related Data | Search the 580 $a, 773 $t | ||||||||||||
| Contributed By (for electronic collections and electronic portfolios) | Use in the Community Zone tab to locate electronic resources that were contributed. | ||||||||||||
| Coverage In Use | Select Only Local, Global AND Local, Global OR Local, or Only Global.
Locate electronic resources based on the type of coverage used.
|
||||||||||||
| Current location | Search for items in the current location. | ||||||||||||
| Date Information Override | Select No or Yes | ||||||||||||
| DOI - Digital Object Identifier | Stored in $a of the 024 if $2 contains doi. | ||||||||||||
|
The Free advanced search option for electronic collections is implemented for both the electronic collection level and the electronic service level advanced searches. It is possible to search for electronic collections whose Free (service) or Free (electronic collection) is not defined using the Is Empty qualifying option. Note that when an electronic collection is not set as Free or Not Free but all of its services are set to Free, the Is free? parameter on the Additional tab of the Electronic Collection Editor is identified as Free; and if there is at least one service that is defined as Not Free, the electronic collection is shown as Not Free. |
|||||||||||||
| General retention policy | When searching for physical titles, search for position 12 of the 008 field in the holdings record. | ||||||||||||
|
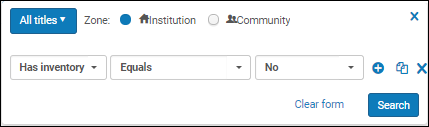
Has inventory (All titles) |
Select No or Yes to search for bibliographic titles without or with inventory.
Note that searching "Has Inventory = No" shows results with Related inventory. This is expected. |
||||||||||||
| Has Items | Select No or Yes to search for holdings without items or holdings with items, respectively.
The index in the Physical Titles search refers to Physical Titles which have at least one holdings record that answers the condition. |
||||||||||||
| Has Local Coverage Information | Select from date override or embargo.
Locate electronic resources that have local coverage.
|
||||||||||||
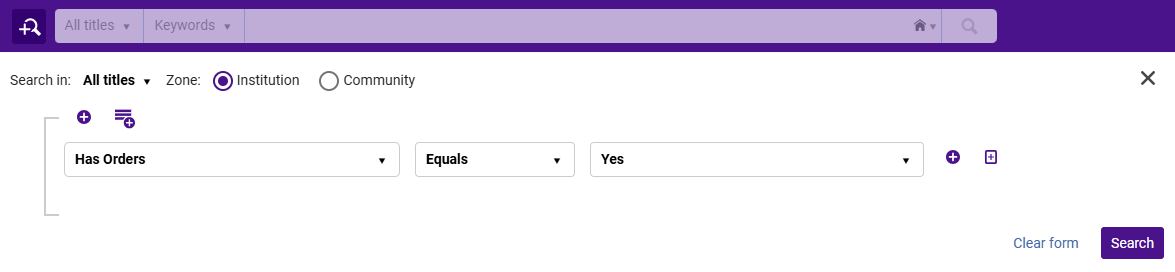
| Has Orders | Select No or Yes to search for bibliographic records with or without purchase orders.
Searching "Has Orders=Yes" retrieves only bibliographic records that have a PO Line linked to them. Relinking a PO Line to another bibliographic record impacts which records are retrieved.
Has Order - Advanced Search
|
||||||||||||
| Heading Information | Search for bibliographic records that are related to a specific heading. For details, see Browsing Bibliographic Headings. Once the results are in the repository search, you can create a set that would include all these results, and work with the set as usual.
In addition, users can search for bibliographic records based on their heading information linked to a specific authority record. When All is selected in the Heading Type drop-down menu, users are prompted to specify the authority record's Originating System and Originating System Id. This functionality enables users to retrieve all bibliographic records with headings linked to the specified authority record, irrespective of the heading type.
Advanced Search - Heading Information
|
||||||||||||
| Is linked | Locate records that are linked (or not) to the Community Zone or Network Zone.
When this index (for All Titles searches) is used in advanced searches from the Institution tab, all bibliographic records that are linked to the Community Zone or Network Zone appear.
|
||||||||||||
| Is Local (for local electronic collections and local portfolios) | Select No or Yes.
Locate locally managed electronic resources.
|
||||||||||||
| ISNI - International Standard Name Identifier | May be stored in $0 of various fields, especially the 1XX, 6XX, and 7XX. | ||||||||||||
| Item PID | Search the internal, system-generated ID for the item. | ||||||||||||
| Language of Cataloging | Use this to locate records based on the language that you select from the drop-down list.
Note that the language is cataloged as a three-letter abbreviation. However, the Advanced Search drop-down list shows the full language name. This is sourced from the MARC 21/KORMARC 040 $b and the UNIMARC/CNMARC 100 $a, positions 22-24. |
||||||||||||
| Linked Institution | Use this for retrieving bibliographic records that are linked either to the Community Zone or to the Network Zone (member institutions). The options are Community or Network. | ||||||||||||
| MMS Creation Date | Available when doing an Authorities Advanced Search. You may find this helpful when working with the Authority Control Task List. | ||||||||||||
| Modification Date | From the MMS record’s modification date column. | ||||||||||||
| Open access | Search the 506 for a match of the following:
506 0_ $f Unrestricted online access $2 star
|
||||||||||||
|
OCLC Control Number (035a)
OCLC Control Number (035a+z)
OCLC Control Number (035z)
|
With these indexes, you can locate specific OCLC numbers.
These fields are indexed based on the presence of one of the following prefixes and only the number is indexed: ocm, ocn, on, or (OCoLC). So, for example, 035 $$a (OCoLC)ocm232354470 is indexed as 232354470. Note that even though only the number is indexed, you can still search with or without the prefix.
These indexes are available for MARC 21, KORMARC, UNIMARC (except for 019), and CNMARC (except for 019).
|
||||||||||||
| ORCID - Open Researcher and Contributor ID | This ID may be stored in $0 of various fields, especially the 1XX, 6XX, and 7XX. | ||||||||||||
| Original Cataloging Agency | Use this to locate records for a certain, original cataloging agency.
This is sourced from the MARC 21/KORMARC 040 $a and (under construction) the UNIMARC/CNMARC 801 $b, when the second indicator is 0. |
||||||||||||
| Originating system | Search the name of the system from which the item was imported into Alma. | ||||||||||||
| Originating system ID | Search the record ID created in the system from which the item was imported. | ||||||||||||
| Other Classification Number | Search any classification number from a scheme not covered by one of the other number fields. | ||||||||||||
| Other System Number | Search the 035 fields.
When the 035 contains a prefix, the 035 is indexed with and without the prefix. As a result, searching for the other system number with or without the prefix returns a successful match. See the table below for examples.
By default, Alma removes the trailing zeros from system nuumbers. To have the trailing zeros retained, contact Ex Libris support. Note that this is only possible when there are exactly 7 trailing zeros. |
||||||||||||
| Peer reviewed | Search the 500 for a match of the following:
500 __ $a Refereed/Peer-reviewed
|
||||||||||||
| Portfolio access type | Select Current or Perpetual. | ||||||||||||
| Processed with Alma AI tools | Records created or enriched with Alma's AI Metadata Assistant | ||||||||||||
| Provider ID (Electronic Collection)
Provider Name |
Search for a collection in Alma using provider information, which is especially helpful when the Community Zone collection name differs from the provider collection name. Community Zone collections may include the provider collection name and ID, as well as the Alma collection name and ID. Once a provider name and ID are defined for a Community Zone collection, they become searchable in the Community Zone, Institution, and Network tabs.
|
||||||||||||
| Provenance code | Search a code, defined by the institution indicating the origin of the material. | ||||||||||||
| Record Format | Select which registry/record format to search (DC=Dublin Core). | ||||||||||||
| Resource Type | This index is constructed from existing bibliographic fields such as the LDR and 008. It supplements, but does not replace, the existing Material Type field. See The Resource Type Field. | ||||||||||||
| Tag sync external catalog | Whether the MMS record must be synchronized with an external catalog such as OCLC WorldCat. | ||||||||||||
| Temporary library | Search based on the actual physical location of the item. | ||||||||||||
| Temporary physical location | Search for items identified in the system’s temporary location field regardless of whether the item is currently in the temporary location (that is, even when Item is in temporary location=No). | ||||||||||||
|
URL |
When searching for Electronic titles or Electronic portfolios, URL is an option under Electronic Collection and Electronic Portfolio. With this option, you can search for URLs in order to maintain their accuracy.
|
- dc:contributor
- dc:coverage
- dc:creator
- dc:date
- dc:description
- dc:format
- dc:identifier
- dc:language
- dc:publisher
- dc:relation
- dc:rights
- dc:source
- dc:subject
- dc:title
- dc:type
| Field | Description |
|---|---|
| Bibliographic | |
| 028 | Publisher Number (R) |
| 264 | Production, Publication, Distribution, Manufacture, and Copyright Notice (R) |
| 336 | Content Type (R) |
| 337 | Media Type (R) |
| 338 | Carrier Type (R) |
| 340 | Physical Medium (R) |
| 344 | Sound Characteristics (R) |
| 345 | Projection Characteristics of Moving Image (R) |
| 346 | Video Characteristics (R) |
| 347 | Digital File Characteristics (R) |
| 377 | Associated Language (R) |
| 380 | Form of Work (R) |
| 381 | Other Distinguishing Characteristics of Work or Expression (R) |
| 382 | Medium of Performance (R) |
| 383 | Numeric Designation of Musical Work (R) |
| 384 | Key (R) |
| Authority | |
| 046 | Special Coded Dates (R) |
| 336 | Content type (R) |
| 368 | Other Attributes of Person or Corporate Body (R) |
| 370 | Associated Place (R) |
| 371 | Address (R) |
| 372 | Field of Activity (R) |
| 373 | Associated Group (R) |
| 374 | Occupation (R) |
| 376 | Family Information (R) |
| 378 | Fuller Form of Personal Name (NR) |
| 377 | Associated Language (R) |
| 380 | Form of Work (R) |
| 381 | Other Distinguishing Characteristics of Work or Expression (R) |
| 382 | Medium of Performance (R) |
| 383 | Numeric Designation of Musical Work (R) |
| 384 | Key (R) |
| Holdings | |
| 337 | Media Type (R) |
| 338 | Carrier Type (R) |
Searching for Titles by Call Number Range
The range operators <, >, <=, >= are available in the Advanced search when searching for Titles (All Titles, Physical Titles, Electronic Titles, Digital Titles). These operators can be used to search within the below bib call number indexes.
When searching with the permanent call number criteria, a permanent call number type must be provided. When using the Item call number type criteria, an Item call number type must be provided
For all of the indexes below, when searching within ranges, the system first sorts the records. This sort is done based on a unique identifier taken from the first occurrence of the call number field.
| Index | MARC 21 fields | UNIMARC fields | CNMARC fields |
|---|---|---|---|
| NLM-type call number | 096 a,z | ||
| Dewey Decimal Class Number | 082 a,b 092 a,b | 676 a | 676 a |
| Other classification number | 084 a,b | 686 a, 69X | 686 a, 69X |
| LC call number | 050 a,b 055 a,b 090 a,b | 680 a | 680 a |
| UDC | 080 a,b | 675 a | 675 a |
| CLC Classification Number | 690 a | ||
| CAS Classification Number | 692 a | ||
| RUC Classification Number | 694 a | ||
| Other Domestic Classification Number | 696 a |
These operators add the ability to search for ranges of call numbers on bibliographic record level. This can be useful, for example, if you want to find all titles belonging to a specific subject or range of subjects. For example, you can search for a range of call numbers across the Dewey Decimal Class Number index:
The below title was retrieved in this search, because its Dewey Decimal Class Number (displayed in 082 field $$ a), is included in the specified range.
Currently, sorting the results of range searches by any type of call number is not supported.
Watch the Search for Titles by Call Number Range video (1:45 minutes).
Order-Line Search Fields
- Access provider (advanced only) — Matches the access provider's code.
- Acquisition method (advanced only) — Select from the list.
- Additional PO line reference — Enter the other PO line number.
- Alert (advanced only)
- Assigned User (advanced only)
- Assignment (advanced only) – Note: When Assigned to me is selected, and the query is then saved as a logical set (see Saving and Reusing Search Queries, below), the user who saved the logical set is saved as the value for Assignment in the query. If a different user makes use of the logical set, the original user is still used as the value for this field.
- Author name
- Cancellation restriction (advanced only) — Whether the PO line can be canceled, Yes or No.
- Creation Date (advanced only)
- Fund code
- Fund name
- Import job ID — This ID exists if the PO line was imported by a job.
- Interested users (advanced only) — Whether the PO line has interested users, Yes or No.
- Internal Notes
- License code (advanced only)
- MMS ID
- Material type — Select the secondary type of the PO line. Note: Use the code of the material type and not the value. You can find the code in the Physical Material Type code table.
- Owning Library — In an institution with multiple libraries, limit the search to an individual library.
- PO line — The PO line number
- PO Line in Claim (advanced only) — Whether the PO line is in claim, Yes or No.
- PO line type — Select the primary type of the PO line (see Enabling/Disabling PO Line Types).
- PO reference number — Enter the purchase order (PO) number, if any.
- PO status (advanced only) — The purchase order (PO) status.
- Physical location name — Based on the ordered item's current physical location.
- Publication place
- Publication year
- Publisher
- Receiving notes
- Renewal Date (advanced only) – Note: When Renewal Date is selected, and the query is then saved as a logical set (see Saving and Reusing Search Queries, below), the value of this field at the time the logical set is saved is retained as the value for Renewal Date in the query. This is true even if the selected value was originally a relative value. For example, if the selected value was Earlier than today, PO lines whose renewal date is earlier than the date on which the query was saved are returned, regardless of when the query is run.
- Reporting code — Primary reporting code.
- Rush (advanced only) — Whether this was marked as a rush order, Yes or No.
- Secondary reporting code
- Sent Date (advanced only)
- SIP ID — This ID exists if the PO line was imported by a job. See Configuring Search Indexes.
- Standard number — See Search Indexes.
- Tertiary reporting code
- Title
- Title — starts with
- Vendor account code
- Vendor code — Finds all PO lines whose vendor code contains the search string.
- Vendor code - Equals — Finds all PO lines whose vendor code exactly matches the search string.
- Vendor invoice number — Finds all PO lines whose vendor invoice number contains the search string (The vendor invoice number is sent from the vendor if the PO Line is generated by EOD.)
- Vendor name — Finds all PO lines whose vendor name contains the search string.
- Vendor name - Equals — Finds all PO lines whose vendor name exactly matches the search string.
- Workflow — A workflow step or PO line status
Note that in the advanced search, there is a drop down that lists all the possible search values. In the simple search, you can enter the search value manually, and in order to get results, you should use one of the following search terms:- INREVIEW
- MANUAL_PACKAGING
- AUTO_PACKAGING
- READY
- SENT
- CLOSED
- CANCELLED
- WAITING_FOR_MANUAL_RENEWAL
- CYCLIC_RENEWAL
- WAITING_FOR_INVOICE
- TRIAL
- RENEWAL_TRIAL
- DEFERRED
- ALL

After adding a note, save the PO Line.
Vendor Search Fields
When searching for vendors, you can enter the following additional criteria (some of these are described in Managing Vendors):
- Code — Vendor code
- Interface Name
- Libraries — Note that this returns all vendors associated with the library that you enter (by name or part of the name), as well as all vendors associated with the institution itself (since a vendor that serves the institution also serves the library).
- Name — Vendor name
- SUSHI Account Name — For more information, see Managing SUSHI Accounts.
Reading List Search Fields
- All — Searches for reading lists that match any criteria. When performing a search, you must insert the full code, exact value, or include a wildcard (*) for the search to be successful. Searching for part of the code without a wildcard results in no found records. A wildcard must be inserted immediately after the search parameter with no spaces.
Search by All does not include results by reading list ID.
- Code — The reading list code. Searching for a code by inserting any part of the code results in a successful search.
- Course — The course code or name.
To find reading lists without an associated course, search for EXLIBRIS_DEFAULT_COURSE.
- List ID — The reading list ID.
- Name — The reading list name.
- Owner — The primary ID or name of any of the reading list owners.
- (Advanced only) Course Start/End Date — The course start or end date.
Citation Search Fields (Simple Search Only)
- Keyword (default selection) – When selected, this option searches the following citations' metadata fields for a match:
- Additional Person Name, Author, Book Author, Book Title, Chapter Author
- Chapter Title, Citation ID, DOI, Edition, Editor
- ISBN, ISSN, Issue, Journal Title, LCCN
- MMS ID, OCLC Number, Pages, Place of Publication, Publication Date
- Publisher, Resource Note, Source, Title, and Volume
-
Keyword searches for citations do not support the use of Boolean operators (such as AND or OR), and if these operators are specified, they are treated as keywords.
-
When special characters (such as hyphen, dash, slash, and so forth) are specified as search terms, the search returns results that both include and exclude the special characters.
- Citation ID
- Course Code
- Course Name
- Creator — The citation author's name. Note: Additional person names are not included in the search.
- ISBN/ISSN
- MMS ID
- Reading List Name
- Title — Citation name
Borrowing/Lending Search Fields
When searching for resource sharing requests (borrowing or lending), you can enter the following additional criteria:
- External Request ID
- Author
- DOI
- Internal Identifier (for borrowing requests)
- ISBN/ISSN
- Item barcode
- Journal Title
- LCCN
- Notes
- OCLC Number
- Other Standard ID
- PMID
- Remote Record ID
- Requester (for borrowing requests)
- Title
- User Identifier (for borrowing requests)
Users Search Fields
- Birth date — Supports a moving range of days
A moving range of days, such as Is Within the Last (days), Is Older Than (days), Is Within the Next (days) search operators can get a numeric value input (1 - 2,500,000) to define the time range (where 1 represents "today").
- Campus
- Create date — Supports a moving range of days
- Phone number
- Since phone numbers are encrypted upon save, a phone search is an exact match search (for example, if country code is entered in the phone number, use it when searching) on numeric values only (any non-numeric values, for example, hyphens, spaces or brackets, do not affect the search).
- The phone number field is considered protected data and can only be searched using the exact phone number index. It is not included in the "All" user search.
- Expiration date — Supports a moving range of days
- Fine/fee total sum — Searches fines/fees with an Active status
- First name
- Has block type
- Identifiers
- Job category
- Last activity date — Supports a moving range of days
- Last name
- Middle name
- Note
- Primary identifier — Search for the full ID when it contains numbers and letters
- Purge date — Supports a moving range of days
- Roles and Scopes — Searches role and scope with the following conditions:
- Searching by role must include a selected scope. You can use the All option to indicate that the role should be searched for with any scope.
- Scope can include multiple values, e.g., Role Equals Circulation Desk Operator AND Scope Equals (Law OR Main OR Theology).
- The Not Equals option exists for Role only (it does not exist for Scope). If you select this option, you get the complement group (as if adding NOT to the entire search criteria). For example, if you select Role Not Equals Circulation Desk Operator AND User Group Equals Staff, you get a list of all the Staff users that do not have a Circulation Desk Operator role.
- Statistical category — If more than 1000 statistical categories exist, an auto-complete option appears after the user types in the first three characters. If fewer than 1000 statistical categories exist, a drop-down list that can be managed appears. For details, see User Details Configuration.)
- User group
This feature is not deployed to sandbox environments; it is available only in production environments.
Course Search Fields
- Course Code
- Course Code (include Section)
- Course End Date
- Course ID
- Course Name
- Course Notes
- Course Start Date
- Instructor Name
- Searchable Id
- Section
- Year
Unlike other searches, a search for course code or course name a) also searches for special characters, and b) is limited to a search string of 40 characters, regardless of the size of the entity being searched.
For searches on Course Code and Course Name, partial search terms are supported. For example if the search code is "134001" and you search for "13400", the item is returned.This is not the case when searching with All.
Searching for Items Without Specific Information
| All Titles (Not Present) |
Holdings (Not Present) |
Physical Items (Not Present) |
|---|---|---|
| LC call number | Permanent call number type | Inventory number |
| Dewey decimal class number | Permanent physical location | Public note |
| UDC | Library | Fulfillment note |
| Other classification number | Call number suffix | Internal note 1 |
| Additional publication year | Summary holdings | Internal note 2 |
| Language | Holdings note | Internal note 3 |
| LC control number | Item sequence number | |
| ISBN | PO line | |
| ISSN | Item call number | |
| ISSN link | Item call number type | |
| Other standard ID | Creation date | |
| Government document number | Current library | |
| National bibliography number | Currently location | |
| Publisher number | Due back from temp location date | |
| Standard number | Expected receiving date | |
| Other system number | Inventory date | |
| Notes | Is Magnetic | |
| Local notes | Item policy | |
| MMS SIP ID (a number assigned to a set of records affected by a job) | Material type | |
| Physical description | Modification date | |
| Country of publication | On shelf date | |
| Genre form | On shelf seq | |
| Publisher location | Pages | |
| Material type | Pieces | |
| Medium type | Process type | |
| Originating system ID | ||
| Originating system | ||
| Tag suppressed | ||
| Tag sync external catalog | ||
| Local field 900 | ||
| Relator |
- Open Advanced Search.
- Select Physical Items as the search type.
- For the field to search, select Physical Item > Barcode.
- Select Is Empty from the condition drop-down list.
- Select Search. The search results display all the physical items without barcodes.
Work Search
The Works search capability enhances user accessibility to linked instances and related works. It enables users to search for works directly, in addition to the current capability of searching instances across all titles.
This functionality is only available if BIBFRAME support is enabled. For more information, see BIBFRAME support.
The Works search capability replicates existing search indexes that are relevant for works. Previously, work records could only be viewed through the linked instances. Now, direct access to works is enabled.
The Work search displays results similar to other repository searches with minor variations to the results details, sections, actions, facets and customizations.
- In Alma's persistent search box, select Works in the search type drop menu. Type the search content in the text field.
The Works search results are displayed. Works Search
The Works search displays results similar to other repository searches, for example, MMS ID, Creation date, Subjects and so forth. However, several fields and buttons are displayed to reflect the Works search, such as, Instances, View Work, Linked Data, and New for May 2026! Create Logical Set. Users can also refine their search by selecting to search based on an attribute from linked instances. The search index drop menu indicates indexes that are an attribute from a linked "instance" with parentheses, for example, Edition (Instance).
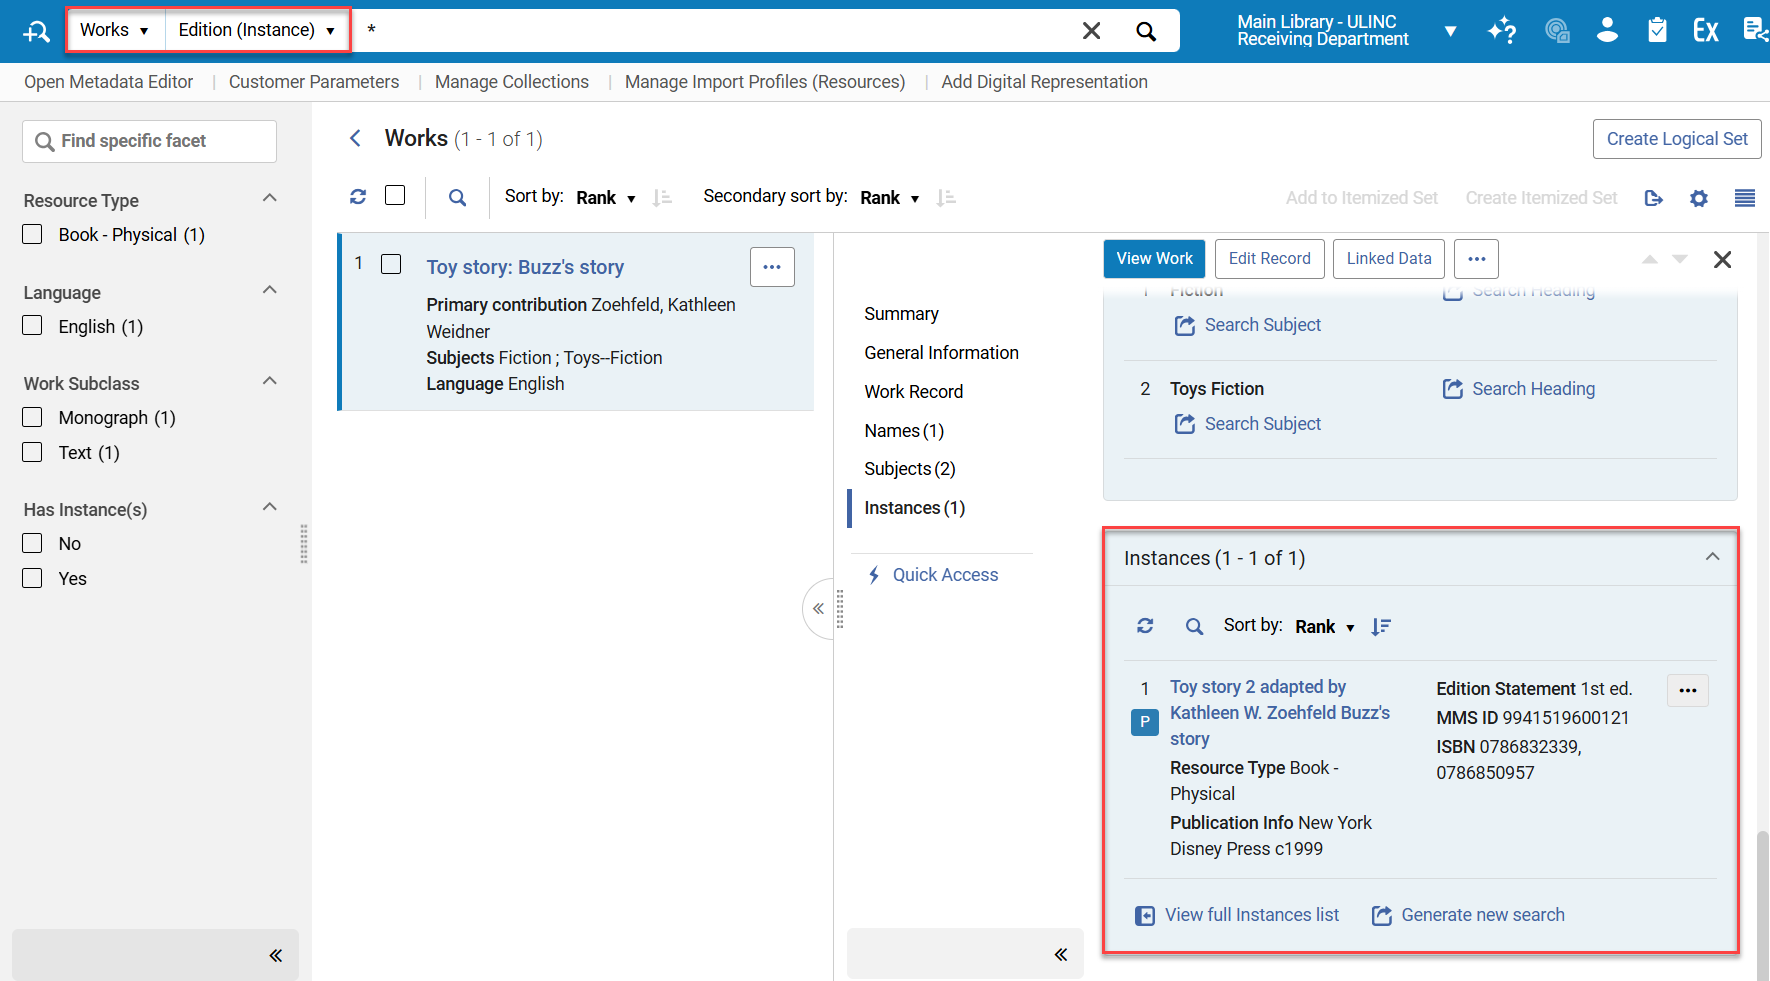
View Work:
In the results screen, users have the ability to view instances from the Works by selecting the Instances quick link ( ). Additionally, further details regarding the Work can be viewed by selecting a record.

Linked Data:
Selecting the Linked Data button displays similar information on all linked entities in the Repository search.
Sections — Work Search
The sections displayed in a Works search differ slightly from those in other Alma searches. The following sections are displayed for a Works search result:
- Summary — see Summary.
- General Information — see General Information.
- Record display — same as Bibliographic Record section, but related to the Work. See Bibliographic Record Section.
 Work Record Section
The BIBFRAME work and instance record view within the persistent searches (All Titles and Works) is displayed by default in a tree view, providing a more focused view on the record's content and a less technical RDF/XML view. Users can still view the XML view in a separate section that can be added to the details display via the section's customization tool. The section is labeled as work RDF/XML in the work search and Instance RDF/XML in the All Titles customization tool. For more information on display customization in Alma, see New Layout.
New for May! Alma also supports easy navigation between record views so each user can find the view that best suits them. The selected view is "sticky" thereby remembering your preference as you navigate through each record. You can display the record in Tree view, RDF/XML view, Table view, and Turtle view.
 Work Record - View Options
The table view displays as much metadata as possible within a section, and uses the familiar display known to catalogers from MARC formats.
 Work - Table View
 - Contributors — see Contributors.
- Subjects — see Subjects.
- Instances — displays a list of related instances attributed to the Work record (similar to the Inventory > Holdings section). The list includes a count of instances linked to the work. To streamline the workflow, you can perform actions on the instances listed in the section that would usually be done from the all titles search.
 Instances Section
 - Related Works — displays a list of related titles and types of relations to the Work record, enabling a quick and seamless navigation as needed.
 Related Work Section
Rerunning a Previous Search
- Select the text box and select a previous search from the drop-down list that appears. All recent repository searches appear when All Titles is selected as your search type; otherwise, only recent searches for the selected type appear. The search runs immediately.
- When no recent searches appear, you may be able to select a previous search string using your browser history.
Searching for Special Characters
- Alma's handling of special characters is relevant for searching in the institution zone only.
- Only one language for special characters search can be defined.
Searching for Special Symbols
Special symbols are characters, such as @, &, !, that are not alphabetic or numeric. In some types of searches, like "Keywords" simple search or "Contains Keywords" operator for the different indexes, special symbols are omitted from the inputted search term.
Special symbols are treated as fully independent characters for repository search, browse bibliographic headings/F3, and sort, and they are not substituted with words. For example, if you have a record in your inventory titled "Crime and Punishment", all Titles where (Title contains keywords "Crime & Punishment") does not return "Crime and Punishment", because "&" is not substituted by the word "and".
On the other hand, if you have the record "War and Peace" in your inventory, then All Titles where (Title contains keywords "War & Peace") is translated in the Alma search engine to All Titles where (Title contains keywords "War Peace"), and does return the record "War and Peace", because its title contains all the words in the search term. All Titles where (Title starts with "War & Peace") or All Titles where (Title equals "War & Peace") does not return the record, as its title is not equal nor starts with "War Peace".
Repository Search Results
- For reference to the new UI search results, continue below.
- For reference to Alma's Classic Repository Search Results, see Alma's Classic Repository Search.
Repository Search Result Views
Search results display information according to the type of resource chosen for your search. You can configure the information and actions that appear for each result; for more information see Display Configuration.
Alma's new UX aims to keep users in context, minimize the need to leave the screen to check information or perform tasks, and improve navigation and efficiency. It therefore offers users a selection of possible views, allowing each person to choose the view most comfortable to them when fulfilling their tasks. Many resources and operations are integrated directly into the search page via the details side-pane, and users can easily switch between different views of the search results:
- List View: Provides a brief view, with expandable inventory "tabs" for easy scanning while scrolling.
- Table View: Displays limited information in a convenient table for easy comparison.
- Split View: Shows search results (in either list or table view) and the details side-pane side by side.
- Full Page View: Displays the details pane only, offering more space for details.


The Sliding Panel
To keep users in context and minimize the need to navigate away, many actions open the relevant pages in a sliding panel. This allows users to perform more complex operations without navigating away and losing search context, as a "side quest" - seamlessly returning to the list of resources to continue their main work once they are done.
The sliding panel is used in various workflows such as editing an item, placing an order, adding a title to a collection, and so forth.

Display Configuration
The display of search results can be configured at both the user and institution levels. For more information on user level customizations, see Customizing the Display in Alma.
Administrators can establish institutional defaults, eliminating the need for individual users to configure their display with data relevant to the entire institution. Users, in turn, have the flexibility to adjust these preferences according to their specific needs, enhancing efficiency and usability.
The available configurations include:
- Sections: Reorder or hide sections in the details pane to prioritize the most relevant information.
- Actions: Reorder or hide actions for quick access to primary actions with a single click, and easy access to other commonly used actions.
- Records: Customize which fields from the results list are displayed and their positioning, ensuring easy access to essential information for your tasks.
The fields in the first column are always displayed, fields in the second column are hidden if the list view is narrow
- Facets: Reorder or hide facets to ensure relevant tools for your work are readily accessible.
- Table: Customize which of the available metadata fields are displayed as table columns in the table view and where, to make working with the table more efficient.
Expanding Tabs
The inventory tabs can be expanded to display up to five entries. While viewing a search result, you can:
-
Recognize tabs that are color-coded by inventory type.
-
Select a tab to view a specific type of inventory (for example, physical holdings), or the collections the title belongs to. If you select a different tab later, the first one closes before opening the new one.
-
Select the Expand all button
 to view all types of inventory and collections associated with the title at the same time. Alma arranges the tabs vertically.
 -
Perform actions in each tab's table, according to its type (e.g. activate an electronic portfolio, remove a title from a collection, etc.).
The example below shows a search result with all tabs open.

Additionally, you can use the Expand table action to expand the tabs for all results in your search. You can select:
-
A specific tab type
-
All tab types
-
None (this closes all tabs)

The options available in the Expand table action vary depending on which scope you are searching in (for example, Institution, Network, or Community). Alma remembers your setting across sessions for each search type and scope.
When you select Expand All, the search results are displayed first and then loads the expanded tabs gradually. This sequence enables you to start reviewing the results right away while the tabs finish loading.
Tabs are available in the Record view only; they are not available in the Table view. When you open the Split view, the tabs automatically close. If you select a tab or the Expand all button, Alma closes the right pane to expand the tabs.
Saving and Reusing Search Queries
- After performing a search, select Create and Filter Set on the search results.
The Logical Set Details pop-up appears.
 Logical Set Details Pop-Up
 - Follow the procedure in Creating Logical Sets - except step 8, entering the search parameters, since this is the search query you are saving.
- For titles, holdings and authority records, you can also filter the set using an indication rule - see Filtering Sets.
Performing a Search Using a Saved Query
Itemized Sets in Search Results
Itemized sets are fixed lists - each time you check their content or use them, the content is the same. You can use selected search results to create a new itemized set, or add to an existing set's content. For more information, see Creating Itemized Sets on the Manage Sets Page.
For consortia members, itemized set actions are only available when searching in the institution scope (not in network or combined scopes).
Creating an Itemized Set
You can create itemized sets for selected results.
- Select the records you want to include in the set by checking the checkbox next to the record - a counter shows the number of selected records.
- From the bulk action buttons, select Create Itemized Set to open the Itemized Set Details pop-up.
- Fill in the set information and Save.
 Table View Bulk Actions - Create Itemized Set
 Itemized Set Details Pop-Up
Adding to Itemized Set
You can add selected results to an existing itemized search that you are allowed to edit.
- Select the records you want to include in the set by selecting the checkbox next to the record. A counter displays the number of selected records.
- From the bulk action button, select Add to Itemized Set to open a sliding panel with the list of relevant itemized sets according to the search type.
- Locate the desired set. Search and filters are available.
- Select a set to add the records to it.
 List View Bulk Actions - Add to Itemized Set
 Add to Itemized Set - Selection Sliding Panel
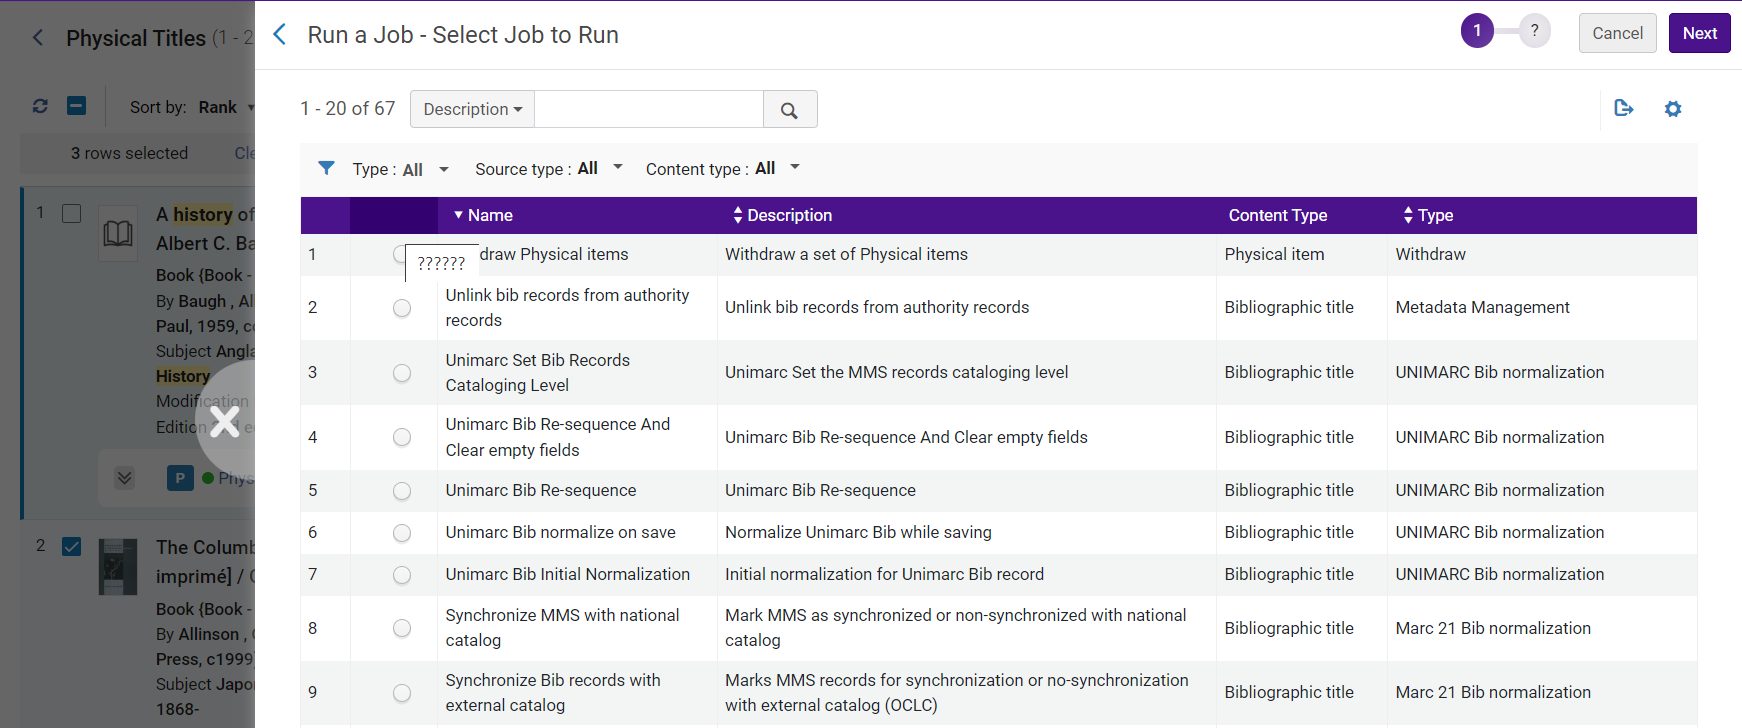
Run a Job on Selected Search Results
If you have the permissions, you can run a manual job on selected results. This does not create a set, but only runs the process.
For consortia members, running a job is only available when searching in the institution scope (not in network or combined scopes).
Select the records you want to run the job on by selecting the checkbox next to the record/s. On some New Generation (NG) search results pages that support logical sets, the Select All option lets you select all results across all the results pages. A counter displays the number of selected records.
From the row actions button, select Run a Job to open a sliding panel with the list of jobs you are allowed to run on the type of records in your search type.
Select the job and enter the parameters to run the process on your selected records.

Exporting Search Results
Sorting Search Results
- Term Frequency - The higher the term frequency in the document, the higher the document score.
- Inverse Document Frequency - The rarer a term is across all documents in the index, the higher its contribution to the score.
- Coordination Factor - The more query terms found in a document, the higher its score.
- Field Length - The more words a field contains, the lower its score. This factor penalizes documents with longer field values.
- Rank
- Title – Asc
- Title – Desc
- Creator – Asc
- Creator – Desc
- Publication Date – Asc
- Publication Date – Desc
- Uniform Title – Asc
- Uniform Title – Desc
- Series – Asc
- Series – Desc
- All titles
- Physical titles
- Physical items
- Electronic titles
- Electronic collections (Sort by only)
- Electronic portfolios (Sort by only for titles)
- Digital titles
- Collections (Sort by only)
Sorting by Full Publication Date
MARC21/KORMARC
The date sorting is determined as follows:
- If the MARC21 008 position 7–10 exists:
- If the MARC21 008 position is 06 = "e" (indicating a detailed date), then:
- Positions 7–10 in field 008 are formatted as yyyy (e.g., 20251104
- Positions 11–14 in field 008 are formatted as mmdd (e.g., 20251104)
- If the MARC21 008 position 06 is not "e", then positions 7–10 in field 008 represent the year (e.g., 2025)
- If the MARC21 008 position is 06 = "e" (indicating a detailed date), then:
- If none of the above options are available, the year (yyyy) is extracted from field 260 $c. If 260$ c does not exist, then the year is taken from 264 $c.
UNIMARC/CNMARC
Field 100 positions 9–12 are reserved for the year of publication. Alternatively, field 210 $d may be used to record the publication date, also in the yyyy format.
Sorting Results (Publication Date – Ascending)
The following example demonstrates how records are sorted when using Publication Date – Ascending, based on the Full Publication Date logic introduced in May 2026.
After applying the Full Publication Date sorting logic, the records are displayed in the following order:
- 20220311
MARC21 record with a full date from field 008 - 20220404
MARC21 record with a full date from field 008
Values in 260 $c and 264 $c are ignored because field 008 takes precedence - 20230000
MARC21 record using the publication year from field 260 $c - 20230000
MARC21 record using the publication year from field 264 $c - 20230000
UNIMARC record using the publication year from field 100 - 20230000
UNIMARC record using the publication year from field 100 or 210 $d - 20230202
KORMARC record with a full date from field 008 - 20260000
MARC21 record using the publication year from field 260 $c - 00000000
MARC21 record with no publication date
Records without a usable publication date are sorted last
This example illustrates how Alma prioritizes full dates when available and falls back to year-only values when necessary, ensuring consistent, predictable sorting behavior.
Filtering Search Results
Facets
The Facets panel helps you filter the search results to only see results that meet selected conditions. The facets enable you to:
- Select multiple values to include in the search results
- Exclude a value from the search results
- Search in the Facets - users can easily and quickly find the value they want to facet on
- Save Facets - users who commonly filter their search results in a specific way can now save this, so it automatically applies to future searches of the same type. The saved facets can be cleared when the user wants to see the unfiltered search results.
For more information, see Facets.
| Search Type | Facets Provided |
|---|---|
| Title Searches (all types) | Material type (see Material Types in Search Results) |
| Resource Type (see The Resource Type Field) | |
|
Language (determined by the contents in the 008 field positions 35-37 and one or more 041 $a entries) The Language Facets currently take the language name from the MARC Code List for Languages. |
|
| Publication year: The user can select a range suggested by Alma, or manually enter a year or a range to facet to. | |
| Collections | |
| Record format (facet displays only when an institution has more than one record format activated in the Active Registry). | |
|
Physical Titles
|
Library Scope - limits the scope of physical search results to specific libraries. This reduces the need to define the library in the Advanced search or to use facets for every search, for users that only work with physical resources of specific libraries.
The library scope is a persistent filter that applies to all physical searches (items, holdings and titles).
When you select Save Query to create a set from the search results limited to specific libraries, the set is saved and does not change, even if you change the libraries selection in the future.
See also Library Scope (LS).
|
| All title search facets | |
| Electronic titles | All title search facets |
| Digital titles | Usage Type |
| Representation Entity Type | |
| All title search facets | |
|
Library Scope — limits the scope of physical search results to specific libraries. This reduces the need to define the library in the Advanced search or to use facets for every search for users who only work with physical resources of specific libraries.
The library scope is a persistent filter that applies to all physical searches (items, holdings and titles).
When you select Save Query to create a set from the search results limited to specific libraries, the set is saved and does not change, even if you change the libraries' selection in the future.
See also Library Scope (LS).
|
|
| Library | |
| Location (the location facet becomes available when a library facet is applied) | |
| Call Number Type |
Secondary Search
Some pages include a secondary search that enables you to search the current task list for items that meet certain criteria (see New Layout).
Repository Search Labels
To manage repository search labels, you must have an Administrator or Manager role.
To manage inventory search labels, you must have an Administrator, Manager, or the relevant Inventory Operator role (Physical Inventory Operator can manage Physical Holdings search labels).
Users without these roles can search, view and facet labels, but cannot add or remove them.
To enable repository search labels for Operator roles, contact Ex Libris support.
In the repository search, institutions can now add local labels to records (currently available for Title and Holdings searches). These labels can be used for searching, faceting, and viewing search results. Adding labels can only be done for local records in the institution level. Adding labels for Community and Network records is not supported.
Adding Labels
Labels can be added in bulk (multiple record selection) or by single record selection in the search results. Adding by bulk is represented in the List View whereas the single selection is done in Split View.
- Run a repository search.
- Select the desired search result record(s) - (See below: a. Bulk selection, b. Single selection):
Bulk selection
- In the search results (List View), select one or more desired search result record(s) that you wish to mark with the label.
Once a record is selected, the Manage Labels ( ) button is enabled. Continue with step 3.
 Manage Labels button enabled in Table View search results
Single selection
- In the search results (Split View), the record selected displays the Add Labels (
 ) button in the screen's right pane. Upon selecting the Add Labels button, the Manage Labels pop-up screen is displayed.
- In the Enter Label text box, type a desired label or select one from the drop menu (if a label was previously added), for example, Test.
- Select Apply.
The label is added and displayed alongside the navigation and smart links.
See Viewing Labels for visual representation.This concludes the steps for adding a label for Single selection in Split View.
Step 3 and onward are continued procedures for Bulk selection. Add Label - Single Selection
- In the search results (List View), select one or more desired search result record(s) that you wish to mark with the label.
- Select Manage Labels.
- In the Manage Labels window, verify the Add Labels radio button is selected.
- In the Enter Label text box, type a desired label, for example, Test.
 Manage Labels Window
 - Select Apply.
The label (in List View) is added and displayed alongside with the navigation and smart links.
See Viewing Labels for visual representation.
Removing Labels
Labels can be removed in bulk (multiple record selection) or by single record selection in the search results. Removing by bulk is represented in the List View whereas the single selection is done in Split View.
- Run a repository search.
- Select the desired search result record(s) — (See below: a. Bulk selection, b. Single selection):
Bulk selection
- In the search results (List View), select one or more desired search result record(s) that are marked with the label you want to remove.
Once a record is selected, the Manage Labels () button is enabled.
 Search results displaying records marked with label to remove
Single selection
- In the search results (Split View), the record selected displays the label (for example,
 ) in the screen's right pane. Upon selecting the label or the edit icon (
 ), the Manage Labels pop-up screen is displayed.
- Select the X alongside the label you want to remove (
 ).
). - Select Apply.
The label is removed.This concludes the steps for removing a label for Single selection in Split View.
Step 3 onwards are continued procedures for Bulk selection. Remove Label - Single Selection
- Select the X alongside the label you want to remove (
- In the search results (List View), select one or more desired search result record(s) that are marked with the label you want to remove.
- Select Manage Labels.
- In the Manage Labels window, verify the Remove Labels radio button is selected.
- In the Enter Label text box, from the drop menu select the label to remove, for example, Test.
 Manage Labels Window
 - Select Apply.
The label is removed from all views (List, Split and so forth).
Viewing Labels
Labels are displayed differently in the varying views (List, Split and Table). Below are visual representations of the labels displayed in the different views.
List View:

Split View:

Table View:
Viewing labels in the Table View – The labels column is not displayed by default but can be configured.
- In the search results screen, select the icon (
 ) for Table View.
 - Select the gear icon (
 ) to customize the view.
 - Under Institution Customization, select Table customization.
- Scroll down the list and select Local Labels.
 Table View Customization - Local Labels selected
 - Select Apply. The Local Labels column is displayed in Table View.
 Local Labels Column - Table View
Thumbnails in Search Results
Institution, Community, and Network Search Scopes


Search Result Icons
| Tab | Icon | Record Condition | Select to Open the Item In | |||||||
|---|---|---|---|---|---|---|---|---|---|---|
| Institution | Record is not found in search results | NOT defined in the institution | N/A | |||||||
| Restricted by an inventory management group | N/A | |||||||||
| No icon | Unlinked | N/A | ||||||||
|
Record is suppressed, or digital representation is inactive. When a record is suppressed, only the Library staff can see it. The record does not appear in the Primo search results, and students cannot see and cannot request it. For details, see Suppressing Alma Records from Primo. The following table describes what to use in the repository search for suppressed holdings and content.
|
N/A | |||||||||
| Peer Reviewed
When performing an All titles, Electronic titles, Electronic portfolios, Electronic collection, Physical titles, Physical items, Digital titles, Digital files, or Collections search, this icon appears for Community Zone MARC 21 bibliographic records that contain the following:
500 __ $a Refereed/Peer-reviewed
|
N/A | |||||||||
| Open access
When performing an All titles, Electronic titles, Electronic portfolios, or Electronic collection search, this icon appears for Community Zone MARC 21 bibliographic records that contain the following:
506 0_ $f Unrestricted online access $2 star
|
N/A | |||||||||
 |
Linked to a Community Zone record. | Community tab | ||||||||
 |
Linked to a Network Zone record | Network tab | ||||||||
| Committed to Retain. Items or Titles marked as Committed to Retain cannot be withdrawn (removed). | N/A | |||||||||
| The record was created or enhanced with the help of AI. | N/A | |||||||||
| Community | Record is not found in search results | NOT defined in the Community Zone | N/A | |||||||
| Peer Reviewed
When performing an All titles, Electronic titles, Electronic portfolios, Electronic collection, Physical titles, Physical items, Digital titles, Digital files, or Collections search, this icon appears for MARC 21 bibliographic records that contain the following:
500 __ $a Refereed/Peer-reviewed
|
N/A | |||||||||
| Open access
When performing an All titles, Electronic titles, Electronic portfolios, or Electronic collection search, this icon appears for MARC 21 bibliographic records that contain the following:
506 0_ $f Unrestricted online access $2 star
|
N/A | |||||||||
| No icon | Linked to a record in the Network Zone
AND
Restricted by an inventory management group
|
N/A | ||||||||
 |
Linked to a record in the Network Zone
AND
NOT linked to a record in the institution
AND
NOT restricted by an inventory management group
Note: This icon also appears if an institution record is linked to the above Network Zone record.
|
Network tab | ||||||||
 |
Linked to a record in the institution
The icon is black
For electronic collections of type 'Database', this icon always appears black
|
Institution tab | ||||||||
| Linked to a record in the Network Zone
AND
Linked to a record in the institution
See notes above.
|
Whichever link was added last. | |||||||||
| The record was created or enhanced with the help of AI. | N/A | |||||||||
| Network | Record is not found in search results | NOT defined in the Network Zone | N/A | |||||||
| Peer Reviewed
When performing an All titles, Electronic titles, Electronic portfolios, Electronic collection, Physical titles, Physical items, Digital titles, Digital files, or Collections search, this icon appears for Community Zone MARC 21 bibliographic records that contain the following:
500 __ $a Refereed/Peer-reviewed
|
N/A | |||||||||
| Open access
When performing an All titles, Electronic titles, Electronic portfolios, or Electronic collection search, this icon appears for Community Zone MARC 21 bibliographic records that contain the following:
506 0_ $f Unrestricted online access $2 star
|
N/A | |||||||||
| No icon | NOT linked to a Community Zone record
AND
NOT linked to a record in the institution
|
N/A | ||||||||
 |
Linked to a Community Zone record | Community tab | ||||||||
 |
Linked to a record in the institution | Institution tab | ||||||||
| Committed to Retain. Titles marked as Committed to Retain cannot be withdrawn (removed).
In the case of network zone records, the retention policy is determined based on the configuration specified in the Network Zone table. When attempting to delete a bibliographic record that is linked to the Community Zone, the removal of the linked record from the local institution is restricted based on the specific configuration set by that institution. Local extension fields cannot be used as retention fields. A field that is used in the Institution Zone without being a local extension may be used as a retention field. |
N/A | |||||||||
| The record was created or enhanced with the help of AI. | N/A |
Viewing Inventory and Collection Information
-
Physical inventory
-
Electronic inventory
-
Digital inventory
-
Collections the title belongs to
-
Held by (consortium members only; see Repository Search when Using a Network Zone for more information)
Alma displays navigation smart links on the right side of the screen in search results. These links provide quick access to information related to the record, such as holdings, items, portfolios, and so on. For more information on smart links, see Using Navigation Links.

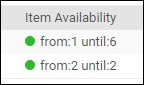


Using Navigation Links
Alma displays navigation smart links on the right side of the screen in search results. These links provide quick access to information related to the record, such as holdings, items, portfolios, and so on, and enable navigating to Alma pages relevant to it.

The navigation links can include both standard hyperlinks and smart links. Standard hyperlinks perform a single action (for example, open a list of orders, courses, licenses, or requests in a sliding panel, or the Collections section in the details pane), depending on the user's roles and privileges - if a user doesn't have the privileges required to perform the action, the navigation link appears as a read-only icon. The display of the links can be customized from the gear icon () and selecting Records Customization. In Badges and Icons (Third column), select the links to hide or display. These links also appear in the Table view ( ). The link counters are included in search exports to Excel, enabling users to easily identify records with related entities in their exported files.
Smart links can perform multiple actions for a specific entity (for example, open its section in the details pane, the full list in a sliding panel, or navigate to a new search). Smart links work in one of two ways:
-
Selecting the link takes you to your favorite resource (such as a section in the right pane or a full list in a sliding panel). You can customize what the single-click action is for each smart link.
-
Selecting the arrow icon next to the smart link opens a navigation window, which offers all actions available for that smart link. From this window, you can select a link to perform the action or star an action to set it as the favorite (single-click) action for this smart link.
The following image shows the arrow icon and the resulting navigation window that appears when you select it.
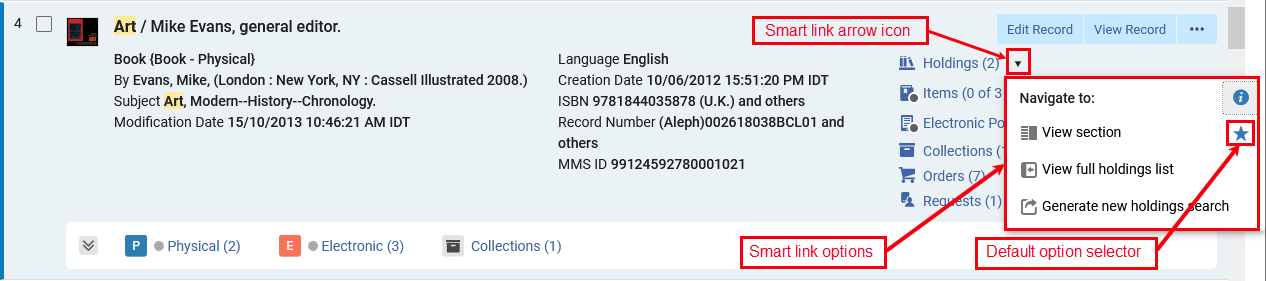
The navigation window can offer the following actions for smart links:
-
View section — Open the details pane and navigate to the relevant section (Holdings, Items, Electronic Portfolios, or Electronic Collections).
-
View full list — Open the full list of items, holdings, electronic portfolios or electronic collections in a sliding panel.
-
Generate a new search — Navigates to a new search for the relevant entities by the bibliographic record's MMS ID.
The star icon specifies the default action used for that smart link. In the example above, the View section action is selected, so the Holdings section appears whenever you select the Holdings link from a search result. To change the default action, hover over the option you want to use and select its star icon.
Smart links are available in List View and Table View. In the Split View, Alma displays the navigation links as icons, and the arrow icon does not appear. Selecting a navigation icon takes you to the default action set for that link.
Performing Record Actions on the Repository Search Results Page
| Search Type | Action | Description |
|---|---|---|
| All Titles, Physical Titles, Electronic Titles, Digital Titles | The results for a titles search include bibliographic records that may have physical, electronic, and/or digital inventory, and the actions for each record vary according to the record type. Unique actions available only in specific context are listed below. | |
| Edit Record | Edit the bibliographic record. Opens the MD Editor (see Working with Records).
Search results include records that may be locked due to another staff member editing the record. Locked records appear in the search results without any indication of being locked. A message that the record is locked appears only when you open the record in the MD Editor. Select Edit Record from the search results to open the record in the MD Editor.
This notation indicates that there is an open draft for the record and that someone other than you is working on it. This record cannot be edited until the operator that has it locked does a Release or Save and Release in the MD Editor or the setting for the working_copy_lock_timeout parameter has expired. The default setting for working_copy_lock_timeout is one hour. See working_copy_lock_timeout for more information.
|
|
| View Record | Opens the Record View of the bibliographic record in a sliding panel. | |
| Order | Initiate a purchase order. Opens the PO Line Owner and Type page in a sliding panel (see Creating PO Lines). | |
| Request | Initiate a fulfillment request on the title. Opens the Create Request page in a sliding panel (see Creating a Request).
From the Create Request page, you can select a Physical titles request such as Move temporarily or Patron digitization request from the Request Type drop-down list.
|
|
| Resource Sharing Request | Initiate a resource sharing borrowing request on the title. Opens the Resource Sharing Borrowing Request page (see Adding a Resource Sharing Borrowing Task from a Search). This action appears only if you have one of the roles Fulfillment Services Operator or Fulfillment Services Manager in the scope of the resource sharing library. | |
| Document Delivery | Initiate a resource request for this title. Opens the Create Request page in a slidin panel (see Creating a Request). | |
| Add to Reading List | When reading lists are assigned to you, use this option to add titles to those assigned reading lists. See Managing Reading Lists for more information. | |
| Push to MDE | Use this option to push the record to Metadata Editor to reference and work with it there. See Pushing Records to Metadata Editor. | |
| Add Holdings | Select to add new holdings. The MD Editor opens and you can add a new holdings record related to the bibliographic record from which you selected this option. The attached bibliographic record does not open, so there is no additional step to release the bibliographic record when you finish creating the new holdings record. | |
|
View the electronic service associated with this title. This opens the Alma Link Resolver Electronic Services page. To view more than a maximum of 25 entries, enable the enable_view_it_show_all_results customer parameter to show all entries. With this parameter enabled, the View It feature provides a Show All link to display all the resources. For more information regarding the Alma Link Resolver Electronic Services page, see Link Resolver for Institutions Using Distributed Electronic Resources.
To enable direct linking to electronic services via Alma Link Resolver Electronic Services, see Configuring Direct Linking.
|
||
|
Add to Collection
|
Add the title to a collection. This action appears only if you have collections configured. For more information refer to Managing Collections. |
|
| Add Reminder | Create and edit reminders for the bibliographic record by entering the following pieces of information:
For more information, see Working with Reminders.
|
|
| Add Representation | Add representation. Opens the Representation Details page. For more information, see Managing Digital Resources. | |
| Release Assignment | Release the bibliographic record if it is assigned to another staff user. If you want to remove all bibliographic record assignments for a particular staff user, see MD Editor Menu and Toolbar Options. This action appears only if you have the role Catalog Manager. | |
| Add Local Portfolio | Opens the New Portfolio form in a sliding panel. | |
| Display in Discovery | Use this option to open the title in Primo’s Full Display page.
This option is only presented when Primo VE is installed.
|
|
| Display Services Page | Use this option to open the title in Primo's Services page.
This option is only presented when Summon over Alma is installed.
|
|
| Linked Data | View linked data such as URI information generated from linked authority records in a sliding panel. See Using Linked Data from the Repository Search Results below for more information. | |
| View Work | View BIBFRAME instance records enabling users to navigate to the details page of the linked work within a sliding panel. In the sliding panel users have the ability to view instances and further details regarding the Work. | |
| Physical Titles | Physical Publishing Information | View publishing information by the record's physical inventory. Opens the Publishing Information page with the following information (available explicitly for General System, Repository, and Catalog Administrators, and Deposit Managers):
Learn about debugging publishing information in the Debugging Publishing Information video (1:52 mins).
|
| Electronic Titles | Electronic Publishing Information | View publishing information by the record's electronic inventory. Opens the Publishing Information page that provides the following information (available explicitly for General System, Repository, and Catalog Administrators):
Learn about debugging publishing information in the Debugging Publishing Information video (1:52 mins).
If the institution is publishing at the campus/symbol level, in addition to the record ID you also need to specify the campus/symbol for which you want to see the publishing information. |
| Digital Titles | Digital Publishing Information | View publishing information by the record's digital inventory. Opens the Publishing Information page that provides the following information (Available explicitly for General System, Repository, and Catalog Administrators, and Deposit Managers):
Learn about debugging publishing information in the Debugging Publishing Information video (1:52 mins).
If the institution is publishing at the campus/symbol level, in addition to the record ID you'll also need to specify the campus/symbol for which you want to see the publishing information. |
|
Community Search Scope
|
The community search scope is available in the All Titles and Electronic Titles searches.
|
|
|
Edit Record
|
Open the community record in the Metadata Editor to edit the community record itself or add local extension fields to it.
See Community Zone Contribution Guidelines and Contributing to the Community Zone – Bibliographic Records
for more details on editing community records. |
|
|
Push to MDE
|
Use this option to push the record to Metadata Editor to reference and work with it there. See Pushing Records to Metadata Editor.
|
|
|
View Record
|
Opens the Record View of the bibliographic record in a sliding panel.
|
|
|
Order
|
Initiate a purchase order. Opens the PO Line Owner and Type page (see Creating PO Lines).
When you place orders for electronic resources (from bibliographic-/title-level search results) that contain multiple URLs (856 $u fields), Alma creates a portfolio for each URL.
|
|
|
Resource Sharing Request
|
Initiate a resource sharing borrowing request on the title. Opens the Resource Sharing Borrowing Request page (see Adding a Resource Sharing Borrowing Task from a Search). This action only appears if you have one of the roles Fulfillment Services Operator or Fulfillment Services Manager in the scope of the resource sharing library.
|
|
|
Link
|
Create new local record linked to the existing community record.
|
|
|
Copy to Catalog
|
Copy the community record to a new local record without linking the records, or unlink local record from the community record.
|
|
|
Copy to Network
|
Copy the community record to a new network record without linking the records, or unlink network record from the community record.
|
|
|
Add Local Portfolio
|
Opens the New Portfolio form in a sliding panel.
|
|
|
Network Search Scope (consortia members)
|
The network search scope is available for members of consortia with a shared catalog, in the All Titles and Electronic Titles searches.
|
|
|
Edit Record
|
Open the network record in the Metadata Editor to edit the network record itself or add local extension fields to it.
|
|
|
Push to MDE
|
Use this option to push the record to Metadata Editor to reference and work with it there. See Pushing Records to Metadata Editor.
|
|
|
View Record
|
Opens the Record View of the bibliographic record in a sliding panel.
|
|
|
Order
|
Initiate a purchase order. Opens the PO Line Owner and Type page (see Creating PO Lines).
When you place orders for electronic resources (from bibliographic-/title-level search results) that contain multiple URLs (856 $u fields), Alma creates a portfolio for each URL.
|
|
|
Resource Sharing Request
|
Initiate a resource sharing borrowing request on the title. Opens the Resource Sharing Borrowing Request page (see Adding a Resource Sharing Borrowing Task from a Search). This action only appears if you have one of the roles Fulfillment Services Operator or Fulfillment Services Manager in the scope of the resource sharing library.
|
|
|
Link
|
Create new local record linked to the existing network record.
|
|
|
Copy to Catalog
|
Copy the network record to a new local record without linking the records, or unlink local record from the network record.
|
|
|
Add Reminder
|
Create and edit reminders for the bibliographic record by entering the following pieces of information:
For more information, see Working with Reminders.
|
|
|
Add Local Portfolio
|
Opens the New Portfolio form in a sliding panel.
|
|
|
Linked Data
|
View linked data such as URI information generated from linked authority records in a sliding panel. See Using Linked Data from the Repository Search Results below for more information.
|
|
| Physical Holdings | Add Item | Create a new physical item for the holdings record, opening the item editor in the sliding pane that opens on top of the current page. |
| Add Item from Template | Add one or more physical items for the holdings record, using a template. | |
| View Holdings | View the record in the sliding pane that opens on top of the current page. | |
| View Title | Opens the details pane of the holdings' bibliographic record in the sliding pane that opens on top of the current page. | |
| Edit Holdings | Edit the record in the Metadata Editor. | |
| Push to MDE | Pushes the selected record the the Metadata Editor in order to work with it later. | |
| Relink | Move the holdings record from one bibliographic record to another bibliographic record. | |
| View Items | Opens the list of items for the record in the sliding pane that opens on top of the current page. | |
| Associate a PO Line | Associates a PO line to the record. | |
| Add New Holdings | Opens a new holdings record for the bibliographic record of the selected holdings record. | |
| Delete Holdings | Deletes the record. | |
The Details Pane
The Details pane displays information about the currently selected record, and provides a number of convenient features for processing the record and its inventory. It is divided into sections for enhanced navigation and usability, appearing when relevant and collapsible by the user - sections are further described below.
|
Sections: |
Details Pane Sections
|

Performing Actions
Users can perform a series of actions directly from the details pane toolbar.
The actions that appear depend upon the search type and the roles of the user. Not all actions appear for all users.
For detailed information on the actions, see Performing Record Actions on the Repository Search Results Page.

Previous/Next Buttons
Users can seamlessly navigate between bibliographic records of search result items by utilizing the Previous ( ) and Next (
 ) buttons in the toolbar - in both the split view and the full view.


Metadata Sections
Summary
Includes the record's title, creator, imprint and MMS ID information, along with links to related records, courses, and licenses (if applicable).
If the record is a linked community record, or a network record in consortia members, a link to the record's community/network view is also provided here.

General Information
The General Information section includes essential metadata that librarians may need to access easily.
Librarians with the appropriate roles and privileges can suppress the record using the checkboxes in this section. For more information, see Suppress from Discovery.

Bibliographic Record
Displays the complete bibliographic record, enabling librarians to review it directly from the search results. With convenient up/down arrow navigation between records, librarians can easily compare search results and identify the correct record to work on.
The Bibliographic Records are color-coded for easy review of fields and subfields.
The RDF/XML section is disabled by default. For users who use BIBFRAME and prefer the RDF/XML view, the section can be enabled from the customization wheel  > User Customization > Sections Customization > select Instance RDF/XML.

Inventory Sections
The inventory sections display the record's inventory, enabling librarians to review and perform actions directly from the search. These sections include:
- A list of inventory by type (holdings, items, electronic portfolios, electronic collections, representations), showing the count of entities of each type associated with the record.
- The first five entities of each type, with pagination to navigate the rest if applicable.
- Search and navigation capabilities.
- Export to Excel functionality.
- The ability to perform row actions on inventory directly from the title search.

Export, Generate Search and Actions capabilities - Electronic Portfolios Section

Internal Searching, Pagination and Actions Capabilities - Items Section

Holdings
The Holdings section includes a list of all the title's Holdings records as well as the option to:
- Search by
 :
:
- Call Number
- Library
- Location
- Sort the holdings (a preference remembered for both the holdings section and the holdings tab in the list of results) by:
- Alma Ranking
- Related Records First
- Related Records Last
- Export the holdings to Excel
 — For more information, see Export to Excel.
- Add a new holdings record — Opens the Metadata Editor with a new Holdings record.
- View the full holdings list in a sliding panel
- Generate a new holdings search by the bib record's MMS ID

The following actions are available from the row actions button, according to the user's roles and privileges ( ) - for more information on these actions, see Working with Holdings Records:
- Edit — Edit the holdings on the MD Editor page.
- View Holdings — Open the full holdings details, enabling the user to view the metadata record and related items.
- Relink — Relink the holdings record to a bibliographic record in the MD Editor in split view.
- View Items — View the items that are associated with the holdings record on the List of Items page. For more information, see Working with the List of Items.
- Push to MDE — Push the holdings to the MD Editor page in order to work with it later.
- Associate a PO Line — Associate a PO line with the holdings.
- Add Item — Add a physical item to this holdings record. For more information, see Adding a Physical Item to an Existing Title.
- Add Item from Template — Add item records from a template. For more information, see Working with Item Templates.
- Delete — Delete empty holdings records. If this is the last holdings record on the bibliographic record, you are prompted to decide how to treat it if it has no other inventory before confirming. Note: You cannot delete Holdings records that contain items.
Items
The Items section includes a list of all items of the bibliographic record as well as the option to:
- Search by :
- Barcode
- Call Number
- Description
- Sort the items in ascending/descending order by:
- Library/Location
- Description
- Temporary Location
- Status
- Process Type
- Receiving Date
- Export the items to Excel — For more information, see Export to Excel.
- Select the Barcode to open the physical item editor in a sliding panel in view/edit mode according to the user's permissions.
- Select the location to view the holdings record in a sliding panel.
- View the full items list in a sliding panel.
- Generate a new items search by the bib record's MMS ID.

The following actions are available from the row actions button, according to the user's roles and privileges () - for more information on these actions, see Working with Items:
- Edit Item — Edit the item in the Physical Item Editor sliding panel.
- Duplicate — Duplicate the item using the Physical Item Editor sliding panel.
- Change Location — Submit a permanent or temporary move item request.
- Work Order — Create a work order for the item. For more information, see Creating a Work Order Request.
- Withdraw — Delete the item - if this is the last item of the holdings record, you are prompted to decide how to treat the holdings and bibliographic record (if it has no other inventory) before confirming.
- Toggle Missing Status — Toggle the item between Item in place and Missing.
- View Holdings — Open the full holdings details, enabling the user to view the metadata record and related items.
- View holdings' items list — View the List of Items that belong to the same holdings record as this item.
Electronic Portfolios
The Electronic Portfolios section contains the following information:
- Indication of the electronic portfolio availability based on portfolio and service status, indicating whether it's accessible to patrons.
This availability is also added to the Excel created when exporting the electronic portfolio.
- Select the Active/Inactive status toggle to update the status (if you don't have permissions, the toggle is view-only).
- Select Portfolio ID to open the Electronic Portfolio Editor in view/edit mode according to the user's permissions. For more information, see Editing a Portfolio Using the Electronic Portfolio Editor.
- Select Service Type to open the Electronic Service Editor in view/edit mode according to the user's permissions. For more information, see Modifying an Electronic Service.
- Select Collection Name to open the Electronic Collection Editor in view/edit mode according to the user's permissions. For more information, see Modifying an Electronic Collection.
- Export the portfolios to Excel — For more information, see Export to Excel.
- Add a Local Portfolio to the title.
- View the full portfolios list in a sliding panel.
- Generate a new portfolios search by the bib record's MMS ID.

The following actions are available from the row actions button, according to the user's roles and privileges () - for more information on these actions, see Managing Electronic Resources:
- Edit Portfolio — Opens the Electronic Portfolio Editor to edit the portfolio record. For more information, see Editing a Portfolio Using the Electronic Portfolio Editor.
- Link to Community — Link the portfolio to the Community Zone. For more information, see Link to Community.
- Create E-Activation Task — Create an electronic activation task for the resource. For more information, see Create E-Activation Task.
- Order / Additional Order — Open the PO Line Owner and Type page to initiate a purchase order (see Creating PO Lines). This includes the ability to order a portfolio from an e-collection that is already locally activated. For more information, see Order.
- Test Access — Test the access to an electronic portfolio. For more information, see Test Access.
- Delete Portfolio — Delete a local portfolio or a portfolio that is linked to the Community Zone. If this is the last portfolio on the bibliographic record, you are prompted to decide how to treat it if it has no other inventory before confirming.
- Report To Clarivate — Send a portfolio update, add, remove, or coverage request to Clarivate. See also Report to Clarivate.
- Make Available/Not Available — Activate or Deactivate the portfolio (this can also be done using the portfolio status toggle).
Electronic Collections
The Electronic Collections section contains the following information:
- Select Collection ID to open the Electronic Collection Editor in view/edit mode according to the user's permissions. For more information, see Modifying an Electronic Collection.
- Select Service Type to open the Electronic Service Editor in view/edit mode according to the user's permissions. For more information, see Modifying an Electronic Service.
- Select Portfolio List to view the collection's portfolio list in a sliding panel (for collections that contain electronic portfolios).
- Export the electronic collections to Excel — For more information, see Export to Excel.
- Generate a new electronic collections search by the bib record's MMS ID.

The following actions are available from the row actions button, depending on the collection type and according to the user's roles and privileges (). For more information on these actions, see Managing Electronic Resources:
- Edit Electronic Collection — Opens the Electronic Collection Editor to edit the portfolio record. For more information, see Modifying an Electronic Collection.
- Edit Service — Opens the Electronic Service Editor. For more information, see Modifying an Electronic Service.
- Create E-Activation Task — Create an electronic activation task for the resource. For more information, see Create E-Activation Task.
- Order / Additional Order — Open the PO Line Owner and Type page to initiate a purchase order (see Creating PO Lines).
- Delete Electronic Collection — Delete the electronic collection. If this is the last electronic collection on the bibliographic record, you are prompted to decide how to treat it if it has no other inventory before confirming. If the collection has portfolios, this triggers a portfolios deletion background process.
- Publishing Information — View the publishing information for the collection in a sliding panel.
- Edit Full Text Portfolios — Opens the Service Editor Portfolios tab in a sliding panel.
- Report To Clarivate — Send a portfolio update, add, remove, or coverage request to Clarivate. See also Report to Clarivate.
Digital Representations
The Representations section contains the following information:
- Select the Representation ID to open the Digital Representation Resource Editor in a sliding panel.
- Select Viewer to open the representation in a digital viewer in a new browser tab.
- Select Files to display the files of the representation in the Digital Representation Resource Editor in a sliding panel.
- Export the representations to Excel — For more information, see Export to Excel.
- Select Add representation to open the Representation Details page in a sliding panel.
- Select View full representations list to display the representations in the Digital Resource Editor's Representations tab in a sliding panel.

For more information, see Editing Representation Metadata and Content
The following actions are available from the row actions button, depending on the collection type and according to the user's roles and privileges ():
- Edit — open the Digital Representation Resource Editor in edit mode.
- View — open the Digital Representation Resource Editor in view mode.
Collections
Shows any collections that the title belongs to, if exists. The Collections section contains the following information:
- Select Collection ID to open the Collection Resource Editor in a sliding panel.
- Export the collections to Excel — For more information, see Export to Excel.
- Whether the collection is a logical collection (where the title list is managed automatically).
- Add to collection — opens the list of collections in a sliding panel. Select a collection to add the title to it.

For collections that are not logical collections, the following actions are available from the row actions button according to the user's roles and privileges ():
- Remove — removes the title from the collection.
- Replace — opens the collections search in a sliding panel, to select a collection to move the title to.
Enhanced Navigation and Linked Open Data Sections
The Linked Open Data and navigation features in the titles search aim to help librarians easily access related information in external resources or their own catalog, such as linked authority records, information on Names, other titles on the same subjects, etc.
For Consortia
When working in a network, the navigation and linked open data is derived according to the record's position, so that:
- For network records, the information on linked authority records comes from the network, and searches for records linked to the same contributor or subject are done in the network catalog.
- For local records maintained by the member, the information on linked authority records comes from the local catalog, and searches for records linked to the same name or subject are done in the institution's catalog as well.
Names Section
The title search uses the creator and Names' bibliographic headings to clearly display information for the librarian, including:
- An info card containing linked data from external resources, when available.
- A link to a contributor page with detailed information from both external resources and the local catalog, when available.
- Information on linked authority records and headings, if they exist, selecting Search Heading opens the linked authority record in a sliding panel.
- Easy navigation to search the catalog for more resources connected to the Names index:
- If the bibliographic heading is linked to an authority record, the search returns bibliographic records with headings linked to the same authority record.
- If the bibliographic heading is not linked to an authority record, the search returns bibliographic records with headings of the same type and vocabulary containing the same text.
- Search Name — triggers a Names equals search on the normalized value of the bibliographic heading, in the "Names" index.

|
The Linked Data Info Card provides more information on a person. It combines data from the Library of Congress Name Authority and Wikidata. If an info card is available (determined by the linked authority record), the contributor’s name includes an additional oval and card icon (
Info Card - popup
Info cards and Names pages are only shown if the record is linked to an authority for which Alma has relevant information to display. The Info Card link is displayed in the following scenarios:
In future releases, this will be expanded to other vocabularies. The Linked Data Info Card can appear in two places:
The link to the Linked Data Info Card works the same in both the Summary and Names sections. When selecting the card icon a popup window appears displaying information pertaining to the heading, taken from Wikidata and LCNAMES. Users are presented with a link to Wikidata within the Linked Data Info Card. Upon selecting the Wikidata link, a new tab in the browser opens with the relevant Wikidata entry. Linked Data Info Card displayed
Wikidata page displayed in new browser tab
The Search Heading link can be accessed from:
Info Card - Names Section - Search Heading
View Contributor Page When available, the Contributor Page displays detailed information from both external resources and the local catalog. New for May! When enabled (see Configuring Other Settings), the Contributor Page is displayed in the user's interface language, when available. The page is displayed in a sliding panel. The View contributor page link is displayed in the following scenarios:
The Contributor Page link can be accessed from the Names section.
Accessing the Contributors Page
From the Contributor Page, users can:
Contributors Page
|
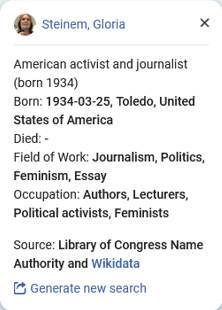


Notes Section
The Notes section enables catalogers to quickly review notes in all types of Title (All, Physical, Electronic, Digital), as well as Physical Holdings search results, assisting users to identify records requiring attention, without needing to open the Metadata Editor. Only users with cataloging privileges can see the Notes section. Users without these privileges cannot see an indication that there are notes. They also cannot see the notes in the customization of records, tables, and sections.
Behavior for Consortia and Community Zone institutions:
Consortia
- When a note is added to a Network Zone (NZ) record by a member or NZ staff, it is visible and manageable across institutions in the NZ search scope. Both the NZ institution and other member institutions display a note indication when searching in the network scope, and the notes section is accessible.
Community Zone
- For institutions not defined as Community Zone (CZ) contributors, the notes indication and section are not displayed. When a user adds notes to CZ records, other users within the same institution, as well as users from other institutions, can view these notes when searching in the community zone scope.
For more information on existing Notes functionality in the Metadata Editor, see Navigating the Metadata Editor Page.
The Notes section features include:
- Note display with details (creator, date, and content)
- Sorting by date added, date updated, and note (in ascending or descending order)
- Search options by creator, updater, and note content
- Additional functionalities include refresh, export to Excel, layout options (list or note view), and pagination (up to five notes per page)
- Only notes that the user has permission to view in the Metadata Editor are visible in the search results. If a record is locked for editing or the user lacks access to open it in the Metadata Editor, the notes section is not displayed.
Users with existing permissions to delete notes also have the ability to update them. If a note is updated, the update date and updating cataloger are presented in the notes section and the Metadata Editor.

Subjects Section
The right pane includes a new section for subjects, clearly displaying subject bibliographic headings, including:
- Information on fully or partially linked authority records, if they exist, selecting the binoculars icon opens the linked authority record in a sliding panel.
- Easy navigation to search the catalog for similar resources:
- Search Heading — triggers a search in the Heading Information search index:
- If the bibliographic heading is linked to an authority record, the search returns bibliographic records with headings linked to the same authority record.
- If the bibliographic heading is not linked to an authority record, the search returns bibliographic records with headings of the same type and vocabulary, containing the same text.
- Search Subject — triggers a Subjects equals search on the normalized value of the bibliographic heading, in the Subjects index.
- Search Heading — triggers a search in the Heading Information search index:

Other Details
The Other Details section contains the following information:
These fields are included in the search export to Excel. For more information, see Export to Excel.
- Number of Loans
- Number of In House Uses — Number of times item has been scanned in without it being in process or on loan.
- Year-To-Date Loans — Completed Loans. This only concerns loans for the current year.
- Completed Requests — Number of times this item has been requested.
- Link Resolver Usage (Access) — Counter that indicates how many times patrons accessed electronic services. This counter represents portfolio services only.
- Link Resolver Usage (Appearance) — Counter that indicates how many times patrons were shown electronic service. This counter represents portfolio services only.
- Last Loan Date
- Last In House Use Date
- Courses
- Licenses
- Orders
- Related Records
- Reminders
- Requests
- Publishing Information according to inventory type
- Publishing Information for Physical Inventory
- Publishing Information for Electronic Inventory
- Publishing Information for Digital Inventory
- Publishing Information for Collection Inventory

Quick Access
The Quick Access module gives you quicker access to specific actions, fields or sections inside the details pane.
For more information, see Quick Access Module.

The Resource Type Field
- Rules Used to Create the Resource Type Field – MARC 21/KORMARC and UNIMARC
- Rules Used to Create the Resource Type Field – CNMARC
- Rules Used to Create the Resource Type Field – Dublin Core

Material Types in Search Results
- Books
- Journals
- Computer files
- Maps
- Music records
- Visual materials
- Mixed materials
| Scope of the Bibliographic Format |
|---|
|
MARC 21 Format for Bibliographic Data is a carrier for bibliographic information about printed and manuscript textual materials, computer files, maps, music, journals, visual materials, and mixed materials. Bibliographic data commonly includes titles, names, subjects, notes, publication data, and information about the physical description of an item. The Alma Bibliographic Formats described below are built according to the official Bibliographic Formats in MARC as described at https://www.loc.gov/marc/bibliograph...e/bdintro.html. The bibliographic format contains data elements for the following types of material:
|