
Receiving Physical Material
This page gives instructions for receiving physical items. For a high level overview of the receiving material workflow see Receiving Material. For a list of links to pages with instructions for purchasing in Alma including creating PO lines, renewals, working with vendors, etc., see Purchasing. For the overall end to end purchasing workflow see Purchasing Workflow. For an overview of working with acquisitions in Alma, including links to relevant sections such as Infrastructure, Invoicing, etc., see Introduction to Acquisitions.
When receiving an item follow the instructions in the sections below for Receiving One Time Physical Material and Receiving Continuous Material.
Do not add the Receiving Date manually to the item; it will be added there automatically when you follow the correct workflow.
- Receiving Operator
- Receiving Operator Limited
The following diagram illustrates the workflow:

| Type | Description | Where received |
|---|---|---|
| One-Time | Receipt of material for a PO line that is not repeated on a frequent or regular basis.
When a PO line expects multiple items, the PO line is not fully received until all items are received. If the remaining items are not received for some reason, remove the items from the PO line and from the inventory and then re-receive the previously received items.
|
See Receiving One-Time Physical Material, below. |
| Continuous | Receipt of material for a PO line, repeated on a regular basis. The material must be connected to an existing holding and can be magazines, periodicals, and so forth. To more easily manage receiving serials, see Prediction Patterns.
For handling items with different receiving intervals, see the explanation for the Technical acquisition method in Acquisition Methods.
|
See Receiving Continuous Material, below. |
| Standing order |
Receipt of material for a PO line, issued as needed on an infrequent or irregular basis. For example, a Standing Order PO line is used for purchasing all the printed books by a particular author when they are published, or where a series of books are being published, but not necessarily on a regular basis. The holdings for this type of PO line are updated upon the receipt of the material. When receiving standing order material, note the following:
|
To receive a physical monograph standing order, see Receiving Physical Standing Order Monograph Material, below. Physical standing order non-monograph material is handled the same as continuous material (see Receiving Continuous Material). |

The page contains the same table in the One-Time and the Continuous tabs, with the following exceptions in the Continuous tab:
- There is no checkbox preceding the PO line numbers.
- There is no Items Received column.
You can also Save and Receive from the Physical Item Editor in some cases. For details see Updating Item Level Information.
Prerequisites to Receiving New Physical Material
You can also configure the receiving department to be managed by a circulation desk.
- A regular Receiving department can serve other libraries as defined in "Served Libraries" tab. The default is the library that owns the department but it can be extended to all other libraries. This means that a department can receive items belonging to the libraries that this departement serves, and receive items from PO Lines owned by these libraries.
- A receiving department that is managed by a circulation desk can receive items that are owned by the library of this circulation desk, or any items belonging to the library that are owned by the circulation desk.
Receiving One-Time Physical Material
- Ensure that you are at a receiving department.
- On the Receive New Material page (Acquisitions > Receiving and Invoicing > Receive), open the One-Time tab.
- Locate the PO line you want to receive, using the controls below:
Find PO Lines for fields on Receive New Material page Field Description Shelf ready (on the top bar) If you have a shelf-ready item, select the Shelf Ready option on top of page and scan the barcode of the item (see Scanning Items). This opens the order in the Received Items List, from which you can receive it (see How to Receive One-Time and Continuous Orders). In the field that opens, enter a barcode or search for the item. See Searching in Alma. If you have RFID installed and an active RFID connection, you can scan the RFID. For more information about RFID, see RFID Support.
If the entered value was not found as a barcode in Alma, Alma will try to search by other parameters (without priority between them):
- Call number/ temporary call number
- Title
- ISSN
- ISBN
- Creator
Search Select the appropriate attribute, enter the value to search by, and select
 Search.
- When searching for an invoice number, select Invoice Number instead of All.
- Searching for Common Fields includes the following fields: Vendor reference number, PO line (number), Additional PO line reference, Title, Standard number, and Vendor title number.
Filter PO lines by vendor / Filter PO lines by owning library Select a vendor from which you anticipate receiving the material or by the inventory owning library to display all PO lines associated with it.
The displayed list of vendors includes only the vendors that are assigned the role of Material Supplier/Subscription Agent.Filters Status The status of the PO lines. For the list of statuses, see Searching for PO Lines. - Items with status of In Transit retain their status until they are scanned at the target location. If the item’s location is the shelving library, the item retains its status until it is scanned at the primary circulation desk.
- You can receive items for Closed PO lines, for example for magazine subscriptions that are fully paid but for which the last issue has not yet been received.
- A PO line with the status Waiting for Invoice (meaning all of its associated items were received) appears only if it contains items that were received with the Keep in department option selected.
The default value is the value of the user’s most recent search.Locate Display PO lines by one of the below:
- Order lines – Find PO lines that match the search criteria (default)
- Entire PO content – Find PO lines that are packaged in the same PO as the PO lines that match the search criteria
When using this filter, the search results will be limited to 1000 PO's.
Orders with interested users Display PO lines that have interested users. These are indicated in the table by a yellow checkmark in the Interested Users column. Orders with patron requests Display PO lines that have patron requests. This option appears only for one-time orders.PO lines that are fully received and do not require additional tasks to be performed (on the In Process Items page) do not appear on the Receive New Material page. - Select the item(s) you want to receive.
To display the Notes or Interested Users tab for the PO line, select the checkmarks in the Notes or Interested Users column (see the Navigate to Notes During Receiving video (1:47 mins).
-
Optionally - In the page header, indicate the next step for the selected item(s) after it is received:
To: Do: Indicate that further work is required before the material can be made available in a library.
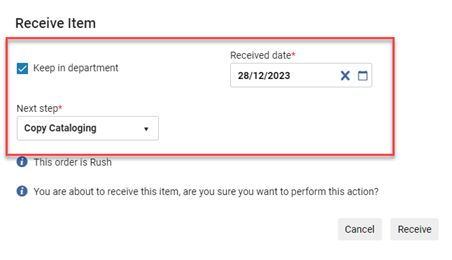
Select Keep in department.
When you select this option, an Acquisition Technical Services work order is created (the default work order type), and the Next step field appears. Note that the values shown in the Next step field in the dialogue window correspond to the Currently At department. Select the next step for the item after it is received. The available options are the statuses configured for the Acquisition Technical Services work order, which by default are items that require further processing. For more information on these options, see Post-Receiving Processing.
Items that require further processing can be viewed:
- On the In Process Items page, using Acquisitions or Fulfillment (see Processing Materials).
- By selecting the task Other Requests - Digitization requests - approval in the Tasks List in the persistent menu (see Tasks in the Tasks List).
Interested users (for information on Interested Users, see Manually Creating a PO Line):
- Interested users receive the 'Interested In Letter' when:
- The Next step selection is complete and the item leaves the department.
- Selecting Done in the row actions for Continuous material on the In Process Items page (see Post-Receiving Processing).
- If there are holds on the item, you will get a notification if that item has a hold. When you receive multiple items at once and some of them have hold, you will get a generic message that notifies you about it.
Indicate that further work is not required and the item can be sent to the library. Clear Keep in department.
The item is now ready for shelving. The following happens:
- The PO line status changes to Transit to indicate that it is ready to be shelved in the library.
- Interested users, if such were indicated on the PO line, receive notifications that the item is available.
- In your discovery system the item becomes available (unless there is a hold request on the item, in which case the item goes to the Hold shelf).
- In the Received Date field (on the page header), indicate the reception date (defaults to today’s date).
When performing the receive operation in a PO line, a dialog box displays enabling you to update the receiving information. The receiving alerts are also displayed in the dialog box. See also Modifying Physical Item Information.
-
To receive items, do as follows:
When: Do: You are receiving all the items that were ordered on the PO line - To receive all the items under a single PO line, select Receive in the row actions list
- To receive items located under multiple PO lines, select the checkboxes for the PO lines you want to receive, and then select the Receive page action.
- To receive all PO lines currently shown on the page, select the Receive All button. Select Confirm in the confirmation message that appears. If a filter is applied, only those PO lines that match the filter are received. The PO Line - Receive All job runs.
Only the checkboxes for the PO lines that can be received are active. All other checkboxes are unavailable.
When you receive all items ordered on the PO line, the status of the PO line becomes 'Waiting for Invoice', or if the invoice has arrived, becomes 'Closed'.
You are receiving only some of the items that were ordered on the PO line You can receive the items that did arrive, while other items will remain as not received, until the time they do arrive.
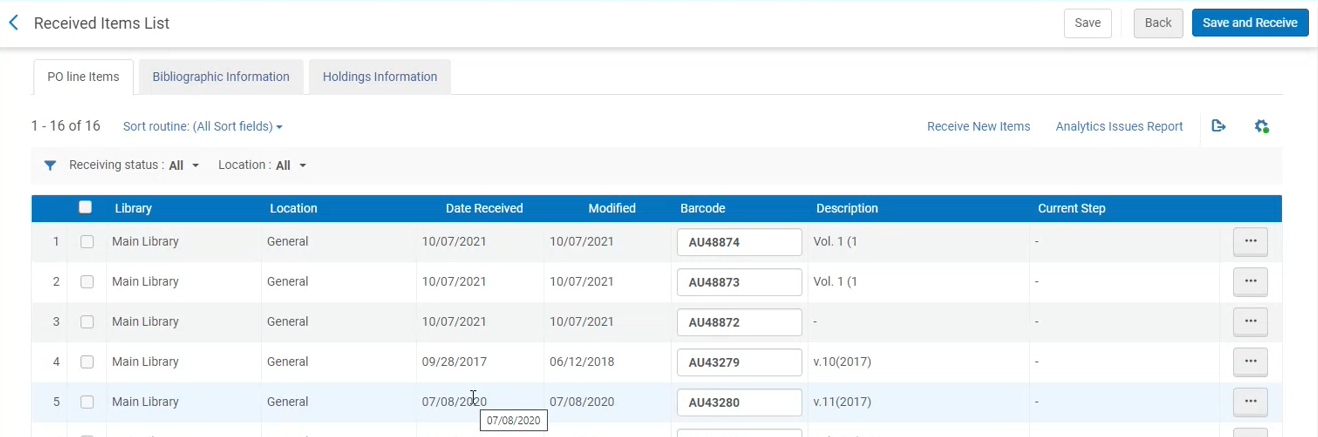
- Locate the PO line you want to receive and select Manage Items in the row actions list. The Received Items List opens that displays all the items listed on the PO line.
- Select the checkboxes for the items you want to receive and select Save and Receive.
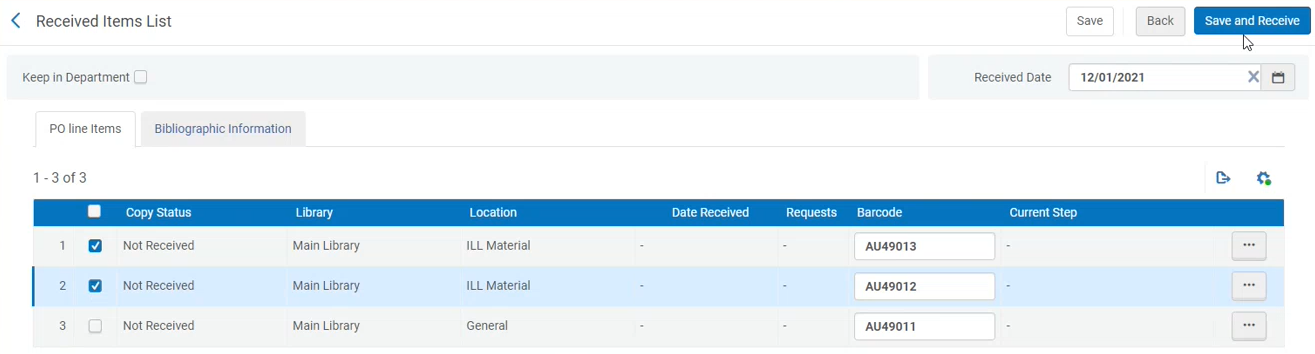
- Return to the Receive New Material page. On this page, you will see that the number of items ordered and of items received is now different.

- Once you have received the missing item, go back to the Received Items List and indicate it as received.
When you do partial receipt, the status of the PO line remains as it was before the current receiving process started.
- If there are any warnings on the items, a confirmation dialog box opens. Select Confirm. An administrator can configure the validations; see Configuring Receiving Departmental Validations. The item is received.
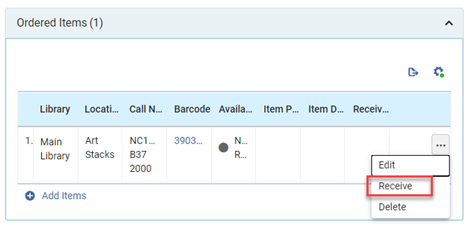
It is also possible to receive a specific item in the Ordered Items section of the PO line by selecting Receive from the row actions menu.
Alternatively you can receive an item using the Save and Receive button when editing the item.

Receiving Continuous Material
When a new continuous PO line arrives to the receiving work bench, its status is either Waiting for Manual Renewal or Recurring Renewal (if the PO line is being renewed automatically).
To receive new continuous physical material:
- On the Receive New Material page (Acquisitions > Receiving and Invoicing > Receive), open the Continuous tab.
- Locate the PO line which contains the items you want to receive, using the controls in the table above.
-
To receive a new item that arrives, do one of the below:
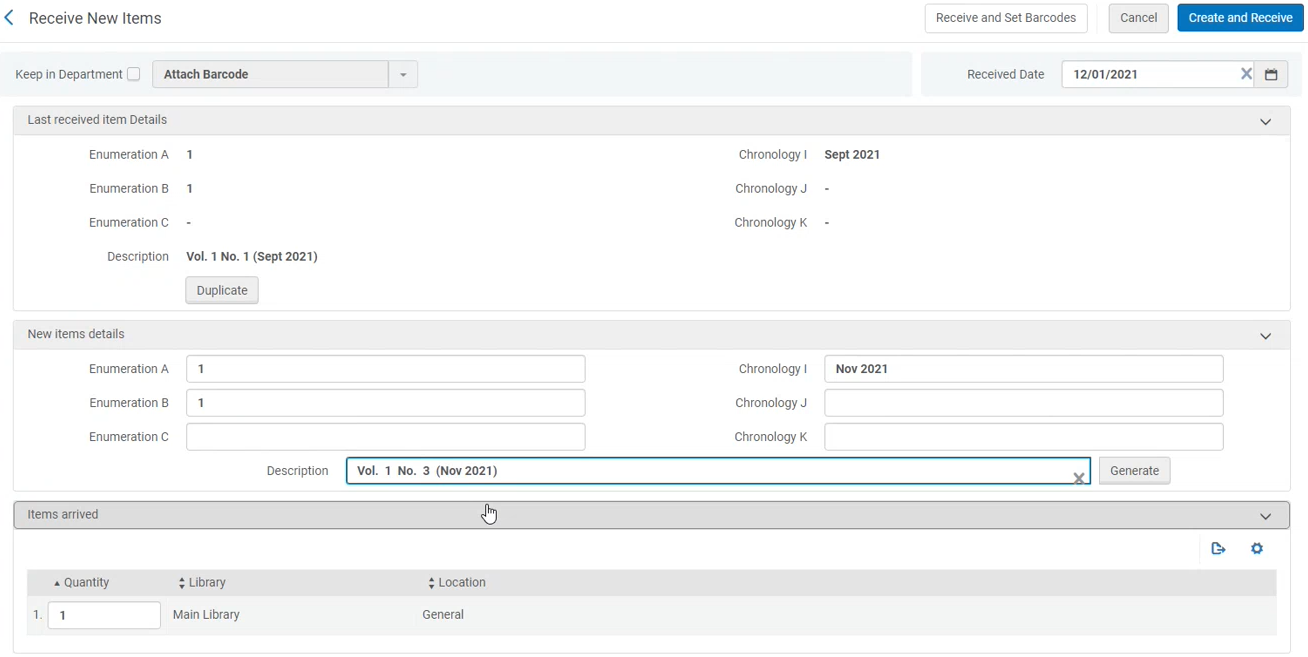
To: Do: Each time a new item arrives (every week, month, etc.), create it in Alma and receive it. - Select Manage Items in the row actions list.
- In the Receive New Items page that opens, select Receive New Item.
- A page opens where you can create a new item. Select Duplicate to create the new item on the basis of the most recent existing item. Provide all the necessary information and select Create and Receive or Receive and Set Barcode, as relevant. For details, see Creating a New Continuous Item, below.
Create a prediction pattern of items expected to arrive throughout the year, and receive each item as it arrives. - Select the link in the Item Description column.
- In the Record View that opens, select Push to MDE.
- Proceed as instructed in Prediction Patterns.
- Once created, return to Receive New Items, find the item with today's date and select Receive in the row actions.
In both cases, the status of the PO line does not change for the continuous items, it continues to be Waiting for Manual Renewal or Recurring Renewal (if the PO line is being renewed automatically). -
Optionally - For the item you just created, select the next step. In the header of the Receive Item List, indicate the following information:
To Do: Indicate that further work is required before the material can be made available in a library. Select Keep in department. For details, see Keep in Department above. Indicate that further work is not required and the item is shelf ready. Clear Keep in department. -
In the Received date box (in the page header), indicate the reception date (defaults to today’s date).
-
Select Save to save and return to the Receive New Material page. The item is received.
Managing Items When Receiving Continuous Material
When receiving continuous material, you can view details of the PO line and manage each of the PO line's items. For example, you may want to configure what happens to the items after they are received, mark an item as received, or change the permanent location of one of the items.
- Select Manage Items in the row actions list to view details of a PO line. The Received Items List page appears.
- You can do the following on the Received Items List page:
To: Do: View bibliographic record information about the ordered item Open the Bibliographic Information tab. When enabled, holdings information may also appear; see Viewing Holding Information.
Edit the inventory for a PO line item Select Edit inventory item in the row actions list for the appropriate PO line item. The Physical Item Editor page appears, where you edit the item details as needed and select Save. For more information, see Updating Item-Level Information. For example, you may want to edit the permanent location of one of the items. Move the PO line to Claims If the expected receiving date of an item has passed and the item has not been received and the PO line is not already in Claim, select Claim Missing Items to move the PO line into Claim. The PO line moves to Claim and Claim Missing Items action no longer appears. 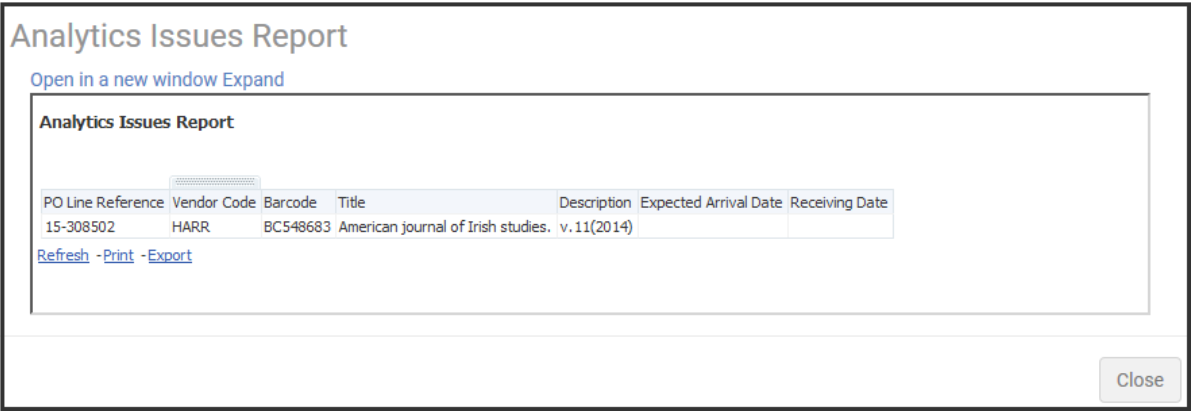 For information on configuring sort routines, see Configuring Physical Item Sort Routines.
To view a Missing Issues report of non-received items for this PO line Select Analytics Issues Report. In the report:
- Select Open in a new window to open the report in a new tab,
- Expand to open the report in Analytics to change the report parameters,
- Close to close the report.
-
Select Back to return to the Receive New Material page.
Creating a New Continuous Item
- Select Manage Items in the row actions list.
- In the Receive New Items page that opens, select Receive New Item.
- A page opens where you can create a new item. In the New Item Details area, enter cataloging details for the new item in the Enumeration and Chronology fields, as required. The following table shows sample values for the Enumeration and Chronology fields:
New Items Details Fields Field Value Enumeration A Vol.1 Enumeration B Qtr. 2 Enumeration C Part 1 Chronology I 2012 Chronology J April Chronology K 1 - When these values are entered, select Generate to create a description in the Description field using the entered values, as follows: Vol. 1 Qtr. 2 Part 1 2012 April 1
- If no value is set for Description, the item is treated as a monograph.
- If a value is set for Description, the item is treated as a serial and is displayed as such in the Get It tab (with the Get It tab display being slightly different, in order to supply the information for the serial title). Requests are made on the description level rather than on the title level. The Description field is what Primo and Alma use to identify the context of a request when it is placed. Patrons placing a request from Primo (or staff placing a request on behalf of the patron in Alma), select from a list of defined descriptions for a given title’s items.
- Either the Enumeration A or Chronology I field must have a value. The values of each of the Enumeration fields appear before the values of the Chronology fields.
- To simplify the task of entering Enumeration and Chronology information, you can create a description template. For more information, see Configuring Description Templates.
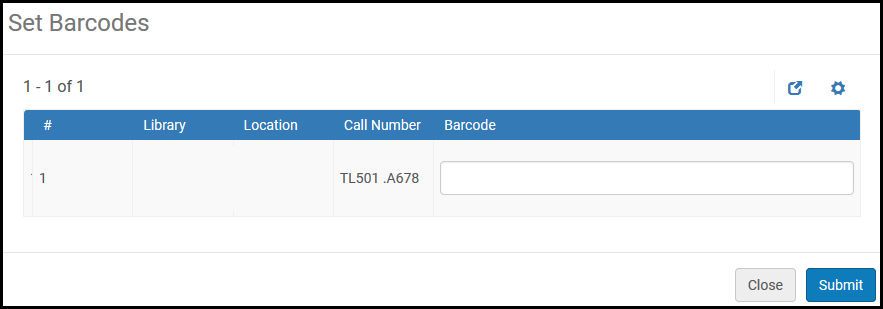
The values of the most recently received item appear in the Last Received Item Details area. Select Duplicate to automatically move these values to the respective fields in the New Item Details area. - Select Create and Receive.
Alternatively, select Receive and set barcodes to set barcodes for the items that you are receiving. The Set Barcodes dialog box opens where you enter barcodes for the items and select Submit. See Scanning Items for more information about scanning barcodes.
Viewing Holdings Information
- On the Receive New Material page (Acquisitions > Receiving and Invoicing > Receive), select the Continuous tab. See Receiving New Physical Material.
- Locate a PO line that has a value in the Locations field, and select Manage Items in the row actions list. The Received Items List page appears.
- Select the Holdings Information tab.The metadata information for the holdings appears.
- You can select Edit Holdings to open the MD Editor page and edit the holdings (see Metadata Management).
Receiving Standing Order Monograph Material
- Ensure that there is a standing order PO line to attach to the new item.
- Create a new physical holdings (Resource Management > Create Inventory > Add Physical Item) (see Adding a New Book or Journal Article).
- Select New in the Choose holding type field, select either a book or an article in the Citation type field, and select Choose. The Quick Cataloging page appears.
- Configure resource and item information, and select Save. The holdings and item are created, and the new item appear in a record list; see Searching in Alma.
- Select Items or View All Items in the row actions list to view the newly created item.
- Select Edit in row actions list. The Physical Item Editor appears (see Updating Item-Level Information).
- In the PO line field, select the PO line of the standing order monograph to link to this item.
- Enter the receive date in Receiving Date.
- Modify any other fields as required.
- Select Save to save the item and close the Physical Item Editor.
Additional Actions
Print Interested Users Slip
You can print the 'Interested Users In Letter', which lists the interested users for the PO line.
The Print Interested Users option appears only if the PO line has interested users (there is a checkmark in the Interested Users column).
When clicking Print Interested Users, Alma will either print a physical copy of the list or send it to email, as was set up by the institution.
- Go to the configuration menu and select the library you are configuring for.
- Go to General > Work Order Departments.
- Select Edit in the row actions for the relevant department (for example, "Acquisition department").
- In the Department Details page, set the Default Printer. This field is used for "Print Interested Users".
The options that are displayed in this list are created in the Fulfillment menu > Printers.
A printer can be:
- An actual printer that has an IP address/email address. In this case, when clicking "Print Interested Users", the list is printed.
- An email address. In this case, when clicking "Print Interested Users", the list is emailed to the recipient's inbox.
For more information on printers, see Configuring Printers.
Un-Receive an Item
When an item is un-received, the receiving date is removed from the item, the work order status is removed, and the item is no longer located in the Receiving department's list of In process items.
Deleting a receiving date does not properly un-receive an item. If an item is received and is in place, it will remain in place, even if you edit the item and delete the receiving date.
To be able to un-receive an item, the following conditions must be met:
-
- The item must have been received.
- The item must still be in the receiving department (i.e. is in a Work order status from marking Keep in department).
- There are no patron or library requests related to the item.
- Open the Receive New Material and search for the POL (set filter to Status: Closed, if appropriate).
- From the item, select "Manage Items" from the row action.
- The "Received Items List" page opens. Locate the item under the PO line items tab.
- Select Un-Receive from the row actions.