
Working with Student Information Systems (SIS)
To configure a Student Information Systems (SIS) profile, you must have the following role:
- General System Administrator
This page describes how to manage exporting/importing users to/from a Student Information System (SIS). For general information on Esploro integration see here. For information on mapping your user accounts to other systems (including SIS) see Working with User Identifiers.
For Esploro implementations performed for institutions that already are using Alma, there is no need to load user records since they already exist in Alma (the shared platform). In this case, researcher data will be an extension of existing Alma user records. It will be required to match researcher records to Alma user records during the SIS synchronization. If Esploro is implemented as a standalone product (customers that are not using Alma), user data loading is a mandatory step during the Esploro implementation.
To import users, the SIS must place a zip file containing an XML file with all the users into a defined S/FTP location. Esploro fetches the file, parses the information, and uploads the users (of type External) according to the parameters defined in the SIS integration profile. If you want to update only a few fields, the recommended practice is to use the Retrieve Researchers API to get all meta-data values for the researchers you would like to update. You then apply your changes on the response data, and send the entire set of fields to the Update Researcher Details API.
All primary and additional identifiers must be unique for users, including for the same user and researcher.
For a detailed overview of user management in Esploro, see https://developers.exlibrisgroup.com/esploro/integrations/researchers/sis/. Note that your external authentication system must be up and running before you can begin Esploro implementation.
To configure a User type of integration profile:
- On the Integration Profile List page (Configuration Menu > General > Integration Profiles), select Add Integration Profile. The first page of the integration profile wizard appears.
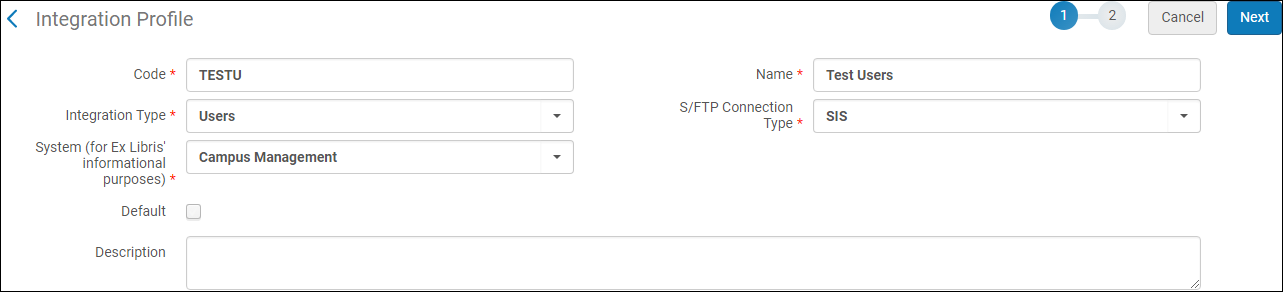 Users Integration Profile Wizard – Page 1
 - On the first page of the wizard, enter the following information.
- Enter a code and name for the profile you are defining.
- From the Integration type drop-down list, select Users.
- From the S/FTP connection type drop-down list, select the name of the FTP connection that you previously defined.
- Indicate the type of SIS with which you are integrating (for Ex Libris’ informational purposes). Note that this is mandatory.
- Optionally, enter a description of the integration you are configuring.
- Select Next. The second page of the wizard appears.
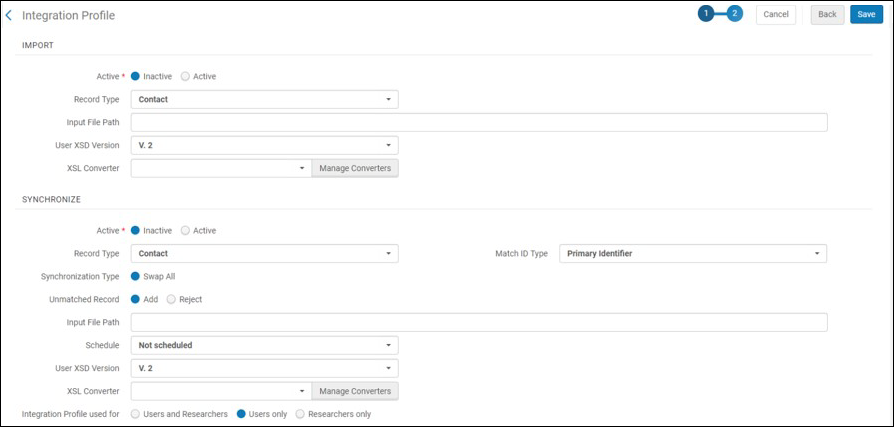 Users Integration Profile Definition – Page 2
- On the second page of the wizard, enter the following information.
Users Integration Profile Fields Section Field Description Import
(used for the initial import of users. A record is not imported if a matching record is found. Manually run this once, or once per year. Afterwards, use the Synchronize section / job.)Active Whether the job is active. If the job is active, it will run according to the selected scheduling option. If it is inactive, it will not run. The job is called Users IMPORT using <integration profile name>.Record Type The type of user record to create in Esploro: Contact, Public, or Staff. For more information on selecting the record type, see https://developers.exlibrisgroup.com/alma/integrations/user-management/sis/synch. Input File Path A subdirectory of the path specified when creating the secure FTP connection (required). For example, if you enter Esploro in the Sub-directory field during secure FTP connection configuration (note that it is mandatory to specify a value in this field) and you enter SIS_import in the Input file path field, the SIS files are imported to the Esploro/SIS_import directory (under the root FTP directory). User XSD Version Select version 1 or 2. Note that 2 should be used. For detailed information about these versions, see https://developers.exlibrisgroup.com/alma/integrations/user-management/sis/synch. XSL Converter Select an XSL converter to process the Integration Profile XML files with XSL before placing them in the output location. Select Manage Converters to view and edit the converter. For details, see Integration XSL Converters. Create Sample File
(available when editing an existing profile)Select an existing user and select Create Sample File to create a new user XML file from an existing user. This enables you to preview the way in which a user XML file should be structured. You can also view a sample XML file on https://developers.exlibrisgroup.com/alma/apis/xsd/external_sys_user.xsd.Synchronize
(used for ongoing synchronization of existing Esploro users. Esploro attempts to merge information if a matching record is found.)Active Whether the job is active. If the job is active, it will run according to the selected scheduling option. If it is inactive, it will not run. The job is called Users SYNCHRONIZE using <integration profile name>.Record Type The type of user record to create in Esploro: Contact, Public, or Staff. For more information on selecting the record type, see https://developers.exlibrisgroup.com/alma/integrations/user-management/sis/synch. Match ID Type The predefined unique identifier type in Esploro to use as the identifier with which you want to match existing Esploro users. For detailed information on match IDs, see https://developers.exlibrisgroup.com/alma/integrations/user-management/sis/synch. Synchronization Type Swap all, which means that all existing user records will be replaced by matching incoming user records. For detailed information on the synchronization workflow, see https://developers.exlibrisgroup.com/alma/integrations/user-management/sis/synch. Unmatched Record Whether Esploro adds a new user record if it has failed to find a matching record, or rejects the incoming record if no match is found for it. By default, the records are added. Input File Path A subdirectory of the path specified when creating the secure FTP connection (required). For example, if you specified Esploro in the Sub-directory field during secure FTP connection configuration (note that it is mandatory to specify a value in this field) and you enter SIS_import in the Input file path field, the SIS files are imported to the Esploro/SIS_import directory (under the root FTP directory). Schedule If you select Not scheduled, the job runs only when you manually run it. For details, see the following sections Manually Importing/Exporting SIS Information and Manually Synchronizing SIS Information. The available scheduling options differ depending on your data center.User XSD Version Version 1 or 2. Note that version 2 should be used. For detailed information about these versions, see https://developers.exlibrisgroup.com/alma/integrations/user-management/sis/synch. XSL Converter Select an XSL converter to process the Integration Profile XML files with XSL before placing them in the output location. Select Manage Converters to view and edit the converter. For details, see Integration XSL Converters. Integration Profile Used For Select one of the following:
- User and Researchers – If you include both user and researcher information in your file.
- Users only – If you include only user information (no researcher fields) in your file.
- Researchers only – If you wish to add or update only the researcher information of the user. Note that each user must include the primary identifier of an existing Esploro user and that other user information, if included in the file, will not be added or updated by the loader. You can load researcher identifiers as part of the Researchers Only option. For more information, see Adding Researchers.
The synchronization is performed in swap all mode, which means that all of the existing information is replaced. If a field does not exist in the input file, it is deleted from the existing user or researcher. Therefore, the input file must always include all of the external information for the user or researcher, not only the updated fields.
Select Researcher Fields To User (Esploro only) Appears only if Esploro is enabled for your institution. Select one of the following:
- All Researcher Fields
- Selected Researcher Fields – When selected, select one or more fields to update from the quick pick list that appears.
Export User By Conditions
(used to export users that should be blocked due to unpaid fines)Users exported include users with fines greater than the threshold and users with blocks, either based on the configured block types or all blocks if none are configured. If a user has fine greater than the threshold OR the user has a block, then the user will be exported.
Active Whether or not the job is active. If the job is active, it runs according to the selected scheduling option. If it is inactive, it will not run. The job is called Users EXPORT using <integration profile name>.User ID Type See the above explanation for Match ID type. User Groups The user group(s) to which the users that you want to export belong. If no value is specified, users belonging to any of the configured user groups are exported. Block Types The previously defined block types (see Configuring Block Preferences) whose associated users you want to export. If no value is specified, users matching any of the configured block types are exported. Fine/Fee Age (days) The users (of the selected groups and with the selected block types) whose fines/fees are older than the stipulated number of days are exported. By default, this number is 0. Threshold Amount The users (of the selected groups and with the selected block types) whose fines/fees exceed the stipulated threshold are exported. By default, the threshold amount is 0. User with Active Loans Select this check box to include only users that have active loans. Active Loan Types When User with Active Loans is selected, this field appears. Users with active loans will be included in the export if the loan types match the loan types selected. Output File Path A subdirectory of the path specified when creating the S/FTP connection. For example, if you specified Esploro in the Sub-directory field during S/FTP connection configuration and you enter SIS_export in the Output file path field, the SIS files are exported to the Esploro/SIS_export directory (under the root FTP directory). Schedule If you select Not scheduled, the job runs only when you manually run it. For details, see the following sections Manually Importing/Exporting SIS Information and Manually Synchronizing SIS Information. The available scheduling options differ depending on your data center.Export Users
(used to export old, inactive, or deleted users, or recently updated/created users - not for an ongoing full export of users)Active Whether the job is active. If the job is active, it runs according to the selected scheduling option. If it is inactive, it will not run. The job is called Users EXPORT_USERS using <integration profile name>.User Groups Select one or more user groups to identify the user records to be considered for export. Days Since Creation Set a condition, in number of days, that identifies when to include a user record in the export. This parameter indicates the number of days since the user record was created in Esploro. The user record that meets this criterion must also be a member of one of the user groups selected in the User Groups parameter in order for the user record to be exported. For example, if you specify 10 here, user records that were created in the past 10 days are included in the export.Days Since Update Set a condition, in number of days, that identifies when to include a user record in the export. This parameter indicates the number of days since the user record was updated in Esploro (see example in Days since creation). The user record that meets this criterion must also be a member of one of the user groups selected in the User Groups parameter in order for the user record to be exported. Days Since Deletion Set a condition, in number of days, that identifies when to include a user record in the export. This parameter indicates the number of days since the user record was deleted in Esploro (see example in Days since creation). The user record that meets this criterion must also be a member of one of the user groups selected in the User Groups parameter in order for the user record to be exported. Output File Path A subdirectory of the path specified when creating the secure FTP connection. For example, if you specified Esploro in the Sub-directory field during secure FTP connection configuration and you enter SIS_Export in the Output File Path field, the files are exported to the Esploro/SIS_Export directory (under the root FTP directory). Schedule If you select Not scheduled, the job runs only when you manually run it. For details, see the following sections Manually Importing/Exporting SIS Information and Manually Synchronizing SIS Information. The available scheduling options differ depending on your data center.User XSD Version Version 1 or 2. Note that version 2 should be used. For detailed information about these versions, see https://developers.exlibrisgroup.com/alma/integrations/user-management/sis/synch. Online Import (Used to import users from a student management system) Active Whether or not the function is active. If the function is active, a process accesses the student management system to fetch the user's information, if it exists. If the function is not active, the process will not run. The default is non-active. Base URL The host/port to which the API calls regarding the user changes will be sent. Mandatory if the Online import action is Active. Note that this should be a REST API which has user information in the format described on the Developer Network. User Name User name for the HTTP basic authentication credentials. Optional. If left empty, the requests will be sent without credentials. Password Password for the HTTP basic authentication credentials. Optional. If left empty, the requests will be sent without credentials. - Select Save. The profile is saved. For information on the Contact Info tab when editing the profile, see Adding User Contact Information.
When the Export Users job is run based on the integration profile you have created, the export process creates an XML file in the format that is used by the Import and Synchronize actions (refer to the Import section and Synchronize section defined under the Actions section on the Actions tab of the integration profile you saved). An XSL file may be used to alter the format. The XSL file is available and customizable in Customize Letters (see Configuring Esploro Letters).
Manually Importing/Exporting SIS Information
To manually run and monitor an SIS import/export:
When editing the profile, in the Import/Export section of the Actions tab, ensure that the Active radio button is selected and select Run.
The job runs as soon as Esploro can accommodate it. A file that is imported is marked so that it is not run again. If email notifications are enabled in Esploro, you receive an email notification of an import and Esploro sends notifications to the SIS of an export.
To view the status of the job, the number of files processed, and other data, select Job history in the row actions list for the appropriate User profile on the Integration Profile List page.
The status Completed Successfully does not mean that all files were imported or exported successfully. Rather, it means that the job completed without error.
If you import a user whose primary identifier matches a primary identifier of one of the existing users, a User rejected on identifier event is generated.
Manually Synchronizing SIS Information
To manually run and monitor an SIS synchronization:
When editing the profile, in the Synchronize section of the Actions tab, select Run.
The synchronization job runs as soon as Esploro can accommodate it. The file that is synchronized is marked so that it is not run again. If email notifications are enabled in Esploro, you receive an email notification.
To view the status of the job, the number of files processed, and other data, select Job history in the row actions list for the appropriate User profile on the Integration Profile List page.
The status Completed Successfully does not mean that all files were synchronized successfully. Rather, it means that the job completed without error.
If there is more than one file to be imported to Esploro for synchronization, the files are read in the order that they are stored in the zip file. If a user appears more than once in the files, the first instance of the user will process. All of the user's remaining duplicate records will fail.
For more information on the synchronization process, see https://developers.exlibrisgroup.com/alma/integrations/user-management/sis/synch.