
Managing Import Profiles for Esploro
- Research Assets Manager
This page describes how to use import profiles which is one of the ways to import records into Esploro. See also the Additional References section at the end of this page.
The import profiles option is mainly used for migration purposes. For other methods of importing see Smart Expansion.
Overview of Managing Import Profiles
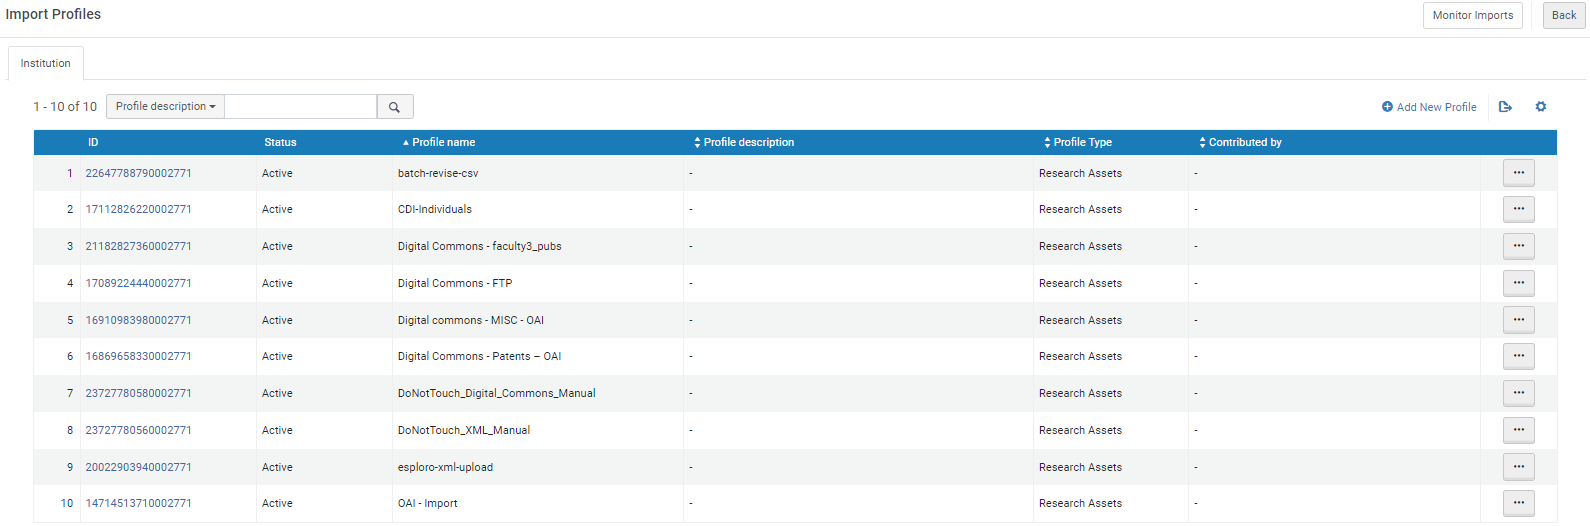
- Add a new import profile - Select Add new Profile.
- Edit an import profile - Select Edit from the row actions list.
- View an import profile - Select View from the row actions list.
- Copy an import profile - Select Copy from the row actions list.
- View an import profile's job history - Select Job History from the row actions list.
- Run an import profile - Select Run Import from the row actions list.
- Delete an import profile - Select Delete from the row actions list.
- Only inactive import profiles can be deleted.
- Once you use an import profile, it cannot be deleted because its job history remains (and cannot be deleted).
Creating an Import Profile
- On the Import Profiles page, select Add New Profile. The Choose Profile Type page appears with the Research Assets option selected.
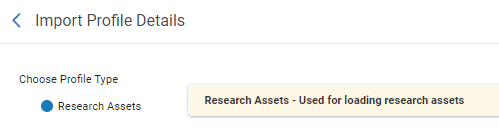 Research Assets Profile Type
 - Select Next. The Import Profile Details page displays.
- Fill the information as described below.
Profile Details
-
Profile name: This is a required field. It displays in the list of import profiles and also appears at the top of the page.
-
Profile description: A free text description of the profile that shows on the list of import profiles.
-
Originating System: This is a required field. It describes the type of system from which the records originated.
If you select Esploro, the following fields will appear:-
Import record as: whether to import as an approved or draft asset
-
Import mode: whether to create new assets or update existing assets
-
Download Template: download an example template to fill and upload
-
-
File name patterns: A file name pattern (such as *.xml) filters out records that do not conform to the pattern you specify. Use this when the FTP directory contains additional files that should not be imported. This field supports regular expressions, with slight modifications:
A period . matches only a period (as if you had entered \\.).
An asterisk * matches zero or more characters of any type (as if you had entered .*).
Otherwise, use regular expressions.
Ensure that the regular expression you use exactly matches only the files that you want to import. For example:
The following retrieves all files ending in ".xml" (without the quotes): .xml$
The following retrieves all files containing the string “yLk” (without the quotes): yLk
The following retrieves all files beginning with “YLK” (without the quotes): ^YLK
The following retrieves all files beginning with “YLK” (without the quotes) followed by a space: ^YLK\s
The following retrieves any file that contains at least one of the following words (without the quotes): “harry” or “potter” or “rowling”: \b(harry|potter|rowling)\b
The following retrieves any file that contains all of the following words (without the quotes):
“harry” and “potter” and “rowling”: (?=*?\bharry\b) (?=*?\bpotter\b) (?=*?\browling\b) -
Import Protocol: The protocol used to retrieve the file containing the records. The options are:
-
Upload File/s – Upload the file from a local or network drive.
-
FTP – Retrieve by FTP. The following fields appear:
Scheduling-
Files to import: Select All for all files found in the FTP location. Select New to select only those files that have not yet been imported.
-
Scheduler status: Select whether the status is Active or Inactive.
-
Scheduler: This field is mandatory. When Inactive is selected for Scheduler status, the value is Not scheduled and it cannot be changed. When Active is selected for Scheduler status, you can select a schedule day/time option such as Every 6 hours starting at 05:00 or Every Tuesday at 11:00.
Times depend on your time zone and the server you are using.Note that scheduling logic was implemented to ensure that not more than one scheduled job of the same profile runs at the same time.
If a scheduled job is started and a previous instance of the job is still running, the This instance of the job is skipped since previous instance of the job is still running message appears in the job report.
If you manually run an import job and a previous instance of the job is still running, the Job did not run – a dependent job is already in process message appears. If you run an import job via API and a previous instance of the job is still running, the same error message appears in the response. -
Email Notifications: Which users and email addresses receive email notifications when the publishing profile completes. Opens the Email Notifications for Scheduled Jobs page. You can choose whether to send the notifications for successful jobs and/or jobs that contain errors.
-
-
FTP information
-
Select from configured FTP: If you select this option, the following sub options appear:
-
S/FTP connection type: Select the relevant option from the drop down list
-
Input directory: Specify the input directory
-
-
Other FTP Site: If you select this option, the following sub options appear:
-
Description: A description of the FTP submission format
-
Server: The server IP address
-
Port: The port ID
-
UserName: The username for logging on to the server that is sending or receiving the files.
-
Password: The password for logging on to the server that is sending or receiving the files.
- Input directory: The path of the submission format’s input directory.
- Is full path: If this is an absolute path, select "Is full path" checkbox and preface your path with the '/' sign. If this is a relative path, leave "Is full path" clear and start the path at your current directory.
-
Max. Number of Files: Accept the default value that appears here.
-
Max. file size: Accept the default value that appears here.
-
Size type: Accept the default value that appears here.
-
Ftp Server Secured: Whether to use a secure FTP transfer (SFTP)
-
FTP Passive Mode: Whether to use FTP passive mode, or not. This depends on the setting in your FTP server.
-
Test Connection: Select to run a test of the FTP connection. The test includes attempts to upload, modify, and delete a fictitious record in the input directory. If the FTP connection is successful, the test will list the files that are found in the specified input directory on the ftp server. When testing a connection to OCLC, the modify and delete attempts will fail. However, if the upload attempt was successful, this means that the connection to the OCLC server has been established.
-
- OAI - Retrieve using OAI. The following fields appear:
Scheduling
-
Scheduler status: Select whether the status is Active or Inactive.
-
Scheduler: This field is mandatory. When Inactive is selected for Scheduler status, the value is Not scheduled and it cannot be changed. When Active is selected for Scheduler status, you can select a schedule day/time option such as Every 6 hours starting at 05:00 or Every Tuesday at 11:00.
Times depend on your time zone and the server you are using.Note that scheduling logic was implemented to ensure that not more than one scheduled job of the same profile runs at the same time.
If a scheduled job is started and a previous instance of the job is still running, the This instance of the job is skipped since previous instance of the job is still running message appears in the job report.
If you manually run an import job and a previous instance of the job is still running, the Job did not run – a dependent job is already in process message appears. If you run an import job via API and a previous instance of the job is still running, the same error message appears in the response. -
Email Notifications: Which users and email addresses receive email notifications when the publishing profile completes. Opens the Email Notifications for Scheduled Jobs page. You can choose whether to send the notifications for successful jobs and/or jobs that contain errors.
OAI Details
-
OAI Base URL: The OAI provider’s URL, which OAI harvesters can use to load metadata. After you have entered a valid URL, select Connect and Edit to display the associated fields. If you configured a default OAI Base URL, it appears here.
-
Authentication: Whether the OAI server requires you to enter a user name and password.
-
Connect and Edit: After selecting this button the following fields appear:
-
Repository Name: From the OAI provider, populated by Esploro.
-
Earliest Date Stamp: The earliest that data exists in the OAI provider records, populated by Esploro.
-
Admin's E-Mail: OAI provider admin's email, populated by Esploro.
-
Metadata Prefix: The available MD prefixes from the OAI provider, populated by Esploro. If you configured a default metadata prefix, it appears here.
-
Set: OAI repository available sets, populated by Esploro.
-
Identifier Prefix: The shared prefix that appears before the actual unique record identifier when harvesting by the identifier.
-
Harvest Start Date: When submitting a new import job and after the job completes successfully, the Harvest Start Date is updated automatically with the job’s ending time.
-
Encode Date: Whether the repository supports encoding dates.
-
Open Test Page: Select to test the OAI connection and flow. See here for more information.
-
-
Physical source format: XML is selected by default and cannot be changed, unless Esploro was selected as the Originating system. In this case you have the option of selecting XML or CSV.
-
Source format: The format of the records in the file (when available for your institution):
-
Status: The default is Active. Select Inactive if you do not want the import profile to be available for use at this time. When set to inactive, attempting to run an import job fails immediately.
Profile Options
-
Enhance author affiliations via OpenAlex: This is selected by default. Deselecting this option will cause the system to not look in OpenAlex for author affiliations.
-
Override existing affiliation in the record: Selecting this option will override the affiliation in the record with the one from OpenAlex.
-
Add Open Access status and link from Unpaywall via OpenAlex: Updates the Open Access status based on Unpaywall (using the OpenAlex API).
-
Select the Notify Researchers checkbox in order to notify researchers about new assets that were added to their profile. Note that this option is only enabled when the NEW ASSETS ADDED TO RESEARCHER PROFILE NOTIFICATION job is active. See New Research Outputs Added to Profile Letter.
- Select Next. The Match Actions page appears. Select whether to import new records when matches are found.
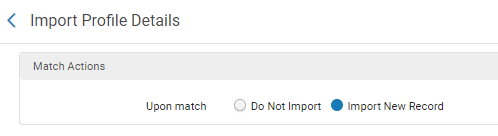 Match Actions
 - Select Next. The next page of the wizard appears.
- Select Next.
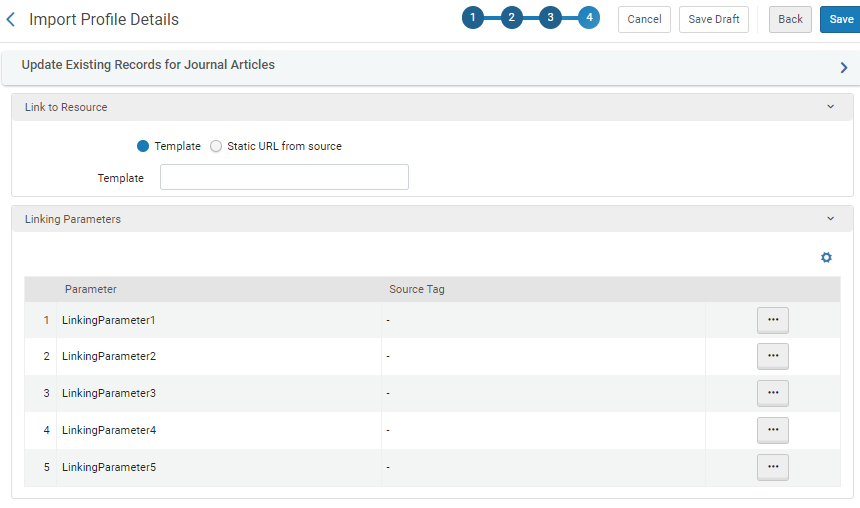
Link to Resource and Linking Parameters - Enter the following information:
Asset Import Profile Details Fields Field Description Value Link to Resource – Esploro uses this section to create the URL to each research asset in the import profile. Template Select to create a substitution string that enables Esploro to build the URL to the asset from multiple DC tags in the import profile. Enter the value in Template. A string with substitution codes $$LinkingParameter1 ... $$LinkingParameter5, where each substitution code represents one of the DC tags configured in the next area. For example: $$LinkingParameter1/$$LinkingParameter2
Static URL from source Select to use a single DC tag from the import file as the URL to the research asset. Enter the tag in Dublin Core tag. The tag name, for example: dc.identifier. Linking Parameters – If you select Template, configure the required substitution codes for your substitution string in this area. Linking Parameter 1 - 5 Configure up to five substitution codes. Each code includes a DC tag from the import profile, when to use it, and whether to normalize it before using it. For each code, select Edit in the row actions list and configure: - Source Tag – Enter or select a Dublin Code tag. For example, dc:identifier.
- Use source tag – Select whether to use this tag always, only when it contains an exact substring (enter the string), or only when it contains a regular expression (enter the regular expression). For example (regular expression):
.*\.pdf$|.*\.jpg$
- Normalization source tag – Select whether to perform no normalization or to perform normalization using a regular expression (enter the regular expression). Strings matching the normalization expression are removed from the tag, except for strings matching parts of the regular expression that are in parentheses. For example, if your normalization string is:
\[.*\](.*)
then initial brackets and anything they contain are removed from the tag: [98798]https://university.it/340/1/coccoli.pdf becomes https://university.it/340/1/coccoli.pdf.
- When you are done, click Save to save the profile.
Testing OAI Import Protocol Flow
- In the OAI Details section, select Connect and Edit after entering the base URL and the authentication information (if necessary) for the OAI server.
This may take from 10-15 minutes to connect.
- Specify any additional fields that you want to test in the OAI Details section and then select Open Test Page.

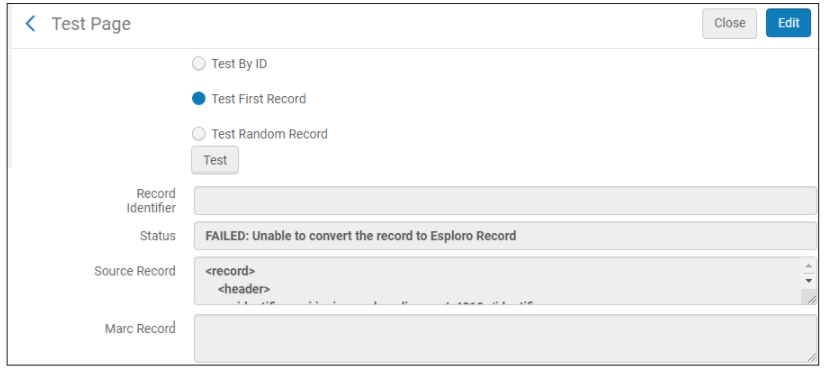
- Select one of the following options to specify the test record to use:
- Test by ID – Enter a full record identifier and harvest this record.
- Test First Record – Harvest the first record in the set.
- Test Random Record – Harvest a random record in the set.
The options Test First Record and Test Random Record are dependent on the date configured in the "Harvest Start Date" field. If no modifications were done to the first/random record after the Harvest Start Date, the test will not yield any results.
- Select Test.
The results include the following fields:
- Record Identifier
- Status – Whether the process passed successfully. If the flow failed, an error will appear in the Status field.
- Source record – Original record that was harvested
For digital remote repositories, the results also include the following fields:- Link to remote file, according to the setting defined in the Object Template of the Remote Digital Repository set for this profile.
- Link to thumbnail object, according to setting defined in Thumbnail Template set for this profile.
- Inventory structure – An XML structure of generated digital remote representation
 Example Test for a Repository Using OAI Protocol
Running an Import Profile
- Go to Repository > Manage Import Profiles.
- From the row actions menu for the relevant job select Run.
- Select the file to upload.
For assets the format should be as described in Esploro Import File Formats.
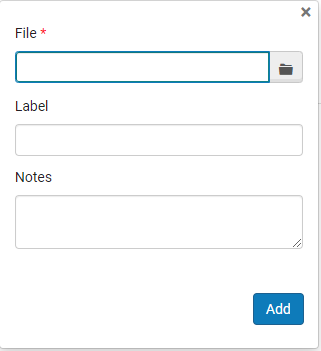
Upload File - Select Add and then select Submit. The records in the file are imported.