
Working with Research Assets
Overview
This page describes how to work with research assets in Esploro after they have been added and approved.
For information about adding researcher output as deposits and managing and approving them, see Working with Research Deposits. For information about working with student deposits, see Working with Research Deposits: Adding Electronic Theses and Dissertations (ETD) Deposits. For information about approving assets that were added through Smart Harvesting, see Author Matching Approval Task List.
For an overview of how to access and get more information on the various features in Esploro, see Quick Guide for Administrators in Esploro.
Watch the Managing Research Deposits and Assets video (6:00).
After being approved, deposits become Esploro assets (see Working with Research Deposits). The metadata of assets can be modified individually or in bulk. In order to modify them in bulk, they must be exported, after which they can be updated, and imported back into Esploro. DOIs can also be registered in bulk. Asset normalization can automatically transform the data in one or more assets – for example, by replacing digits with other characters, such as a dash. You can deposit dissertations and theses into Esploro by integrating with the ETD Administrator (using SWORD server).
Researchers can also modify certain asset fields, and add or remove files and URL links, via their private Profiles. Depending on your system settings, these changes may require approval by staff.
When working with research assets, you can import usage statistics into Esploro from an Excel document. This is useful for analytic reports that record the usage performed in other systems. You can import an Excel file into Esploro from databases of citation counts of research publications. This is useful for measuring the impact of the asset in the academic community.
When searching for research assets in Esploro, the search results include deposits as well.
Before working with research assets, ensure that your administrator has configured research organization units and researchers. See Configuring Research Organization Units and Managing Researchers.
Managing Research Assets
You manage research assets on the Research Assets page. To open this page, search for research assets; see Searching in Esploro.
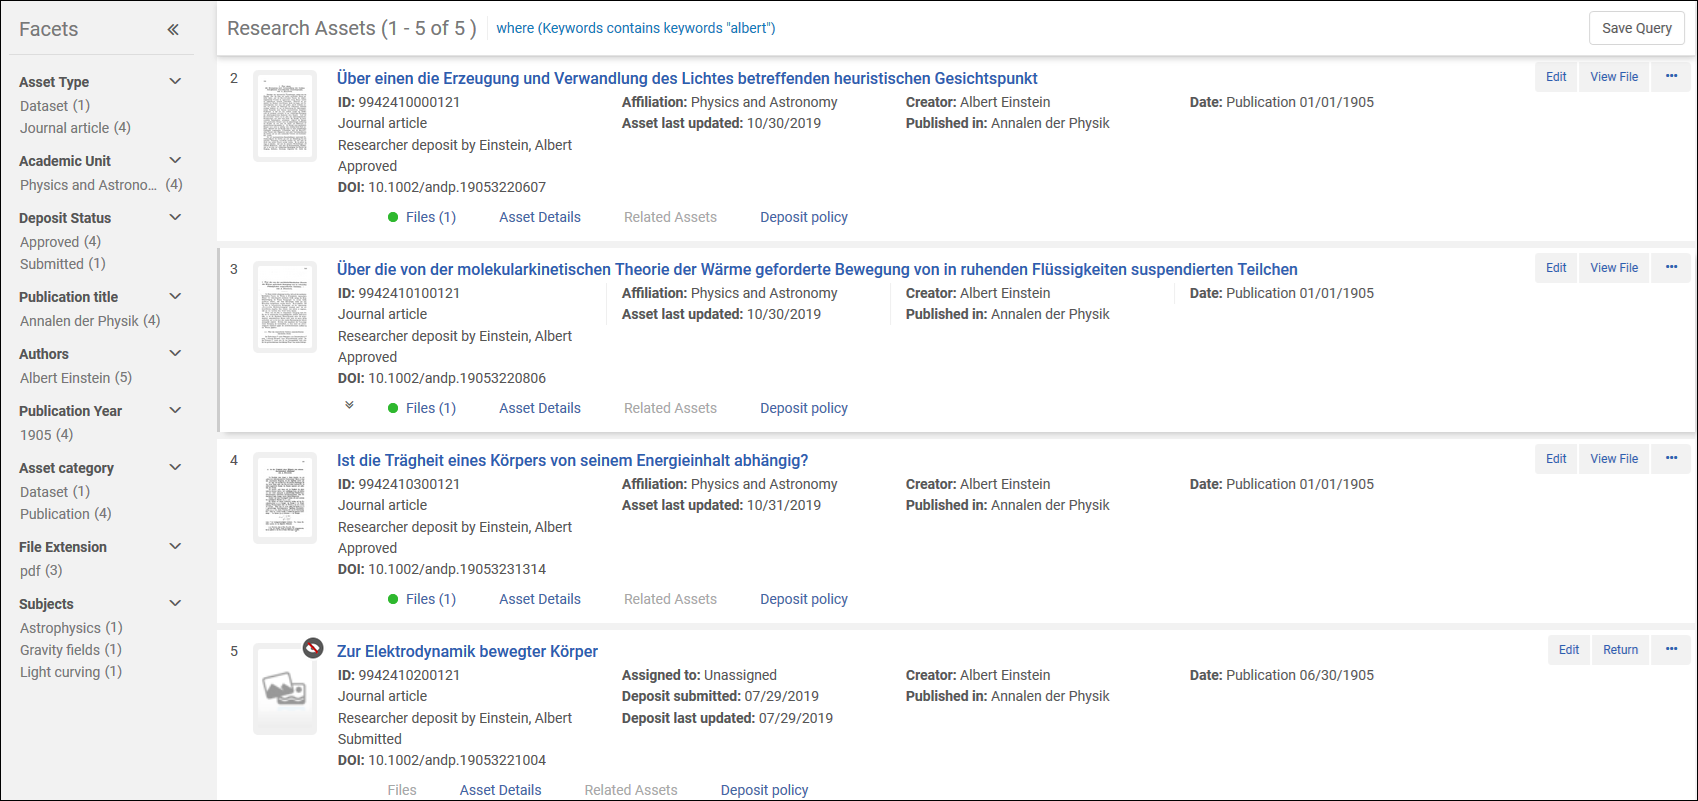
The Research Assets page displays a record list of research assets, including research deposits. (For more information about record lists, see Record Lists.) The search results can be sorted in a variety of ways. Two levels of sorting are implemented: Sort by and Secondary Sort by. For each level, you can choose to sort in the following ways:
- Rank – An internal ranking mechanism that takes the following ranking factors into account:
- Term Frequency – The higher the search term frequency in the assets' metadata, the higher the score.
- Inverse Document Frequency – The rarer a search term is across all assets' metadata in the index, the higher its contribution to the score.
- Coordination Factor – The more search terms found in the assets' metadata, the higher its score.
- Field Length – The more words a field contains, the lower its score. This factor penalizes assets with longer metadata field values.
This ranking system is based on Apache Solr; for more information, see https://solrtutorial.com/solr-search-relevancy.html. - Title – In ascending or descending order
- Record Update Date – In ascending or descending order
- Asset Date – The year of the asset, in ascending or descending order.
The Asset Date is not a standalone field; instead, its value is derived from one of the date fields defined for the asset. Since some date fields may be empty, a hierarchy is used to determine the Asset Date. This hierarchy ranks the date fields based on how representative they are of the asset. The highest-ranked date field that is defined for the asset is selected as the Asset Date. (This is also the date that appears in the asset record in the search results, as shown in the illustration above.)
The hierarchy of date fields used to determine the Asset Date is:
- Date of degree
- Date published
- Date e-published
- Date copyrighted
- Date posted
- Date available
- Date presented
- Date of opening
- Date of performance
- Date valid
- Date issued
- Date renewed
- Date approved
- Date accepted
- Date defended
- Date submitted
- Date of application
- Date completed
- Date created
- Date collected
- Date other
- Date updated
Asset Icons
 – Not publicly visible, either due to status (the asset is still a deposit), an access right restriction or a suppression of the asset from display
 – Displays when the asset is identified as open access – i.e., there are no limitations on who can view or download it (see When Is an Asset Labeled Open Access?, below)
 – Indicates that an approved/imported asset will not be displayed in the Profile
 – Indicates that an approved/imported asset will not be displayed in the Portal
![]()
When Is an Asset Labeled Open Access?
Files and links that are attached to an asset can each be assigned individual access rights. Whether the asset itself is labeled Open Access depends on the access settings of these files and links, and is determined based on an algorithm. The algorithm is somewhat complicated, but the gist of it is as follows:
- If any files attached to the asset are either marked as Open or have no access rights defined for them, the asset is labeled Open Access (regardless of the access rights of any links attached to the asset).
- If no files are attached to the asset, but links are attached to it, then: If any of the links are marked as Open, the asset is labeled Open Access. If none of the links are marked as Open, either because they have no access rights defined for them, or because they are marked as having other types of access rights, the asset is not labeled Open Access.
- If no files or links are attached to the asset, the asset is not labeled Open Access.
That is to say:
- The settings of attached files are given precedence over the settings of attached links.
- When no setting is specified for a file, the default is Open Access. When no setting is specified for a link, the default is Not Open Access.
A file whose Access Rights policy is Embargo is treated as Open when the end-date of the embargo has passed.
This description of the algorithm is an over-simplification, because both files and links can be attached to an asset either as main attachments or as supplemental. (Any attachment that is not marked as supplemental is considered a main attachment.)
For the purposes of labeling an asset as Open Access, supplemental files and links are essentially treated by the algorithm as Closed Access, regardless of their actual access settings. Thus, for example, if an asset has a two files attached to it, and file #1 is a main file, and is Closed, while file #2 is a supplementary file, and is Open, the asset is not labeled Open Access, because it is only a supplementary file that is Open.
Viewing Additional Asset Details
Additional information about each asset appears in tabs beneath the asset, where relevant. If the tabs contain any information, the tab area can be expanded to make it visible by selecting one of the active tabs or the Expand all button ( ), or collapsed to reduce the amount of space occupied by the asset's information on the page by selecting the Collapse all button (
 ).
).
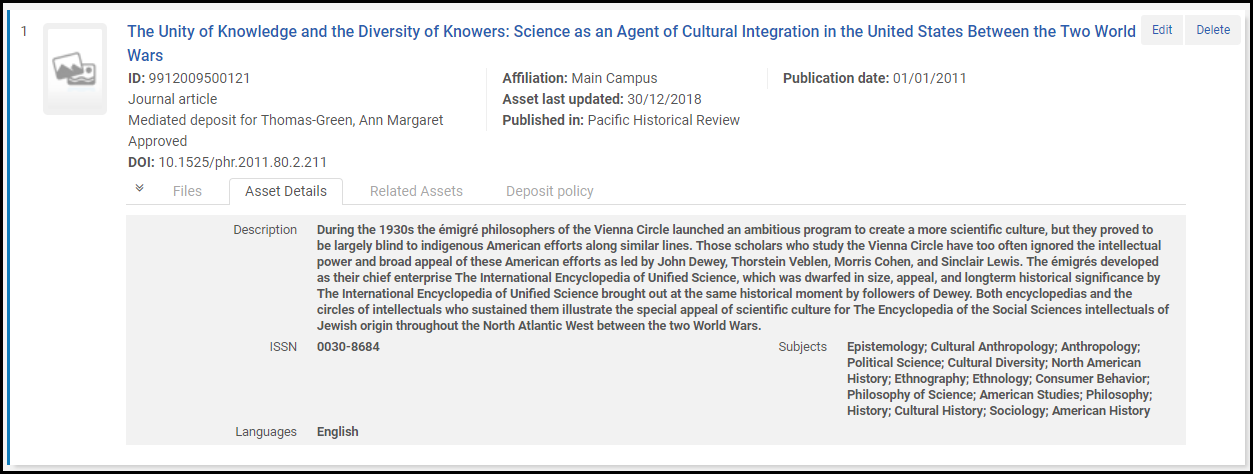
- The files comprising the asset appear in the Files tab. Select the link in any file row to view the file with descriptive information in the research asset viewer. To configure the descriptive information that appears in the Descriptive Information area of the research asset viewer, see Asset Display in the File Viewer.
 Research Asset ViewerIf an asset does not have a value for a particular field, that field does not appear in the Descriptive Information area of the viewer.
 - Metadata information appears in the Asset Details tab.
- Related assets, and their relationships, appear in the Related Assets tab. Select the link in any row to view the related asset. Related assets are added in the Relationships section that is available when adding or editing any asset or deposit, including ETD assets . See Adding Staff-Mediated Research Deposits.
- The deposit policy to which the researcher agreed when making the deposit appears in the Deposit policy tab. To configure whether the entire policy appears in this tab, see Configuring Esploro Deposit Policies.
Working With Research Assets
- Delete (Research Assets Manager only) – Delete the asset.
-
Edit – Edit the metadata of the asset. Select this option to open the Asset Details page.
- Change asset type – Change the asset category and/or type (not available for an ETD). When you select this action, the Change asset type dialog box appears. Select the new category and type, and then select Change to save your changes.
 Change Asset Type PaneWhen you change an asset type, some settings may not appear when you edit or view the asset if these settings are not relevant to the new type. Nevertheless, these settings are retained in the asset's metadata. You can view and/or edit these settings in the generic form.For a list of available asset categories and types, see Research Asset Categories and Types.
- Edit in generic form – Edit the asset in the generic form (not available for an ETD) . See Adding Staff-Mediated Research Deposits - Generic. See also the above note. For configuring asset types to always open in the generic form or not, see Configuring Asset Types to Open in Generic Form.
- Link ETD to a researcher (ETD only) – Use this action to link an existing local student or researcher to the ETD. If the ETD is already linked to a local student or researcher, you can select Unlink ETD to a researcher.
- View File / Files – View the file or files associated with the asset.
- Register DOI – Register the DOI with the DOI registration agency. See Digital Object Identifier (DOI) Registration. Esploro attempts to register the asset's DOI with a DOI agency. If mandatory information is missing, Esploro displays a warning message that the asset does not include a file or an institutionally-owned link. If no date is provided in the asset record, Esploro automatically fills out the Publication Date field with the current date. For Crossref registration, the status of the registration request may be pending in CrossRef, in which case any changes to the status are sent by email to the email address that is configured for Crossref. For more information, see Configuring DOI Agencies.
The following warning message is displayed when registering a DOI. The first bullet is displayed in the warning message only if an asset does not include a file or institutionally-owned link.
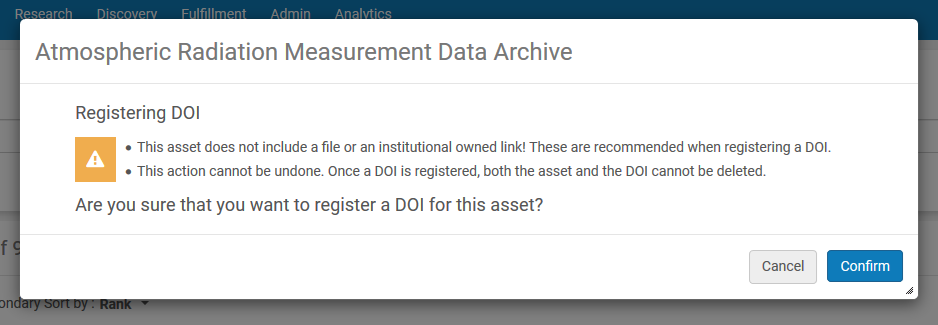 Warning Message when an Asset Does Not Include a File or Institutionally-Owned Link
 - Register Handle - Manually register handles. When a unique identifier is created for an asset, it can be registered directly to the handle server without running a job. This feature must be enabled by Ex Libris customer support for it to be active. See Configuring Handle Server Integration for more information on handles.
- Delete from ORCID – For assets that have already been pushed to ORCID, removes all references to the asset from ORCID, enabling you to remove incorrect researchers, flag a researcher as not-for-display, or delete the asset from Esploro. Note that, if none of these changes are made, the asset will be sent to ORCID again the next time the the Update Researcher ORCID job runs (see ORCID in Esploro).
Editing Asset Metadata
- Deposit
- Visibility
- Display in portal - This is checked by default. If this option is unchecked then it will only display the title in search results on the Portal, but the full details will not be visible.
- Display in profiles - This is checked by default. If this option is unchecked then it will only display in the researcher's private Profile.
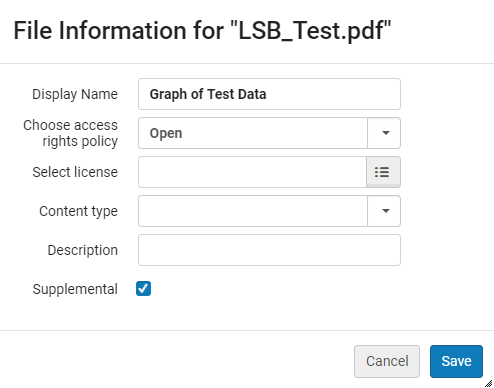
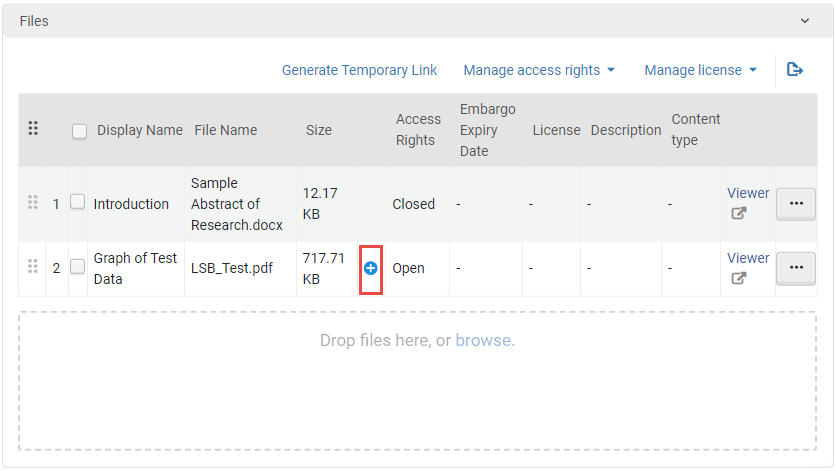
- Files – Add and manage files belonging to the asset. Depending on their access rights, these files may be accessible to users via the Portal; files that are not intended to be available in the Portal should be added in the Attachments tab. The following actions are available for files that have been added here (see also, Files Section):
- Edit File Information – Edit the metadata of the file: its display name, access rights, license, content type, description, and whether it is a main or supplemental file.
- Download – Download a copy of the file.
- Delete – Remove the file from the asset.
- Generate Temporary Link – Generate a temporary link, which grants access to the file for a certain period of time to the requester, to an access-restricted file.
- Replace – Replace the file with a different file of the same type. None of the metadata of the file, including its original name, are changed when you use this option. This is useful if you want to replace a file, but you want existing links in indexes (such as Google Scholar) and other locations to continue to work properly.
- Links for Remote Access
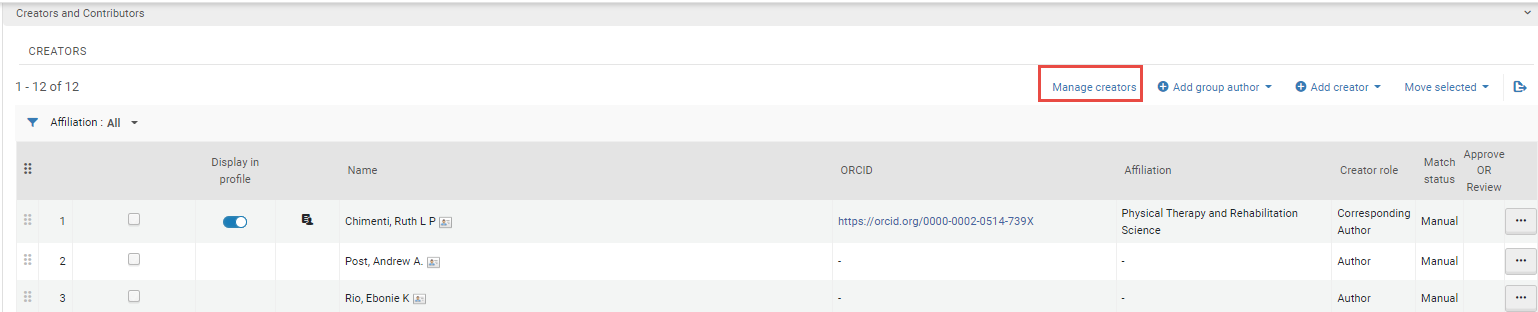
- Creators and Contributors
If many creators/contributors were added, you can select the Manage creators or Manage contributors buttons to view up to 500 of them on a single page. See Manage Creators and Contributors, below, for more information. - Statuses and Dates (see also Date Hierarchy)
- Asset Details
- Publications Details (is part of)
- Article Information
- Parent Details
- Conference / Event
- Additional Description Fields
- Description and Research Topics
- Geospatial Information
- Access Rights and License (Asset level)
- Asset Grants and Funders
- Comment
- Relationships
- Additional Fields
- Research Acceptance of Deposit Policy
Managing Creators and Contributors
You can manually update the list of creators and contributors of an asset and the properties of each author in the list. You can change the order in which the authors appear in the list by dragging them up and down in the list. In addition, you can modify or delete the affiliations of multiple authors in bulk. If an author has multiple affiliations, you can also manually add additional affiliations to their information (this cannot be done in bulk).
Managing Long Lists of Creators or Contributors
If an asset has many creators/contributors, you can open the list in a separate management page in which you can view up to 500 of them. This makes it easier to find an author, change affiliation in bulk, and change the order in which the authors are displayed. Note that very long lists may take time to load.
- In the Asset Details page, select the Manage creators or Manage contributors buttons. The Manage Asset Creators or Manage Asset Contributors page opens.
For a video showing how to manage research assets with many authors see here.
Manage Creators Button
Updating Author Affiliations in Bulk
In the Manage Asset Creators/Contributors page, you can update the affiliations of multiple creators/contributors in bulk.
Bulk updates of affiliations do not affect authors that have multiple affiliations (see Adding Multiple Affiliations to a Creator or Contributor, below). The affiliations of authors with multiple affiliations can only be managed individually.
- In the Asset Details page, in the Asset tab, select the Manage creators or Manage contributors buttons to open the Manage Asset Creators or Manage Asset Contributors page (respectively).
- Select the checkboxes next to the creators/contributors you want to update
- Select the Update selected author affiliations button. The Edit Affiliation dialog box opens.
 Update Selected Author Affiliations Button in the Manage Asset Contributors Page
 - Select one of the following:
- Search Internal to select an affiliation within the organization
- Search External to select an external affiliation that is already defined in your system
- Create New External to create a new external affiliation
- If you selected Search Internal or Search External, under Affiliation, begin typing a string of characters that appears in the name of the affiliation you want to add. When you find the affiliation, select it. If you selected Create New External, enter a Name and Code for the new affiliation, and select its Type.
 Edit Affiliation Dialog Box
 - Select Save. The selected affiliations are updated.
 Updated Affiliations
Adding Multiple Affiliations to a Creator or Contributor
When you edit an asset, you can define up to five affiliations for each of its creators and contributors. In the Hub, when multiple affiliations are defined for an author, the first one in the list is displayed in the asset page, with an Expand button ( ) beside it. Select the Expand button to open a box in which all of the affiliations are displayed.

The affiliations also appear in the asset page in the Portal. At the top of the asset page, the list of authors can be expanded to show the affiliations of the authors by selecting the Show details for ... authors link below the list. In addition, the list of authors can optionally also appear in the Details section of the asset page, with some or all of their affiliations listed; see Configuring the Display of Multiple Author Affiliations in the Portal, below.

Adding Affiliations to the Author of an Asset
- In the Asset Details page, in the Asset tab, in the row actions of the author, select Edit. The Edit creator (or Edit contributor) dialog box opens.

- Under EDIT AFFILIATION/S, select one of the following:
- Search Internal to select an affiliation within the organization
- Search External to select an external affiliation that is already defined in your system
- Create New External to create a new external affiliation
- If you selected Search Internal or Search External, under Affiliation, begin typing a string of characters that appears in the name of the affiliation you want to add. When you find the affiliation, select it. If you selected Create New External, enter a Name and Code for the new affiliation, and select its Type.
- Select the relevant Add button. The affiliation is added to the list.
If five affiliations are already defined for the author, the Add button is not available.
- To change the order in which the affiliations appear in the list, drag them up or down, as required.
- Select Save. The dialog box closes and the changes are added to the Asset Details page (but not yet saved in the database).
- When you have finished modifying the Asset Details page, select Save to save them in the database.
Configuring the Display of Multiple Author Affiliations in the Portal
You can configure the display in the Portal of author affiliations in the Details section of the full asset page. The options available enable you to choose whether to display the list of creators in this section at all, and, if so, whether to show their roles, and whether and how to display their affiliations:
- Roles – When a role is defined for a creator, if it is displayed, it appears in parentheses after the creator's name.
- Affiliations – When one or more affiliations are defined for a creator, if they are displayed, they appear after the creator's name and role. Depending on the option selected, all affiliations may be displayed, only those that are related to your institution, or only the first affiliation specified for the creator.
These settings are configured in the Asset Page tab of the Research Portal configuration page (Configuration Menu > Portal & Profiles > Research Portal > Assets Display Configuration), in the Details configuration (see Configuring the Research Portal: Details Settings). For additional information, see Configuring the Research Portal: Options for Displaying a List of Creators.

Deleting Author Affiliations in Bulk
In the Manage Asset Creators/Contributors page, you can delete the affiliations of multiple creators/contributors in bulk.
- In the Asset Details page, in the Asset tab, select the Manage creators or Manage contributors buttons to open the Manage Asset Creators or Manage Asset Contributors page (respectively).
- Select the checkboxes next to the creators/contributors you want to delete.

- Select the Delete selected author affiliations option.
- Confirm that you want to delete the affiliations of the selected authors. The affiliations are deleted from the page (but not from the asset record until you select Save).
- At the top of the page, select Save. All of the affiliations of the selected authors are deleted from the asset record.
Uploading Large Files
You can upload files larger than 2 GB, using a desktop loader utility, Esploro File Uploader, that bypasses the browser limitation by enabling users to upload files straight to Esploro. In order to do this, you can download the Esploro File Uploader at Asset Files Uploader (in the Developer Network). The utility does not have to be installed; you just open the file to use it.
The version of the Esploro File Uploader described is part of the December 2023 release. If the version of the utility you have was downloaded before December 3, 2023, it is an older version, and cannot upload files larger than 5 GB. From December 3, 2023, and onwards, it is recommended to download the new version.
Before you can use the Esploro File Uploader to upload files to an asset, you must go to the asset and create a token that identifies the asset, environment, and customer instance, as explained below. (In order to be able to create an upload token, the esploro_display_issue_upload_token customer parameter needs to be set to True; see Configuring Institution Settings).
In principle, the Esploro File Uploader enables you to upload files of up to 5,000 GB. However, a customer parameter, file_loader_utility_size_limit_in_GB, controls the maximum size in your organization. By default, this parameter is set to 5 GB. (For information about setting this parameter, see Configuring Institution Settings.) When the asset token is created, the code of the token includes information about the current maximum file size configured in your system. After the asset token is validated by the uploader, the size limit is displayed in the uploader window. (Thus, if the value of the customer parameter is modified after the asset token is generated, the change is not implemented in the uploader.)
The Esploro File Uploader initially uploads files to an upload folder, and then transfers them, in the background, to the storage folder. Very large files may take up to a few hours to be completely uploaded to the storage folder. During this time, the files are listed under the asset in Esploro, but are not yet accessible.
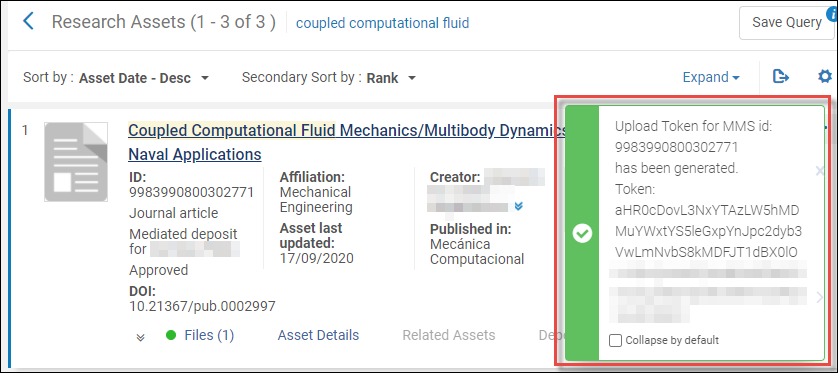
- For the relevant asset, select Issue Upload Token from the actions menu.
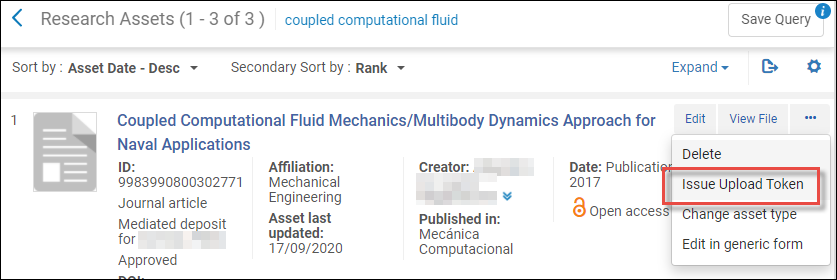
- Copy the token ID from the message that displays.
- Open the Esploro File Uploader (see above).
- Paste the token into the Enter Token field.

- Select Get Upload Data. The token is validated and the File Uploader window expands. The MMS ID of the asset is displayed, and, below it, the maximum file size is indicated. Below them are the upload controls.
The maximum file size is the maximum size per file – you can upload multiple files, even if the sum of their sizes is larger than the maximum specified.
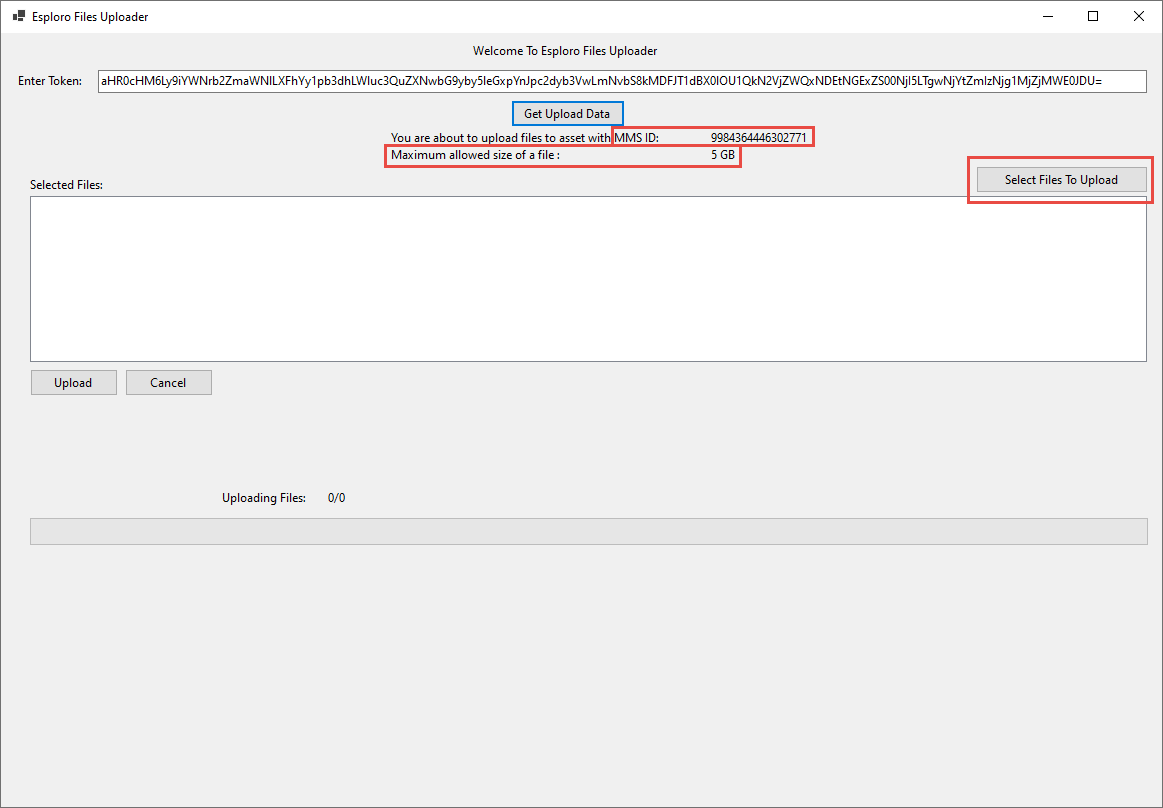
- Verify that the correct MMS ID appears.
- Select the Select Files To Upload button and then select the files you want to upload. The files you select appear under Selected Files. (The checkboxes to their left control whether they will be included in the upload. Clear the checkboxes of files you added but do not want to include in the upload. You cannot delete files from the list.)
- When you’ve finished selecting files, select Upload. The files are uploaded one by one. After all the files are uploaded, they are associated with the deposit.
When the upload is finished, a Success message pops up. This indicates that the files have been saved in the upload folder; it may take a while for them to be transferred to the storage folder, at which time they will become available for viewing and downloading. The files are automatically assigned “closed” access rights.
During the upload process, you can select the Cancel button to stop the upload. If you do so, the files that were already uploaded will not be associated with the deposit.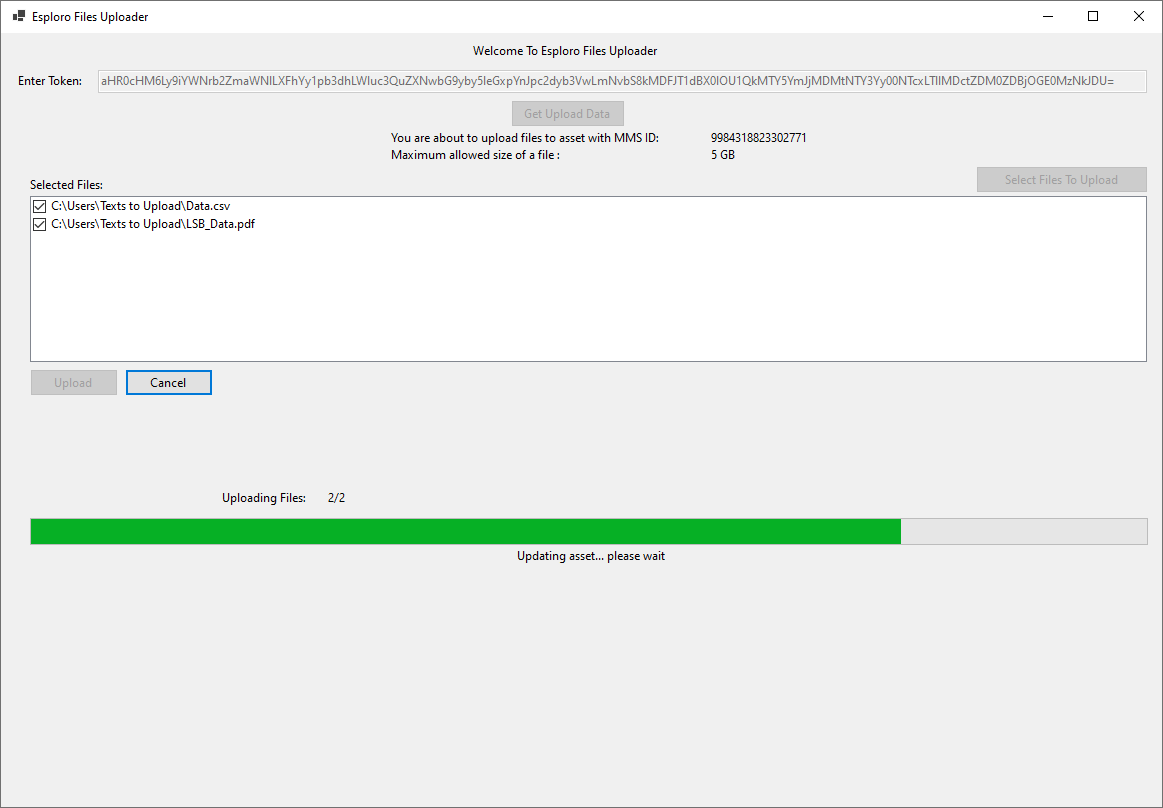 Upload Underway
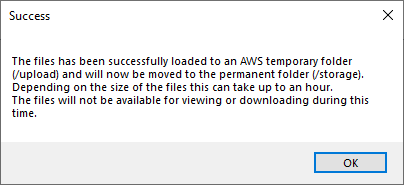 Success Message
 - In the Success message, select OK.
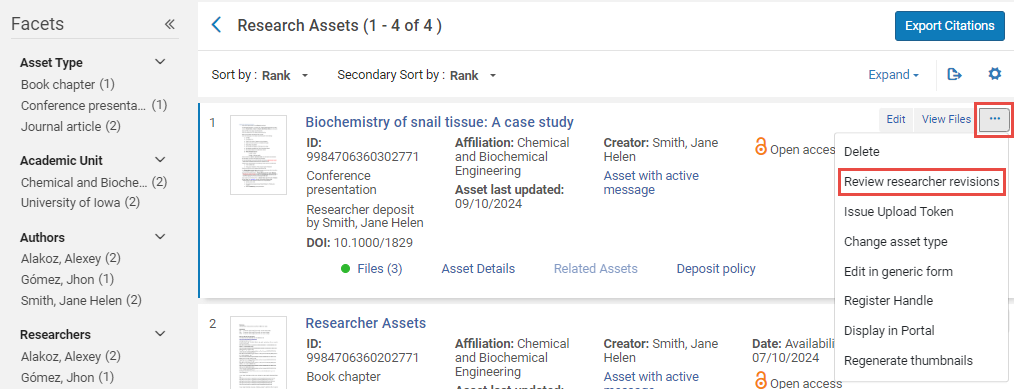
Approving Researchers' Modifications to Assets
Researchers can update certain asset fields from their private Profiles (see Adding Output to a Profile). Depending on your system settings (see Configuring Asset Display on the Portal), the changes they make may require staff approval in order to be implemented in the assets records. When an asset is awaiting approval for updates made by researchers, the option Review researcher revisions appears in the asset's More Actions menu in its entry in the Research Assets page.
You can use the Assets with Revisions for Review task list (under Research Assets) to find all the assets that are currently awaiting approval for researcher modifications.

Reviewing Researcher Modifications
- In the Research Assets page, in the asset's More Actions menu, select Review researcher revisions. The Review Researcher Revisions page opens and displays a list of fields that were modified by researchers and not yet approved.

- For each revision, under Action, select either Accept or Reject. When you have selected an action for each of the revisions, the Submit button becomes active.
- Select Submit. The changes you accepted are implemented, the researcher is informed, and the asset record is once again open for editing by researchers.
Viewing a History of Researcher-Initiated Modifications
You can see a list of modifications that were made to an asset record by researchers in the asset's Details page. The list includes all modifications that were already approved. Modifications that were not yet approved, or that were rejected, do not appear.
- In the Research Assets page, in the asset's More Actions menu, select Edit. The asset's Details page opens.
- Select the Researcher Updates tab. A list of researcher-initiated modifications is displayed in the tab.
This tab does not appear in the Details page of assets that were never modified by researchers.

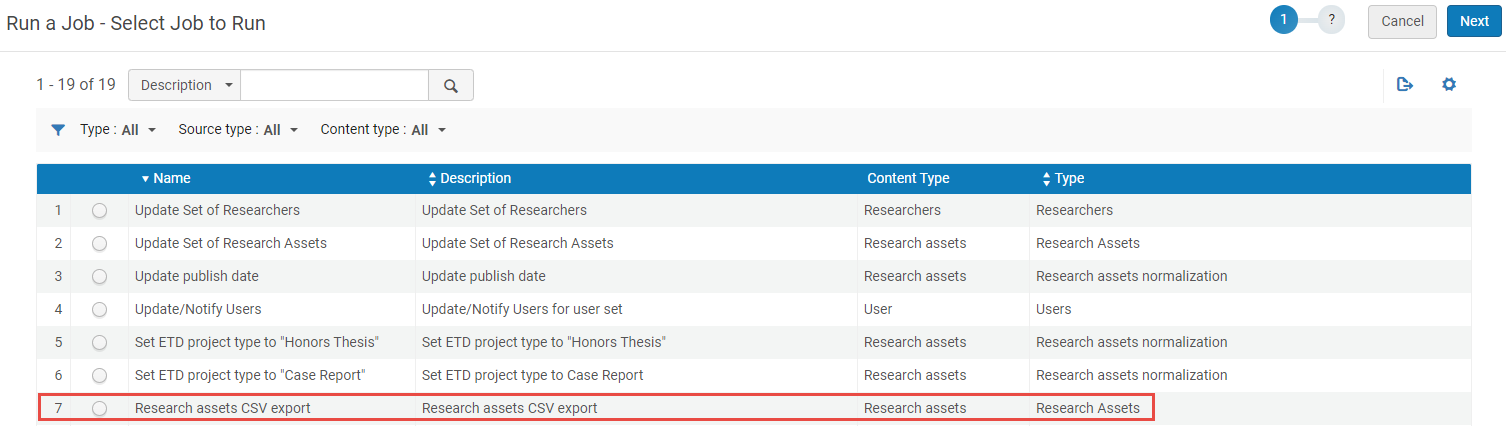
Exporting Research Assets to CSV
You can export a set of research assets to CSV format using the Research assets CSV export manual job. See Running Manual Jobs on Defined Sets. Below are instructions for exporting a set of research assets to CSV and for downloading the exported CSV file.
Creators, contributors and files are not included in the export, because these fields cannot be updated using CSV import.
- Go to Admin > Run a Job and select the Research assets CSV export job.
- Select Next and then select the set.
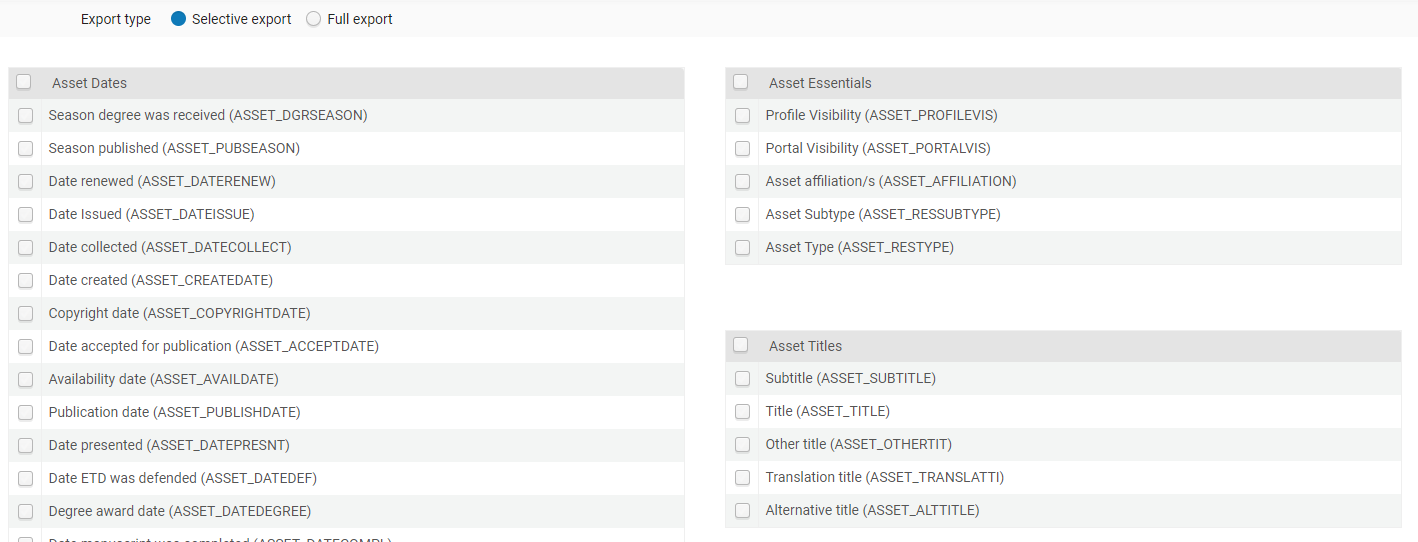
- Select Next and then select either the Full export or the Selective export radio button.
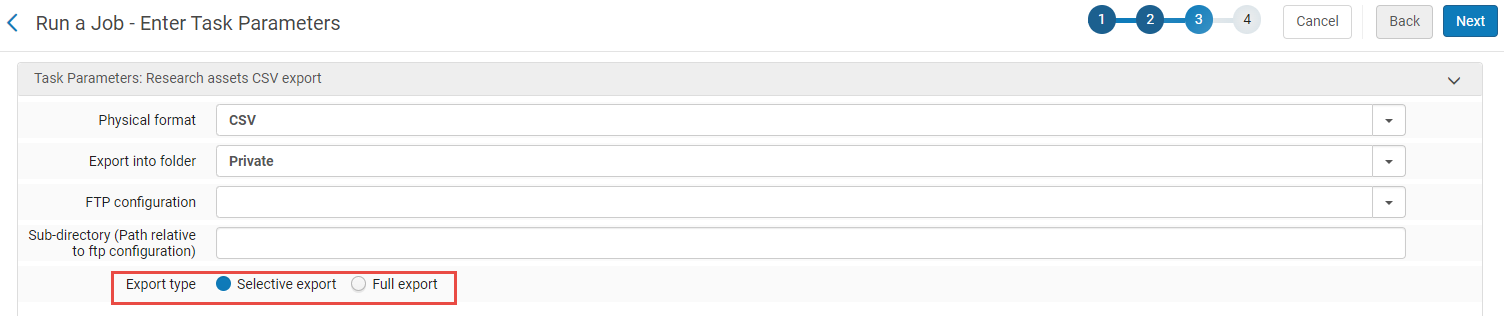
Full export exports all fields and columns, while Selective export allows you to select specific fields to export. - For Selective export select the relevant fields in the Task Parameters: Fields to export section.
- Select Next and then Submit.
- Make sure that the job has finished. The Status in the Running tab is Running until it has completed, at which stage it is no longer displayed on the page. Note that you may need to refresh the page to see the updated status.
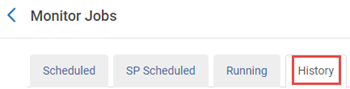
- In the Monitor Jobs page select History.
- Select the Name of the CSV job.

- Select the link next to Link to Exported Records.

- In the Exported Files page select Download from the row actions menu.
Bulk Update of Existing Research Assets
You can update existing research assets in a set, using the Update Set of Research Assets job as described below. Alternatively, you can update selected research assets in a set using the CSV Import feature (see here). For information on working with sets see Managing Search Queries and Sets.
Bulk Update of Existing Research Assets in a Set Using the Manual Job
If you want to apply the same change to all members of the set, use the Update Set of Research Assets job (see here). Otherwise, use CSV Import as described below.
The following operations are supported by the Update Set of Research Assets job:
- Creator or Contributor
- Replace affiliation on asset - Replace the affiliation that the creator or contributor had at the time that the asset was created.
- Update public profile display - Display or hide the asset in the public Profile of the researcher.
- Academic Unit
- Add - Add an asset's academic unit to a set of assets.
- Remove - Remove an asset's academic unit from a set of assets.
- Replace - Update one academic unit with another for a set of assets.
- Access Rights - Update or remove the access rights granted to an asset.
- Remove - Remove the access rights for an asset.
- Replace - Update the access rights for an asset.
- License - Replaces or removes the license held by an asset.
- Remove - Remove the license for an asset.
- Replace - Update the license for an asset.
- Asset Type - Update from one asset type to another.
- Replace - Update the asset type for an asset.
- Visibility - Change an asset's Profile and Portal visibility.
- Portal visibility - Select True to display the asset on the Portal.
- Profile visibility - Select True to display the asset on the Profile.
- Non-affiliated authors - Remove an asset's non-affiliated authors.
- Remove All - Remove all non-affiliated authors from the assets in the set.
- Links - Remove all links
- Remove All - Remove all links from the assets in the set.
- Remove By - Remove links from the set according to selected criteria.
Bulk Update of Selected Existing Research Assets Using CSV Import
You can update a set of research assets by exporting it in CSV format, making changes to the CSV file, and then importing the file to Esploro. For information regarding the CSV file format and importing a file of new assets in CSV, see Esploro Import File Formats. For exporting in CSV format use the Research assets CSV export manual job (see Exporting Research Assets).
For importing research assets using profiles, see here.
For a video showing how to update research assets in bulk see How to Bulk Update Assets Using CSV.
To update a set of research assets using CSV import:
If you want to apply the same change to all members of the set, e.g., delete links from all members of a set, change the asset type for all members in the set, delete non-affiliated authors, etc., use the Update Set of Research Assets job. Otherwise, follow the steps below.
- Make a set of the assets you plan to update as described in Managing Search Queries and Sets.
- Export the assets as described in Exporting Research Assets
- Get the resulting CSV file from its download location.
- Import the CSV file to Excel as described below. Do not open the CSV in Excel, or the final digit of the MMS ID (research_originate_id) will change.
- Open a new spreadsheet in Excel.
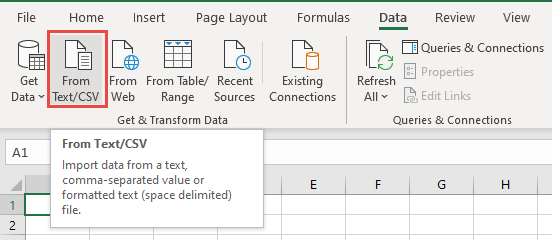
- From the Data menu select From Text CSV.
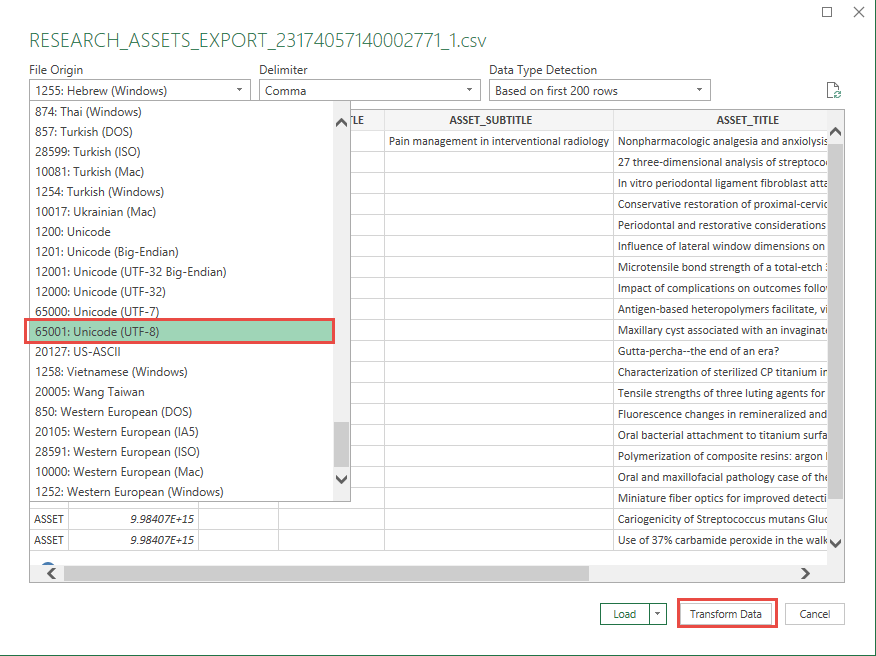
- Select the file that was downloaded and select Import.
- For File Origin select UTF-8 and then select Transform Data.
- Select the RESEARCH_ASSET_ID column and change the Data Type to Text.
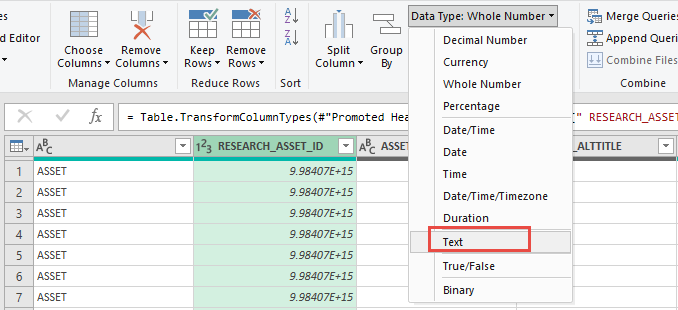
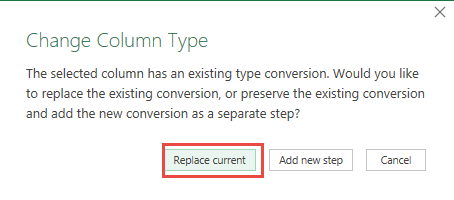
- In the Change Column Type box that appears select Replace Current.
- In the Home menu select Close and Load.
- Update the fields you need to change. Note that deleting the contents of any cell will delete that value from the Esploro asset.
Do not delete the asset ID or the update will not work - only assets with asset IDs will be uploaded. - For assets with multiple rows, if you delete some of those rows then the data in them will be deleted from the Esploro record.
- If you remove all rows of an asset then the asset will not be updated.
- The first 2 columns should not be moved. The other columns can be rearranged as needed.
- In the Table Design menu, select Convert to Range.
- In the message that appears select OK.

- Delete the A1 cell value (added automatically by Excel to avoid blank table headings).
- Save the file as a CSV.
After saving the CSV, make sure to not open the file in Excel before importing it back into Esploro or the process will not work. You can open the file in a text reader or notepad.
- You are now ready to import the file back into Esploro. Select Repository > Import Assets > Manage Import Profiles.
- If you already have a CSV Import profile for research assets, you will see it on the Import Profiles page.
There is a difference between the profile for updating assets and the profile for importing new assets.
For updating existing assets, the Import Mode field should be set to Update. For importing new assets, the Import Mode field should be set to Create new. - If you don't have a profile specifically for updating existing research assets, create a new profile (see Creating an Import Profile).
Make sure that Update is selected for Import Mode. - You can now run the profile by selecting Run from the row actions menu and then selecting the Select File option.
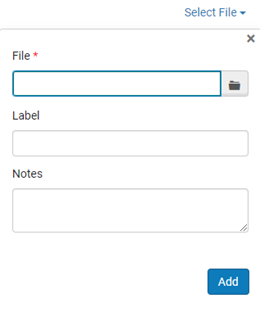
- Add the file details, select Add, and then select Submit.
- To see if the job has finished, refresh the page. When the job has completed, select Report from the row actions menu to view the job report. In the Assets Imported section of the report, the Overlaid records count refers to the number of existing assets that were updated.
You can view errors by selecting View errors from the row actions menu on the Records with warnings row.
Bulk Import of New Research Assets Using Import Profiles
You can import new research assets in bulk by performing a two-step process. First you configure and run an import profile to import the records. Second you run a job that extracts the files and adds them to the Esploro asset records. For more information about import profiles, see Managing Import Profiles. When importing assets, Esploro tries to match assets to existing ones and overlays them, and in addition, tries to match authors to existing authors, creators, and contributors and match them.
To update assets using CSV Import see here.
You manage Esploro import profiles on the Import Profiles (Esploro) page (Repository > Import Assets > Manage Import Profiles).

Actions you can perform on this page include:
- Create an import profile – see Creating an Import Profile for more information.
- View or edit an import profile – select View or Edit in the row actions list.
- Run an import profile – select Run in the row actions list (see Running an Import Profile for more information).
- See a history of when the profile was run – select History in the row actions list.
- Delete the profile – Select Delete in the row actions list.
Running the Import Research Assets Files Extract Job
After running an import profile job for adding new assets, you must run the Import Research Assets Files job (Admin > Run a Job) to extract the files and add them to the Esploro asset record. Select the imported file from which you want to extract the files.
Esploro Import File Formats
Esploro file format must be in XML or CSV format.
For an XML file, Ex Libris provides a schema for you to use to generate the XML. For details, see Esploro XML.
Select here for an example CSV file. You can create your own CSV file by first exporting a set of research assets; see Exporting Research Assets.
The CSV file format consists of a predefined header column and header row that must contain the data according to specific rules. The following is part of an example CSV file that can be used to perform a bulk import:
Take into account the following points when creating the import file:
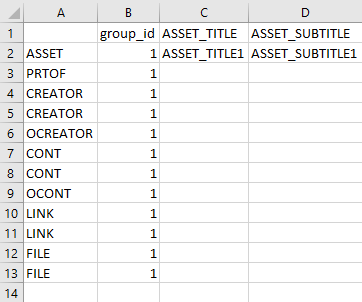
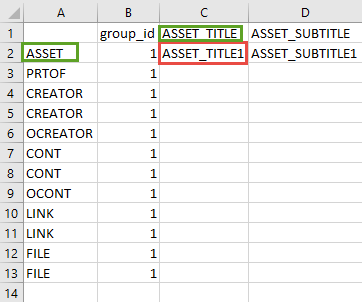
- The elements in the first column consist of the record types in which the fields of the first row reside in Esploro. For example, because the ASSET_TITLE field resides on the Asset (Row #2) in Esploro, the value of the asset title is placed in cell C2:
 Asset Title
 - The first two fields – the type and either group_id, research_asset_id, or research_originate_id are mandatory and must be in order. All remaining fields can be in any order.
- ASSET_TITLE, ASSET_AFFILIATION, and ASSET_RESTYPE are also mandatory.
Note that for ASSET_AFFILIATION you need to add the institutional prefix before each affiliation code, e.g., 01AUL_INST__01AUL_INST. - The vast majority of elements of Row 1 reside on the asset, so that the data for these row items will be in the Asset row (Row #2).
- Some elements of Row #1 (for example CREATOR_FAMNAME and CREATOR_GIVNAME) do not reside on the asset, but on other record types, for example, on the CREATOR. The data for these elements reside in the Creator row (Row #4, for example):
 Creator
 - The group ID number in Column B must be the same for all the metadata of the asset record. Multiple asset records can be added to one CVS file by giving them unique Group IDs. All of the elements in Column A must be present for each Group ID.
- For the record types in column A that can be repeated, the metadata for each instance of that element must be in that instance's row.
- Multiple ASSET_KEYWORDS columns can be included in a single CSV file. This is one way you can add multiple keywords to an asset: Add additional columns with the heading ASSET_KEYWORDS to the file, and then add additional keywords to the asset rows in those columns.
- You can also add multiple keywords in a single column by separating them with these characters: @@.
 Attaching Multiple Keywords to Assets Using Multiple Columns and/or @@ as a Separator
The following table provides information for each column element:
| Field Code | Multiple | Field | Description | Values / Format |
|---|---|---|---|---|
| type | Line Type (mandatory) | The type of record to import (see the next column). Multiple lines may be used to import a single assets and its creators, files, etc. These are grouped by the ID of the next column.
Must be the first column. |
|
|
| group_id | Group ID (mandatory *) | Group ID is an arbitrary ID used to group records to an asset in this file.
* One of group_id, research_asset_id, or research_originate_id must be the second column. |
Free text | |
| research_asset_id | MMS ID (mandatory *) | When MMS ID is used, the asset in Esploro is replaced with the contents in this file. This field groups records to an asset in this file.
* One of group_id, research_asset_id, or research_originate_id must be the second column. |
Free text (digits) | |
| ASSET_ORIGASSET_ID | Originating System ID (mandatory *) | The ID from the originating system, if any. When Originating System ID is used, the asset in Esploro is replaced with the contents in this file. This field groups records to an asset in this file.
* One of group_id, research_asset_id, or research_originate_id must be the second column. |
Free text | |
| ASSET_TITLE | Asset Title (mandatory) | Free text | ||
| ASSET_SUBTITLE | Asset Subtitle | Free text | ||
| ASSET_DOI | Asset DOI | DOI | ||
| ASSET_PMID | Asset PMID | PMID | ||
| ASSET_ISBN | Y | Asset ISBN | ISBN | |
| ASSET_EISBN | Y | Asset EISBN | EISBN | |
| ASSET_PMCID | Asset PMCID | PMCID | ||
| ASSET_GOVTNUM | Asset GOVTNUM | GOVTNUM | ||
| ASSET_PUBLISHER | Asset Publisher | Free text | ||
| ASSET_PUBLICATIONPLACE | Asset PUBLICATIONPLACE | PUBLICATIONPLACE | ||
| ASSET_PUBLISHDATE | Asset Publication Date | At least one date is mandatory. | YYYYMMDD | |
| ASSET_AVAILDATE | Asset Available Date | At least one date is mandatory. | YYYYMMDD | |
| ASSET_ACCEPTDATE | Asset Accepted Date | At least one date is mandatory. | YYYYMMDD | |
| ASSET_COPYRIGHTDATE | Asset Copyright Date | At least one date is mandatory. | YYYYMMDD | |
| ASSET_CREATEDATE | Asset Creation Date | At least one date is mandatory. | YYYYMMDD - YYYYMMDD | |
| ASSET_OPENINGDATE | Asset OPENINGDATE | At least one date is mandatory. | YYYYMMDD | |
| ASSET_PERFORMANCEDATE | Asset PERFORMANCEDATE | At least one date is mandatory. | YYYYMMDD | |
| ASSET_CONFDAT | Asset Conference Date | At least one date is mandatory. | YYYYMMDD | |
| ASSET_SUBMITDATE | Asset Submitted Date | At least one date is mandatory. | YYYYMMDD | |
|
ASSET_DATEISSUE |
Asset Date Issued | At least one date is mandatory. | YYYYMMDD | |
| ASSET_DATESUB | Asset Date Submitted | For ETDs. At least one date is mandatory. | YYYYMMDD | |
| ASSET_DATEUPD | Y | Asset Date Updated | At least one date is mandatory. | YYYYMMDD |
| ASSET_DATEVALID | Asset Date Validated | At least one date is mandatory. | YYYYMMDD | |
| ASSET_DATEEPUB | Asset Date E-Published | At least one date is mandatory. | YYYYMMDD | |
| ASSET_DATEPOSTED | Asset Date Posted | At least one date is mandatory. | YYYYMMDD | |
| ASSET_DATEOTHER | Y | Asset Date Other | At least one date is mandatory. | YYYYMMDD |
| ASSET_DATEAPP | Asset Date Approved | For ETDs. At least one date is mandatory. | YYYYMMDD | |
| ASSET_DATECOMPL | Asset Date Completed | For ETDs. At least one date is mandatory. | YYYYMMDD | |
| ASSET_DATEDEGREE | Asset Date Degree Awarded | For ETDs. At least one date is mandatory. | YYYYMMDD | |
| ASSET_DATEDEF | Asset Date Defended | For ETDs. At least one date is mandatory. | YYYYMMDD | |
| ASSET_DATEPRESNT | Asset Date Presented | At least one date is mandatory. | YYYYMMDD | |
| ASSET_EVNTDAT | Asset Event Date | At least one date is mandatory. | YYYYMMDD | |
| ASSET_RESTYPE | Asset Resource Type | The Type Code of the asset type (mandatory). This is composed of the asset's category and type; see Esploro Glossary of Terms and Basic Concepts. | Example: publication.book | |
| ASSET_RESSUBTYPE | Asset Resource Subtype | The subtype code of the asset (optional); see Esploro Glossary of Terms and Basic Concepts. | Example: subtype.tabular | |
| ASSET_KEYWORDS | Y | Asset Keywords | Asset subjects | Free text in the form of single words or multi-word phrases; separate multiple keywords with the characters @@; see above |
| ASSET_PEEREVIEW | Asset Peer Reviewed |
|
||
| ASSET_LANG | Y | Asset Language | ISO 639-2/B Three letter code | |
| ASSET_ABSTRACT | Asset Abstract | Free text | ||
| ASSET_COPYRIGHT | Asset Copyright | Copyright statement. | Free text | |
| ASSET_LICENSECODE | Asset License | License code; see Configuring Esploro Licenses | ||
| ASSET_ACCESSRIGHT | Asset Access Rights | Access Rights ID; see Configuring Esploro Access Rights | ||
| ASSET_ACCESSRIGHTDATE | Asset Access Rights Date | Relevant when access rights is not "open": A date associated with the access rights, such as a fixed embargo date. | MM/DD/YYYY | |
| ASSET_AFFILIATION | Y | Asset Affiliation (mandatory) | Research organization unit. | Code, visible when viewing the organization unit; see Configuring Research Organization Units. Requires the institutional prefix before the code, e.g., 01AUL_INST__01AUL_INST |
| ASSET_ANZTOA | Asset Type of Activity | Relevant to ANZ customers |
|
|
| ASSET_AUDIENCE | Asset Audience | Free text | ||
| ASSET_BIBLIOGRAPH | Asset Bibliograpy | Free text | ||
| ASSET_COURSENAME | Asset Course Name | Free text | ||
| ASSET_COURSENUMB | Asset Course Number | Free text | ||
| ASSET_COVERAGE | Asset Coverage | Free text | ||
| ASSET_DATECOLLECT | Asset Date Collected | YYYYMMDD-YYYYMMDD | ||
| ASSET_DATEISSUE | Asset Date Issued | YYYYMMDD | ||
| ASSET_DATERENEW | Asset Date Renewed | YYYYMMDD | ||
| ASSET_DGRSEASON | Asset Degree Season | Code table | ||
| ASSET_DGRPRG | Asset Degree Program | Code table | ||
| ASSET_EDUCTNLEVEL | Asset Education Level | Free text | ||
| ASSET_GRANTNOTE | Asset Grant Note | Free text | ||
| ASSET_ILLUSTRATION | Asset Illustration | Free text | ||
| ASSET_INSTRUCTMETHOD | Asset Instruction Method | Free text | ||
| ASSET_LEARNTIME | Asset Typical Learning Time | Free text | ||
| ASSET_LOCLFLD1 | Asset Local Field 1 | Free text | ||
| ASSET_LOCLFLD2 | Asset Local Field 2 | Free text | ||
| ASSET_LOCLFLD3 | Asset Local Field 3 | Free text | ||
| ASSET_LOCLFLD4 | Asset Local Field 4 | Free text | ||
| ASSET_LOCLFLD5 | Asset Local Field 5 | Free text | ||
| ASSET_LOCLFLD6 | Asset Local Field 6 | Free text | ||
| ASSET_LOCLFLD7 | Asset Local Field 7 | Free text | ||
| ASSET_LOCLFLD8 | Asset Local Field 8 | Free text | ||
| ASSET_LOCLFLD9 | Asset Local Field 9 | Free text | ||
| ASSET_LOCLFLD10 | Asset Local Field 10 | Free text | ||
| ASSET_LOCLFLD11 | Asset Local Field 11 | Free text | ||
| ASSET_LOCLFLD12 | Asset Local Field 12 | Free text | ||
| ASSET_LOCLFLD13 | Asset Local Field 13 | Free text | ||
| ASSET_LOCLFLD14 | Asset Local Field 14 | Free text | ||
| ASSET_LOCLFLD15 | Asset Local Field 15 | Free text | ||
| ASSET_ORIGASSET_ID | Originating System ID | The ID from the originating system, if any. Relevant when not using research_originate_id. | Free text | |
| ASSET_ORIG_REPOSITORYNAME | Asset Originating System Name | The asset name from the originating system, if any. | Free text | |
| ASSET_PAGES | Asset Pages | Free text | ||
| ASSET_PROJTYPE | Asset Project Type | For ETDs. | Code table | |
| ASSET_PRIMARYSUBJ | Asset Degree Primary Subject | For ETDs. | A research topic code; see Appendix: Research Topics | |
| ASSET_SECONDARYSUBJ | Asset Degree Secondary Subject | For ETDs. | A research topic code; see Appendix: Research Topics | |
| ASSET_SIZE | Y | Asset Size | Free text | |
| ASSET_EXTENT | Y | Asset Extent | Free text | |
| ASSET_FORMAT | Y | Asset Format | Free text | |
| ASSET_METHODS | Asset Methods | Free text | ||
| ASSET_MOBILCOMPAT | Asset Mobile Compatibility |
|
||
| ASSET_EDITION | Asset Edition | Free text | ||
| ASSET_PUBSEASON | Asset Publication Season | Code table | ||
| ASSET_SERIESNUMBER | Asset Series Number | Free text | ||
| ASSET_SRCCODEAVAIL | Asset Source Code Availability |
|
||
| ASSET_SPATIALDESC | Asset Spatial Description | Free text | ||
| ASSET_SUBJECT | Y | Asset Subject | Asset research topics. | A research topic code; see Appendix: Research Topics |
| ASSET_TECHINFO | Asset Technical Information | Free text | ||
| ASSET_TEMPORALDESC | Asset Temporal Description | Free text | ||
| ASSET_OTHERDESC | Asset Other Description | Drop down field that includes an option to add free text | ||
| ASSET_OPENACCESS | Asset Open Access |
|
||
| ASSET_PRVNCE | Asset Provenance | Not in use | Free text | |
| ASSET_SERIESINFO | Asset Series Information | Free text | ||
| Free text | ||||
| ASSET_ALTTITLE | Y | Asset Alternate Title | Free text | |
| ASSET_TRANSLATTI | Y | Asset Translated Title | Free text | |
| ASSET_OTHERTIT | Y | Asset Other Title | Asset alternate title 2. | Free text |
| ASSET_SERIES | Asset Series | Free text | ||
| ASSET_VOLNUM | Asset Volume Number | Free text | ||
| ASSET_IDURI | Asset ID URI | Not in use | Free text | |
| ASSET_IDOTHER | Asset ID Other | Not in use | Free text | |
| ASSET_IDPQDT | Asset ID PQDT | Not in use | Free text | |
| ASSET_HANDLE | Asset HANDLE | Free text | ||
| ASSET_COMMENT | Asset Comment | Free text | ||
| ASSET_CONFNAME | Asset Conference Name | Free text | ||
| ASSET_CONFNUM | Asset Conference Number | Free text | ||
| ASSET_CONFLOC | Asset Conference Location | Free text | ||
| ASSET_EVNTNAM | Asset Event Name | Free text | ||
| ASSET_EVNTLOC | Asset Event Location | Free text | ||
| ASSET_EVNTTYP | Asset Event Type | |||
| ASSET_EVNTNUM | Asset Event Number | Free text | ||
| ASSET_DGRGRANT | Y | Asset Degree Grantor | For ETDs. Organization that granted the degree. | Free text |
| ASSET_DGRLEVEL | Asset Degree Level | Not in use | Free text | |
| ASSET_DGRNAME | Asset Degree Name | For ETDs. Degree awarded. | Use ETD degree name mapping table. | |
| ASSET_PAGESUNPAGINATED | Asset Pages Unpaginated | Free text | ||
| ASSET_APPLICATIONDATE | Asset Application Date | Free text | ||
| ASSET_RENEWEDDATE | Asset Renew Date | Free text | ||
| ASSET_PATENT_STATUS | Asset Patent Status | Free text | ||
| ASSET_PATENT_NUMBER | Asset Patent Number | Free text | ||
| ASSET_PATENT_ABBREVNUM | Asset Patent Abbreviation Number | Free text | ||
| ASSET_PATENT_KINDCODE | Asset Patent Kind Code | Free text | ||
| ASSET_PATENT_APPLICATIONNUM | Asset Patent Application Number | Free text | ||
| ASSET_PATENT_APPLICATIONCODE | Asset Patent Application Code | Free text | ||
| ASSET_PATENT_AGENCY | Asset Patent Agency | Free text | ||
| ASSET_WOS | Asset WOS | WOS | ||
| ASSET_SCOPUS | Asset SCOPUS | SCOPUS | ||
| ASSET_ARXIV | Asset ARXIV | ARXIV | ||
| ASSET_ARK | Asset ARK | ARK | ||
| ASSET_SICI | Asset SICI | SICI | ||
| ASSET_RNO | Asset RNO | RNO | ||
| ASSET_ISMN | Asset ISMN | ISMN | ||
| ASSET_PORTAL_VISIBILITY | Asset Portal Visibility |
|
||
| ASSET_PROFILE_VISIBILITY | Asset Profile Visibility |
|
||
| ASSET_IDENTIFIER_ADDITIONAL01 | Asset Additional Identifier | IDENTIFIER_ADDITIONAL01 | ||
| ASSET_IDENTIFIER_ADDITIONAL02 | Asset Additional Identifier | IDENTIFIER_ADDITIONAL02 | ||
| ASSET_IDENTIFIER_ADDITIONAL03 | Asset Additional Identifier | IDENTIFIER_ADDITIONAL03 | ||
| ASSET_IDENTIFIER_ADDITIONAL04 | Asset Additional Identifier | IDENTIFIER_ADDITIONAL04 | ||
| ASSET_IDENTIFIER_ADDITIONAL05 | Asset Additional Identifier | IDENTIFIER_ADDITIONAL05 | ||
| ASSET_IDENTIFIER_ADDITIONAL06 | Asset Additional Identifier | IDENTIFIER_ADDITIONAL06 | ||
| ASSET_IDENTIFIER_ADDITIONAL07 | Asset Additional Identifier | IDENTIFIER_ADDITIONAL07 | ||
| ASSET_IDENTIFIER_ADDITIONAL08 | Asset Additional Identifier | IDENTIFIER_ADDITIONAL08 | ||
| ASSET_IDENTIFIER_ADDITIONAL09 | Asset Additional Identifier | IDENTIFIER_ADDITIONAL09 | ||
| PRTOF_EPAGE | Journal End Page | For type PRTOF. | Free text | |
| PRTOF_SPAGE | Journal Start Page | For type PRTOF. | Free text | |
| PRTOF_ISSUE | Journal Issue | For type PRTOF. | Free text | |
| PRTOF_ARTICLENUMBER | PRTOF_ARTICLENUMBER | Free text | ||
| PRTOF_VOL | Journal Volume | For type PRTOF. | Free text | |
| PRTOF_ISSN | Journal ISSN | For type PRTOF. | Free text | |
| PRTOF_EISSN | Journal EISSN | For type PRTOF. | Free text | |
| PRTOF_ISBN | Book ISBN | For type PRTOF | Free text | |
| PRTOF_EISBN | Book Electronic ISBN | For type PRTOF | Free text | |
| PRTOF_PAGES | Pages of parent publication | For type PRTOF. | Free text | |
| PRTOF_NLMABRV | NLM abbreviation for journal | For type PRTOF. | Free text | |
| PRTOF_TITLE | Journal Title | For type PRTOF. | Free text | |
| PRTOF_DOI | Journal DOI | For type PRTOF | Free text | |
| CREATOR_FAMNAME | There can be multiple creator lines for the same asset | Creator Last Name | For type CREATOR. | Free text |
| CREATOR_GIVNAME | Creator First Name | For type CREATOR. | Free text | |
| CREATOR_MIDNAME | Creator Middle Name | For type CREATOR. | Free text | |
| CREATOR_NAMESUF | Creator Name Suffix | For type CREATOR. | Free text | |
| CREATOR_AFFILIATION | Creator Affiliation | For type CREATOR. Organization research unit or external research organization. | Code table | |
| CREATOR_EMAIL | Creator Email | For type CREATOR. | Free text | |
| CREATOR_RESEARCHERID | Creator Researcher ID | For type CREATOR. Web of Science Researcher ID. | Free text | |
| CREATOR_ORCID | Creator ORCID | For type CREATOR. | Free text | |
| CREATOR_PRIMARYID | Creator PRMARYID | For type CREATOR | Free text | |
| CREATOR_BRCODE | Creator BRCODE | For type CREATOR | Free text | |
| CREATOR_ADDITIONAL | Creator ADDITIONAL | For type CREATOR | Free text | |
| OCREATOR_ORGANIZATION | Organization Name | For type OCREATOR. The organization name. | Free text | |
| CONT_TYPE | There can be multiple contributor lines for the same asset | Contributor Type | For type CONT. | Code in table |
| CONT_CONTNAME | Contributor Full Name | For type CONT. | Free text | |
| CONT_FAMNAME | Contributor Last Name | For type CONT. | Free text | |
| CONT_GIVNAME | Contributor First Name | For type CONT. | Free text | |
| CONT_MIDNAME | Contributor Middle Name | For type CONT. | Free text | |
| CONT_NAMESUF | Contributor Name Suffix | For type CONT. | Free text | |
| CONT_AFFILIATION | Contributor Affiliation | For type CONT. | Code in page | |
| CONT_EMAIL | Contributor Email | For type CONT. | Free text | |
| CONT_RESEARCHERID | Contributor Researcher ID | For type CONT. Web of Science Researcher ID. | Free text | |
| CONT_ORCID | Contributor ORCID | For type CONT. | Free text | |
| CONT_PRIMARYID | Contributor PRIMARYID | For type CONT. | Free text | |
| CONT_BRCODE | Contributor BRCODE | For type CONT. | Free text | |
| CONT_ADDITIONAL | Contributor ADDITIONAL | For type CONT. | Free text | |
| OCONT_ORGANIZATION – can be multiple | Organization Contributor Name | For type OCONT. Organization research unit or external research organization. | Code | |
| LINK_LINKURL | There can be multiple link lines for the same asset | Link URL | For type LINK. | Free text |
| LINK_LINKTITLE | Link Title | For type LINK. | Free text | |
| LINK_LINKDESC | Link Description | For type LINK. | Free text | |
| LINK_CONTENTTYPE | Link Content Type | For type LINK. | Code from the Asset File and Link Types table; see Configuring Research Asset File and Link Types | |
| LINK_LINKLCNSE | Link License | For type LINK. | License code; see Configuring Esploro Licenses | |
| LINK_LINKRIGHTS | Link Access Rights | For type LINK. | Access Rights ID; see Configuring Esploro Access Rights | |
| LINK_LINKOWN | Link Owner | For type LINK. Link owner. |
|
|
| LINK_ORDER | Link Order | For type LINK. Link order. | Free text | |
| LINK_DISPLAY_IN_VIEWER | Link Display in Viewer | For type LINK. | Free text | |
| FILE_FILEURL | There can be multiple file lines for the same asset | File URL | For type FILE. Exiting file URL; the file will be downloaded from this URL and uploaded to Esploro. | Free text |
| FILE_LICENSE | File License | For type FILE. | License code; see Configuring Esploro Licenses | |
| FILE_RIGHTS | File Access Rights | For type FILE. | Access Rights ID; see Configuring Esploro Access Rights | |
| FILE_CONTENTTYPE | File Type | For type FILE. | Code from the Asset File and Link Types table; see Configuring Research Asset File and Link Types | |
| FILE_DESCRIPTION | File Description | For type FILE. | Free text | |
| FILE_DISPLAY_NAME | File Display Name | For type FILE. | Free text | |
| FILE_ORDER | File Order | For type FILE. | Numeric | |
| FILE_RIGHTS_DATE | File Rights Date | For type FILE. | YYYYMMDD | |
| FILE_RIGHTS_REASON | File Rights Reason | For type FILE. | Free text | |
| FILE_SUPPLEMENTAL | File Supplemental | For type FILE. |
|
Viewing the Research Import Profile Reports
Running a research import profile produces two reports:
- Research Asset Import Profile Report
This report displays the assets that were uploaded by running the import profile including records processed, assets matched, authors matched, and assets imported and not imported.
- Author Matching Report
This report displays authors matched by the import profile and their associated assets.
Research Asset Import Profile Report
- Select Repository > Manage Import Profiles and then select History in the row actions for the profile.
- Select Report in the row actions list for the report you want to view.
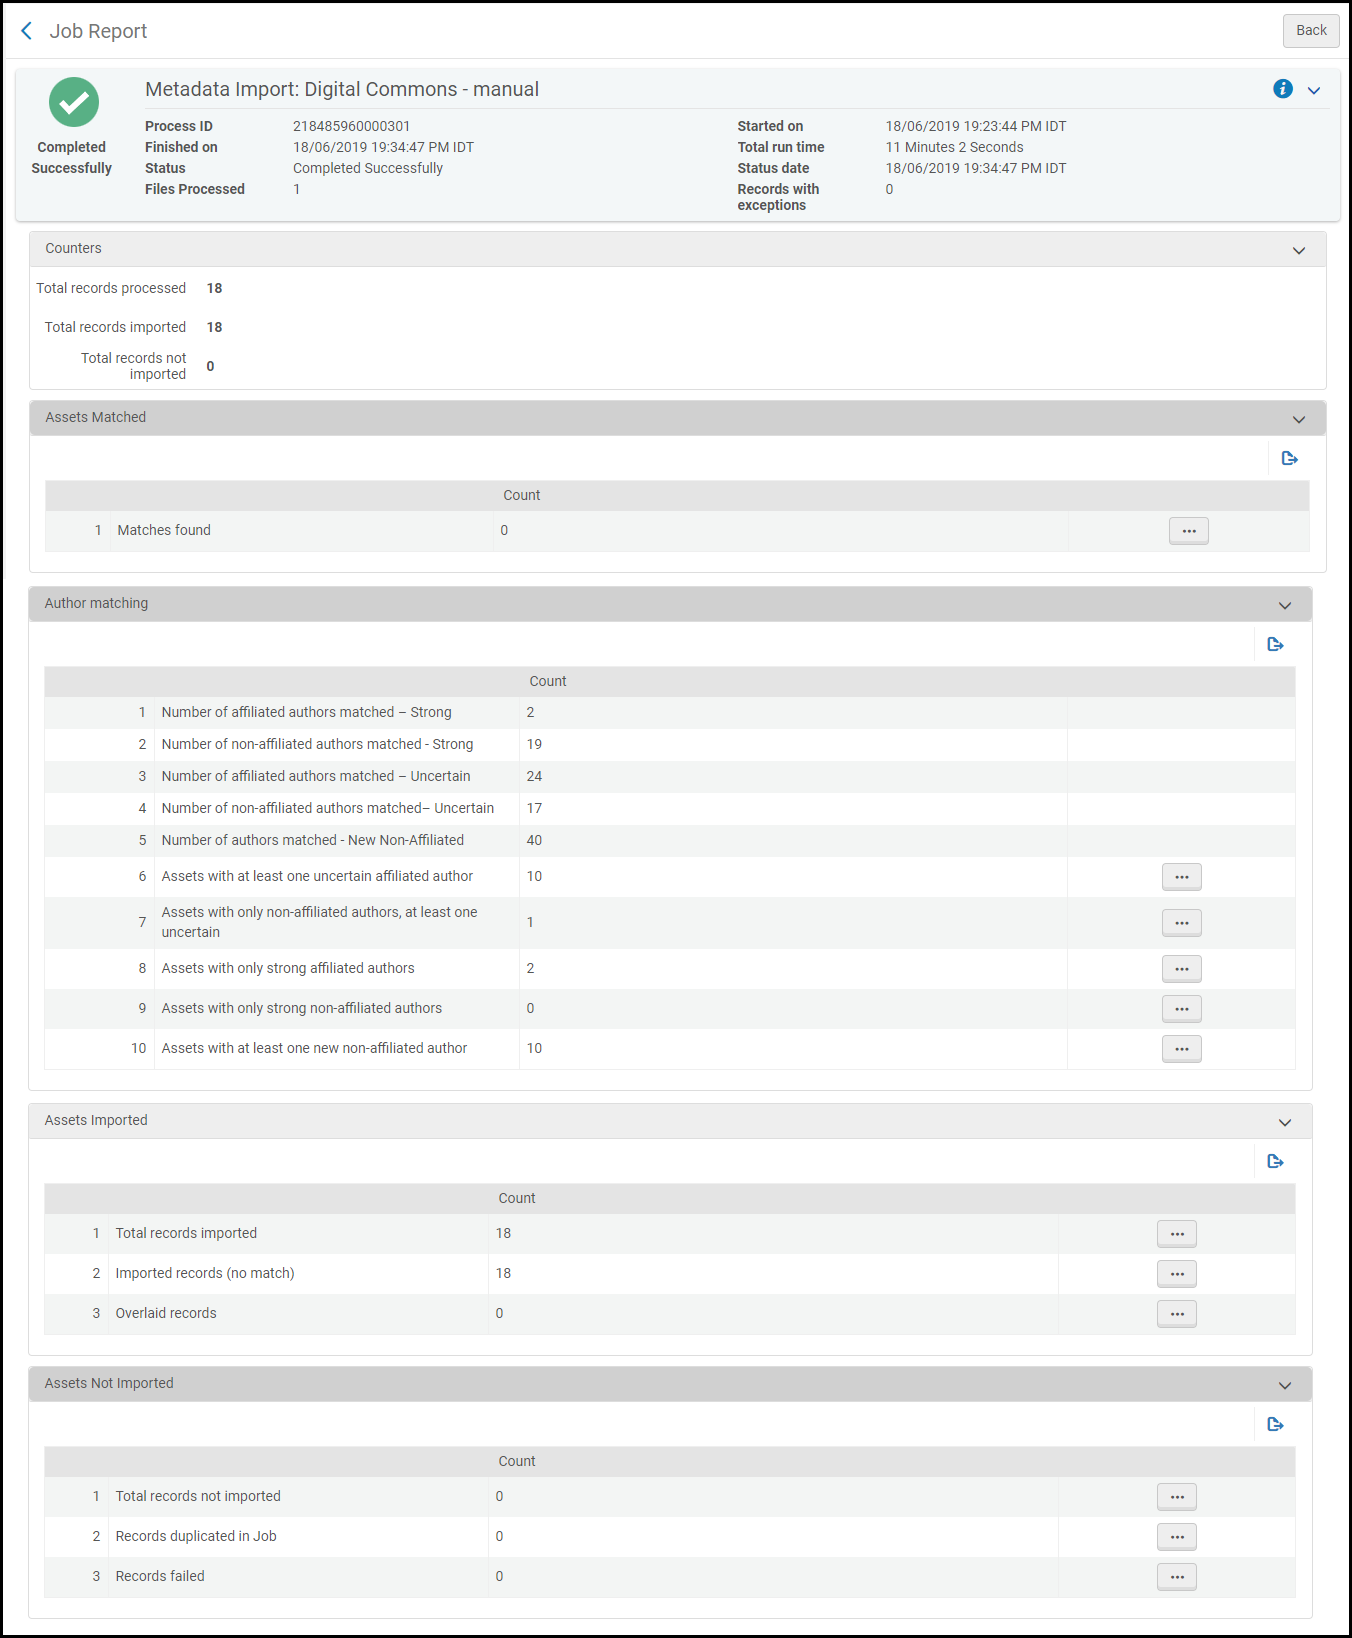
For some results, the following options are available:
- View the list of assets that match the result
- Create a set out of these assets
- Download this list of assets to an XML file.
Author Matching Report
- Select Repository > Manage Import Profiles and then select History in the row actions for the profile.
- Select Author matching (by authors) in the row actions list for the report you want to view.
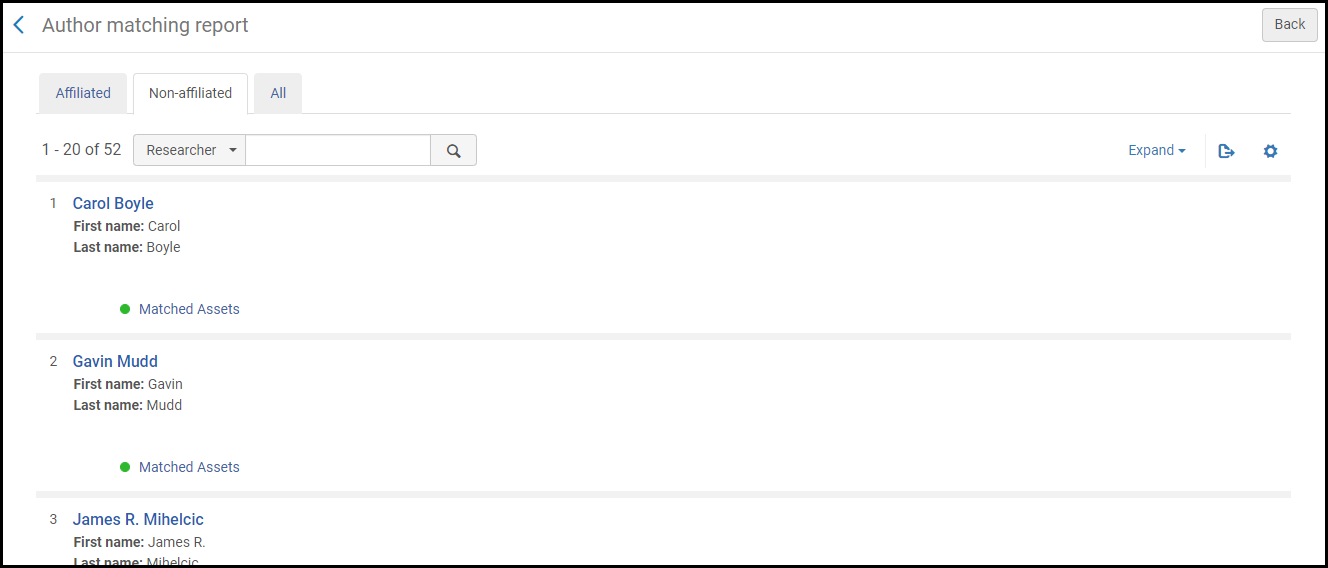
Select the relevant tab to view affiliated or non-affiliated authors. Select an author to view their researcher Profile. Select the Matched Assets tab in any author to see associated assets.
Importing Research Asset Files in Bulk
If you have a set of research assets that link to files in other locations, you can import those files to Esploro in bulk and change the assets to point to the (now) local files instead. See the Import Research Assets Files job in Running Manual Jobs on Defined Sets. You can also reach this job by selecting Research > Import Assets > Import Research Assets Files. To configure bulk imports see here.
Importing Relations for Migrated Assets
When importing assets from other systems, it is possible to include an asset's relations to other assets in the input XML. For more details on the structure of the input XML, see the Developers Network.
Once the relations are successfully imported with the assets, you need to run the Import Research Assets Relations job on the migrated set of assets to create the relations for each asset in the set. For more details on jobs, see Running Manual Jobs on Defined Sets.

Editing Research Assets in Bulk
- Navigate to the Esploro jobs page (Admin > Run a Job).
- From the Type drop down menu, select Research Assets.
- Select the Update Set of Research Assets radio button and click Next.
- Select a radio button corresponding to a set and click Next.
- Select an action for the fields to update in the following table:
Update Set of Research Assets Job Field to Update Action Comments Creator or Contributor Replace Affiliation on Asset Academic Unit One of the following actions:
- Add
- Replace
- Remove
Access Rights One of the following actions:
- Replace
- Remove
License One of the following actions:
- Replace
- Remove
- Click Next. The Run a Job - Review and Confirm screen is displayed.
- Click Submit to run the job, Back to change your task parameters, or Cancel to cancel the job.
Deleting Research Assets in Bulk
- Navigate to the Esploro jobs page (Admin > Run a Job).
- From the Type drop down menu, select Delete Set of Assets.
- Select the Delete Set of Research Assets radio button and click Next.
- Select a radio button corresponding to a set and click Next.
- Select the checkboxes according to the following table:
Delete Set of Research Assets Job Checkbox Action Comments Do not delete if related to other assets Determines whether or not to delete assets that are related to other assets. Do not delete if includes a file Determines whether or not to delete assets that include a file. Do not delete if includes a reserved DOI Determines whether or not to delete assets that have a reserved DOI. - Click Next. The Run a Job - Review and Confirm screen is displayed.
- Click Submit to run the job, Back to change your task parameters, or Cancel to cancel the job.
Assets with a registered DOI cannot be deleted. However, assets with a reserved DOI are deleted by the job.
Registering DOIs for Asset Sets in Bulk
- To define a set, see Managing Search Queries and Sets.
- The Register DOI for Research Assets job is a Research Assets job. For more information, see the Register DOI for Research Assets job in Running Manual Jobs on Defined Sets.
- For the job to run, a DOI profile must be configured. For more information on configuring a DOI profile, see Configuring DOI Agencies.
The following validation checks are performed by the batch job:
- Asset type matches one of the configurations.
- Asset is not suppressed.
- Asset does not have DOI (excluding reserved). If its already a registered DOI, no update is done with this job, i.e., the asset is skipped.
- For DataCite, the asset has creators and contributors.
DOIs will be registered only for assets that pass all the validation checks.
Asset Normalization
Asset normalization is the process of automatically transforming (add, update or delete) the data in one or more assets using normalization rules (also known as drools).
Some sections of the asset, such as relationships, files and links, are not supported for editing by drools. For these, you need to use the CSV Update (see Bulk Update of Existing Research Assets Using CSV Import).
The process of normalization includes the following steps:
- Create a research asset set. See Managing Search Queries and Sets.
- Create a normalization rule (also known as a drool): a series of transformation steps in a specialized syntax to conditionally match data in the asset and transform that data in some way: add to, delete, move, or replace the data. See Managing Asset Normalization Rules.
- Create a normalization process that includes the rule (see Configuring Normalization Processes). This creates a manual job that you can run.
- Run the manual job on this set, specifying the normalization rule to use for the transformation. See User defined research assets normalization jobs in Running Manual Jobs on Defined Sets.
Managing Asset Normalization Rules
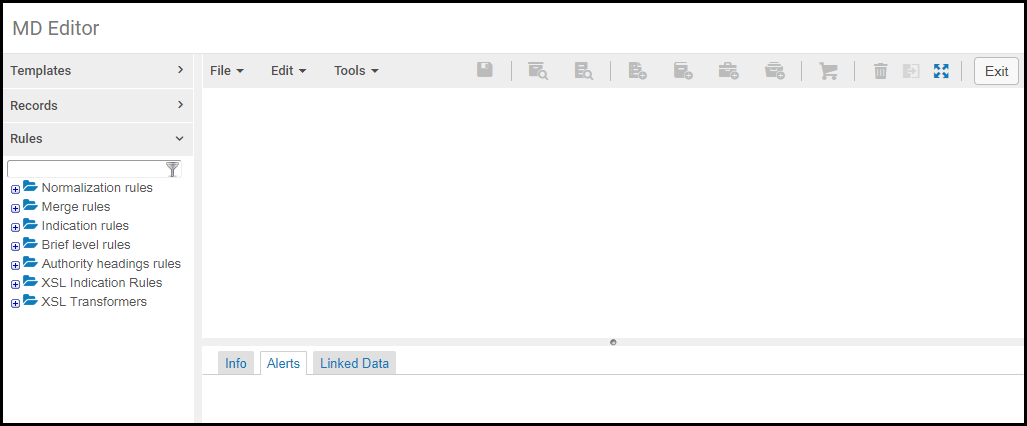
- Select Show MDE from the Esploro menu. The Metadata (MD) Editor opens. The MD Editor is a rich, complex record editing tool. Most of its features are relevant only to Alma and are described in the Alma documentation (see Navigating the MD Editor Page).
- Select Rules.
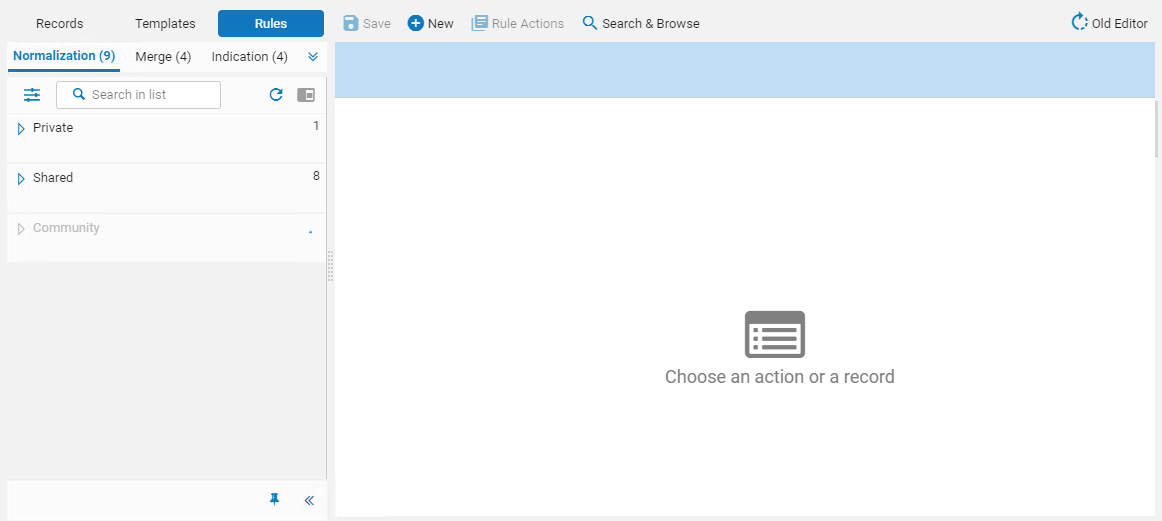 MD Editor - Rules
 - Select New > Normalization rules (Research). The Rules properties pane appears.
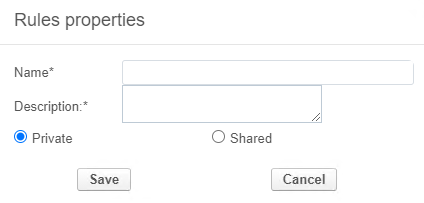 Rules Properties Pane
 - Enter a name and description, select Shared, and select Enabled. All of these actions are mandatory.
- Select Save to create the rule. The rule appears in the left pane under Normalization rules (Research) > Shared. If you do not see the Normalization (Research) sub-tab in the left pane, select
 on the top to display the full list of available sub-tabs.
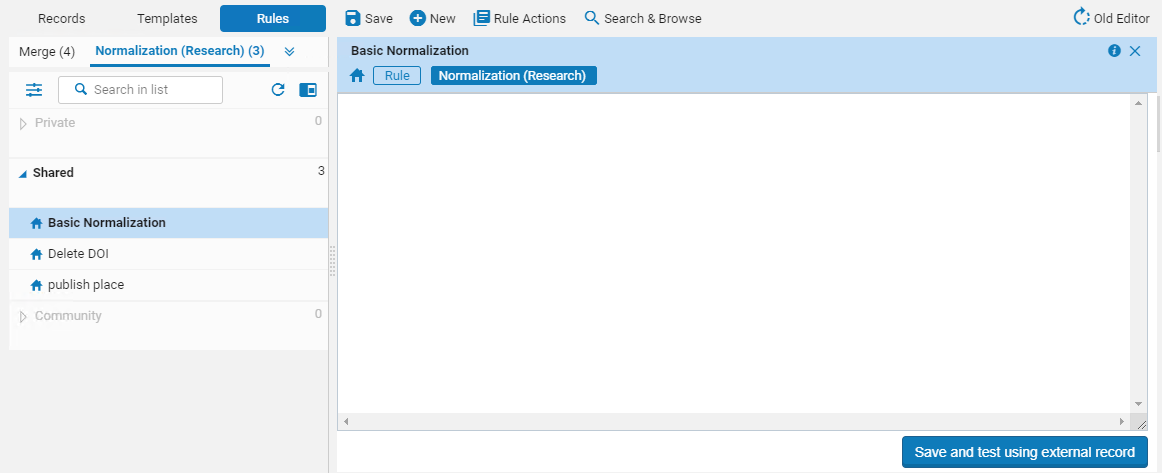 Normalization Rule (Research)
 - Enter the normalization script in the central text box and select Save. For assistance, contact Ex Libris. Some examples include the following.
rule "Remove digits"
when
exists "/record/title"
then
set TEMP"1" to get value "/record/title"
remove substring using regex (TEMP"1","\\d+")
replace "title" with value TEMP"1"
endrule "Replace digits with -"
when
exists "/record/title"
then
set TEMP"1" to get value "/record/title"
replace string by string (TEMP"1","\\d+","-")
replace "title" with value TEMP"1"
endrule "Get only the digits"
when
exists "/record/title"
then
set TEMP"1" to get value "/record/title"
return substring using regex (TEMP"1","\\d+")
replace "title" with value TEMP"1"
endrule "Set peerreview to yes"
when
(true)
then
replace "peerreview" with value "yes"
endrule "Change resource type"
when
"//resourcetype.esploro" equals "creativeWork.musicalComposition"
then
replace "resourcetypeEsploro" with value "creativeWork.musicalScore"
end
You can test the normalization rule without actually importing any records.
- When editing the rule, select Save and test using external record. Alternately, you can reach for this page from the Main Menu (Repository > Manage Assets > Test Normalization Rules). The Testing Normalization of Research Assets page appears.
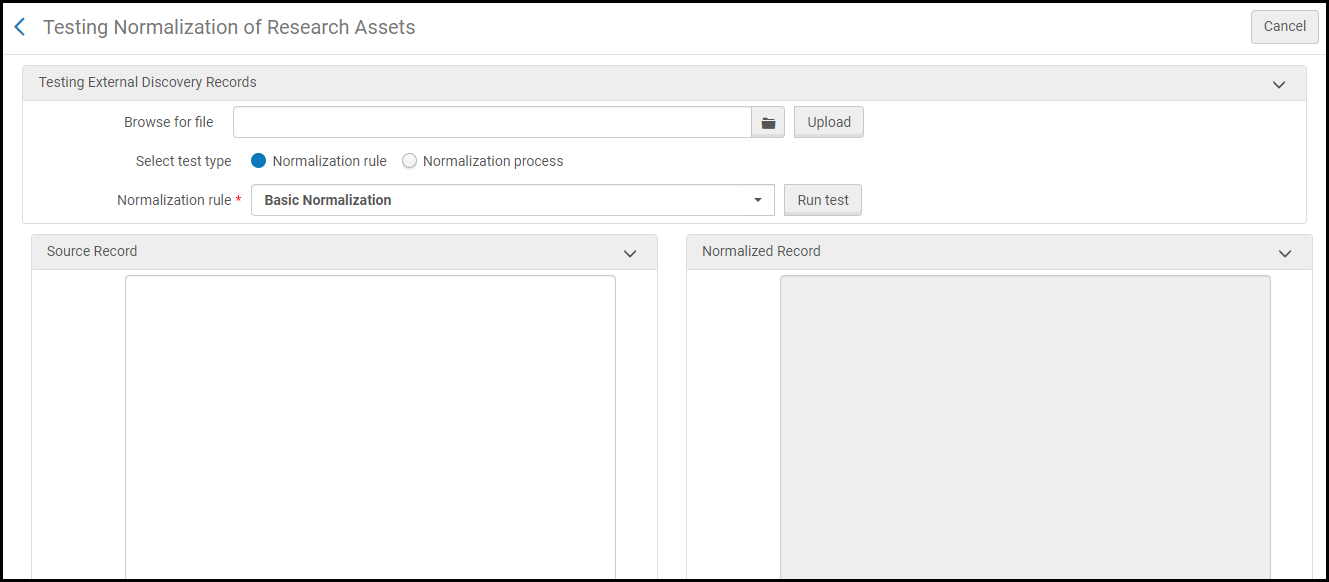 Testing Normalization of Research Assets Page
 - In order to perform the test, you need to save one test record in XML format. You can use this same record for future testing. For full details of how to create the test record, see here.
- Browse for the file or enter the file name and select Upload.
- Select the normalization rule and select Run test.
- You can view the results on the page.
Configuring Normalization Processes
For more information, see Asset Normalization.
You can configure Esploro normalization processes on the (Asset) Process List page (Repository > Manage Assets > Normalization Processes). For more information about this page, see Configuring Processes in. On this page, you can add, view, edit, copy, and delete processes.

- On the (Asset) Process List page, select Add Process. Step one (Process Details) of a wizard appears.
 Process Details Page
 - Leave the fields as they are and select Next. The Process Details - General Information page (step 2) appears.
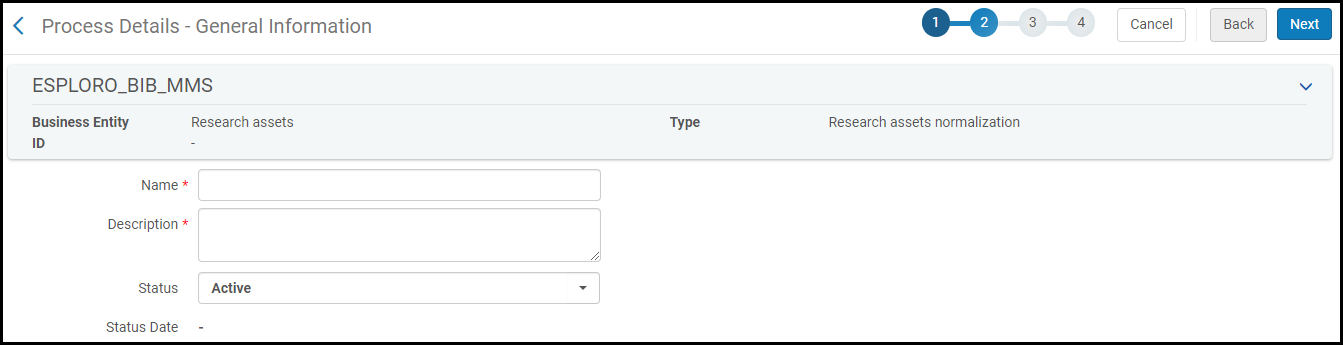 Process Details - General Information Page
 - Enter a name and description (these are both mandatory), and select Next. The Process Details - Add Tasks page (step 3) appears.
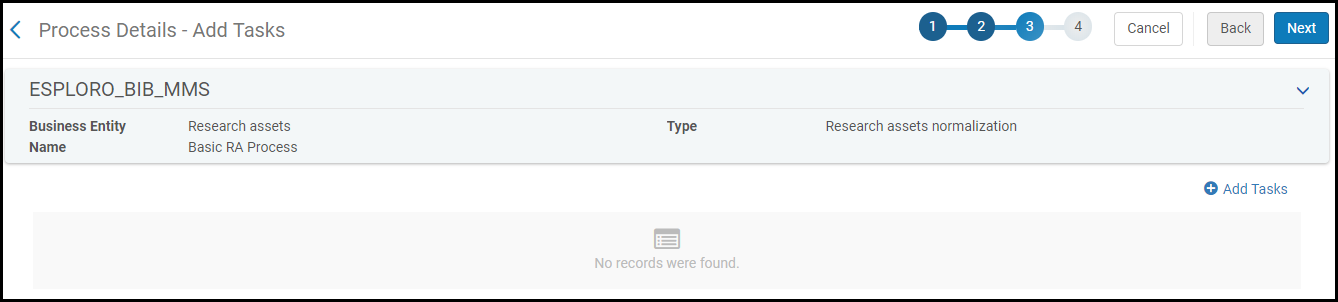 Process Details - Add Tasks Page
 - On this page, add one or more normalization rules (tasks) to apply in succession when this process runs. Each of these rules is a task. For each task, perform the following steps.
- Select Add Task. The Add Tasks pane appears.
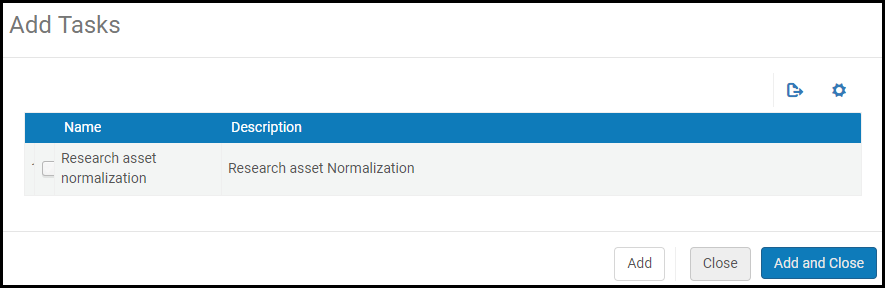 Add Tasks Pane
 - Select the only option (Research asset normalization) and select Add and Close.
- Select Add Task. The Add Tasks pane appears.
- Select Next. The Process Details - Task Parameters page (step 4) appears.
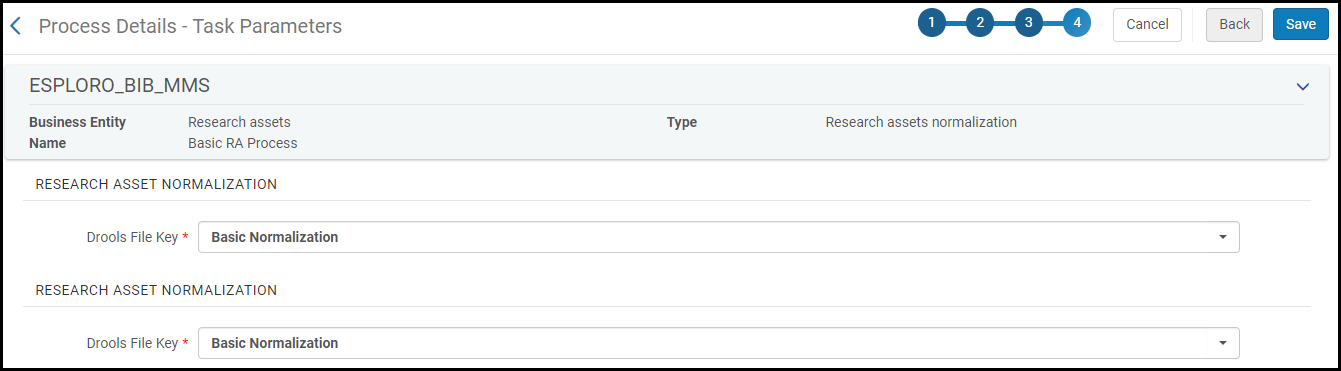 Add Tasks Pane
 - For each task that you configured in the last steps, select a previously defined asset normalization rule.
- Select Save to save the process. A new manual job appears on the Run a Job page. See Running Manual Jobs on Defined Sets.
ETD Administrator Integration
Esploro supports an integration with ETD Administrator (using SWORD server) for depositing dissertations and theses into Esploro. Integration is handled by the SWORD Server integration profile. See ETD Administrator Integration for instructions. After the profile is created, the primary ETD administrator at your institution needs to contact ETD Administrator technical support and give them the URL, user name, and password.
Importing Usage Statistics
- Configuration Manager
You can import usage statistics into Esploro from an Excel document. This is useful if you want usage performed in another system to be recorded in Esploro for analytics reports and the Research Portal.
The format of the Excel file is different depending on the originating system and the export format the system provides for the usage:
Digital Commons
The following is an example of the Digital Commons format:

For an example copy of the Excel file, see the following files:
- A first row is required, but it is ignored.
- The header must be the second row.
- The header of the first column must indicate the match type, according to which the row is matched to an asset in Esploro, i.e., either URL or OriginatingAssetId.
The content of the first column should include:- The unique asset URL in Digital Commons for URL.
OR - The Asset ID in Digital Commons for OriginatingAssetId.
- The unique asset URL in Digital Commons for URL.
- The header must have at least one usage date per column. The usage date should be in the format MM/dd/yyyy.
EPrints
The following is an example of the EPrints format:
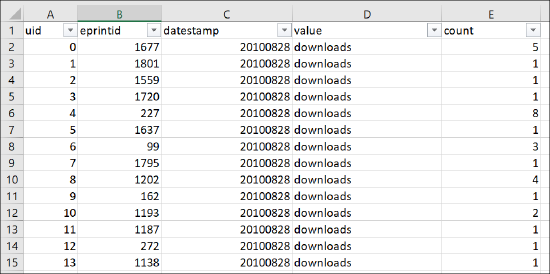
For an example copy of the Excel file, see EPrints Example Excel.
- The header is in the first row.
- Column 1 – uid: an internal EPrints usage ID not used by the import.
- Column 2 – eprintid: The Asset's EPrints ID that is matched with the Asset Originating System ID in Esploro.
- Column 3 – datestamp: The usage date in YYYYDDMM format. At least one usage date is required.
- Column 4 – value: a usage type that is ignored by the import, since you configure the usage type directly on the Import Usage Statistics page (see below).
- Column 4 – count: the number of usages.
Fedora
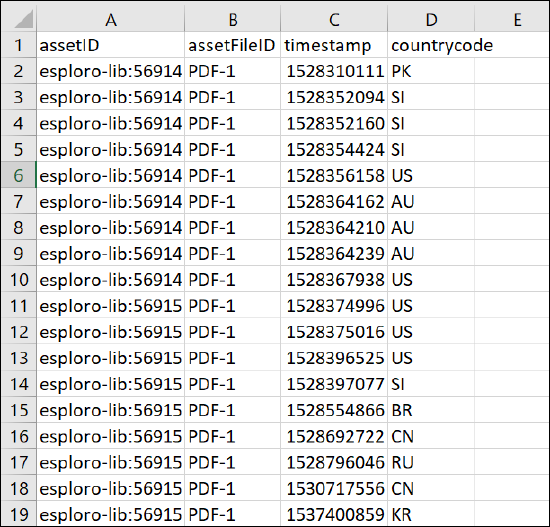
The following is an example of the Fedora format:
For an example copy of the Excel file, see the Fedora Example Excel.
- The header is in the first row.
- Column 1 – OriginatingAssetId: The Fedora's asset ID that is matched with the Asset Originating System ID in Esploro.
- Column 2 – assetFileID: The Fedora asset file ID – ignored by the import.
- Column 3 – timestamp:The usage date and time in UNIX format. At least one usage date is required.
- Column 4 – countrycode: the column must exist, but values are not mandatory. The country the usage originates from using a 2 letters code value as the country code.
Dspace
The following is an example of the Dspace format:

For an example copy of the Excel file, see the Dspace Example Excel.
The header is in the first row. The columns are described below:
| Name | Description |
| ID | The Dspace usage ID – ignored by the import. |
| Item_ID | The Dspace asset ID – ignored by the import. |
| Item_HITS | Number of record views – read by the import if the selected usage type is “Record views” |
| Bitstream_ID | The Dspace file ID – ignored by the import. |
| Bitstream_HITS | Number of file views – read by the import if the selected usage type is “File views/downloads” |
| Month | Month of the usage transaction (first day of the month is added to the Esploro date by the import) |
| Year | Year of the usage transaction |
| Item_URI | The unique asset URL in Dspace |
Generic
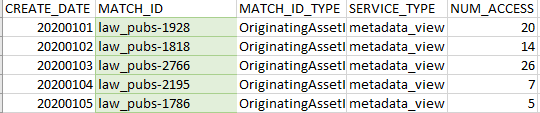
The following is an example of the Generic format:
For an example copy of the Excel file, see the Generic Example Excel.
The header is in the first row. The columns are described below:
| Name | Description |
| CREATE_DATE |
Date of the usage transaction |
| MATCH_ID |
Legacy system asset ID that is matched with the asset originating system ID in Esploro. Depending on the MATCH_ID_TYPE column, this can have ID or URL. |
| MATCH_ID_TYPE |
Accepts the values URL or OriginatingAssetId (same as for Digital Commons) |
| SERVICE_TYPE |
The usage_type to be loaded. The following values are supported:
|
| NUM_ACCESS |
Number of usages |
How to Import Usage Statistics
You import usage statistics from the Import Usage Statistics page (Repository > Import Assets > Import Usage Statistics):
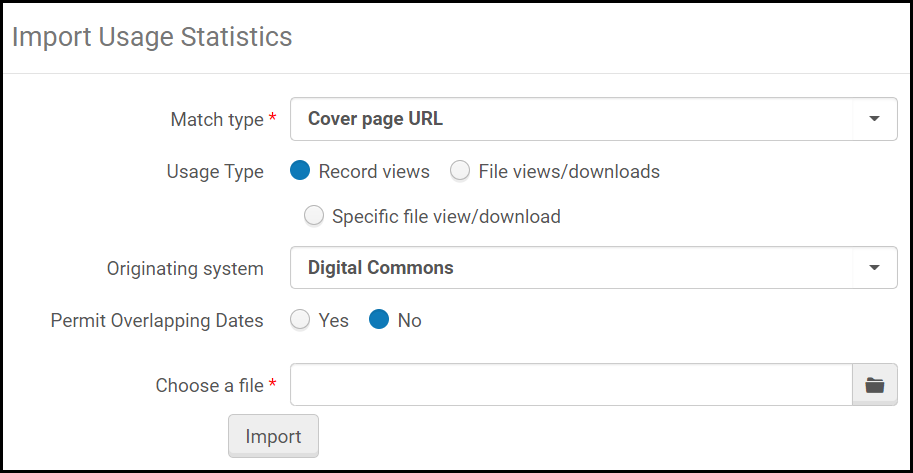
- Select a match type to identify the asset according the first column of the excel, either Cover Page URL or Originating System ID.
Cover Page URL is a valid option only if importing usage from Digital Commons and the header URL is used in the first column of the file. Otherwise, select Originating System ID.
- Select a usage type for the data to be imported:
- Record Views – views of the asset's metadata page in the Research Portal.
- File Views / Downloads – total views and file downloads of the asset
- Specific file view/download – file views and file downloads of a specific file. This adds the usage for the first file of the asset.
- Select the originating system from the drop-down list.
- If you are loading usage from Fedora or you are loading usage from a different originating system that overlaps with usage dates that already exist in Esploro and you want to count both usages, select Yes for the Permit Overlapping Dates field to allow usage with a duplicate date to be loaded. If not, select No to reject usage that has a duplicate date.
- Select the Excel file to import.
- Select the Import button to import the file.
The usage data is imported into Esploro.
Loading Citation Metrics
You can import an Excel file into Esploro from databases of citation counts of research publications. A citation count is useful for measuring the impact of the asset in the academic community. Data can be imported from Web of Science (WOS) or Scopus. It can be displayed on the full asset page in the Portal and incorporated in Analytics reports. (It is not visible in the Hub.)

- Before you can import citation counts for research outputs from a source, you must enable the source and verify that you have a license for the data from that source. This is configured on the Citations Sources page (Configuration > General > Institution Settings > Citation Sources). For more information, see Configuring Institution Settings.
- Citation counts from a particular data source are only displayed in the Portal if they are activated for display in the Portal settings; see Configuring the Research Portal.
- WOS citation counts can also be imported into Esploro automatically if WOS is integrated with Esploro. This option is only available to WOS subscribers. When citation counts are imported in this way, the WOS citation count that appears in the Portal links to the asset's page in WOS. For additional information, see Web of Science Integration.
Each Excel file of citation counts you import can only contain data from a single source – either WOS or Scopus. The file must contain a header row with headings for the following columns:
- DOI – The DOI identifier of the asset
- Total Citations – The total number of citations
Each of these columns can only appear once in the file. In addition, the file can optionally contain columns for individual years, in which the citation counts for those years are itemized. This data is not displayed in the Portal, but can be used by Analytics. The total number of citations given in the Total Citations column does not necessarily have to equal the sum of the itemized values.
This is an example of an Excel file of citation counts that can be imported into Esploro:

- In the Load Citation Metrics page (Repository > Import Assets > Load Citation Metrics), select the Source of Data and the file.
 Load Citation Metrics Page
 - Select Import. The Import esploro citations job reads the file and imports the data into Esploro, and the Monitor Jobs page (Admin > Monitor Jobs) opens with the Running tab selected and the job status displayed. Select Refresh to update the status, as required. When the job is finished, it disappears from the Running tab. Select the History tab to see information about the run. (For information about working with this tab, see Viewing Completed Jobs.)
The job report displays the following metrics about the job:
- Processed records
- Missing ID rejected records
- No match on ID rejected records
- Loaded records
Running Author Matching Report / Update Approved Matches
This report lists author-researcher matches for assets imported via an Import Profile (migration) or via SWORD as well as those captured by Smart Harvesting.
For more information, see Reports and Notifications and Author Matching Approval Task List.
Additional References
- Video: How to Manage Research Deposits and Assets
- Video: Depositing New Research Assets (7 minutes)
- Video: How to Update Research Assets in Bulk
- Video: How to Delete Research Assets in Bulk
- Working with Research Deposits
- Working with Student Deposits
- Adding Staff Mediated Research Deposits
- Managing Import Profiles
- SWORD Deposits