
Intota: Cost Data
- Product: Intota
How does my library use Intota to manage cost information for our resources?
June 18, 2016 Update: Several features have been added, including the ability to add credits (as negative amounts), and display of Transactional Currency.
You can use Intota to add multiple-payment information to resources at any level: collection, provider, database, or holding (title). Cost data added by your library is viewable in the relevant Details page (Collection, Provider, Database, Holding Details pages).
The below information focuses on how to manually add cost information to a resource. To import acquisitions and cost data see Cost Data Upload.
Manually Adding Cost Information
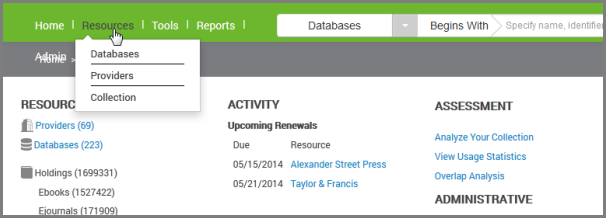
1. Locate the Collection, Provider, or Database to which you want to attach payment information.Click Resources on the menu bar to go to a list of the selected resource type and then click on the resource to which you want to attach payment information.
If you are adding costs or payment information to a holding (title) within a database:
When you are viewing the database to which you want to attach payment information (you will be viewing the Database Details page), in the Titles section click on View All to find the title to which you want to attach cost information.
Note that for the purposes of consolidated reports, database and title costs are the two costs that are uploaded into the reports. Collection and provider costs can be entered and stored in Intota, but they will not upload into consolidated reports.
2. Add Payment
The bottom of the page contains the Costs section. Click the Add Payment button, as in this example from a Database Details page:

In the Add Payment screen (see screenshot below), the one required field is Fiscal Year. Click the Add More Details button at the bottom of the screen to view additional data fields.
Notes:
- Your library's Local Currency will display per your Intota Library Settings. You can select a Transactional Currency Code for each payment. Do not include a currency indicator (for example, do not use $5,000.00; instead, use 5,000.00 or 5000.) To represent a credit, you can enter a negative number.
- Payment information that has been entered in the Payment Amount (Local Currency) field will display in the Costs section of the Database Details page; payment information that has been added to the Payment Amount (Transactional Currency) field will also display in the Costs section, but it will display in a smaller font than the Local Currency amount.
- See Payment fields in the resource management glossary for a complete explanation of the payment information fields.
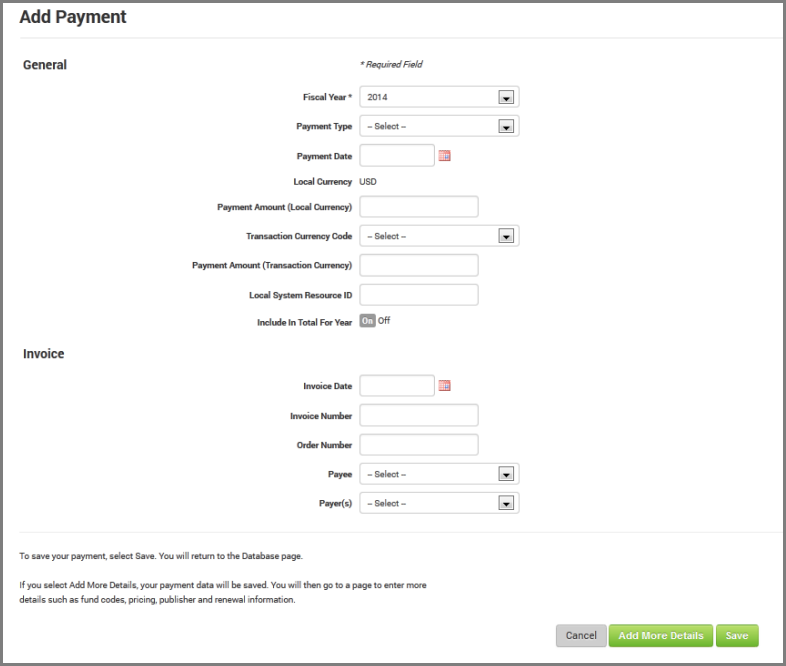
You can elect to save these payment details without providing additional details. When you click Save the system will automatically generate a unique Payment ID that will display the next time you view details about the payment.
Alternately you can add more payment details to the payment record in a second step by clicking the Add More Details button. Doing so will save the information you have already entered, and open a new form. See Payment fields in the resource management glossary for a complete explanation of the fields on the below More Payment Details page.
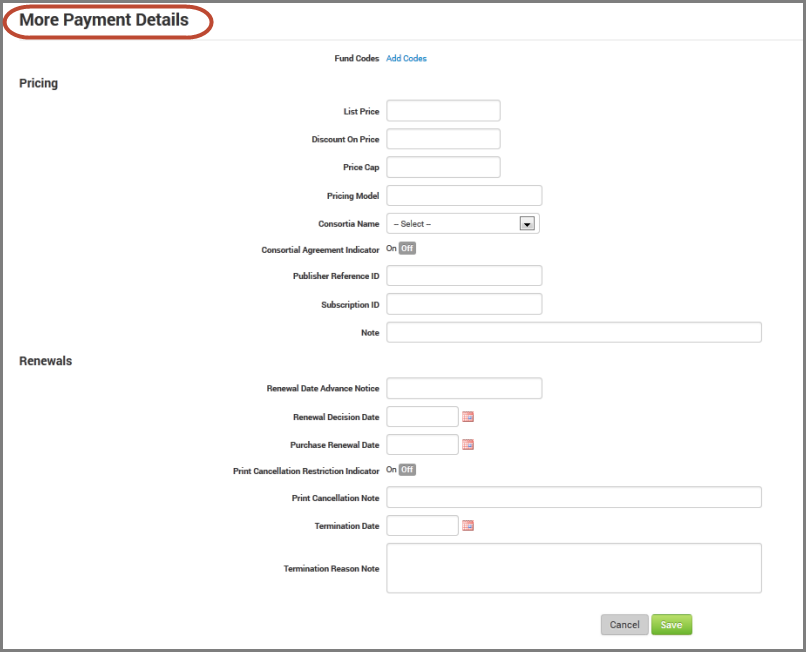
Note that while there are functional renewal details on the More Payment Details page, they are displayed for historical reasons and it is expected that most libraries will use the Renewal Details section on a Details page (Collection, Provider, Database, or Holding Details page).
Once you have added your cost/payment data you can see a snapshot of your year-over-year cost/payment data in the Costs section of the resource details page, as in this example from a Database Details page:
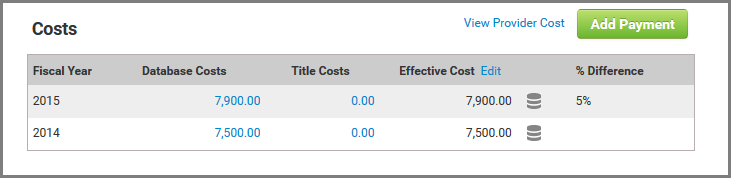
The database costs entered above display the Payment Amount (Local Currency) values, and the Effective Cost column displays the database icon rather than the title icon. To base Effective Cost on title rather than database costs, use the Edit button above the effective costs.
The % Difference is calculated automatically based on the change in Payment Amount (Local Currency). Payment Amount (Transaction Currency) is not used in this calculation.
Adding Fund Names (Fund Accounts/Fund Codes)
Once you have entered the cost/payment information you have the option to add fund information about the payment.
A fund name may be anything helpful to your library. Some examples include a fund account from your ILS, the name of a selector or professor, a campus library, or even a subject heading. You can add up to 500 fund names to each title or database. Taking advantage of fund names in Intota lets you see "cost per fund name" information.
Adding fund information does require that you have already entered the general payment information described in the steps above.
1. Open the Payment
In the Costs section of the resource details page, open the payment for which you want to add a fund name. Do this by clicking on a blue link such as the below Database Cost link.

2. Access the Fund Codes
Click on Payment ID for the payment you want to add a fund name to, and the Payment page will display. Click on View Codes in the Other Details section of the page.
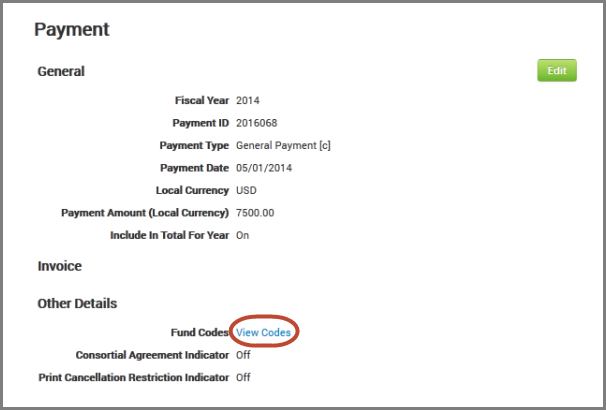
The Fund Codes window will display. Click the green Add button.
3. Add Fund Code
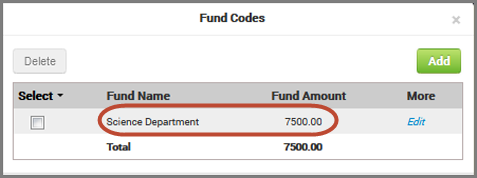
In the Add Fund Code screen, add a Fund Name and Fund Amount. You can choose any name that helps your workflow. A few examples of fund names are provided above in the introduction to this section of the document.
To allow greater flexibility, the fund tool does not compare the Fund Amount to the Payment Amount, thus you can have a Fund Amount less than or greater than the Payment Amount (you can even have a Fund Amount of zero).
After you click Save, the fund code displays in the Fund Codes screen when you click View Codes (as highlighted in the above screenshot). Below is an example Fund Codes screen showing a fund name associated with a payment.
- Date Created: 2-Jun-2014
- Last Edited Date: 18-Jun-2016
- Old Article Number: 10844