Configuring Importing Course Enrollment Jobs
To configure the user to course integration profiles, you must have one of the following roles:
- Fulfillment Administrator
- General System Administrator
For general information about courses, see Managing Courses. For information about user loading, see Student Information Systems. For information about course loading, see Configuring Course Loading.
This page is relevant only to institutions using Leganto.
When students in an LMS navigate to Leganto using a course, reading, or citation link from the LMS, the student is automatically associated with that course in Leganto. The reading lists associated with that course (and only that course) are added to the student's list of reading lists in Leganto.
The course enrollment job can either a) map a list of students to courses, or b) remove this mapping for a list of students and courses. After mapping students to courses, students logging in to Leganto (even directly) are automatically presented with all relevant lists. Note that users and courses are not created or removed using these jobs, only the connections between them. To manage the course enrollment information in Alma, see Managing User and Course Enrollment Information.
It is not recommended to run a full enrollment load/remove job on a daily basis, which can cause performance issues. Once you have enrollment information in Alma, it is recommended that you run only additions or deletions.
The file mapping must be in a tab-separated value file (not comma-separated) in a dedicated directory on an FTP server accessible by Alma, saved either as a .txt or .csv file.
- The FTP directory must not be used for any other purposes.
- Each file must have a valid date stamp. The profile loads only a file with a date stamp later than the last time that the profile ran.
- The file must be in UTF-8 or ASCII format with CRLF line termination.
The file must contain a list of students to course mappings, one on each line, with the following columns, in order. The first line in the file is assumed to be a header line that is ignored. The columns are as follows:
- User ID – You can configure the ID type when configuring the profile (see below). When removing mappings, use * to disassociate all students from the course.
- Course code – When removing mappings, use * to disassociate the students from all courses.
- Course section – When removing mappings, if you added a * in the course column, this field is ignored.
To configure a user to course mapping / remove mapping profile:
- Create an S/FTP connection for the integration profile. For more information, see Configuring S/FTP Connections.
This profile requires a unique, dedicated directory on the FTP server.
- On the Integration Profile List page (Configuration Menu > General > External Systems > Integration Profiles), select Add Integration Profile. The Integration Profile page appears.
 Integration Profile Page
 - In the Integration type field, select Course Enrollment. The page refreshes with different fields.
 Integration Profile Page after Selecting Course Enrollment
 - Enter a Code and Name for the profile.
- Select the S/FTP connection for the profile. This option is not required if you only configure the "remove mappings" job and you select the option By modification date (which is not yet implemented).
- Optionally enter a description. The default checkbox has no effect.
- Select Next. The second page of the wizard appears.
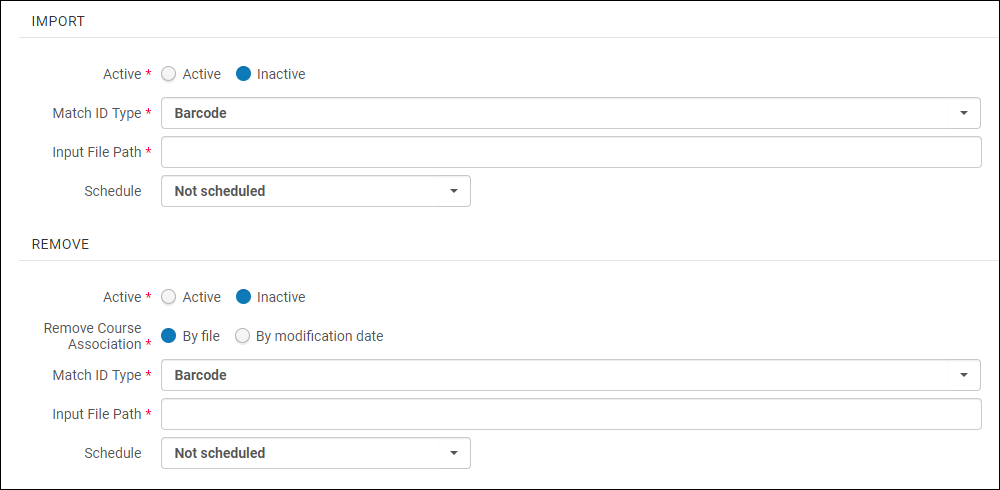
 Integration Profile Second Page
 - Configure the following fields for the two jobs:
- Import:
- Active – Whether this job is active or inactive. An inactive job cannot be scheduled or run.
- Match ID Type – Select the type of ID to match for each user.
- Input File Path – If the file is located in a subdirectory at the FTP connection, enter the subdirectory. Otherwise, enter /.
- Schedule – Select when you want the job to run. The scheduling options vary depending on your time zones.
- Remove:
- Active – Whether this job is active or inactive. An inactive job cannot be scheduled or run.
- Remove Course Association – Select By file to upload the list of students/courses to disassociate from a file, or By modification date to select a date range to disassociate (all students that were associated between the specified range are disassociated with the listed courses).
The By modification date feature is not yet functional; it will be added in an upcoming release.
- Match ID Type (By file, only) – Select the type of ID to match for each user.
- Input File Path (By file, only) – If the file is located in a subdirectory at the FTP connection, enter the subdirectory. Otherwise, enter /.
- Date (By modification date, only) – Select the date range of the student/course associations that you want to remove.
- Schedule – Select when you want the job to run. The scheduling options vary depending on your time zones.
- Import:
- Select Save to save the profile.
Active, scheduled jobs are added to the list of scheduled jobs. See Viewing Scheduled Jobs.
To manually run a user to course mapping / remove mapping profile:
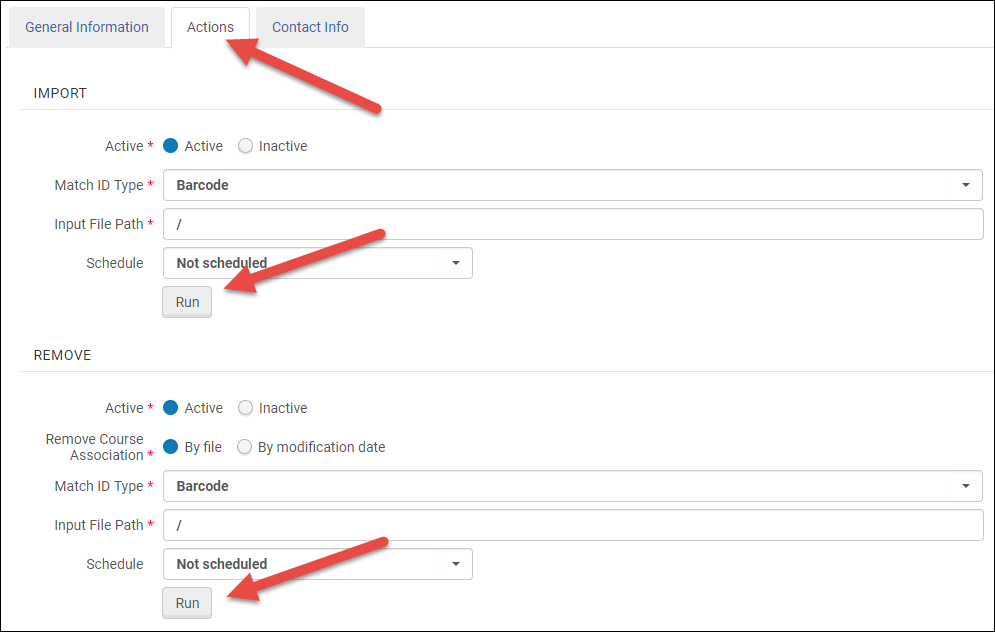
- On the Integration Profile List page (Configuration Menu > General > External Systems > Integration Profiles), select Edit in the row actions list for the profile. The profile appears with the General Information tab pre-selected.
The Contact Info tab is reserved for future use.
- Select the Actions tab. The Actions tab appears.
 Action Tab
 - Select Run to run the profile. The job number appears in a success message.
You can monitor the job (either IMPORT_COURSE_USER_ASSOCIATION or REMOVE_COURSE_USER_ASSOCIATION) on the Monitor Jobs page. See Viewing Running Jobs and Viewing Completed Jobs.
To edit a user to course mapping / remove mapping profile:
- On the Integration Profile List page (Configuration Menu > General > External Systems > Integration Profiles), select Edit in the row actions list for the profile.
- Enter any changes (see To create a user to course mapping / remove mapping profile, above) and select Save. The profile is modified.
To delete a user to course mapping / remove mapping profile:
On the Integration Profile List page (Configuration Menu > General > External Systems > Integration Profiles), select Delete in the row actions list for the profile, and then select Confirm in the confirmation dialog box. The profile is deleted.
There are also APIs that allow you to enroll users in a course, view users enrolled in a course, and un-enroll users from a course. For more information on these APIs, see the Developers Network.

