
Adding Resources
For more information, watch Add Resources to a Leganto List.
Searching for an Item from the Institution's Library
Your library configures whether your library search is in Alma, Summon, or Primo, and/or whether you can select the Primo scope in which to search.
Leganto does not search in the full-text.
- From a list, select Add > Search the library. The basic Search the library pane opens.
 Basic library search
 - When configured, you can select the Search everything search scope.
The following search filters are available:
- Search everything
- Library Catalog
- Articles and more
- Course Reserves
- Newspapers
- Alma
- Rialto
- Enter your search criteria.
- Optionally, select whether to include or hide records that do not provide full-text access. The default is configured by your library.
- Press Enter. The search results are displayed.
- Optionally select Filter to filter your results by Type or Availability.
When filtering a list, you can select multiple filters for Tags. The filter is applied using an OR condition rather than an AND condition. Similarly, you can select multiple filtering options when searching the library. Filters are applied using and OR operator.
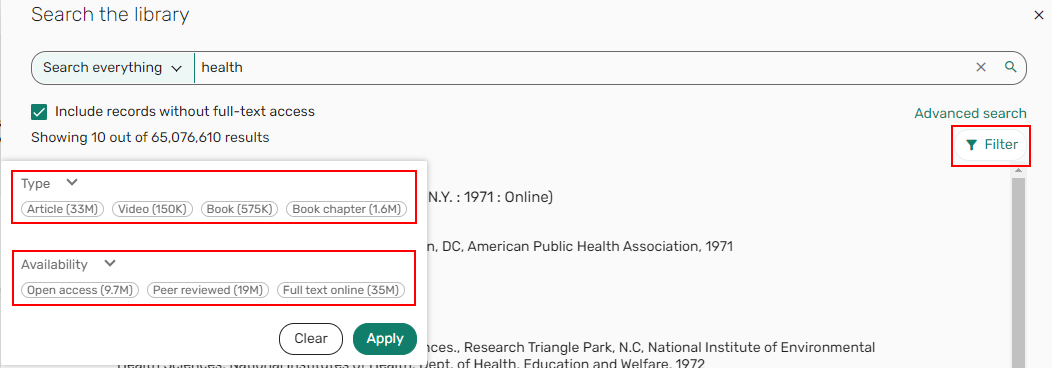 Filter by Type/Availability
- Select Advanced search and enter multiple search terms.
 Advanced search option
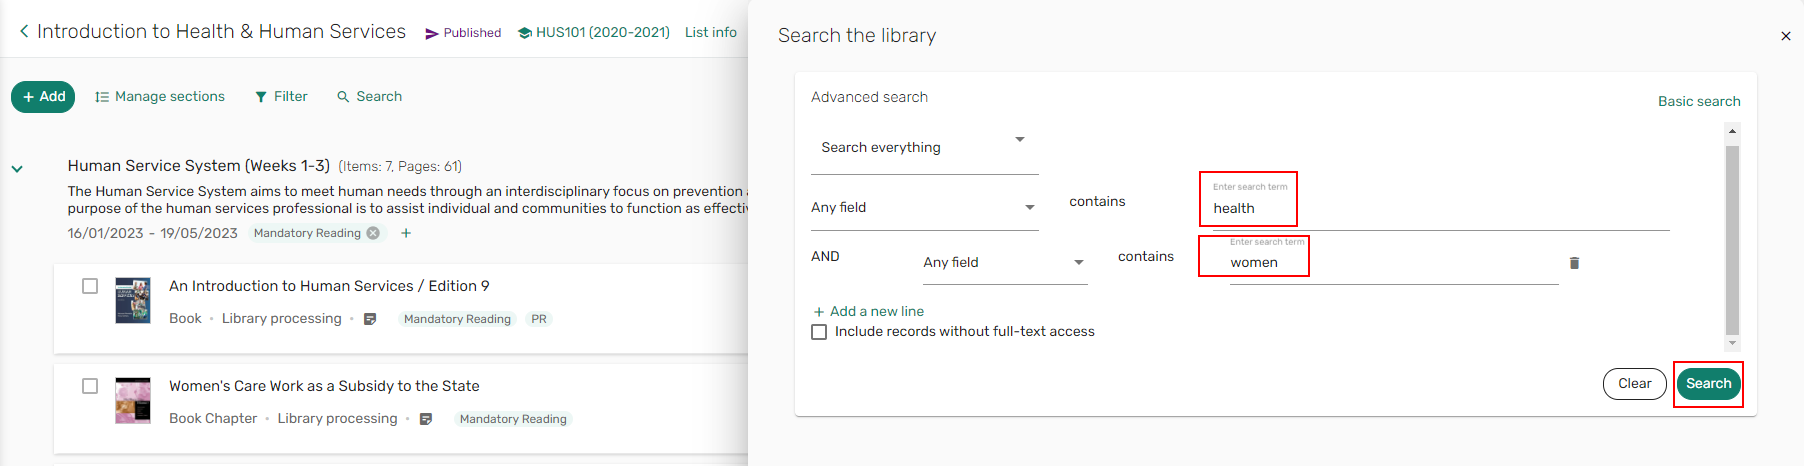 An Advanced search
 - Use the Any field dropdown list to select the field by which you want to search.
- Optionally select Add a new line to add multiple search options as needed.
- Optionally select whether to include or hide records that do not provide full-text access.
- Select Search. The search results are displayed.
- Optionally select Filter to filter your results by Type or Availability.
Filter by Type/Availability
- Hover over the item you want to add and either use the Drag icon
 to drag the item to a section in the list
OR
Select the Add to list icon
 . The add item options pane expands.
 - Selecting More details enables users to review an item's details, including links and physical availability without adding the item to a list.
The option is available when adding items from the library search, favorites, suggestions, and Cite It!.
 Add item options
After selecting More details the Links & availability tab and Item details tab are displayed.
 More details - Links & availability and Item details tabsWhen using Cite It!, the label reads Check availability. Selecting Check availability opens more details and the Links & availability tab and Item details tab is displayed.
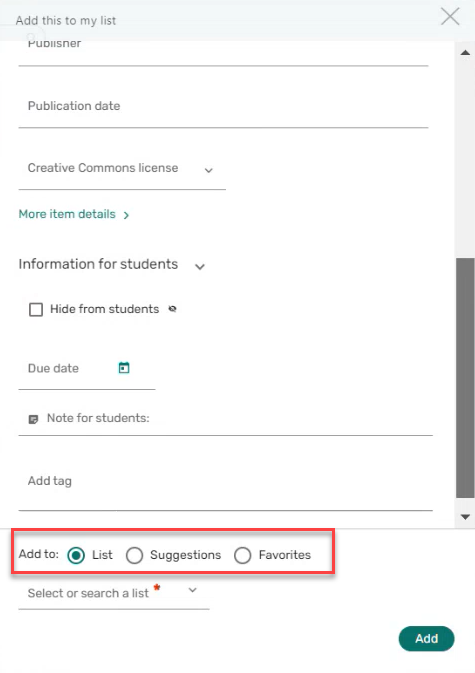
 - Select whether to Add to:
- List
- Suggestions — For more information, see Suggesting an Item from Favorites.
- Favorites — You can add several resources to Favorites and add all of them to a list at once. For more information, see Saving Resources as Favorites.
- If you have selected Add to: List, select the section to which you want the item added.
The section defaults to the last section added to the list and can be changed from the Section dropdown list.
- Select Add to add the item
OR
Select Add & Edit to add the item to the section and open the Edit item pane.
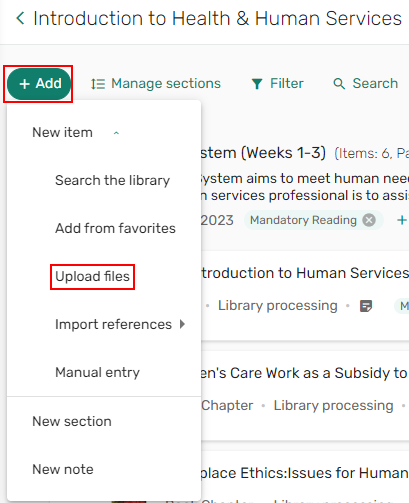
Uploading a File
When configured by your institution, the option to Upload Files is available in the Add list.
The library can set the maximum file size. The default is 50 MB.
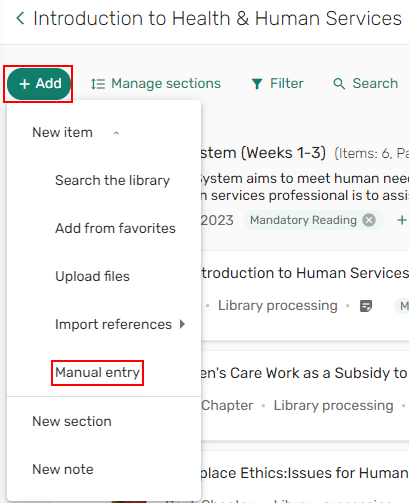
- Select Add > Upload Files.
 Upload files option
 - Browse to upload a file/folder. The Upload files wizard appears.
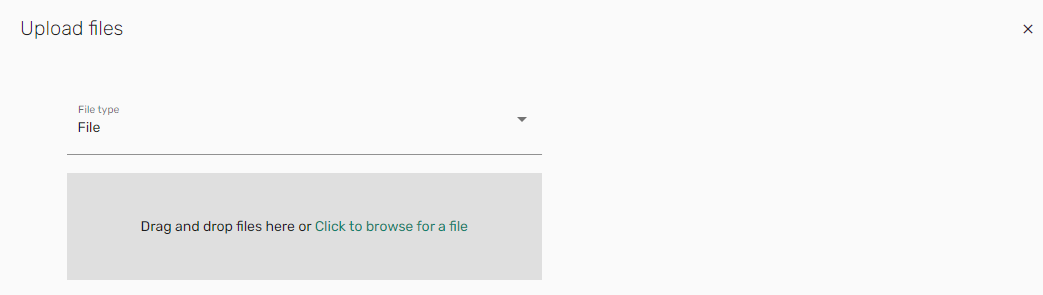 Upload files/folder
 - If the File Upload Copyright Options are enabled, select the copyright information and select Next.
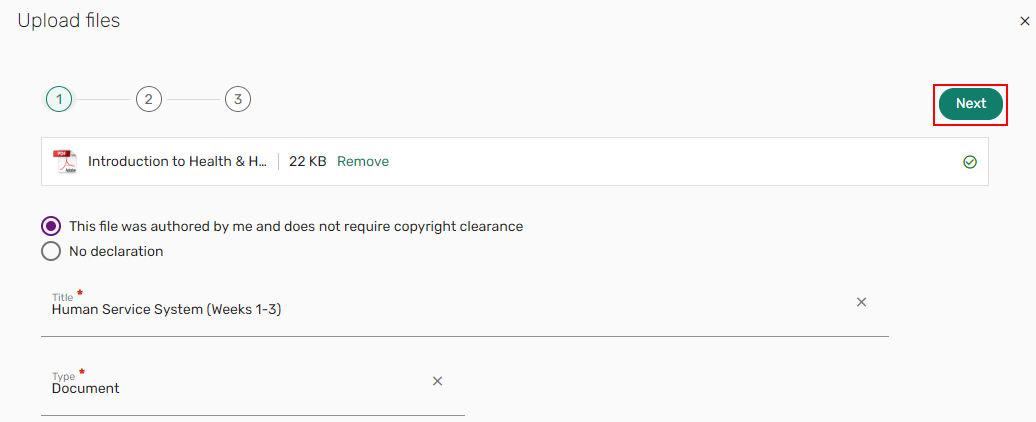 Upload wizard
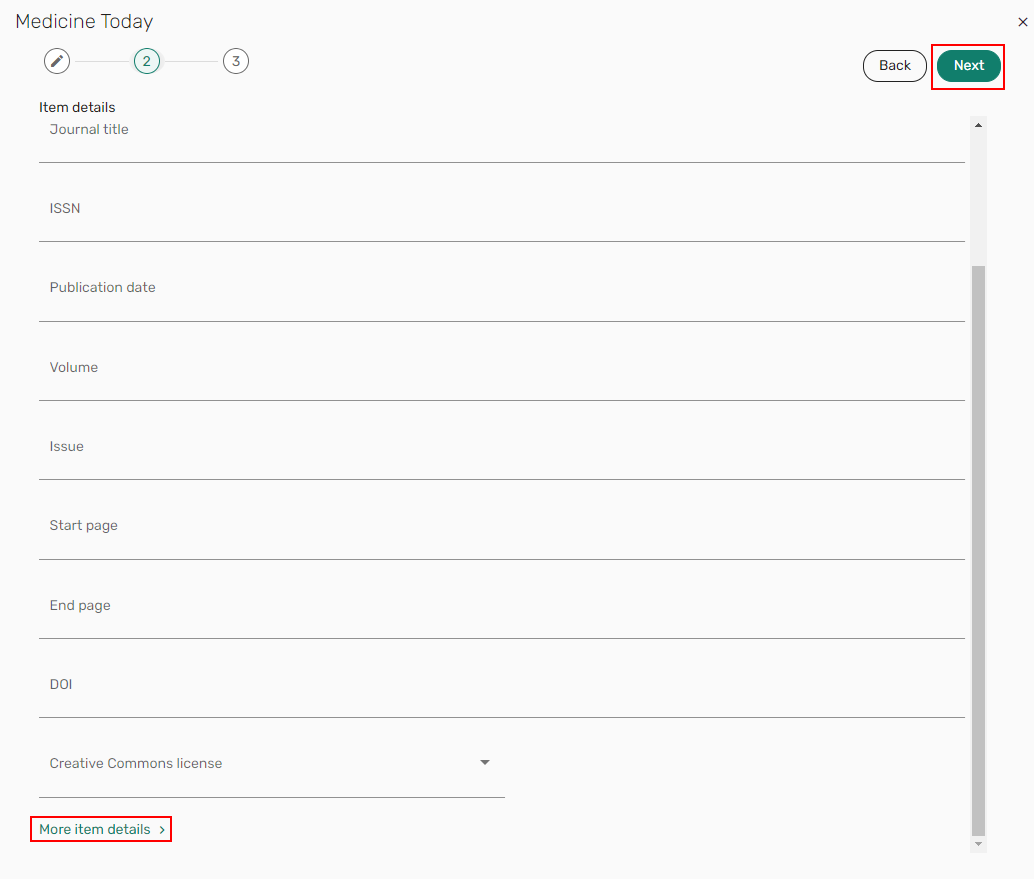
 - Leganto attempts to pull item details from the file. If needed, enter or edit the details and select Next. The fields that appear depend on the type. Some of these fields appear only if you select More item details. For more information on types, see Adding an Item Manually.
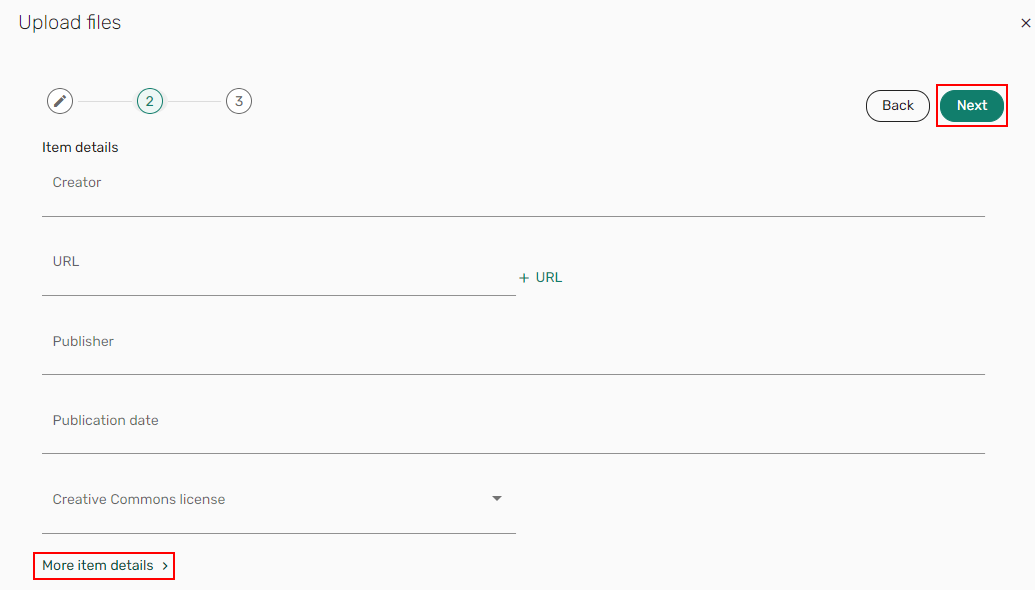 Item details
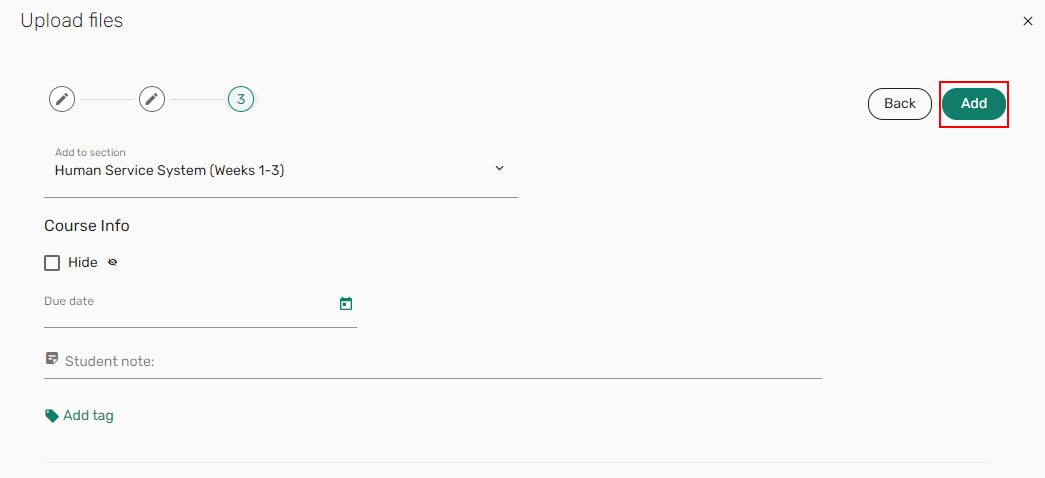
 - Optionally, select the section to which to add the file, fill in the course information section, and select Add. The file is added to the list.
 Add uploaded files
When configured, the file includes a download icon to download the file and an icon that indicates the item type.
 Uploaded file
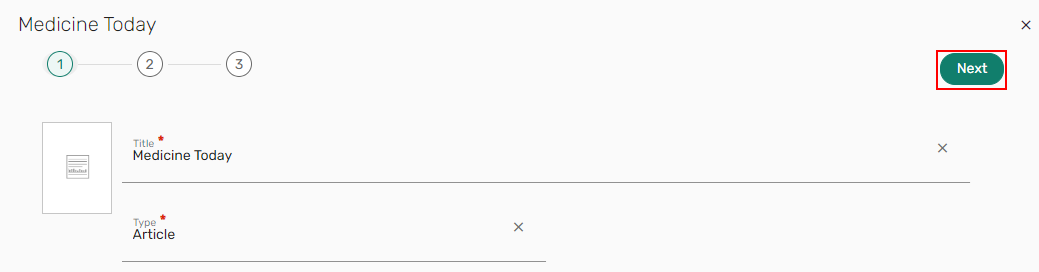
Adding an Item Manually
- Select Add > Manual entry. The Manual entry wizard appears.
 Manual entry option
 - Enter a Title, select a file Type, and select Next.
To customize the types and the metadata available for those types, see Adding/Editing Citation Field Mappings.
 Manual entry wizard
 - Enter the details and select Next. The fields that appear depend on the type. Some of these fields appear only if you select More item details. For more information on the types, see Adding/Editing Citation Field Mappings.
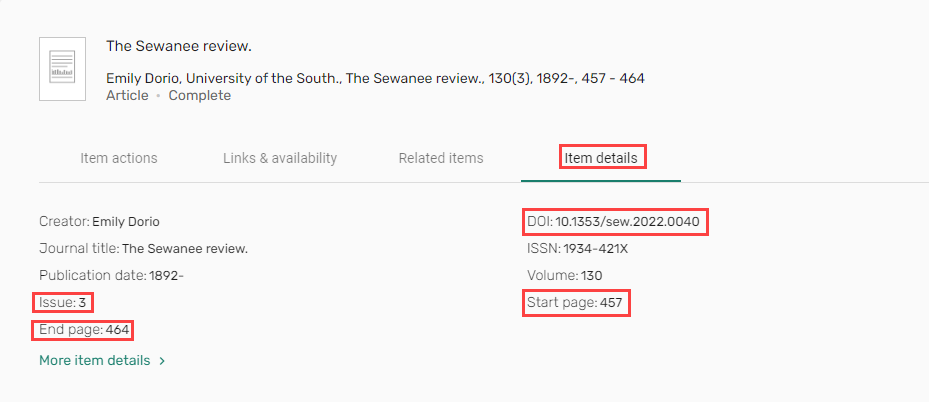
All types include the following fields – Additional Person Name, Creative Commons License, DOI, Edition, LCCN, OCLC Number, Place of Publication, Publication Date, Publisher, Resource Notes, Source, and Volume. For all types, you can upload a file and add a public note.
Article, Electronic Article, and Journal include the following additional fields – Author/Creator, ISSN, Issue, Journal Title, Start Page, and End Page.
Book, Conference, and E-book include the following additional fields – Author, ISBN, and Total Pages.
Book chapter includes the following additional fields – Book Author, Book Title, Chapter Author, Chapter Number, Editor, ISSN, Pages, Start Page, and End Page.All other types include the following additional fields – Author, Chapter, End Page, ISBN, ISSN, Issue, Journal Title, Pages, Start Page, Title, and Total Pages.
When adding a manual entry and entering an ISBN, the metadata auto-populates.
 Item details
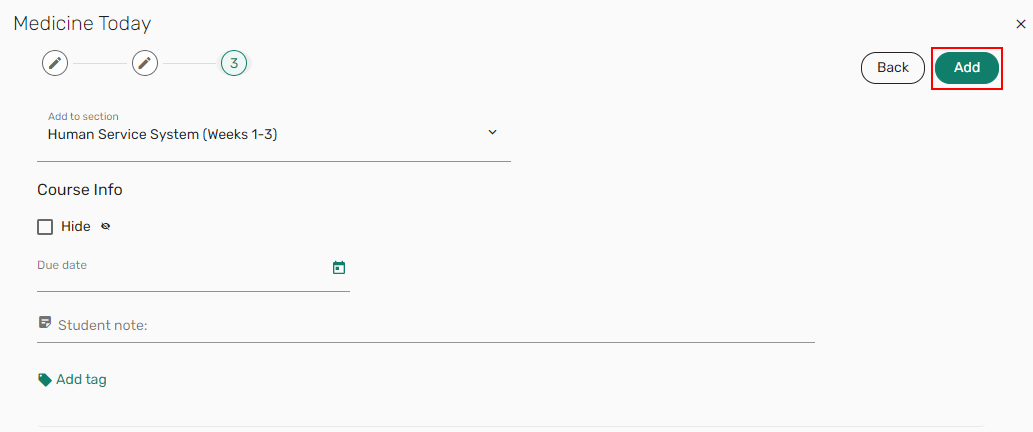
 - Optionally, select the section to which to add the item, check the Hide checkbox to hide the item from students, enter a Student note, or Add tag and select Add. The item is added to the list.
 Add manual items
The item includes the type and status.
 Manually added item
Adding an Item from a Website (Using Cite it!)
Leganto Cite it! is a bookmarklet is available as a browser extension and as a small javascript-based bookmark that you can add to your browser's bookmark bar. When you are browsing any website, Cite it! enables you to add the resource on the current page as an item to a list in Leganto.
Enabling Cite it! Browser Extension
See Leganto Cite it! Bookmarking Tool Installation Instructions.
Adding Cite it! to a Browser's Bookmarks Bar
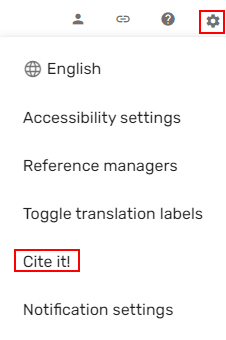
- From the Settings menu
 , select Cite it!
Drag the Cite it! button  to your browser's bookmarks bar.
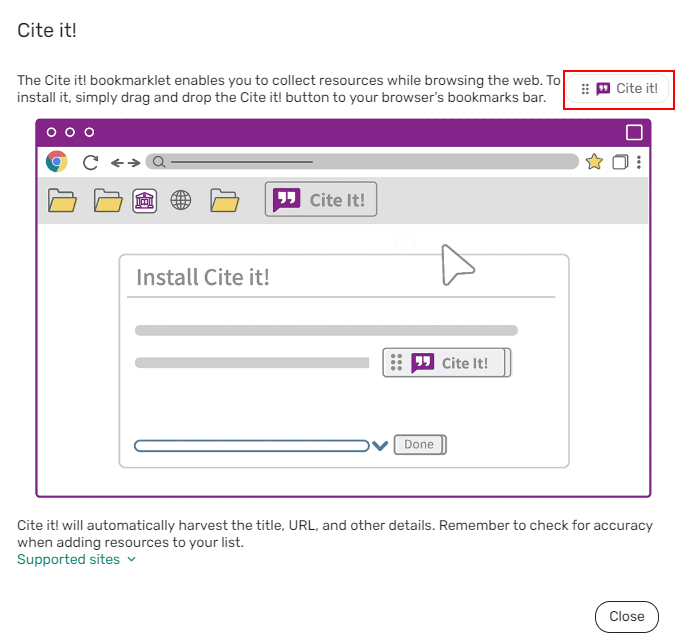
The list of sites that Leganto is specifically known to support appears as a link in the Cite it! pane. Even if a website is not listed, Leganto is likely to work on the site if the resource information is easily identifiable to the bookmarklet code. View this file for a list of supported Cite it! sites.
Using Cite it!
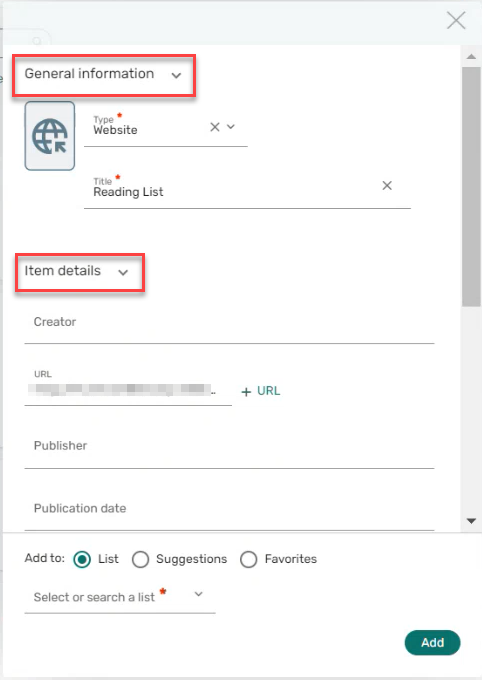
You must be logged in to Leganto to use Cite it! However, you do not have to have a specific tab with Leganto open in your browser. If you try to use Cite it! but you are not logged in, you are prompted to log in.
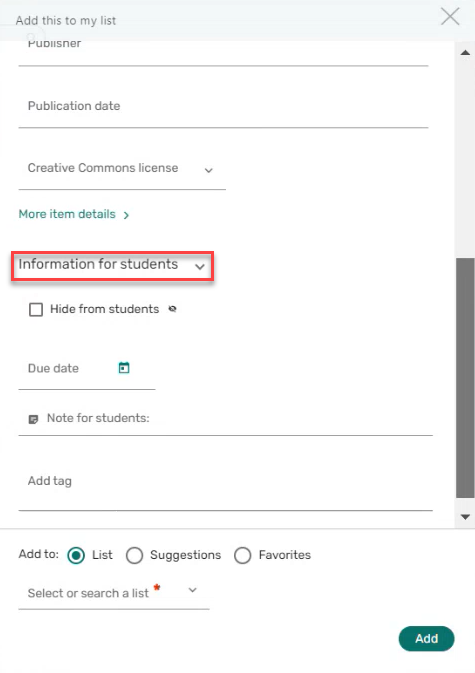
The sections are presented on one screen with a scroll. The default presentation for the General information, Item details, and Information for students sections is expanded, but the sections can be collapsed.
 |
 |
|
General information and Item details
|
Information for students
|
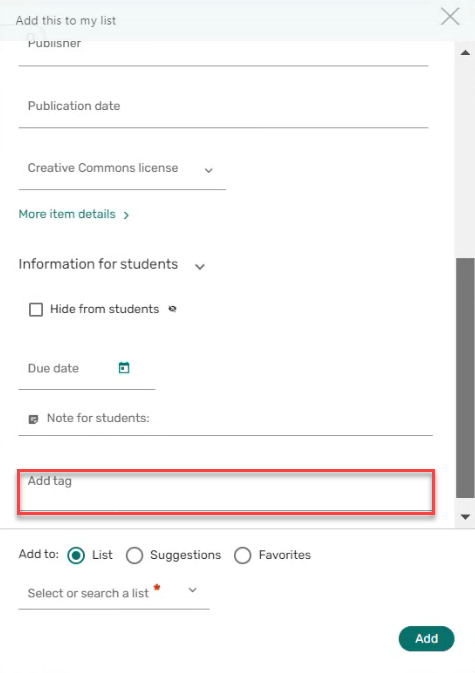
Tags can be added immediately when adding the citation.
Additionally, citations from Cite it! can be added to a specific List, to Suggestions, or to Favorites.
Cite it! automatically harvests the title, URL, and other details about web-based resources. Remember to check for accuracy when using Cite it! for adding resources to your list.
Cite it! Support
If you experience any issues using Cite it!, contact your library so they can open a support ticket with Ex Libris.
Enriching Citation Metadata
For institutions whose AUGMENTATION profile is configured to work with CrossRef, when a citation containing a DOI is added, any missing metadata is automatically added to the citation.
Additionally, items that are available in your library can be added to a list using a DOI or ISBN.
- From a list, select Add > Add Using DOI or ISBN.
- Select an Identifier type (DOI or ISBN).
- Enter the item's DOI/ISBN. The remaining metadata is then auto-populated when adding the item.
Setting a Connection to a Reference Manager
If you use RefWorks, Zotero, Mendeley, or EndNote reference managers, you can configure Leganto with the external site's credentials and then drag and drop those items to Leganto.
- From the Settings menu , select Reference managers.
-
Add your credentials by selecting the relevant tab and entering the information.
Your library must configure RefWorks/Zotero/Mendeley/EndNote credentials for this tab to appear correctly.
After adding valid credentials, the reference manager appears in the Add > Import references list menu.
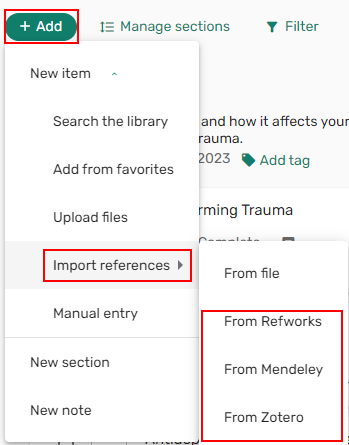 Import references
Adding an Item from a Reference Manager
When configured (see Configuring Other Services for Leganto), you can import items from RefWorks, Mendeley, or Zotero.
- From a list, select Add > Import references > From <RefWorks/Mendeley/Zotero>. The Import references from <RefWorks/Mendeley/Zotero> pane opens.
 Import references from RefWorks
 - Hover over the item you want to add and either use the Drag icon to drag the item to a section in the list
OR
Select the Add to list icon
. The add item options pane expands.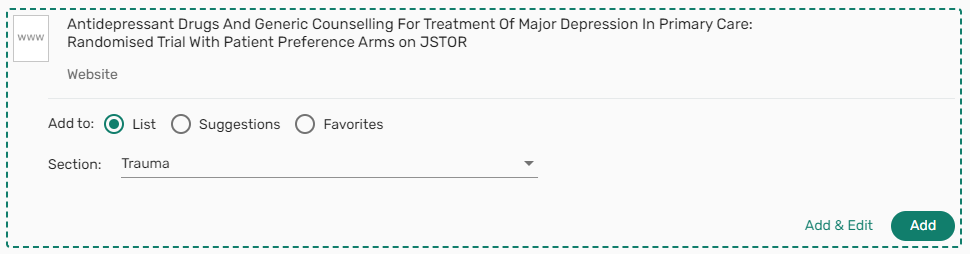 Add item options
 - Select whether to Add to:
- List
- Suggestions — For more information, see Suggesting an Item from Favorites.
- Favorites — For more information, see Saving Resources as Favorites.
- If you have selected Add to: List, select the section to which you want the item added.
- Select Add to add the item
OR
Select Add & Edit to add the item to the section and open the Edit item pane.
Importing References
Leganto supports importing files in the RIS, BibTex, and reference file formats. Reference files are any files that include references, such as a bibliography section in an essay.
When importing a citation with a material type not listed in your material types (Configuration > Fulfillment > Courses > Citation Material Type), Leganto automatically assigns the Default Material Type to that citation.
- From a list, select Add > Import references > From file. The Import references from file pane opens.
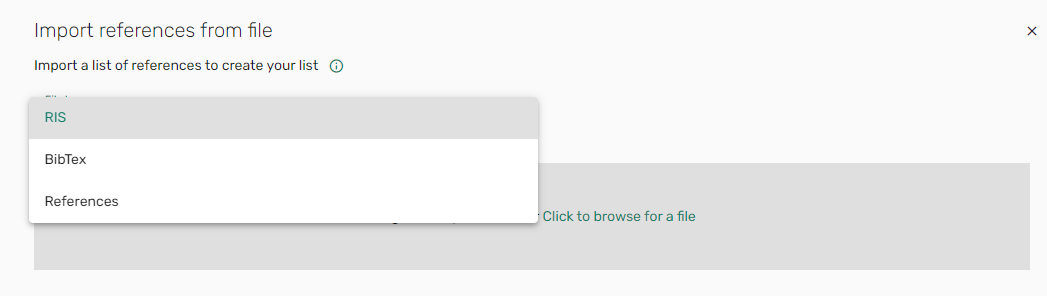 Import references from an RIS/BibTex/References file
 - Select File type: RIS/BibTex/References.
- Either drag and drop your files or folders
OR
Select Click to browse for a file.
-
Select the section to which to add the references.
-
If relevant, hover over any unwanted items and select Remove.
-
Select Add all items. The items are added to the selected section of the list.
The list of references must be in PDF format.
The following table lists Leganto's RIS field mapping format:
|
RIS Field |
Leganto Field |
|---|---|
|
A2 |
rlterms_additionalPersonName |
|
A3 |
rlterms_additionalPersonName |
|
A4 |
rlterms_additionalPersonName |
|
AU |
creator |
|
CY |
rlterms_placeOfPublication |
|
DA |
date |
|
Y1 |
date |
|
DO |
doi |
|
EP |
end_page |
|
ET |
rlterms_edition |
|
J2 |
rlterms_journalTitle |
|
N1 |
rlterms_note |
|
PB |
publisher |
|
PY |
date |
|
RN |
rlterms_note |
|
SN |
identifier_isbn |
|
SN2 |
identifier_issn |
|
SP |
start_page |
|
T1 |
title |
|
T2 |
rlterms_journalTitle |
|
T3 |
rlterms_journalTitle |
|
TI |
title |
|
UR |
source |
|
VL |
rlterms_volumePartNumber |
|
IS |
rlterms_issue |
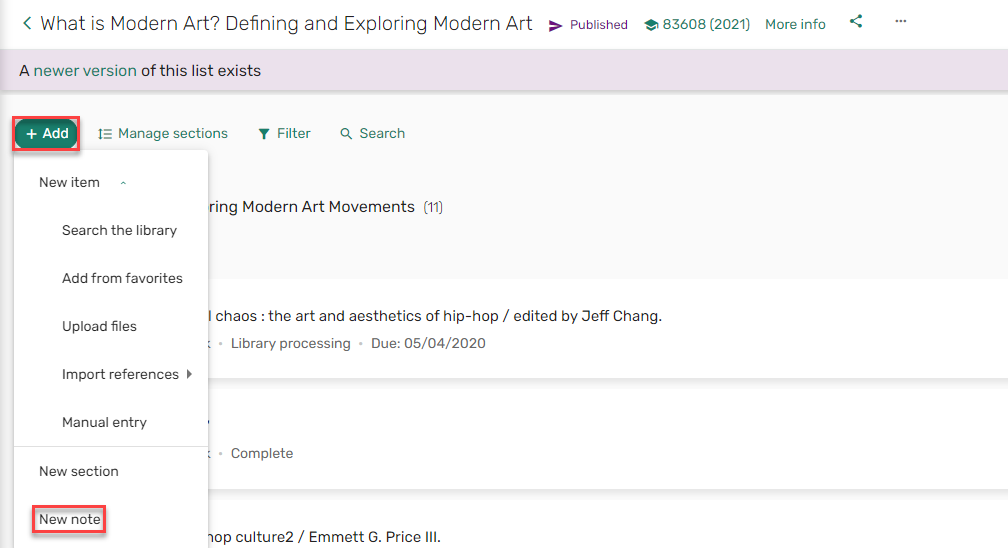
Adding a Note to a List
You can add notes to share additional information or instructions with your students within the list. A note is displayed like an item.
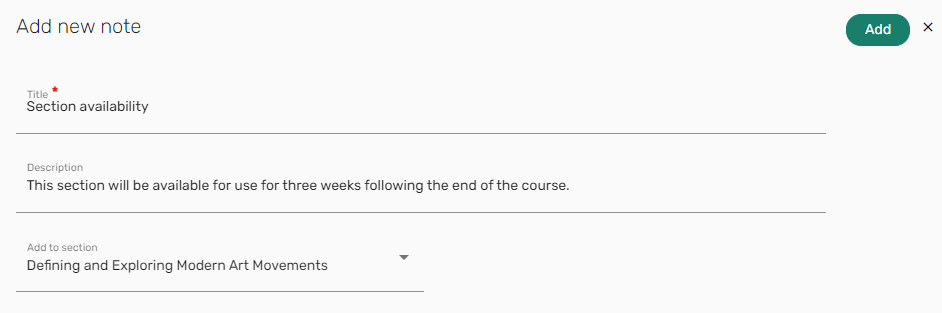
- From the Add list, select New note. The Add new note pane opens.
 New note
 - Enter values in the fields in the Add new note pane and select Add.
 Add a note
The note is added to the section. The fold icon
 indicates that this is a note rather than an item.
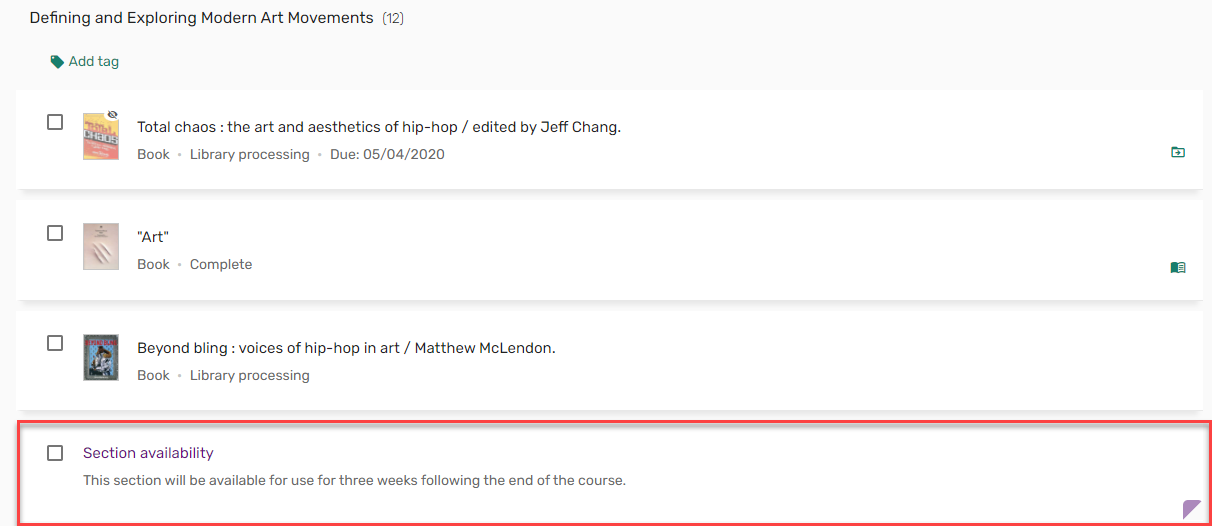 List note
You can move the note by the Drag icon
and dragging it to any part of the section.
 Drag a note
You can edit or delete a note using the Edit item/Delete item actions.
 Edit/Delete note
When adding notes, the library processing status is automatically set to Complete.