Pivot-RP Profiles
To claim or create a profile, see Claiming or Creating Your Profile.
Clarivate maintains over 3 million faculty profiles created and maintained by our Editorial Team. A profile is associated with an institution, published papers, and funding opportunities. It is expected and recommended that Pivot-RP users also have profiles.
- Discovering Pivot-RP Profiles (3 min)
- Updating Your Pivot-RP Profile (7 min)
Searching for Profiles
Pivot-RP offers both basic and advanced text search for profiles.
In the results, you can view specific profiles or select multiple profiles to perform actions on them in bulk. See Viewing Profiles.
Basic Text Search
To perform a basic text search, use either of the following search areas:
-
The Profiles tab on the search box in the main menu of your My Funding Opportunities lists.
 Search the Profiles in Main Menu
 -
The search box at the top of the Profiles page (Profiles).
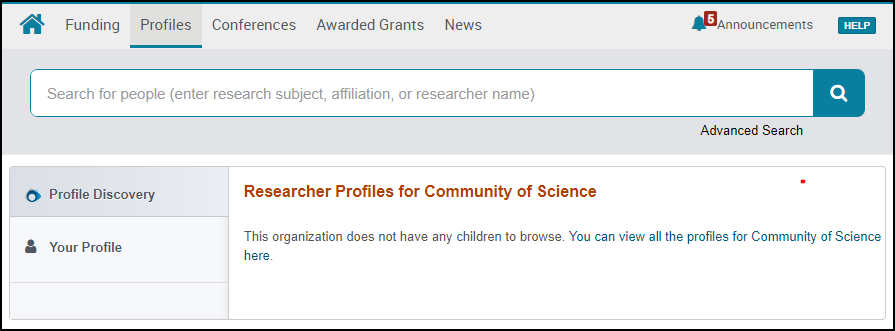 Search on the Profiles Page
Advanced Text Search
On the Profiles page, select Advanced Search. The Funding Advanced Search page appears.
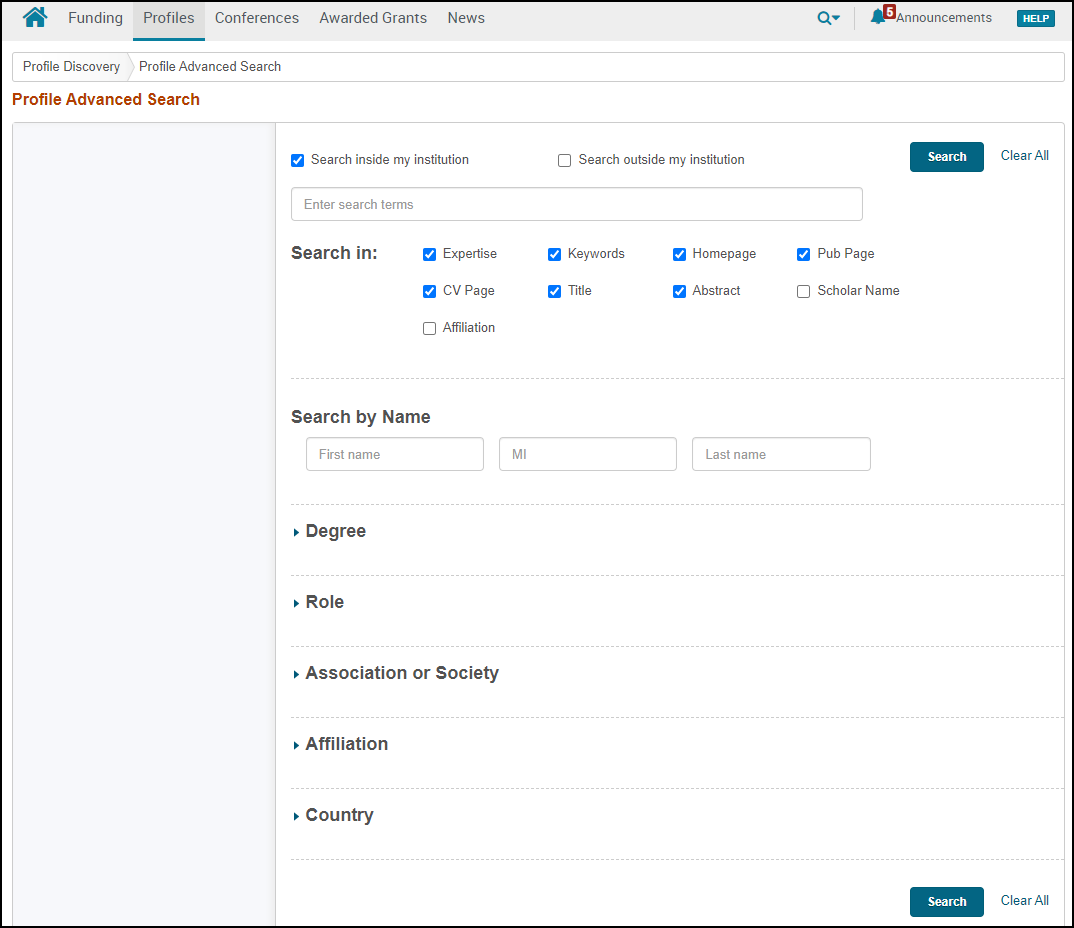
Select, enter, edit, or clear filters to expand or narrow your search and select Search. On the search results page, you will have the opportunity to clear any of these filters or to further filter the results.
- Search inside my institution / Search outside my institution – Return only profiles of users who are at / not at your institution.
- Search in – Enter text in the text field (see basic search for more information) and select one or more fields in which to search for this text.
- Search by name – Return only profiles matching the specified first, middle, and or last names.
- Degree – Return only profiles matching all of the selected degrees, for example Bachelor of Arts.
- Role – Return only profiles matching all of the selected roles, for example Alumni and Assistant Professor.
- Association or Society – Return only profiles that match an association or society name. This field is free text.
- Affiliation – Return only profiles that match an affiliation. This field is free text.
- Country – Return only profiles matching any of the selected countries. If you select United States, Canada, or Australia, you can additionally select specific states / provinces in that country.
Viewing Profiles
After searching for profiles, the results appear in a list, with facets on the left.
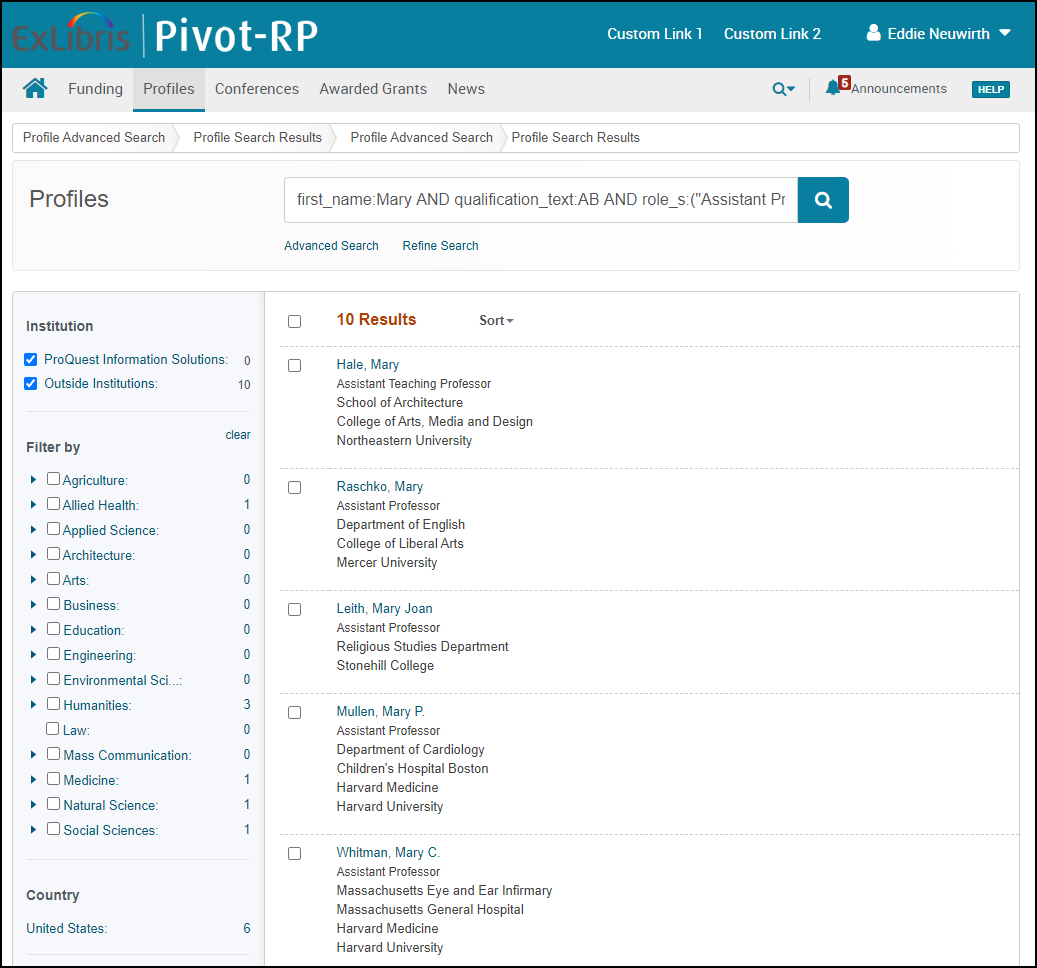
Each result displays general information about the profile. You can select one or more profiles and click Add to Group (appears after you select a researcher) to add the users to a group. For more information about groups, see User Groups.
To view a profile, select the profile name.
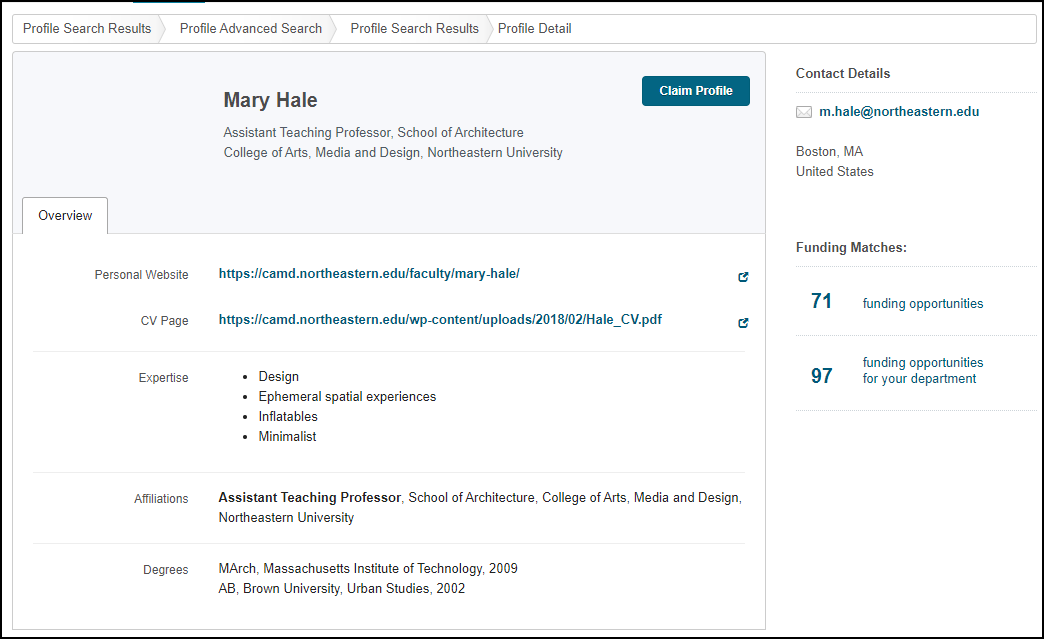
On this page you can (not all actions may be available for each profile):
- Open the user's personal website.
- Open the user's c.v. website.
- Open the user's publication page website.
- Send an email to the user.
- View funding opportunities that match the user's keywords or the user's department.
- Select the Publications tab to view the user's publications. When available, select the magnifying glass beside the publication title to see contents from the publication.
Updating Your Profile (or a Profile for Which You Are a Designated Proxy)
Updating your profile makes it easier for other researchers who are looking for collaborators to find you in Pivot-RP. In addition, the more accurate your profile is, the better results you will see from the Pivot-RP Advisor's funding opportunity suggestions.
Updating Your Pivot-RP Profile (7 min)
You can update your own profile, or a profile for which are a designated proxy, and you can designate proxies who can manage your profile.
- Select Your profile in the user menu or select Your Profile in the left sidebar on the Profiles page. Your profile page appears.
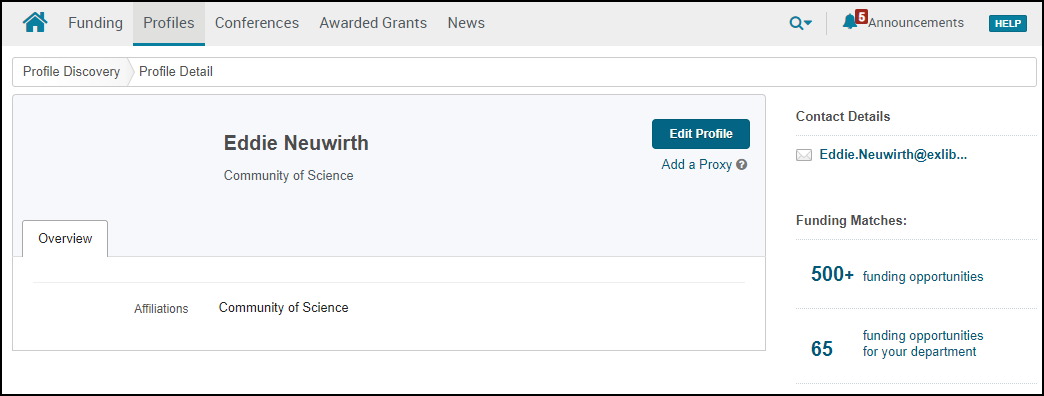 Profile Details - My Profile
 - To assign a proxy to manage your profile, select Add a Proxy to open user preferences. For more information, see Managing Profile Proxies.
- To edit your profile, select Edit Profile and select Continue in the confirmation dialog box. A page to edit your profile opens in a new browser tab or window.
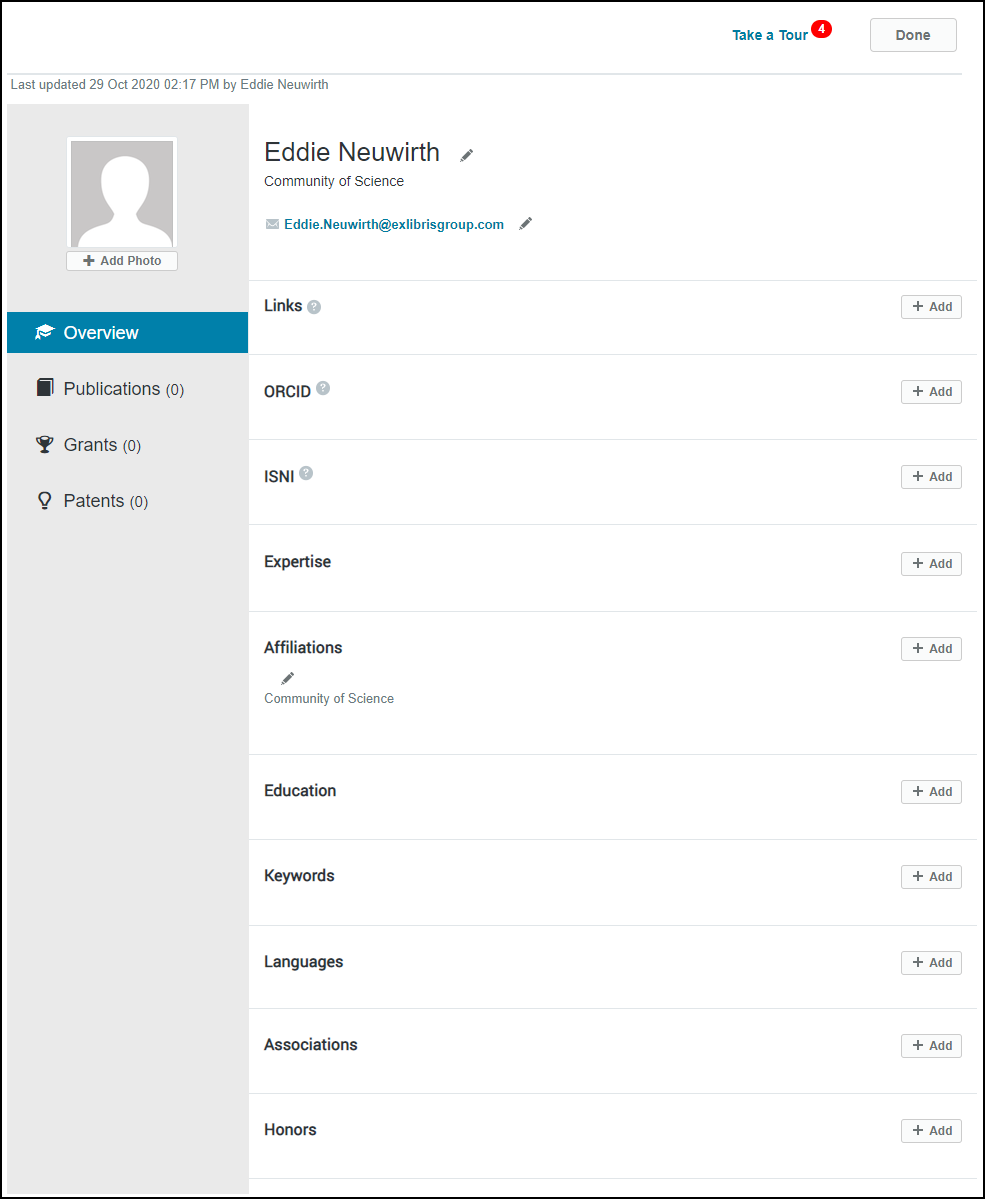 Edit Profile
 - Follow the on-screen instructions for editing your profile's overview, photo, publications, grants, and patents. Select the pencil icon to the left of any value to edit that value.
- Overview:
- Select + Add Photo at the top left to add a photo. Photos must be .jpg, .png., or .gif file and cannot be larger than 10 MB. You can crop or resize a photo after uploading it.
- When editing your name, you can add or edit the first name, middle name, last name, and suffix of your display name (in Pivot-RP) and any previous names. As soon as you enter any information into a field in the first row of Other Names, an additional blank row appears for you to enter an additional name, and so on.
- Similarly, you can add, edit, or remove multiple email addresses, including your display email (in Pivot-RP) and any additional, former email addresses.
- In Links, add websites related to your profile. The content of the webpages at the links that you add are used for the Advisor, scholar search results, and Pivot-RP's automated linking of publications and grants. You can add multiple links, including a personal webpage, c.v. page, and publication page. Select the relevant icon(s) for each link that you enter.
You can also upload a file that contains these links.
- In ORCID, connect your Pivot-RP profile to your ORCID profile (or create an ORCID profile and then link your Pivot-RP profile to it).It is recommended that you link it to your Pivot-RP profile. This ensures that your Pivot-RP profile is updated and current with your ORCID profile. In addition, this connection can be used to eliminate duplicate citations from your profile. When you ask Pivot-RP to associate your ORCID ID with your profile, you are directed to the ORCID website. You then log in to your ORCID profile, after which you authorize the connection between your ORCID profile and Pivot-RP.
You can also create an ORCID profile following the above procedure.
- In ISNI, add your International Standard Name Identifier (ISNI) to your profile.
- In Expertise, enter a description of your skills in the text box.
- In Affiliations, enter organizations that you belong to. For each organization, enter the organization name (or select it from the drop-down list after you have entered a partial match), department, role (or select it from the drop-down list after you have entered a partial match), and date range. Select if this is a current affiliation. When you are done, select Add.
If you have more than one affiliation listed, select Order and drag and drop the organizations so as to order them as required.
- In Education, enter the places that you went to school and the degrees that you earned. For each entry, enter the institution name (or select it from the drop-down list after you have entered a partial match) and degree (or select it from the drop-down list after you have entered a partial match), select the year that you received the degree, enter the field of study, and select Add.
If you have more than one institute listed, select Order and drag and drop the institues so as to order them as required.
- In Keywords, select one or more topics of research to add to your profile. It is highly suggested that you add at least one keyword. Pivot-RP's Advisor can only suggest funding opportunities if you have at least one keyword defined.
- In Languages, select one or more languages to add to your profile.
- In Associations, enter (or select it from the drop-down list after you have entered a partial match) one or more associations to which you belong. As you enter an association, an additional row appears for you to enter another, and so on.
- In Honors, enter honors or awards that you received. For each honor or award, enter the award title, the organization that gave the award (or select it from the drop-down list after you have entered a partial match), the year or date range for which the award was given, and select Add.
If you have more than one honor listed, select Order and drag and drop the honors so as to order them as required.
- Publications, Grants, Patents: On the relevant tab, select +Add to add a publication, grant, or patent, enter the information, and select Add. When adding publications (Publications tab), you can batch upload publications if you have previously exported them to an RIS or BibTex file. It may take a few minutes for Pivot-RP to process an uploaded file. After it is done, the publications become suggestions for you to add to your profile.
 Add Publications
 Batch Upload Publications
 - Publications, Grants, Patents: On the relevant tab, select Edit to edit, hide, show (unhide), or remove publications, grants, and patents. Hidden patents remain in your profile but do not appear in Pivot-RP. Select Done when you are finished.
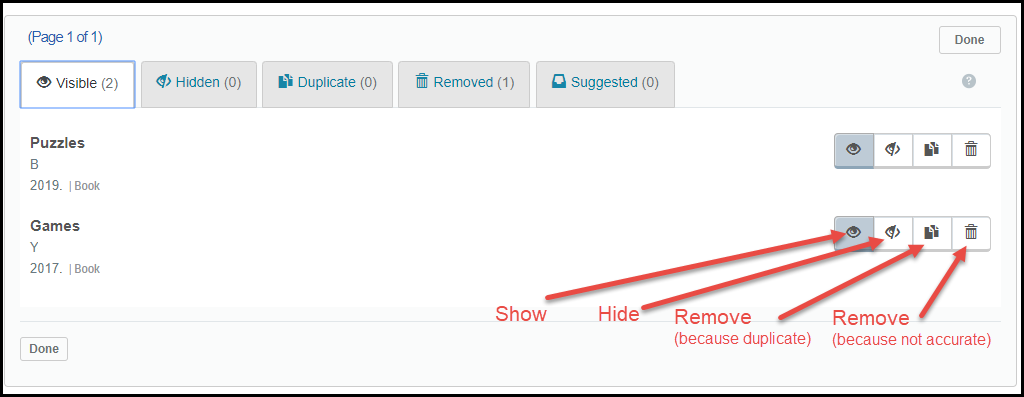 Edit Publications
- Overview:
- When you are done, select Done and close the tab or window.
Select My Profile Proxies on the Profiles page to view profiles for which you are a designated proxy to edit. Follow the above instructions for editing your own profile.

Administrative Management of Profiles
Administrators can manage other users' profiles the same way that all users can manage their own profile. When managing profiles, an administrator can see the number of suggested publications for the user at the top of the Publications tab.
To update a profile for a user, select the user name on the User Accounts Report page and follow the same procedure that a user follows when updating a profile.
To export one or more profiles to a CSV file:
- To export a selected list of profiles, on any page of profile search results, select the profiles to export, select Export, and select OK in the confirmation dialog box.
- To export all profiles, on the User Accounts Report page select Export to Excel and select OK in the confirmation dialog box.
The portfolios are exported to a CSV file with a header row as follows:

