
NDE UI Enablement
Introduction
The NDE (Next-Generation Discovery Experience) UI provides a modern, streamlined interface for library users. This guide will help you set up your first NDE view from an existing Primo VE view, utilizing your current configuration. In addition, you will be able to review the new configuration options available.
We recommend working on NDE in your Production environment. You can start configuring NDE alongside your live Primo VE views without impacting your existing setup.
It is important to note that the transition to the NDE UI is purely an interface update. All discovery-related data managed in Alma, including PNX records, local fields, normalization rules, and other configurations, remains unchanged. This ensures consistency in the underlying data layer, allowing institutions to focus on exploring the new interface options and customization capabilities offered by the NDE UI.
If you use the Duplicate for NDE option to create your NDE view, all existing view settings, including labels, feature enablement and more, are automatically carried over to your new NDE view.
Creating Your NDE View
In addition to creating a new view for NDE, you can duplicate an existing non-NDE view to retain its settings.
-
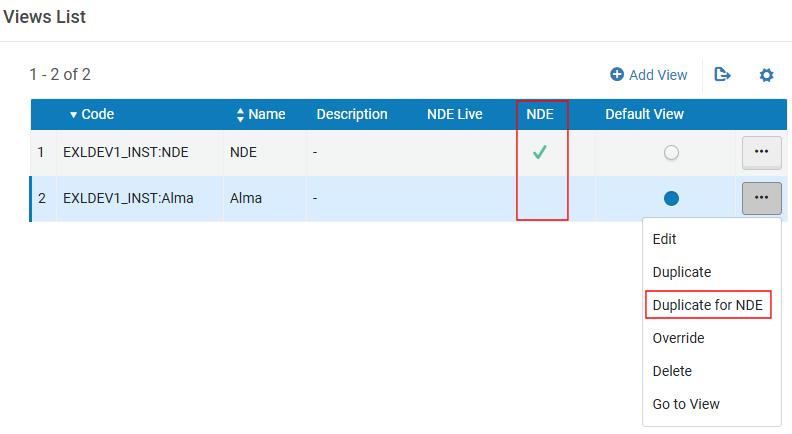
Open the Views List page (Configuration > Discovery > Display Configuration > Configure Views). The NDE column has been added to the Views list let you know which views support NDE.
 New NDE Column on Views List Page
 -
In the row containing your Primo VE view, select the Duplicate for NDE option to create an NDE View with the same options as your Primo VE view. If you prefer to create an NDE view from scratch, select the Add View option above the list, ensuring that you select the NDE check box since it cannot be added or changed later:
 New NDE Check Box on View Configuration Page
 -
When you have completed your testing and are ready to go live, select the Switch to Live row action and decide whether to redirect traffic from a non-NDE view. NDE views that have gone live will have a check mark in the NDE Live column.
 Switch to Live Row Action
For more information about creating views, see Configuring Discovery Views for Primo VE.
When using the Duplicate for NDE option, the main menu links are copied from your existing view. Some links (such as Journal Search) may appear but may not work because the related pages are still under development per the NDE release plan.
Accessing your NDE View
As with Primo VE, you can use the Go to View row action on the Views List page (Configuration > Discovery > Display Configuration > Configure Views) or enter the view's URL directly into a browser, which is formatted as follows:
Where:
-
institution_domain—The base domain of the NDE UI.
-
institution_code—Your institution's code.
-
view_code—The unique code assigned to each view in your environment.
Example: https://na02.primo.exlibrisgroup.com/nde/home?vid=TRIAL_10_INST:TRIAL_10_INST_NDE