
Go VE: Converting Views in Primo to Primo VE
During the Enablement phase, you can select which views in Primo that you want to include in Primo VE. This process does not copy specific feature configurations, but it enables the out-of-the-box view configuration in Primo VE.
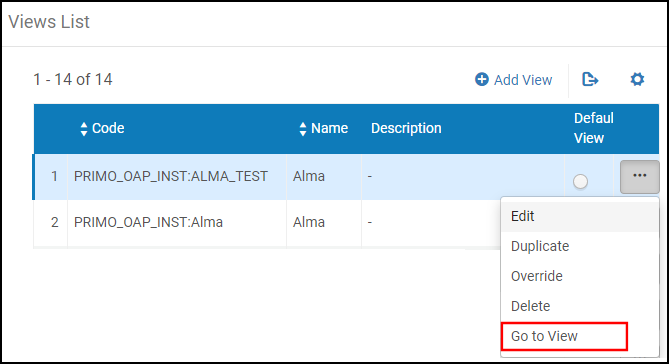
This guide provides instructions on how to configure views in Primo VE based on the views configured in Primo. Before you begin making changes, you can quickly test each view by selecting the Go to View row action on the Views List page.
The institution's code is prefixed to the view's ID (or View code) after the view is created.
Background
View Configuration Differences Between Primo and Primo VE
In comparison with the Primo Back Office, the View Configuration page in Primo VE enables you to benefit from a redesigned and more user-friendly backend interface that allows you to configure specific settings without having to skip through other settings. An emphasis has been put on reorganizing and centralizing view settings and adding many out-of-the-box settings that can be modified, disabled, or left unchanged. Here are some examples:
-
Browse configuration options were added as part of the Links menu configuration instead of using a separate mapping table.
-
Links to blank Resource Sharing and Purchase Request forms are included in the Links menu configuration.
-
The Customization Package Manager has been added as a dedicated tab in view configuration, instead of using a separate configuration page.
-
The configuration for full record services (such as the Detail fields, Browse Shelf, Citation Trail, and Times Cited) are now organized per service in a dedicated tab in view configuration.
Changes to views in Primo VE take effect immediately and do not require deployment.
Documentation and Training
In preparation for this task, it is recommended that you familiarize yourself with the following document and training videos:
Preparation: Gathering View Settings from Primo
Before you begin this configuration in the next section, it may be necessary to check the following settings in the Primo Back Office:
-
On the Views List page (Primo Home > Ongoing Configuration Wizards > Views Wizard), see which views are currently used for Primo and determine whether you want to keep them, modify them, or create additional views when configuring your views in Primo VE. During the Enablement phase, you will be asked to specify which of these you views you want to copy to Primo VE.
-
Edit each view and gather its settings from the Views Wizard to help in the configuration of the view in Primo VE.
Configuration: Configuring a View in Primo VE
The View Configuration page consists of several tabs that allow you to configure the settings that are related to what end users see in the UI (such as search scopes, look-and-feel, and services). The initial definition of a view configures the General tab and populates the other tabs with the out-of-the-box settings. For more details on creating and configuring views, see Configuring Discovery Views for Primo VE.
This section provides the steps to configure the views that were created during the Enablement process by copying the configuration from your Primo view to Primo VE.
-
Open the Views List page (Configuration Menu > Discovery > Display Configuration > Configure Views).
-
Edit the view that was created during the Enablement process.
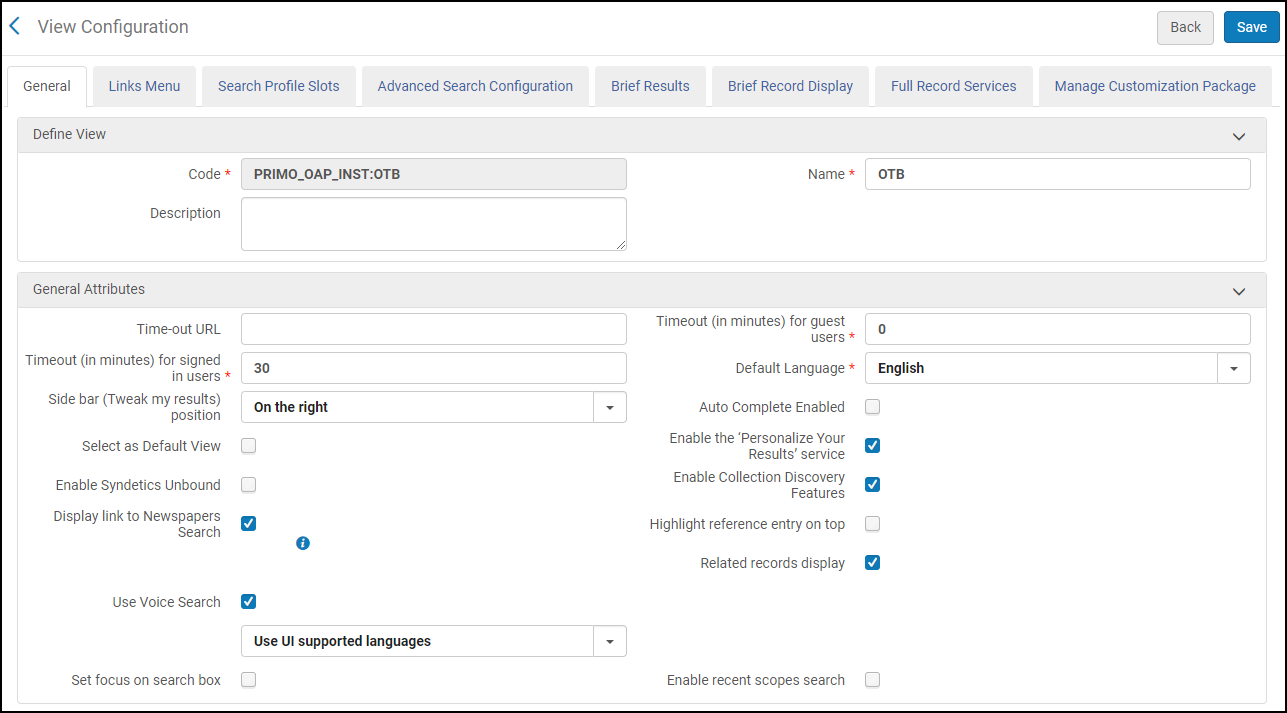 View Configuration Page - General Tab
 -
Configure the General tab (see Defining a View):
-
Select any general display options and features that you want to offer patrons. Refer to the following table for information on how to configure information from your Primo view (Primo Home > Ongoing Configuration Wizards > Views Wizard) to Primo VE:
Option Location in Primo VE Location in Primo Auto Complete Enabled
General tab
Auto Complete field in Institution Wizard (Primo Home > Ongoing Configuration Wizards > Institution Wizard)
Enable Collection Discovery Features
General tab
Auto Complete field in Institution Wizard (Primo Home > Ongoing Configuration Wizards > Institution Wizard)
Related records display
General tab
Enable related record services field on the Related Records page in Alma (Configuration Menu > Fulfillment > Discovery Interface Display Logic > Related Records)
Default institution
Not applicable to Primo VE since availability is based on the view's institution, not the IP address.
Views Wizard > Edit View Attributes
Enable citation trail
Full Record Services tab
Views Wizard > Edit View Attributes
Display featured newspapers
Featured Newspapers on the Central Index and Proxy Set Up page (Configuration Menu > Discovery > Other > Central Index and proxy set-up)
Views Wizard > Edit View Attributes
More from the same Course
Full Record Services tab
Views Wizard > Edit View Attributes
More from the same Collection
Full Record Services tab
Views Wizard > Edit View Attributes
Main menu links
Links Menu tab
Views Wizard > Tiles Configuration > Home Page > Main Menu tile
-
Select Save and continue. These settings are saved in the General tab.
-
-
Select the Links Menu tab to configure the links on the Main menu (Configuring the Links Menu):
-
Select Customize.
-
From this page, you can activate/deactivate the out-of-the-box links, order the links, update display labels, and provide additional settings for Browse Search and Journal Search.
-
Select Add Link if you want to include other links.
For details regarding your current settings in Primo, see the Main Menu tile in the Views Wizard (Primo Home > Ongoing Configuration Wizards > Views Wizard > Tiles Configuration > Home Page).
-
-
Select the Search Profile Slots tab to configure the view's slots (Configuring Search Profile Slots):
-
Select Customize.
-
From this page, you can activate/deactivate the out-of-the-box search profiles, order the slots, and edit slots.
-
Select Add a Slot if you want to include other search profiles.
For details regarding the conversion of your current tabs in Primo, see Go VE: Converting Primo Scopes to Primo VE.
-
-
Select the Advanced Search Configuration tab to configure the settings associated with Advanced Search (see Configuring Advanced Searches):
In each of the following sections, select Customize and activate the necessary search filters:
-
List of Indexes – Select Add Index if you want to add another index. For details regarding your current settings in Primo, see the Advanced Search tile in the Views Wizard (Primo Home > Ongoing Configuration Wizards > Views Wizard > Tiles Configuration > Home Page).
-
List of Resource Types – Select Add Resource Type if you want to add another resource type. For details regarding your current settings in Primo, see the Advanced Search tile in the Views Wizard (Primo Home > Ongoing Configuration Wizards > Views Wizard > Tiles Configuration > Home Page).
-
List of Languages – Select Add Language if you want to add another language. For details regarding your current settings in Primo, see the Advanced Search tile in the Views Wizard (Primo Home > Ongoing Configuration Wizards > Views Wizard > Tiles Configuration > Home Page).
If you want to enable the search filters for basic searches, select the Enable For Basic Search option as needed in the above sections. For information regarding your current settings in the Primo's Views Wizard (Primo Home > Ongoing Configuration Wizards > Views Wizard > Tiles Configuration > Basic Search).
-
-
Select the Brief Results tab to configure the settings associated with the Brief Results page (see Configuring the Brief Results Page):
In each of the following sections, select Customize:
-
Facets – Activate and configure the facets that you want to display on the Brief Results page. If you want to add a new facet, select Add a local facet. For details regarding your current settings in Primo, see the Refine My Results (Facets) tile in the Views Wizard (Primo Home > Ongoing Configuration Wizards > Views Wizard > Tiles Configuration > Brief Display).
-
Sort – Activate the sort types that you want to provide on the Brief Results page. For details regarding your current settings in Primo, see the Brief Results tile in the Views Wizard (Primo Home > Ongoing Configuration Wizards > Views Wizard > Tiles Configuration > Brief Display).
-
Dedup and FRBR – Specify how you want to handle Dedup and FRBR groups in the search results (such as how to display the FRBR record and which sort field to apply in the FRBR list). For details regarding your current settings in Primo, see the Brief Results tile in the Views Wizard (Primo Home > Ongoing Configuration Wizards > Views Wizard > Tiles Configuration > Brief Display). For additional FRBR and Dedup settings provided by Primo VE, see Configuring Display Options for Dedup and FRBR Groups in Primo VE.
-
-
Select the Brief Record Display tab to configure the settings associated with a record's brief display on the Brief Results page (see Configuring the Brief Record Display):
In each of the following sections, select Customize:
-
Display Fields – Activate and configure which display fields will appear in the first four lines of each record's description in the search results. For details regarding your current settings in Primo (which allows the configuration of three lines), see the Advanced Search tile in the Views Wizard (Primo Home > Ongoing Configuration Wizards > Views Wizard > Tiles Configuration > Home Page).
-
Record Actions – Activate and configure the up-front export actions and the full list of supported export actions (such as email, permalink, and My Favorites) that will appear in the brief and full displays, My Library Card, and My Favorites. For details regarding your current settings in Primo, see the Brief Results tile in the Views Wizard (Primo Home > Ongoing Configuration Wizards > Views Wizard > Tiles Configuration > Brief Display) and the Actions List mapping table (Primo Home > Advanced Configuration > All Mapping Tables).
-
-
Select the Full Record Services tab to configure the settings associated with each record on the Full Display page (see Configuring the Full Display Page):
-
Select Customize.
-
Activate/deactivate the services that will display for each record. In addition, you can apply further configurations to the following services: Details, Browse Shelf, Links, Citation Trail and Times Cited, and More From The Same Course/Collection.
For details regarding your current settings in Primo, see the following pages in the Primo Back Office:
-
Brief Results tile in the Views Wizard (Primo Home > Ongoing Configuration Wizards > Views Wizard > Tiles Configuration > Brief Display)
-
Full Results tile in the Views Wizard (Primo Home > Ongoing Configuration Wizards > Views Wizard > Tiles Configuration > Full Display)
-
-
-
Select the Manage Customization Packages tab to manage your customization package, which is copied for you during the Enablement phase (see Step 1: Enablement Phase). If you need to make changes to the package, use this tab to download it. For information on how to convert customizations your customizations in Primo to Primo VE see: Go_VE: Converting Your View's Customization Package to Primo VE.
-
Adjust the view labels to meet your preference (Configuration Menu > Discovery > Display Configuration > Labels). For additional details, see Configuring Display Labels for Primo VE.