
Lending Customization
Lending Policies — Participating Items
To manage resource sharing lending requests, you must have the Fulfillment Services Manager, Fulfillment Services Operator and Fulfillment Administrator roles.
Participating items are sets of physical items used for fulfilling resource sharing requests. Participating items must be defined for each resource sharing member.
Adding Participating Items
You add participating items to determine which physical item sets are available for lending.
- Edit a member (Configuration > Resource Sharing > Members).
- From the Physical Items Lending Policies tab, check Supplies physical items.
- Select Add Participating Items to determine which media are available for lending.
- Enter a Name for the media type.
- Select the Material Type conditions.
- Select the Item Policy conditions.
- Select the Location.
The Location is the item's current location and not the permanent location.
- Select Add to add the participating item(s) and continue adding more participating items, or select Add and Close to add the participating item(s) and close the Add Participating Items window.
Adding a Physical Lending Policy
Lending policy terms make requests for physical items available to other Rapido institutions that are not part of a pod. This information is available for other institutions when using the Find Partners action from borrowing requests if they have signed the resource sharing agreement.
- Edit a member (Configuration > Resource Sharing > Members).
- From the Physical Items Lending Policies tab, check Supplies physical items.
- Select Add Physical Lending Policy to specify the terms for each type of item.
- Select the Participating Items.
Selecting All Items refers to all items that exist in this Alma IZ.
- Select the Supply Term For.
- Enter the Delivery Time.
- Enter the Loan Period.
- If relevant, enter a Cost.
- If relevant, check Allow Renewal.
- If relevant, check Allow Rush.
- If relevant, enter an Expiry Time in days.
- Select Add to add the physical lending policy and continue adding more physical lending policies, or select Add and Close to add the physical lending policy and close the Add Physical Lending Policy window.
When Rapido is used by a non Alma ILS, titles are checked by Rapido for participating items in real time by using API calls to the relevant ILS to determine the status of the title’s items. API calls are supported for the following ILSs:
- Folio
- Sierra
- Polaris
- Koha
- SirsiDynix Symphony
- TLC Library Solution
As a result of Rapido’s reliance on the ILS managed inventory and its exposure through the API, when Rapido is used by non Alma ILSs, the options for defining participating items are dependent on the ILS APIs and vary between the different ILS, as below:
| System | Configurable elements |
|---|---|
| Folio | Location |
| Sierra |
Location, Item Type and the following boolean indicators:
|
| Polaris |
Location, Material Type and the following boolean indicators:
|
| Koha |
Location, Item Type, Collection and the following boolean indicators:
|
| SirsiDynix Symphony | Location, Item Type and five item categories |
| TLC Library Solution | Location |
Digital Lending
Request Purpose for Digital Requests
For digital requests, request purposes can be controlled based on Partner Account Allowances. This enables libraries to restrict request purposes according to the permitted usage defined for each partner. When configured, only request purposes that correspond to the partner’s account allowances are applied to digital requests. If no account allowances are defined for a partner, digital requests cannot be submitted. Request purposes are selected when creating digital requests and are stored with the request for use in lending workflows.
- Go to Configuration > Resource Sharing > Configuration > Request Purpose.
- Select Add Row.
- Fill in the necessary information for the Code, Description and the Default Value fields.
- Select Save.

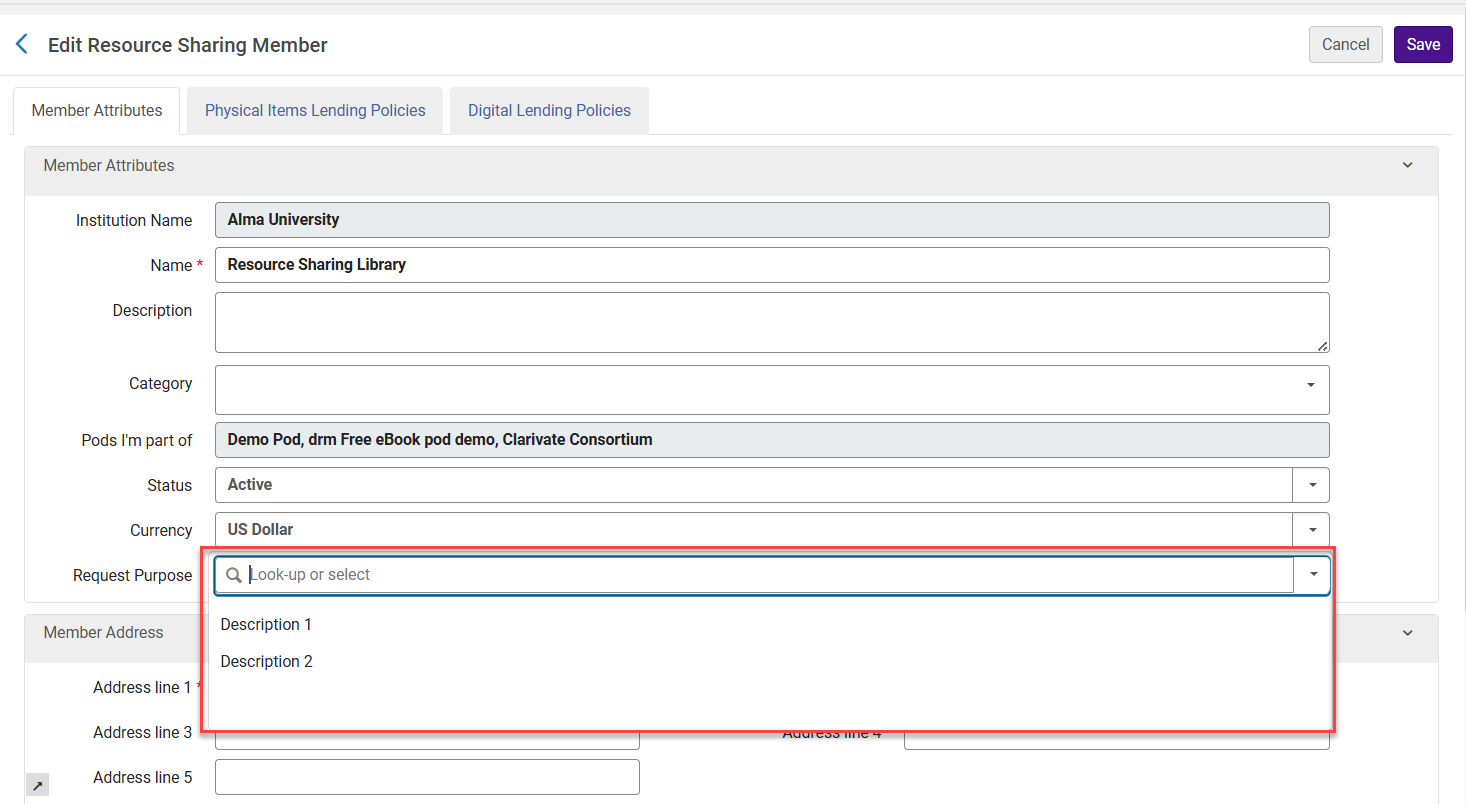
- Go to Configuration > Resource Sharing > Configuration > Members.
- Select a member and open the Member Attributes section
- In the Request Purpose drop-down, select a value.
- Select Save.
Configuring Digital Lending Policies
eBook pod members can configure their eBook participating item policies to include sets that contain EILL Eligible items.
- From the Digital Lending Policies tab (Configuration > Resource Sharing > Configuration > Members), select Add Participating eBooks.
- From the Add Set dropdown list, select a predefined set (Admin > Manage Jobs and Sets > Manage Sets) to include in the eBooks available for lending. For more information on creating sets, see Creating Logical Sets. The logical set is added to the participating eBooks available for lending.
Configuring Material Supply Methods
Lenders configure how material is supplied to the borrowing library by setting the Select Digitization Target option in Configure > Fulfillment > Digitization and Copyright Rules.
- Supply via Link: The maximum file size is 1,000 MB
- Supply via Attachment: The maximum file size is 25 MB, in alignment with common email provider limits.
When an attachment is supplied, the borrowing team must download the file and upload it for the end user. To streamline the process and avoid size limitations, it is recommended to select Supply via Link.
Defining Participating Items Sets for RapidILL
An automated Alma job publishes an automatically updated set of titles through the OAI protocol on a weekly basis. This set is enriched with item information so that RapidILL has all the details it needs.
RapidILL automatically pulls this data weekly and processes it into RapidILL holdings. These are the holdings that RapidILL uses to determine which requests are received and what is locally owned.
Each title extracts the following metadata from the holdings process:
- Title
- ISBN/ISSN/OCLC number
- Location/Collection
- Call Number/URL
- Years/Volumes (journals only)
For information on defining sets, see Rapid OAI Holdings - Step 2: Defining Sets.
Setting Lending Request Limits
This configuration may be relevant for libraries where copyright limits apply to lenders. Currently, these settings need to be configured in RapidILL.
Lenders can configure how many requests to allow from a single borrower within a specified number of hours.
- From the RapidILL Settings > My Profile > Copyright Settings page, check the Lending Request Limits checkbox.
- Enter the maximum Number of Requests.
- Enter the interval by Length of Time (in hours) to allow the borrower to send requests.
- Select Save. Requests from the same borrower are limited, and additional requests move to another lender. If there are no additional lenders, the request is rejected by RapidILL partner.

Automatically Ship Rapido Digital Requests Job
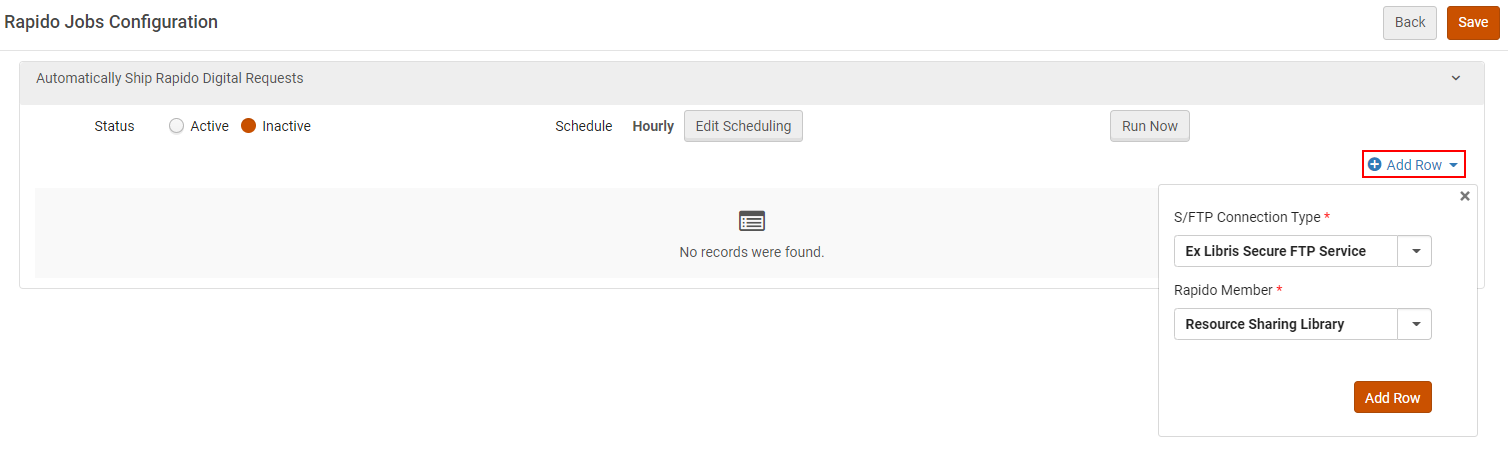
Rapido supports batch automatic delivery of digital lending requests from a configured folder. This functionality uses the Automatically Ship Rapido Digital Requests (default Inactive) job to scan a configured folder to attach files to the appropriate request. The attached files are then automatically sent to fill the borrowing request. Configuring this job enables staff to skip manually attaching files to individual lending requests. To enable automatic processing for lending requests with scanned resources saved in a folder, use the Automatically Ship Rapido Digital Requests job.
The Automatically Ship Rapido Digital Requests job relies on the file names being saved with the lending request internal identifier.
Select Add Row and select the S/FTP Connection Type (as configured in Configuration > General > External Systems > S/FTP definitions) and Rapido Member. The job can be scheduled hourly, daily, weekly, or monthly, or you can Run Now.
When using this job, the lending files should be saved with the internal identifier name.
The Digitization Workflow Setup (Configuration > Fulfillment > Copyright Management > Digitization and Copyright Rules) determines what kind of output the borrowing institution receives, based on what output type (link or attachment) is selected in the Select digitization target drop down list. When the job is run, the folder AutoShipFileTmp is created in the institution's root directory folder with a folder for shipped files and a folder for failed deliveries.
Conditional Terms of Use for Digital Requests
Lenders filling digital requests can indicate whether the supplied document has terms of use. If shipping terms of use are applied, the request requires manual handling by the borrowing staff. Terms of use can indicate requirements such as supplying the document as a physical non-returnable printout for copyright compliance such as printing a physical copy that can be shared with the patron as a non-returnable physical copy. This new option enhances copyright control by enabling the lender to specify to the borrower that the document cannot be shared with the patron. As a lender, you can enable the relevant terms from Configuration > Fulfillment > Resource Sharing > Shipping Terms of Use. By default, only the NONE term is enabled. The other available terms are:
- Library use only
- No reproduction
- Client signature required
- Special collections supervision required
Lending License Visibility
Rapido includes the ability to select the license fields to be added to the screen rather than using the Primo screen for this flow. (Resource Sharing > Configuration > Manage Download Electronic Resource)
The following are out-of-the-box and can be deleted if they are not needed:
- Interlibrary loan print or fax
- Interlibrary loan secure electronic transmission
- Interlibrary loan electronic
- Interlibrary loan record keeping required indicator
- Interlibrary loan note
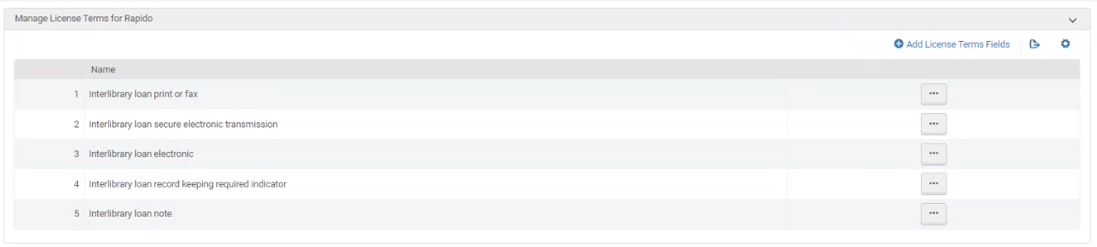
Each license field that is enabled appears in the right pane.
Shipping
Enabling Branches to Ship Directly
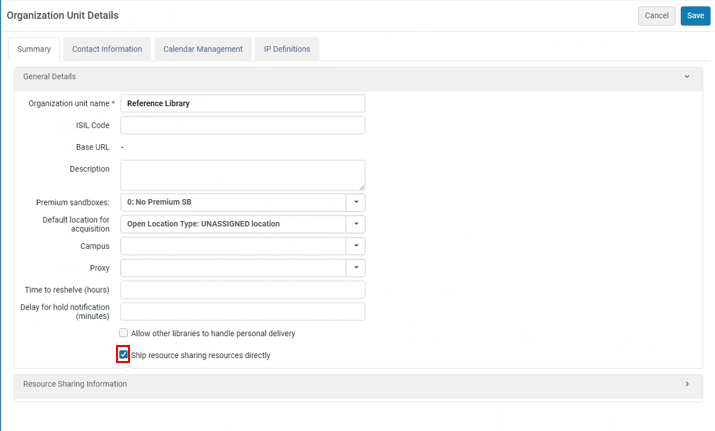
This feature enables institutions to define which library can ship on its own, without needing to send the resource to the resource sharing library to ship the resource to the borrowing institution.
Check Ship resource sharing resources directly (Configuration > General > Libraries > Add a Library or Edit Library Information) to enable branches to ship resources directly from a borrowing institution instead of sending the request to the associated resource sharing library.
We recommend enabling the Move to Branch to Automatically create move or digitization request for incoming request, (see Creating a Move Request Configuration). This creates the fulfillment request for the staff at the branch to handle without needing to access the resource sharing requests task list.
If the above is configured and the staff has fulfillment privileges in the library defined as allowed to ship resources directly from the branch while at the scope of that library, the Shipping Items menu (Fulfillment > Resource Sharing > Shipping Items) and the Scan In Item page > Shipping Items button are visible. The user can use either one of them to ship the resource. The resource sharing request is then updated accordingly, for example, Shipped Physically.
Prioritizing Locations for Fulfilling Digitization Request
When multiple copies exist for a title requested for digitization or Ship Digitally, locations can be prioritized through an optional setting (value from 1 to 10):
- Medium (default) priority - 5
- Lowest Priority - 1
- Highest Priority - 10
During activation, Rapido evaluates eligible holdings based on this priority and activates the request on the highest‑priority available copy. This applies to both patron digitization and Ship Digitally requests.

Physical Shipping
Configuring Reshelve Without Transit Rules
To configure reshelve without transit rules, you must have one of the following roles:
- General System Administrator
- Fulfillment Administrator
You configure reshelve without transit rules from the Reshelve Without Transit Rules page (Configuration > Fulfillment > Library Management > Reshelve Without Transit Rules) to set relationship rules between libraries, departments, and circulation desks so that transit for reshelving is not required between certain libraries. This reduces redundant work effort by not automatically putting items in transit for reshelving when the libraries are close to each other. This does not affect other transit types, such as hold shelf, work orders, and processing.
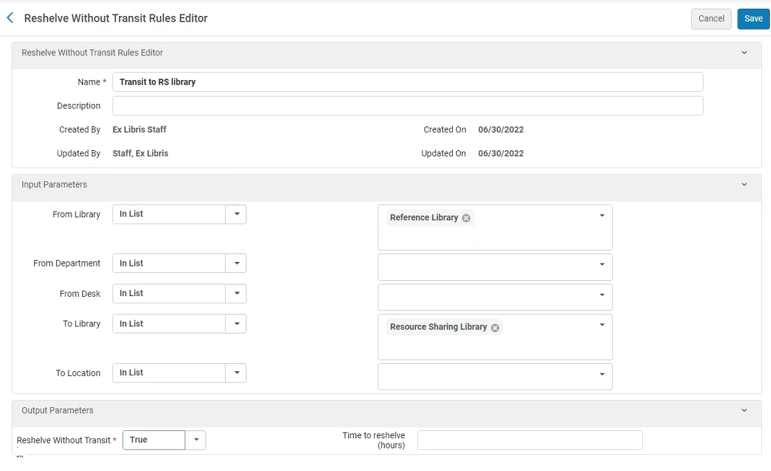
The default input parameter rules are empty. The default output parameter is set to False, which means all items should be set into transit when reshelving.
Each rule can be either enabled or disabled. By default, both rules are enabled.
Configuring Scan In Messages
You can set a message to warn users that scanning in items will complete the lending process.
Configure the Complete lending request (Configuration > Fulfillment > Physical Fulfillment > Scan In Messages Configuration) parameter (default Show message None).
If Show message is set to Popup message and 'Cancel" available at popup is set to Yes, if an item is scanned in and is part of a Resource Sharing Request that is linked to a lending request with the status Shipped Physically, a warning message requires the user to Confirm or Cancel. This prevents users from unintentionally completing the lending request.
If Show message is set to Feedback message and 'Cancel" available at popup is set to Yes, the feedback notifies the user that the request will be completed, but the scan in action cannot be canceled.
Alerts
Configuring Lending Alerts
Alerts can be attached to a lending request during the main steps of a request's workflow.

The alerts show the progress of the request (In Process, Canceled, or Completed). The following alerts are currently supported and can be configured from Configuration > Resource Sharing > Configuration > Manage Lending Alerts:
| Code | Description | Enabled By Default |
|---|---|---|
| AUTO_GENERATED_PARTNER_MISSING_DATA | Auto-Generated Partner Missing Manadatory Information | Yes |
| CITATION_DIGITIZATION_REQUEST_CANCELLED | Digitization Request Cancelled | Yes |
| CITATION_DIGITIZATION_REQUEST_COMPLETED | Digitization Request Completed | No |
| CITATION_DIGITIZATION_REQUEST_IN_PROCESS | Digitization Request in Process | No |
| MANUAL _RAPIDO_REQUEST_LOCATE_FAILED | Manual Rapido Request locate Failed | Yes |
| CITATION_MOVE_REQUEST_CANCELLED | Move Request Cancelled | Yes |
| CITATION_MOVE_REQUEST_COMPLETED | Move Request Completed | No |
| CITATION_MOVE_REQUEST_IN_PROCESS | Move Request in Process | No |
| NEW_REQUEST_CREATED_FOR_PARTNER | New Lending Request Created For Specific Partner | Yes |
| REQUEST_COST_EXCEEDED | Request Cost Exceeds Maximum Borrowing Cost Allowed | Yes |
| REQUESTER_EMAIL_EMPTY | Requester Email Empty | Yes |
| RESEND_REQUEST_RECEIVED | Resend Request Received | No |
Costs to Partner
Configuring Shipping Cost Lender Rules
You can add a rule to apply shipping and overage costs to borrowing requests. These cost fields are controlled by the Base fee page limit (Configuration > Fulfillment > Resource Sharing > Shipping Cost Lender Rules) parameter. These costs are displayed in the right pane of the borrowing and lending requests.
For example, if the total amount of pages permitted at the Base Fee rate is 10, and the total number of pages requested is 20 (calculated from the Pages field on the Borrowing request or the Start page to End page), and the Base fee page limit value is 10, and the Page Overage Fee is 1, then the patron cost is 10 (the total pages requested minus the Base fee page limit value) plus the sum of the amounts configured for the Shipping Cost, Service Level Fee, or Base Fee. In the example below, the total patron cost is 15.
The Base fee page limit rule only applies if the total requested pages exceed the configured Value.
You can configure additional input parameters to refine shipping cost rules:
- Location: Multi-select dropdown based on library location and hierarchy.
- Organization Type: Dropdown using values from the Partner Organization Type code table (Resource Sharing Partners).
- Material Type: Multi-select dropdown based on supplied item types.
- Shipping Country: Dropdown using values from the Country Code table.
- Currency: Dropdown using values from the Currency Subset mapping table.
Use the VAT output parameter to apply VAT charges as needed.

When an institution configures shipping cost lender rules with an input parameter that relates to an item (such as Location or Material Type), the shipping cost cannot be calculated immediately when the screen loads, because the item has not yet been selected. For additional clarity, Rapido displays an information icon (i) next to the Shipping Cost field. Selecting this icon displays a message The Shipping cost will be calculated after the item is selected.
 The shipping cost will be calculated after the Item is selected
Send Invoice to Partner Job
Lending institutions can send invoices directly to borrowers for requests that include fees using the Send Invoice to Partner job, (Inactive by default).
You can specify which partners should be emailed invoices (default All). The partners available in the list are partners with at least one lending request attached to them with a processing fee. The Job processing start date is the last date the job ran. If the job has not run, the Job processing start date defaults to today's date.

The Send Invoice to Partner job report can be accessed from Admin > Manage Jobs and Sets > Monitor Jobs > History tab with a list of how many invoices were sent successfully and the reason for those that failed, along with the name of the invoices that failed and why.
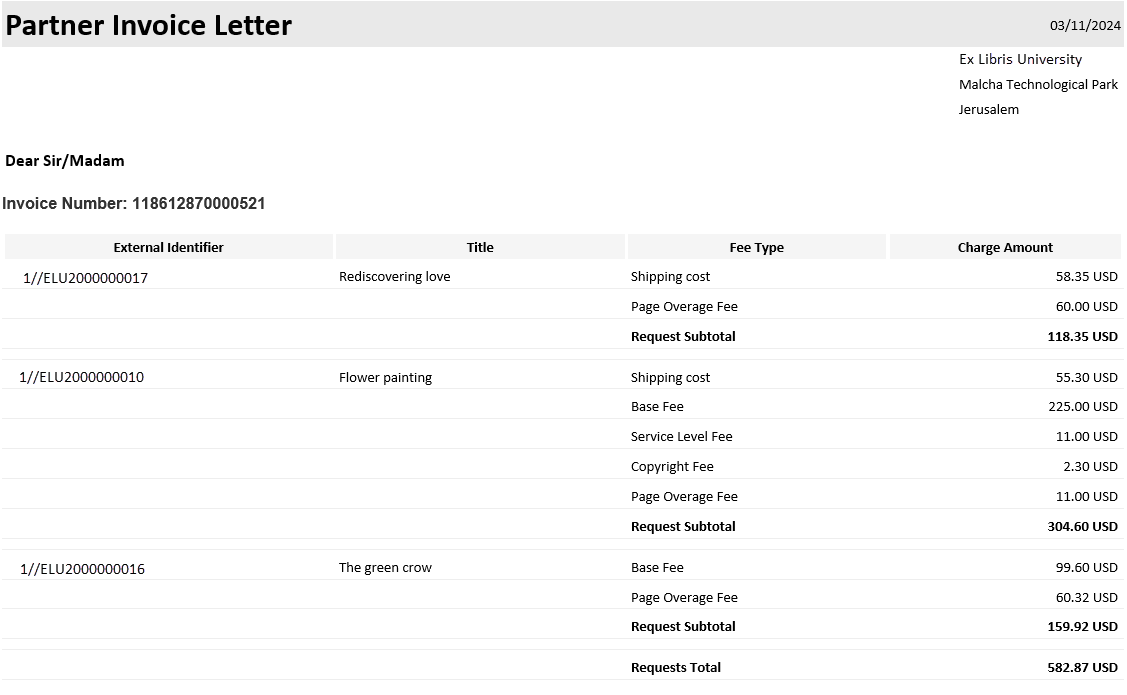
When the Send Invoice to Partner job runs successfully, the Partner Invoice Letter (Configuration > General > Letters > Letters Configuration) is emailed to relevant partners detailing the costs for the request.
Currency Handling
Currency handling within the Request Cost section can now reflect the currency of the partners. Currently, the currency reflected in Request Cost is defined via (Configuration Menu > Acquisitions > General > Currency Subset). To have the request cost reflect in the partner's currency, configure (Configuration > Fulfillment > General > Other Settings) rs_use_partner_currency to true. The default value is false. If rs_use_partner_currency is set to true and the request cost field is populated, the currency value changes to reflect the value of the currency defined on the General Information tab of the partner (Fulfillment > Resource Sharing > Partners).


Non-Supplier
Excluding Non-Workdays Days from Expiry Period
The Expiry Time (days) can either be defined on a partner or on a lending policy. A job runs that deletes unhandled expired requests. To prevent lending requests from expiring during non-workdays, Rapido enables you to set days to exclude from the expiry period calculation (Configuration > Resource Sharing > Configuration > Resource Sharing Working Days).

Disabling Lending Hours in Rapido
To disable resource sharing lending hours, you must have a General System Administrator role.
- Select Configuration > General > Libraries > Add a Library or Edit Library Information.
- From the resource sharing library Summary tab, select Temporarily inactive for lending.
- If relevant, select the Inactive dates range.

For RapidILL users, when the parameter rs_update_rapid_with_lending_offtime (Configuration > Fulfillment > General > Other Settings) is set to true (default false), changes to the Inactive dates range field automatically updates the RapidILL Lending Off Hours.
- The start date must be less than one year in the future.
- The duration cannot be longer than 30 days.
- Setting this configuration to true means that the configured inactive dates override the dates submitted using RapidILL webpages.
- The temporarily inactive checkbox remains selected after the date range until it is manually deselected.
Also see Disabling lending hours for RapidILL.
Lending will resume when the date range passes; however, the library must manually deselect the Temporarily inactive for lending checkbox.
If there are active lending requests that cannot be filled due to the need to become temporarily inactive for lending, staff can reject these requests to move them to the next partner.
Temporarily Disable Lending for Different Formats
This feature enables users to selectively disable specific lending services, rather than disabling all services. In Configuration > Fulfillment > Library Management > Library Details, you can temporarily disable Physical lending, Digital from Physical lending, or disable Everything.

Temporary Inactive Date Ranges for Lending
- Fulfillment Services Manager — enabled by default
- Fulfillment Administrator — enabled by default
- Fulfillment Operator — requires opening a ticket with the Clarivate Support team to enable it
New for June! This feature enables staff members to temporarily close the library for lending. You can define one or more inactive date ranges for each resource sharing library. Each date range represents a period during which lending activities are unavailable. Libraries remain available for selection even if they already have defined inactive date ranges. Overlapping date ranges for the same library are not allowed.
- Select the Temporarily Inactive Date Ranges (Fulfillment > Resource Sharing > Temporarily Inactive Date Ranges) link.

- The Temporary Inactive Date Ranges window appears.
- Select the Add inactive date range button.

- A pop-up opens that enables users to define an inactive period for one or more resource sharing libraries.
- Resource sharing library: multi-select dropdown with all the resource sharing libraries of the institution. Libraries remain available in the dropdown even if they already have defined inactive date ranges. This field is mandatory.
- Turn Off lending For: see Temporarily Disable Lending for Different Formats.
- Inactive dates range: the date range in which the library will be inactive.
- Select Add and Close after defining all fields.
Changes to inactive date ranges are saved only after selecting Save. If you leave the page without saving, your changes are not applied.

Once the user sets one or more inactive date ranges, they appear in the Temporary Inactive Date Ranges section as a list, sorted by start date.

Customizing Lending Reject Reasons
Customizing Internal Rejection Reasons
Library staff can customize their internal rejection reasons. When the Internal Reject Reasons table is configured (Configuration > Resource Sharing > Configuration > Internal Reject Reasons), the list of configured reasons is displayed in the Internal reject reason dropdown list. Library staff can also define a default value for the Internal reject reason dropdown list.
Copyright Compliance Reject Reason
New for July! For the Lacks copyright compliance reject reason, Rapido supports an optional configuration that prevents repeat requests for the same resource from the same borrowing library for a defined period. This behavior is controlled by the rapidill_copyright_compliance_block_days customer parameter (Configuration > Fulfillment > General > Other Settings). When the parameter is set, requests for the same resource are not routed to the same lender for the specified number of days set in the parameter value field after a copyright-based rejection.

Customized Statuses
It is now possible to set the workflow profiles so that a lending request that is renewed is set to a status of Renewal Accepted. As opposed to the current behavior, where the request reverts to a Received by partner status. This makes it more evident for the lending library staff that the request has been renewed.