Title Alerts
The following user roles are required to work with title alerts:
- All Rialto roles have rights to work with Title Alerts except Selector Limited and Rialto Purchaser.
Title Alerts enable staff to create lists of titles for review according to a user-defined query and ranking. Differing from recommendation feeds, title alerts create a finite set of titles drawn up at predefined intervals—weekly, biweekly, or monthly. Users can optionally be emailed when new alerts are created.
Rialto staff (typically selectors) define Title Alerts to be notified of new titles published in areas of their interest. Title Alerts are created per user, but staff selectors share them with other staff members. Only Rialto administrators have access to the entire list of university Title Alerts.
Each time a Title Alert runs, it gathers offers that match the query and sorts them by the configured ranking profile (choosing the best offer for each work). These offers are saved to a list named after the search date. The lists do not contain offers from works returned on past lists. Any staff attached to the list are notified via email and a system pop up that new results are available. All staff can see a Title Alert badge on an offer from an active Title Alert list.
Selectors review the lists, performing standard actions on titles they are interested in. Lists can then be archived or deleted when the review is complete.
Creating a Title Alert
Rialto users may define a new title alert, including the query to build lists and all information associated with the list.
- Navigate to Collection Development > Automatic selection > Title Alerts.
- Click Create New Title Alert.
- Enter a Name and click Add.
 Create New Title AlertThe newly added Title Alert page is displayed.
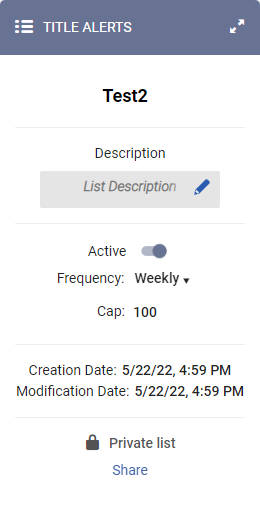
 - To the far right of the screen, in the Title Alerts widget, select the following fields to define them:
 Title Alerts widget
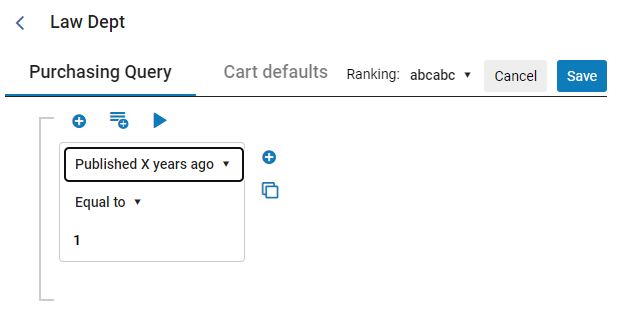
Field Description Name Select this field to edit the name of the Title Alert. Description A short description on the Title Alert. Active/Inactive Select whether the alert will be active or inactive. Frequency Select the frequency that the alert will run: weekly, biweekly, or monthly. Cap (capacity) Select the capacity amount of alerts to be displayed. Share If you want to share this Title Alert with other users, select this option, and then select the users to share it with. For additional information, see Working with Lists. - In the Purchasing Query tab, set the desired attributes for the Title Alert.
For detailed descriptions on the query values, and how to use the query builder, see Configuring the Recommendations Feed Profile.For more information on Ranking, see Managing Ranking Profiles.
 Purchasing Query Tab
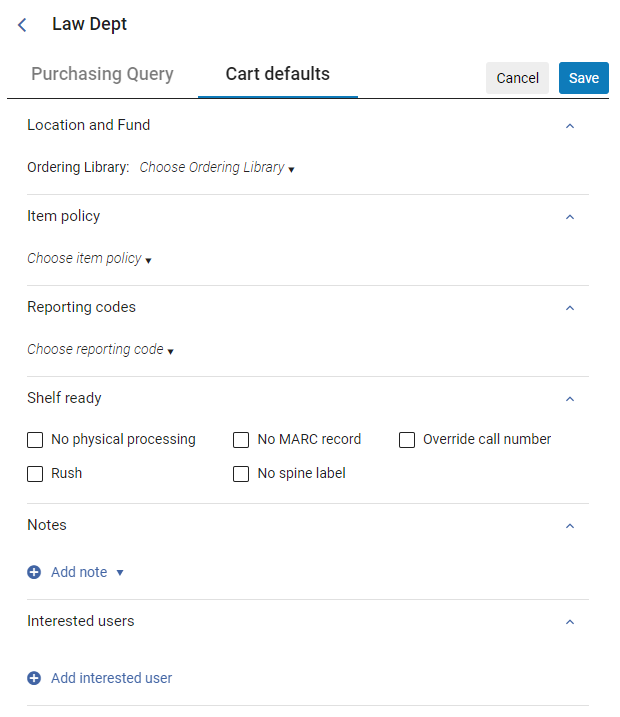
 - In the Cart defaults tab, define the shopping Cart options.
For detailed descriptions of the Cart options, see Adding to Shopping Cart and Submitting to Approval > Shopping Cart Options.
 Cart defaults tab
 - Under Ranking, select the ranking profile to apply when generating the list of titles. For additional information about ranking profiles, see Managing Ranking Profiles.
- Select Save.
Editing a Title Alert's Configuration
Once a Title Alert has been created, it is displayed on the Title Alerts page. On this page, you can edit the alert.
- Access the Title Alerts page: Collection Development > Automatic selection > Title Alerts.
- Select the row actions (
 ) button, and then select Edit.
 - Edit the Title Alert as required (see Creating a Title Alert, above).
- Select Save.
Reviewing Title Alerts
In the Title Alerts page (Collection Development > Automatic selection > Title Alerts), you can see a list of all the Title Alerts to which you are subscribed.
From this list, you can open current and past results for each Title Alert, modify the settings of Title Alerts, run a Title Alert manually, and delete a Title Alert. For each Title Alert in the list, the name and description of the alert, modification and review data, and the following information are provided:
- Number of Items – The number of titles returned the last time the alert ran (not including titles that were manually deleted from the list
- Visibility – Whether the item is only visible to the user who created it (Private) or was shared with additional users (Shared)
- Type – Whether the Title Alert is a regular Title Alert or was generated from a Selection Plan (see Selection Plan Management)

Viewing and Handling Results
When the Title Alert generates a list, all staff users who are marked as an owner are notified via email and in system pop up. (To configure per user default notifications, see User Notifications in Rialto.)
- Select the name of the Title Alert or, in the row actions, select Review Last Results.
- In the row actions of the Title Alert, select Review All Results. All the titles that were included in the results in the past are displayed in a single list (except for titles that have already been deleted).
The results are presented as standard offer lists (including facets, sort options, search options, bulk actions, and Details panels). As with other offer lists, the row actions of each title in the results lists include the following options:
- Add to Cart
- Remove from List
- Add to DDA
- Add to List
- Move to List
- Move to Cart
For more information about these options and about working with offer lists in general, see Working with Lists.
Viewing the History of a Title Alert
The History page of a Title Alert presents a list of the times the Title Alert was run, and indicates how many titles were returned for each run (not including titles that have since been removed from the results) and the current status of the run (New, Viewed, Archived, Restored).

- In the row actions of the Title Alert, select History.
- Select the name of the run or, in the row actions of the run, select Review.
- In the row actions of the run, select Remove.
You can archive and restore runs individually from their row actions, or in bulk by selecting them and then selecting Archive or Restore above the list.
Archiving Title Alert Runs
To reduce clutter without losing information, Title Alert runs can be archived. Archiving a run has the following results:
- The run and its contents are not displayed in the all-titles list (opened by selecting Review All Results).
- In the Title Alert's History, the run is not visible when the default Display filter, "Active," is selected.
- Faculty cannot see it.
- The Title Alerts badge is removed from all offers throughout Rialto (see Badges on Offers, below).
Archiving can be performed manually, and can also take place automatically. By default, all runs are set to be archived six months from their creation date. This value can be modified per Title Alert in its configuration screen, under Archive the list after.

Lists can be manually archived from the list itself, or from the History page (see Viewing the History of a Title Alert, above).

An archived list can be restored if needed from the History page or from the list itself, when it is opened from the History page (see Viewing the History of a Title Alert, above).
All archived lists are deleted one year after their archive date.
Badges on Offers
A Title Alert Badge is displayed throughout Rialto on offers that are found on an active Title Alert list. On hover, information about the Title Alert displays.

Reviewing Selection Plan Slips
In the Title Alerts page (Collection Development > Automatic selection > Title Alerts), you can easily identify the list of title alerts produced from the Selection Plan Slip, which is marked Selection Plans in the Types column. You can also filter the list of Title Alerts to only show those with Selection Plans as their Type. The review process for the slips is the same as it is for regular title alerts.
- Selection Plan Slips can be accessed from the Title Alert page, allowing selectors who don't have access to selection plans to view the results.
- A single selection plan may contain multiple Selection Plan Slip rules, along with a combination of purchase and add-to-DDA rules.
- Multiple selection plans can be added to a single Selection Plan Slip.


