
Preparing Preservation Plans
Preparing Preservation Plans
- Prepare Preservation plans
- Test Preservation plans and evaluate their results
- Compare Preservation options and select the best approach
- Planning and Testing Process Flow
- Viewing Risk Reports
- Creating a Preservation Set
- Creating a Preservation Plan
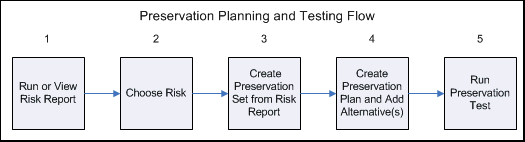
Planning and Testing Process Flow
Viewing Risk Reports
Open the report you want to view by clicking the Preservation tab and selecting View Global Risk Report from the Risk Analysis section.
The report opens, displaying a list of risks with their associated formats.
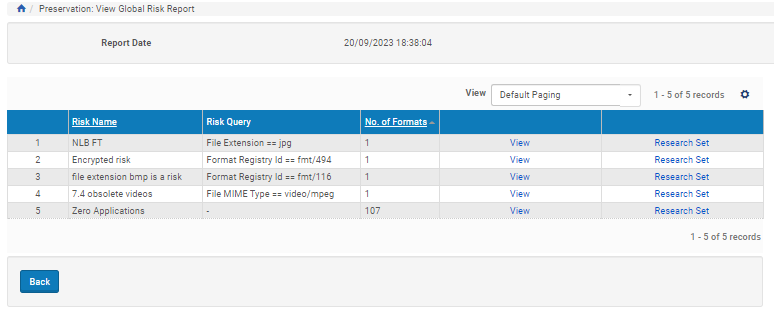
The list is searchable and sortable. Each entry in the list has the following two options:
- Create Set - Clicking this link opens the Search Object page, from which you can start creating a set of objects for a Preservation plan. To proceed, see Creating a Preservation Set.
- Preservation Plans - Clicking this link opens the List of Preservation Plans page, which displays a list of existing Preservation plans related to the given format.
Each entry in the list has the following two options:
- View - Clicking this link opens the Risks per Format page.
 Risks Per Format Page
The Risks per Format page lists all risks associated with the given format and shows the number of IEs, representations, and files affected by each risk. The list is searchable and sortable. Each entry has the same two options: Create Set and Preservation Plans. See Creating a Preservation Set to proceed.
- Research Set - Clicking this link opens the Search Object page, from which you can start creating a set of objects for a Preservation plan. To proceed, see Creating a Preservation Set.
Creating a Preservation Set
- From the View Global Risk Report page, click View for the format you want to work with, then Create Set for the row that contains the specific risk you want to target. The Search Object page opens.
 Search Object Page
This page lists all objects in the repository affected by the given risk. The list is sortable. To proceed, see Creating a Preservation Plan
- (Optional) To apply additional conditions to the list, do the following:
- Under the Add Conditions bar, click the Add Conditions button. The Search page opens to the Search Conditions tab.
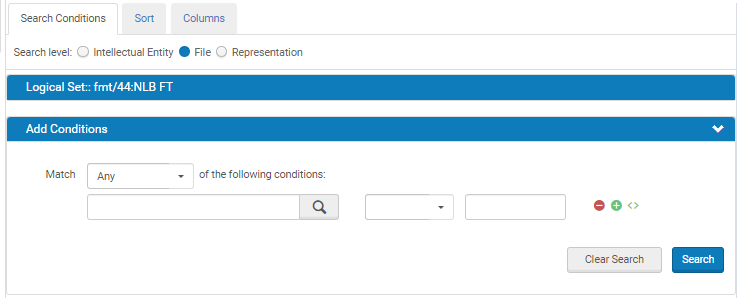 Search Conditions Tab
 - Select All or Any from the Match drop-down menu.
- Enter the field you want to search in the first text field. Matching fields display in a drop-down menu as you type.
- Select a comparison value and enter a search term for each condition. To add more rows, click the plus icon beside the current row. To delete a row, click the corresponding minus icon.
- Click the Search button.
The results display in the Results section. Results from Single Format Search for Objects
 - If necessary, adjust the conditions and re-run the search until your search and results match the parameters you need.
To proceed, see Creating a Preservation Plan.
- Under the Add Conditions bar, click the Add Conditions button. The Search page opens to the Search Conditions tab.
Creating a Preservation Plan
- On the Search Object page, click the Launch Basic Preservation Plan or the Launch Advanced Preservation Plan button.
The Plan Details - Administrator Information page opens. Plan Details - Administrator Information Page
 - Type the new Preservation plan’s name and reason in the appropriate fields.
- (Optional) To attach a document to the plan, click the Browse button in the Attached Documents area, choose the required file in the dialog box that opens, and click Add.
The file is attached to the Preservation plan. - To proceed, see Creating a Test Set.