
Fixity, Provenance, and Storage
Fixity in Rosetta with an External Storage Layer
Fixity checks occur as part of validating files as they are deposited, ingested, or otherwise altered within Rosetta. If an institution using Rosetta wants to store files in one or more storage locations outside of the Rosetta repository, fixity checks and events from this external storage layer can be integrated into Rosetta records.
As part of this process, provenance events are performed in Rosetta before an object or IE is returned to the external storage layer. Rosetta performs its part of the equation through its Data Management module and the use of an API.
As part of maintaining the preserved file copies, a fixity check is performed on each of the copies wherever they are stored. In order to record all the information about these checks in Rosetta, the library must run an API that updates Rosetta after a fixity check. This allows reports to be generated in Rosetta and provide the fixity status for all files.
The process includes the addition of an event that can be either a statistical event (not provenance) or a provenance event.
A provenance event is recorded in the IE METS file, and it requires a new version of the METS file to be written.
The provenance event functions as follows:
- The event itself is written to the database whenever it is generated, whether it succeeds or fails.
- The event is written to the DNX as provenance when the check result is different from the current status:
- first time it runs (success/failure)
- success after failure
- failure after success
In addition, this event does the following:
- Captures the information about a fixity check that was performed in the storage layer on any of the file copies
- Is added to Rosetta by an API
- When triggered externally, is written to the database as if it had been triggered internally
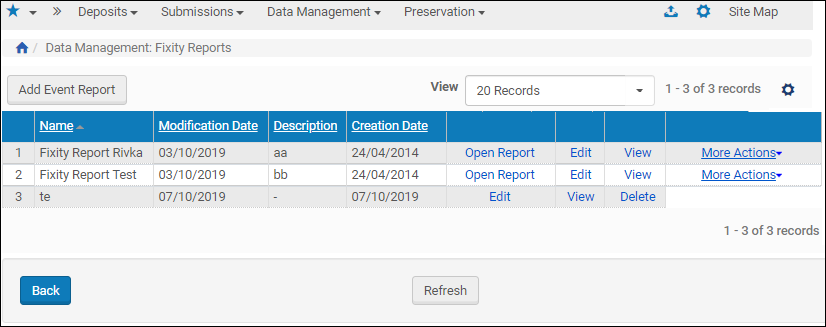
Managing Fixity Reports
Fixity reports are set up as Event Reports in the Data Management section of the Management module:
Fixity Reports Page
Access the page by following the path Home > Data Management > Advanced Tools > Fixity Reports. From this page you can
- Add a new report
- View, edit, or delete an existing report
- Open or generate an existing report
To add a new report:
- From the Fixity Reports page (Home > Data Management > Advanced Tools > Fixity Reports), click the Add Event Report button.
The Add Event Report page opens. - Enter values in the fields as described in the following table:
Event Report Page Fields Field Description Name Provide a name for the report to appear on the Fixity Reports page. Description Describe the report (not required). Time Period Specify the number of days, weeks, months, or years for the report to cover. Number of copies and fixity events per copy To select a specific number of copies and/or fixity events per copy to capture in the report, select the check boxes and specify the numbers in the fields. - To create or add a set to be included in the report, click the corresponding button and specify a new set (Create Set button) or select a set that has already been defined (Add Set button).
To create a new set with search conditions, see Creating a Logical Set.
When you have created a new set or added an existing one to the event, the Event Report Details page refreshes with the selected set shown beside an Unlink set option:
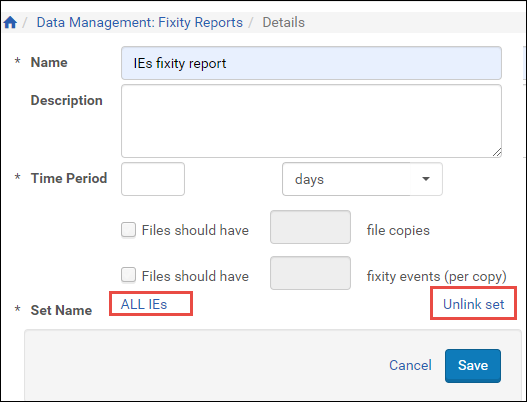
Set Selection for Event Report
- To change the set, click Unlink set and repeat from the beginning of the previous step in this procedure. To keep the set, select Apply. To keep the set and continue with the procedure, click Save.
Rosetta returns you to the Fixity Reports page, where the new event report appears in the list of fixity reports.
To view, edit, open, delete, and generate a fixity report:
- From the Fixity Reports page (Home > Data Management > Advanced Tools > Fixity Reports), the following row actions are available:
- Open Report to open the report. Click Export Fixity Report to Excel to download an excel of the report.
- Delete to delete the report (then click Confirm to continue the deletion)
- View to view the report details (click Back to return to this page)
- Edit to make changes to the report details. Click Generate Report to generate the report.
- Click Save to save changes or Cancel to return to the report list page without saving changes.