
Managing IEs
The section describes various activities that you can perform with IEs. It includes the following:
- About Deleting, Restoring, and Purging an IE
- Deleting an IE from the Web Editor
- Deleting IEs in Bulk
- Recovering an IE from the Recycling Bin
- Purging an IE from the System
- Moving IEs
- Restoring IEs from the Permanent Repository
- Exporting IEs
Deleting, Recovering, and Purging IEs
About Deleting, Recovering, and Purging an IE
When IEs are deleted from the system, they are sent to the recycling bin, and their status changes to Deleted. From the recycling bin, they can either be recovered or purged from the system.
IEs in the recycle bin retain their CMS information, and the Metadata Orphan Handler does not update the CMS system until the IEs are purged.
When an IE has been purged, only provenance events remain on record in the system.
Deleting and restoring can be performed by a user with the role of Editor - Full. Purging an IE from the system can only be performed by a user with the role of Data Manager.
Deleting and Purging an IE are assigned to different roles in order to avoid accidental and permanent deletion of an IE.
The following table describes user actions and system behavior related to deleting, restoring, and purging IEs.
| User Action | System Actions | Resulting IE Status |
|---|---|---|
| Delete IE(s) (from the Web Editor or using a system process | Changes the IE status to Deleted without any other actions | Deleted – cannot be viewed, edited, published or searched for (but can be recovered). |
| Recover IE (from the recycling bin) | Changes the IE status to In Permanent. | In Permanent |
| Purge IE permanently (from the recycling bin) | Deletes the streams and the operational data, all the metadata from the METS file except the provenance events that remain for audit and logging. | Deleted – cannot be viewed, edited, published, or searched for (and cannot be recovered) |
Deleting an IE from the Web Editor
When a user deletes an IE, the IE becomes unavailable for standard actions in the Web Editor.
To delete an IE:
- Perform a search on the database (through Data Management > Search for Objects, for example) to find the IE you want to delete.
- Click Editor in the row of the object you want to delete.
The object opens in the Web Editor:
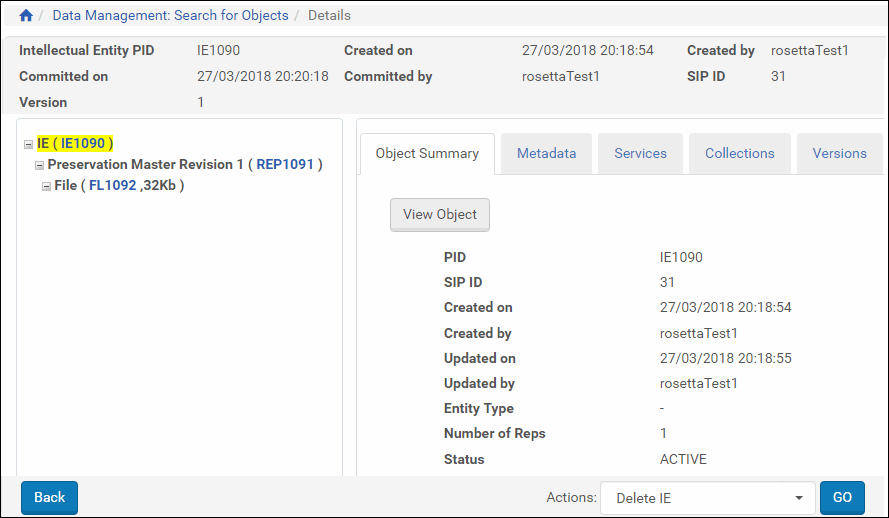
Deleting an IE
- In the bottom pane, click the down arrow of the Actions drop-down field and click the Lock IE option.
- In the bottom pane, click the down arrow of the Actions drop-down field and click the Delete IE option.
The Delete IE option does not appear in the drop-down list if you have not locked the object. All objects must be locked before action can be taken on them. (This prevents two users from interfering with each other’s work.) If you see an option to lock the object, select that and click the GO button. When the page refreshes, you should see several options in the drop-down list, including Delete IE.
- Click the GO button.
The Deletion Reason and Note Page opens:
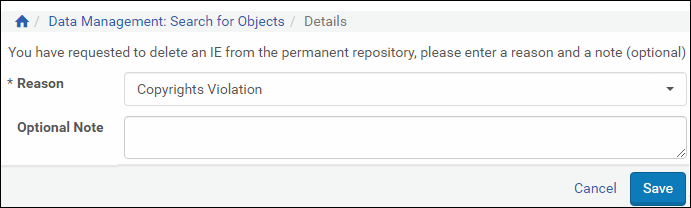
Deletion Reason and Note Page
- Use the drop-down menu to select a reason for the deletion.
- Enter a note in the text field if you want more information to be recorded with this action.
- Click the Save button to complete the deletion of the IE.
Deleting IEs in Bulk
The bulk delete process deletes IEs by removing them from the permanent repository to the recycle bin area. Users schedule the process using two input parameters:
- Task chain – created using the task chain UI.
- Set of IEs – created using the set management UI. To create a set of IEs (an itemized set), see Creating an Itemized Set of this guide.
To create a process that deletes multiple IEs:
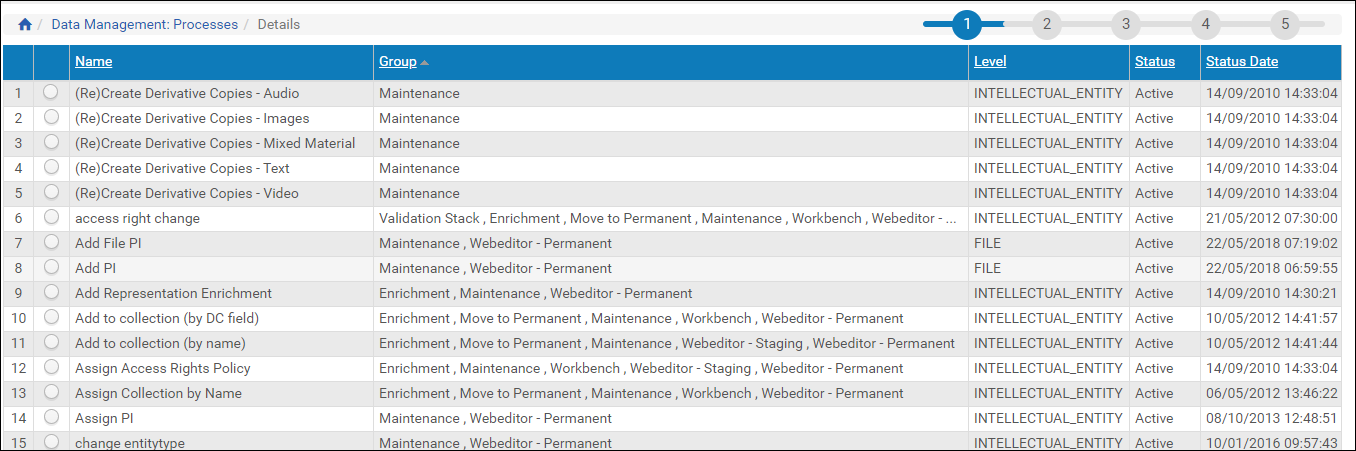
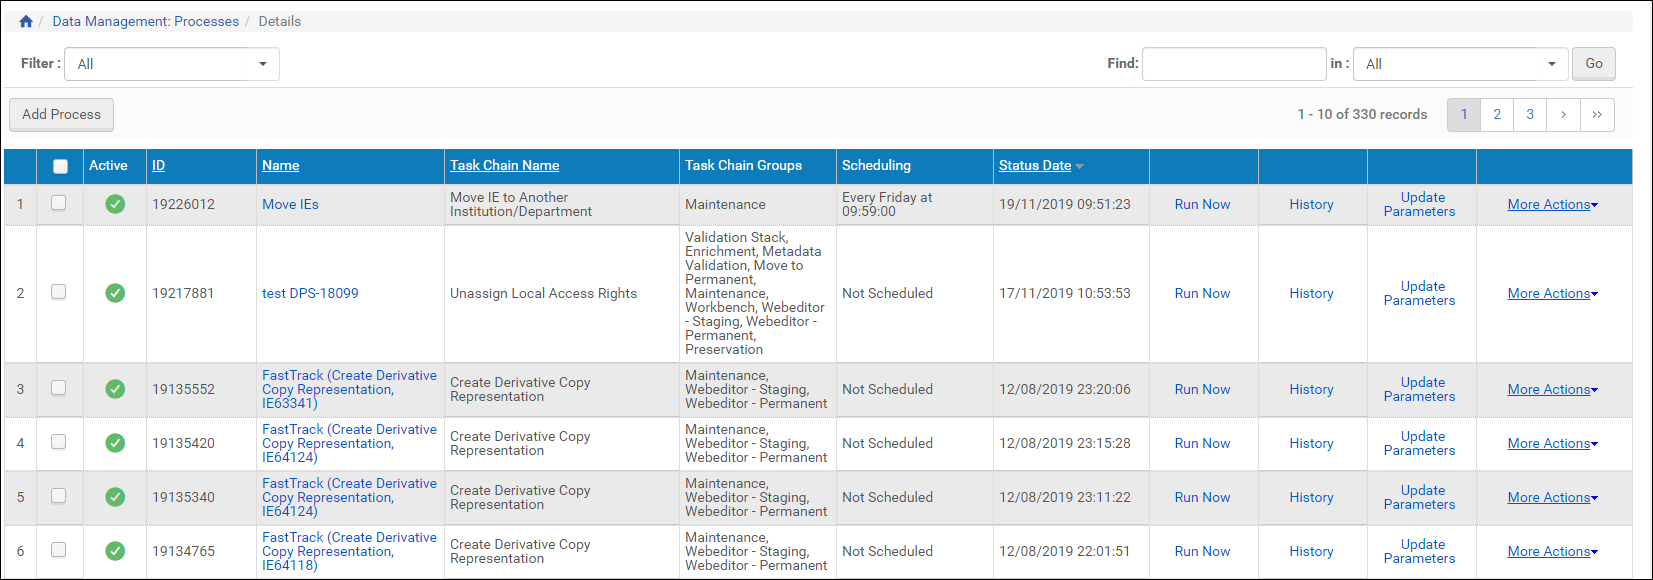
- From the Management Home page, click Data Management > Processes.
The Process List page opens to existing processes.
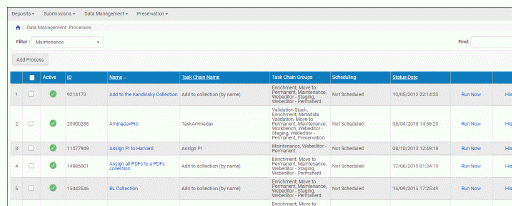
Process List Page
- Click the Add Process button.
The list of task chains opens. This is the first step of a 5-step wizard that guides you through the creation of the process. - Select the Delete IE task chain and click the Next button.
The Complete Parameters (step 2) of the wizard opens.
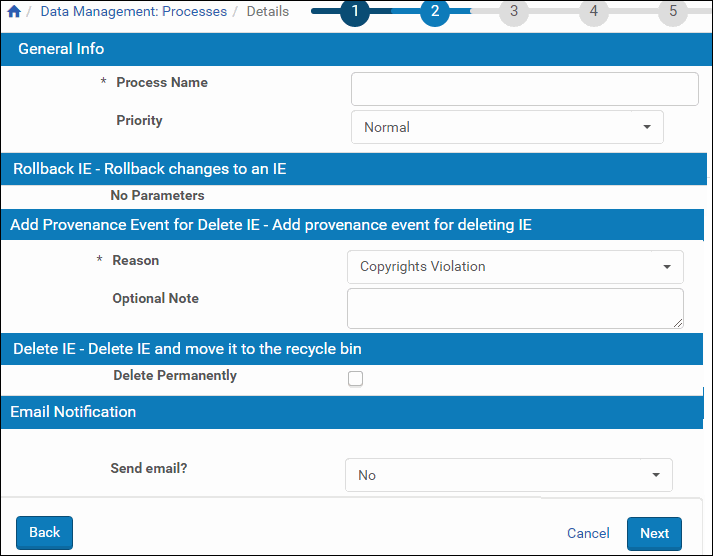
Complete Parameters - Step 2
- Enter a process name and select a Priority.
- Select a reason for deleting the IE set.
- Enter an optional note to be retained as provenance material even if the IE set is purged from the system.
- To purge the IE set immediately from the system, select the Delete Permanently check box. (This is equivalent to purging the IEs in the recycle bin.)
- Select an Email notification option.
- Click the Next button.
The Define Set step (3) of the wizard opens.
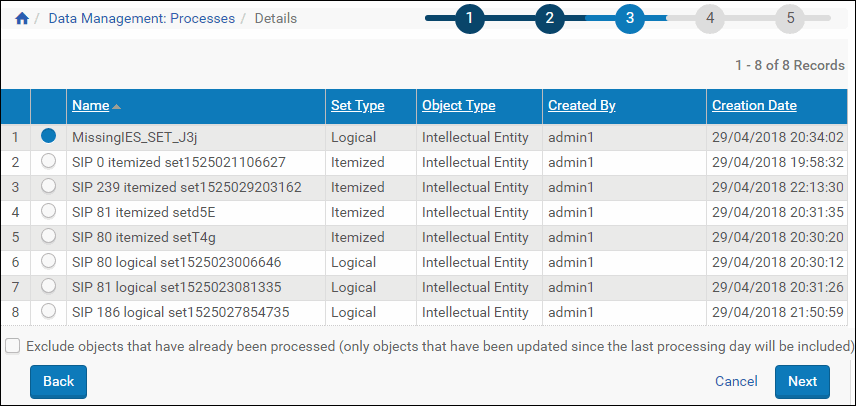
Define Set - Step 3
- Select the itemized set you created for this process and click Next.
Select the Exclude... check box to avoid objects that have already been processed.
The scheduling step (4) opens.
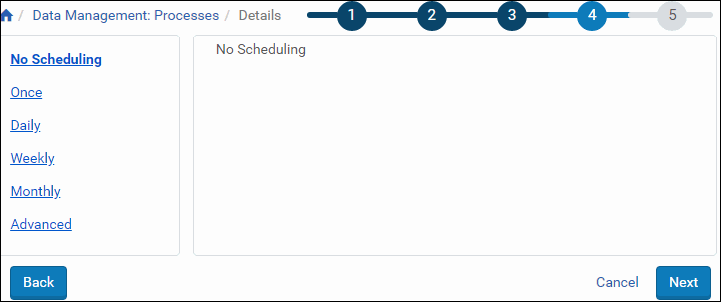
Scheduling - Step 4
- Select the interval in the left column of the page and enter values in the right column as they display. To run the process right away, leave the default value, No Scheduling. Then, from the process list, click Run Now for your process.
- Click Next.
The Review and Confirm step (5) opens.
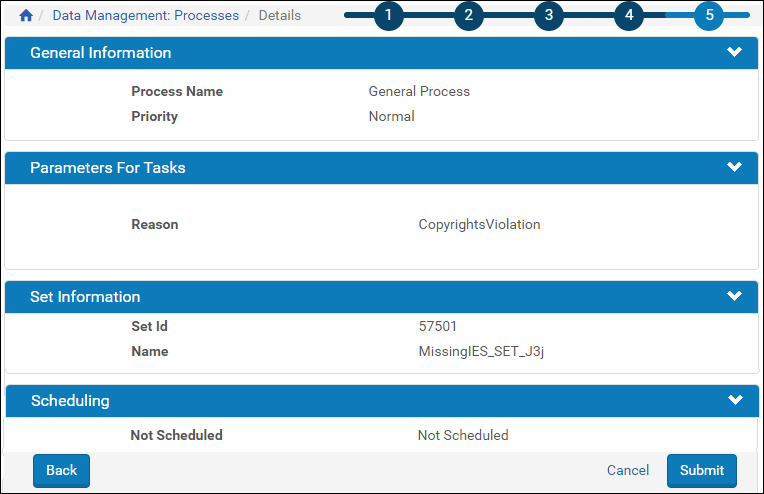
Review and Confirm - Step 5
- Review the information. To change any information or parameters, use the Back button(s) to take you to the necessary page.
- When the process is complete, click the Submit button.
The system adds your process to the Process List page and carries out the process to your specifications.
Recovering an IE from the Recycling Bin
IEs that have been deleted through the Web Editor can be recovered from the Recycling Bin. Retrieving an IE from the Recycling Bin restores it to its previous location in the database.
If you have moved the IE from one institution to another, the restoration will move it back to the earlier institution.
To recover an IE from the Recycling Bin:
- From the Home page, select Data Management > Advanced Tools > Recycle Bin. The Recycle Bin page opens. Any IEs that have been deleted but not purged from the system are listed with identification information and information on their deletion. Items can be sorted by clicking the column headers you want to sort by and filtered by selecting an option from the Filter drop-down list
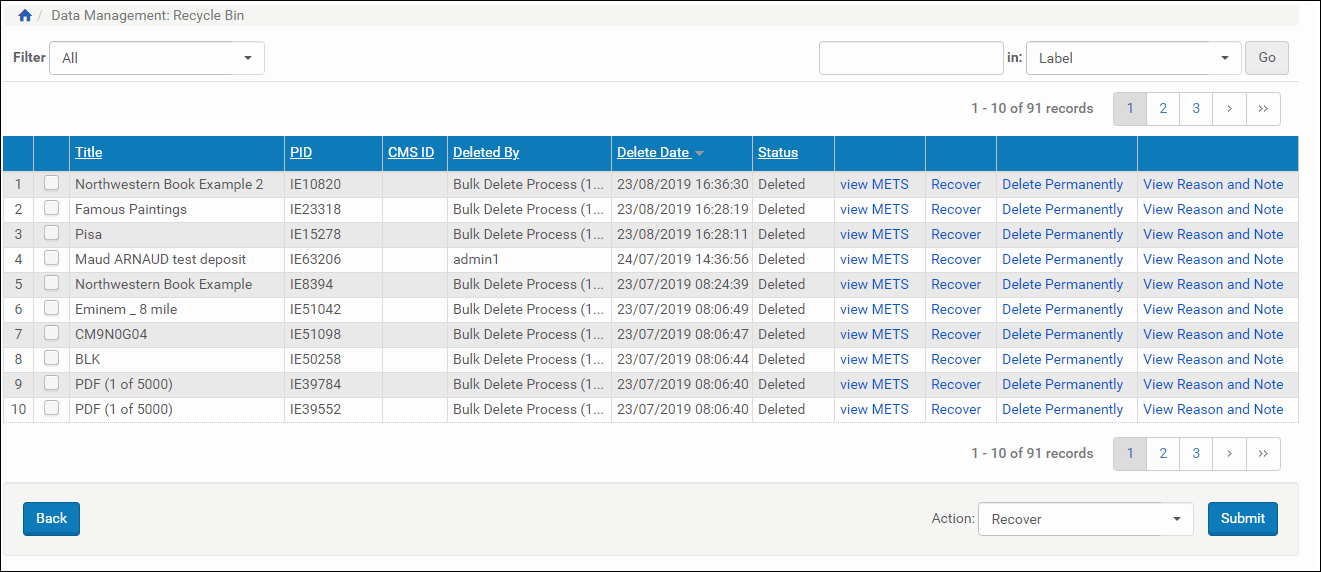
Recycle Bin Page
Action items are also listed in each IE row:
- view METS displays the METS XML for the IE
- Recover restores the IE from the Recycle Bin to the repository
- Delete Permanently deletes the IE permanently
- Retry attempts to delete an IE after a previous attempt failed. This option only appears for IEs with status Failed.
- More opens a third link, View Reason and Note, which, when clicked, displays the PID, Delete Date, and the reason and note explaining why the IE was deleted.
- To restore a single IE, click Recover on the corresponding row. To restore more than one IE, select the check box to the left of the title for each IE you want to restore, then select Recover from the Action field and click the Submit button
The system restores the IE or IEs you selected and refreshes the page with a message that it successfully restored the IE. The items that were restored no longer appear on the Recycle Bin page.
Purging an IE from the System
Users with the role of Repository Manager can permanently delete IEs from the system.
To purge an IE from the system:
- Log on in the capacity of a Data Manager.
- Open the Recycle Bin page by clicking through Home > Data Management > Delete From Permanent/Recycle Bin.
- Do one of the following:
- Click the check boxes beside the names of the IEs that you want to delete permanently, from the Action drop-down list select Delete Permanently, and click Submit.
- Select Delete Permanently in the row of the IEs that you want to delete.
To delete all of the IEs in the Recycle Bin, select Delete ALL Permanently from the Action drop-down list and click Submit.
If the deletion is successful, the system sends a confirmation message to the user, permanently deletes the IEs, and saves provenance information.
If an IE fails to be deleted, it is given the status Failed. You can retry to delete failed IEs by clicking Retry in the row of a failed IE, or select Delete ALL Permanently from the Action drop-down list and click Submit.
Moving IEs
In the course of managing a consortium with several institutional and departmental members, libraries may want to move some or all of the IEs from one location to another. A task chain accessed from the Data Management module of Rosetta provides the steps for carrying out the transfer of IEs.
The following rules and conditions apply when transferring IEs:
- The initiating member needs to own the IEs being moved (but does not need permissions for the target institution)
- Moving IEs between institutions/departments generates a provenance event.
- If an IE is assigned to a collection, and the institution changes when the IE is moved, the collection will be unassigned.
- If an IE's source and target departments are identical, the IE will be ignored by the task.
To move IEs:
- From the Process List page (Data Management > Manage Sets and Processes > Process List), click the Add Process button. The Choose Task Chain page opens
Choose Task Chain Page
- Find the task chain named Move IE to Another Institution/Department and select it. Then click Next at the bottom of the page.
The Complete Parameters page opens for the task chain you selected
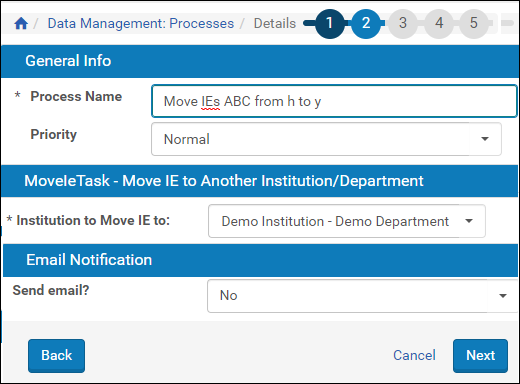
Complete Parameters Page of Move IE Wizard
- Provide a name for the new process in the Process Name field. This will identify the process for anyone who wants to use it. The name appears on the Process List page and is searchable using the quick-find box on that page.
- From the Move IE to drop-down list, select the institution and department to which you want to move the objects.
- Click the Next button.
The Define Set page of the wizard opens. All available sets for this wizard are listed on this page
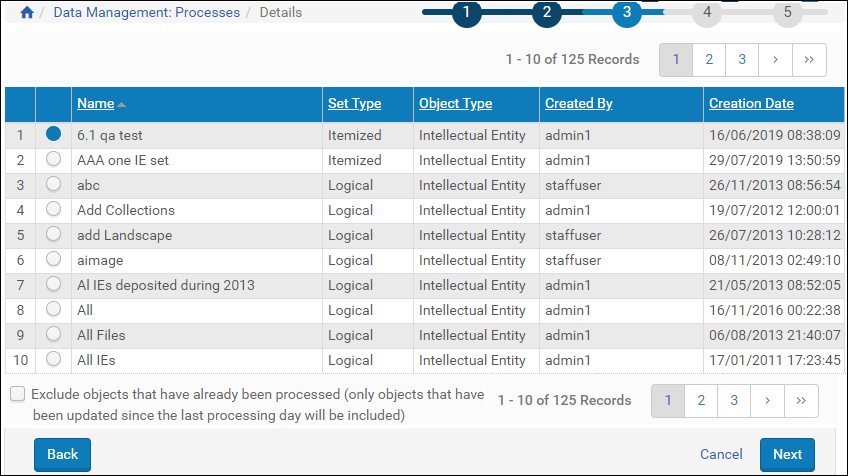
Define Set Step of Wizard
- Select the set containing the IEs you want to transfer, then click the Next button.
The Scheduling step of the wizard opens. The schedule defaults to No Scheduling. Also available are once, daily, weekly, monthly, and an advanced option that allows you to enter a firing schedule using a Cron Trigger (with samples provided)
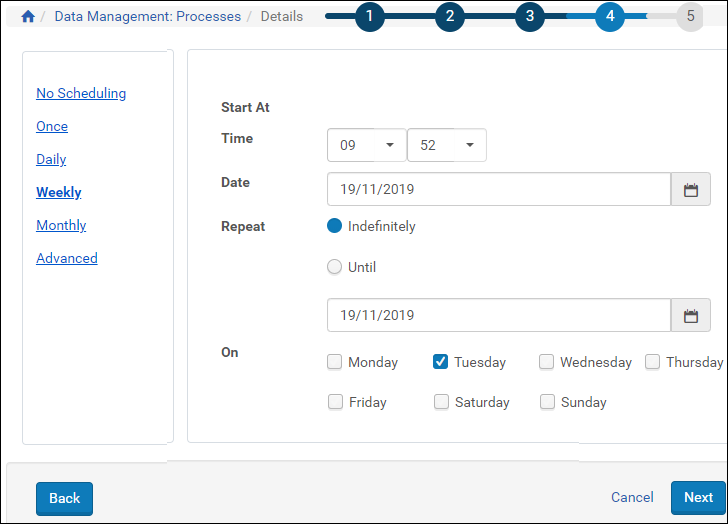
Process Scheduling - Weekly
- Enter a schedule for the process and click Next.
The system returns a summary of the process on the Review and Confirm page
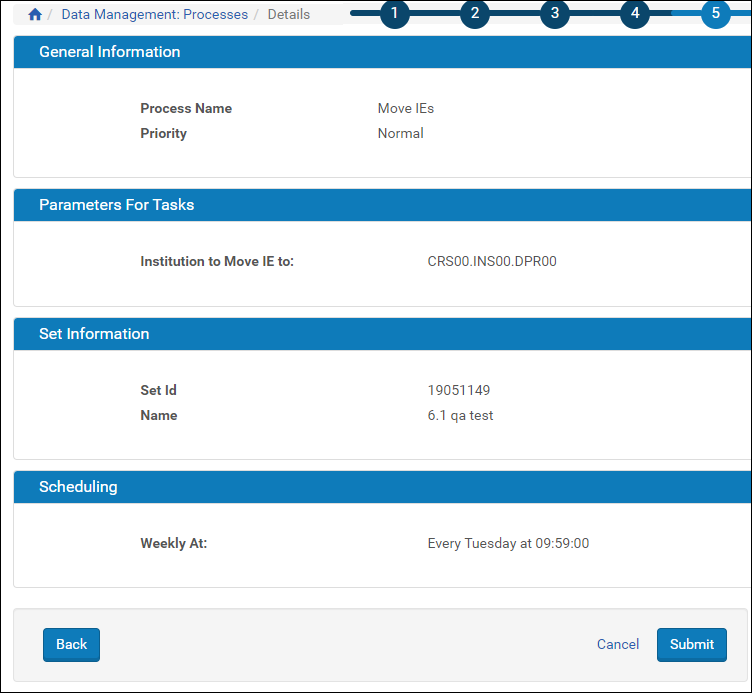
Summary of Process Entries
- Review the information on step 5 of the wizard. If you need to make changes, use the < Back link until you reach the page where you want to make changes. To cancel the process, click the Cancel button. To submit the process to the system, click the Submit button.
If you submitted the process, Rosetta runs it or queues it for running. The Process List page opens with the new process appearing there
New Entry in Process List
Restoring IEs from the Permanent Repository
Library staff who want to view previous versions of an IE and possibly restore those versions can do so through the Web Editor. A tab on the Web Editor called Versions displays a list of current and older versions of an IE. Staff with sufficient authorization can retrieve an older version of an IE from the permanent repository and store it as the new and latest version of itself.
Rosetta uses the IE’s METS file, which consists of the preserved representation only. When the restoration is complete, the IE in the operational repository match the version in the permanent repository.
- Although the IE to be overridden will take on the content and metadata of the restored object, access copies and access rights exceptions attached to the IE will migrate with the IE being restored and remain in the database.
- If a full-text file is deleted (directly or if the associated content file was deleted) the full-text cannot be restored. The extracted full-text file is considered auxiliary to the content file and so is not part of the information preserved in the version history in Rosetta.
To view or restore an IE from the permanent repository:
- Find the object you want to restore by searching the repository for an object or for metadata (Home > Data Management > Search for Objects|Search for Metadata).
When you find the object, the Web Editor displays its details in a tabbed pane. - Click the Versions tab in the pane.
Information on the versions of this IE display under the tab
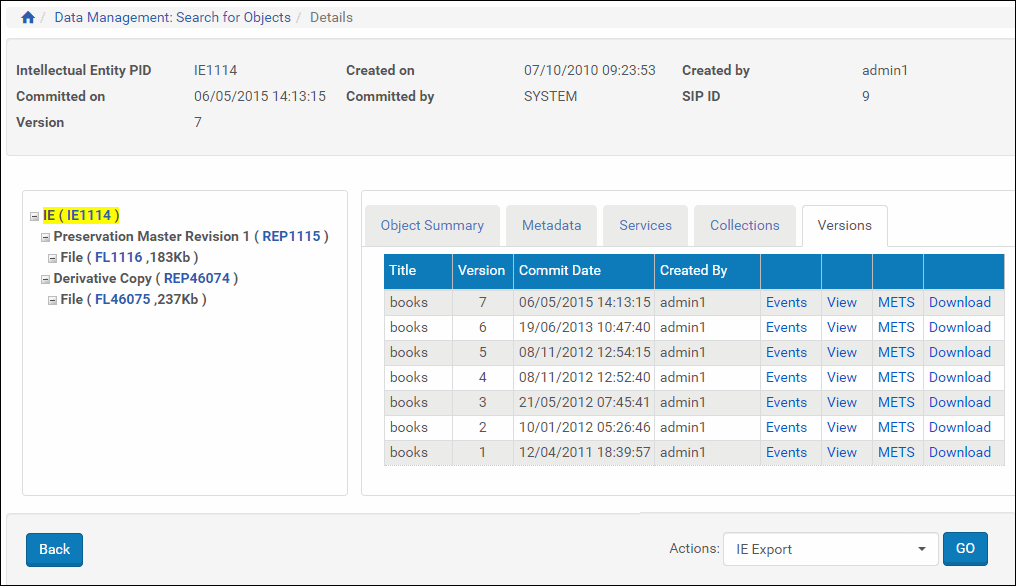
Version Tab of the Web Editor
- Find the version you want to view or restore and click the text link corresponding to that IE.
If you are viewing, the METS information will open in a separate window. If you are restoring, Rosetta will open a confirmation page. - To restore, click the Confirm button.
The system restores the IE and refreshes the Versions tab with messages regarding the IE status and instructions for verification. The Restore text link is no longer available for that version you restored

Versions Page After Restoring IE
Exporting IEs
You can export IE data from Rosetta to be used by other systems.
To export IEs:
- Search for an IE (see Searching in Rosetta and Searching for SIPs).
- Select Export for the IE that you want to export. The following appears:
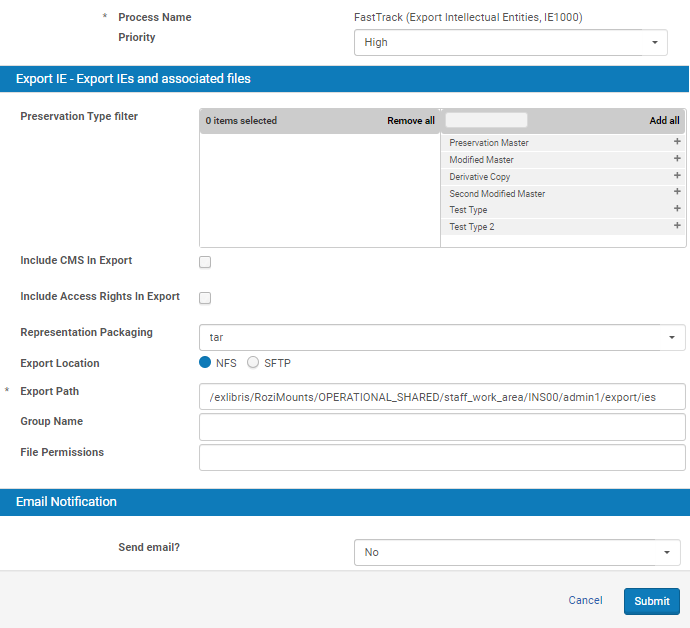 Exporting IEs
 - Fill in the fields according to the following table:
Field Description Priority Select the priority of the export process compared to other process running in the system. Preservation Type filter Select a preservation type to limit the export to IEs with the selected preservation type. Include CMS In Export Select to include the CMS information of the IE in the export. Include Access Rights In Export Select to include the access rights information of the IE in the export. Representation Packaging Select tar to package the representation as a tar file. Export Location Select NFS (Network File System) to export the IE to a local server or SFTP to export the IE to an SFTP server. Export Path (For NFS only) Enter the path of the location to which you want the IE exported. Group Name (For NFS only) Specify the Linux file group name for the exported files. The default value is defined under the general parameter export_ie_default_group_name (optional). File Permissions (For NFS only) Specify the octal/symbolic Linux file permissions for the exported files. Directories have additional execute permissions for group and owner. The default value is defined under the general parameter export_ie_default_permissions (optional). Server (For SFTP only) Select the server to use to export the IE. Port (For SFTP only) Select the port to use to export the IE. Sub-directory (For SFTP only) The subdirectory to which you want the IE exported. Authentication Method (For SFTP only) Select either Password or Key. User Name (For SFTP only) The user name of the SFTP server. Password (For SFTP - Password only) The password of the SFTP server. Identity File Path (For SFTP - Key only) The authentication identity file path on the local server for accessing the SFTP server. - Click Submit.
The IE is exported.