
360 Counter: Uploading Counter Reports
- Product: 360 Counter
How do we upload Counter reports into 360 Counter?
This Answer contains instructions for uploading usage data into 360 Counter.
Even though all clients can use our Data Retrieval Service, there will be times when you want to upload your own usage statistics manually, for instance:
- Repair an error in an older report.
- Upload non-COUNTER-compliant usage data.
Once you have retrieved your usage report from the information provider, you're ready to use these instructions. There are four steps:
Before Uploading
Many libraries spend time "cleaning up" their spreadsheets before attempting an upload. You may wish to scan the data looking for duplicate titles, locating garbled diacritics, and matching the report to the 360 Counter template to make sure the format is correct. (Or you can even start with some blank templates.)
Even if you don't clean up your spreadsheet, you need to make sure the files are in a .csv (comma separated values) format, or a tab-delimited .txt format. If you download a usage statistics report in Excel format (.xls or .xlsx), open the file in Excel and Save As .csv format for uploading into 360 Counter.
Be aware that if you upload a report that has the same Date run (that is, the date the vendor ran the report) as a previously uploaded report, the first report will not be visible on the 360 Counter page, so you won't know if it was uploaded successfully or had errors. The solution for this is fortunately easy: Before you upload the reports, open one of the reports (in Excel or a similar program) and change the Date run to be a day or two different than the other report.
Finally, the 360 Counter system can only upload files that are 4 MB or less in size. If your file is bigger than that, you will need to break it into smaller sets of titles. When you do this, be sure to change the Date run in each (smaller) file to different days (one day apart is fine) so that each file appears on a separate line on the 360 Counter page, with slightly different Date Created dates.
Upload Usage Data
When you're ready to upload the reports, follow these instructions:
- From the Client Center Home page, click 360 Counter.
- On the 360 Counter page, click Upload in the upper-right corner. You'll see the Upload Counter Report page:
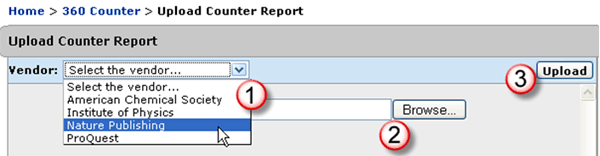
- Using the drop-down menu on the left, select the Vendor (provider) whose data you wish to upload. The vendors in the drop-down menu are taken from your Data Management section of the Client Center. You cannot upload a report from a provider that does not appear in your Data Management list of providers.
- Locate the saved report containing the usage data on your local computer. Use the Browse button from the Add file field to search for the report you have saved. Be sure it's in a .csv or tab-delimited .txt format.
- Click Upload on the upper-right side.
360 Counter does a preliminary upload check of the file to verify that the spreadsheet matches the appropriate Project COUNTER format. If the report is accepted, the file name is listed below the Add File field, and it is then added to the list of reports on the 360 Counter page. You may continue adding as many reports as you wish; the list of the uploaded report will appear below the Add file field.
If the usage report is not accepted, it will not be uploaded into 360 Counter, and an upload error message (see table below) will appear above the Add file field. You will need to make modifications to the file and try to upload it again.
For more information, see Troubleshooting Errors and Uploading Hints and Tips.
| Upload Error Message Text | Corrective Action |
| File must have a ".csv" or ".txt" extension. | Only comma-separated values (csv) and tab-delimited formats may be uploaded. Reopen your original file and save the report as a ".csv" or ".txt" file. |
| Could not recognize the Report Type: <"text of problematic report type"> | 360 Counter cannot tell if the report is a JR1, JR1a, JR2, DB1, DB2, DB3, BR1 or BR3. Re-open the report and enter one of the below valid report type descriptions into the first line of the report. Note: if your journal or database report is in COUNTER Release 3 format rather than Release 4, replace R4 below with R3:
|
| The file does not exist or it does not contain report data. | It is possible that the file doesn't exist, or that it is blank. Find the file, change the file name, and try uploading again. |
| Rundate "text from problematic date" was not a recognizable date format. | The date must be entered in the format of yyyy-mm-dd or mm/dd/yyyy. Ensure that your date is entered in this format and try uploading again. |
| The file is currently locked. Please verify file is not open and try again. | Confirm that you do not still have the file open. It may be that multiple people are trying to upload the same file. Try uploading again. |
Validation Check
After uploading usage data into 360 Counter, return to the Counter page to check on the results of your work.
Once your report has initially been accepted, the uploaded data will go through a multi-step validation check.
During this process time, you will see a blue hourglass in the Status column ...
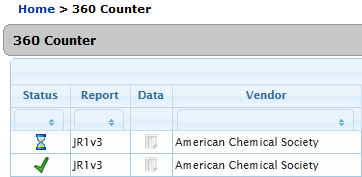
... while several pieces of information are examined:
- The report gets an initial, automated scan to determine whether the structure of the report is correct (complete columns and rows, proper headings,etc.).
- Journal Titles are standardized and assigned subjects (if there is a subject heading in the journal's MARC record).
- The usage data is "consolidated" or "pushed" into a large report with your other usage data, and cost-per-use is calculated if costs were added to the resources in the Client Center.
The entire validation and consolidation process can take up to several days, depending on when the usage data was uploaded into your profile, in relation to our back end upload schedule.
Validation Results
When the validation check is complete, one of three validation marks will appear in the Status column: A red error mark, a green check mark, or a yellow (almost gold) check mark:
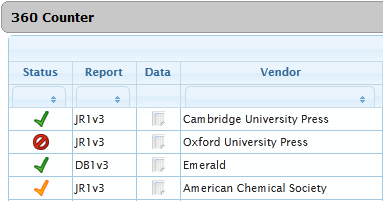
Each icon has a particular meaning; see Troubleshooting Errors for interpretation of these validation marks.
Note that successfully uploaded reports can be downloaded for approximately one year from when the report was uploaded (see Section 3 (Other Icons) in 360 Counter Landing Page for information), so we suggest that you archive your successfully uploaded reports in case of future need to alter or update them.
A note about viewing 360 Counter usage and cost data on Fridays:
- Per our backend upload schedule mentioned in the Validation Check section above, new reports are delivered into Intota Assessment on Friday after their consolidation. During this process, it is possible that the same report will yield different results if run multiple times on Friday - before and after new consolidated reports are delivered.
- Date Created: 9-Feb-2014
- Last Edited Date: 26-Oct-2016
- Old Article Number: 7193