
How to Setup and Test a Fulfillment Network (FN) and an Automated Fulfillment Network (AFN)
Introduction
This is a quick setup list that guides users through the process of setting up and testing a Fulfillment Network (FN). The process further explains setting up an FN and an Automated Fulfillment Network (AFN) workflow between two specific institutions.
The process is normally done between multiple institutions.
While having a Network Zone (NZ) is not mandatory for a functioning FN, some elements of the FN configuration may be done in the NZ where relevant and are referred to, when necessary, in this documentation.
The basic configuration of an FN is made up of three elements:
- Setting up the network
- Setting up the sharing of users
- Setting up the fulfillment relations between institutions
The AFN setup is an additional configuration and workflow layer that enables automating the FN requesting process. It is recommended to complete the setup process in the order it is defined.
The different models of shared user management (such as Centralized User Management and use of Consortial IDs) are not discussed.
Setting Up the Network
Shared Password
This step is required only when no Network Zone (NZ) is in place. In situations where a shared NZ is used, the password is shared via the NZ setup.
For Alma institutions to communicate, they must share a password. The password is set up using the Configuration menu > Resources > General > Other Settings option and setting up the networkSearchPassword parameter. All participants of the network must have the same password.
Network Members
Non Network Zone (NZ) Members
Setting up which institutions your institution shares fulfillment network services with is done by listing them using the Configuration menu > General > Network Groups > Fulfillment Member option.
For more information, see Configuring Fulfillment Members.
Network Zone (NZ) Members
In an NZ, all members of the NZ are considered potential members of fulfillment networks within the NZ. Configuring the members of the network is therefore done by setting up Fulfillment Groups in the Configuration menu > General > Network Groups > Fulfillment Member option at the NZ. Using the mapping in this table, you define which institutions are part of a fulfillment network. While this enables the flexibility of creating multiple fulfillment networks within the same NZ, the classic configuration is to list all the NZ members in one fulfillment group, creating a single network of all of the NZ members.
For more information, see Configuring Fulfillment Networks Management Groups.
Testing Your Setup
Once the above elements have been configured, an option to Find users in other institutions is displayed when using the Manage Fulfillment Services (a.k.a. circulation desk) page and seeing a list of the institutions you have configured.
The ability to actually pull a user record from another institution depends on the setup in the next section, Setting up the Sharing of Users.
Setting up the Sharing of Users
Linked Account Rules
Linked account rules determine how accounts are copied to your institution from another institution. This configuration option maps the values of the linked account that is created in your institution, for example:
- The user group the account is set to
- When the record expires
- When the record is purged
- If blocks at the source institution affect the linked account created in your institution
Linked account rules are configured using the Configuration menu > User Management > Collaborative Networks > Linked Account Rules option. These rules affect how accounts are created at your institution from other institutions' user records.
For more information, see Configuring Linked Account Rules.
Linked Account Shared Fields
Linked Account Shared Fields setup enables you to control what fields from your patron records are copied over to another institution. It enables you to protect the privacy of your patrons, for example by setting this configuration to enable other institutions to pull only the patron name and email.
Linked account rules are configured using the Configuration menu > User Management > Collaborative Networks > Linked Account Shared Fields option. These rules affect how accounts are pulled from your institution by other institutions.
For more information, see Configuring Linked Account Shared Fields.
Restricted Users
Restricted Users setup enables you to determine which user groups are hidden from other institutions in a fulfillment network. Effectively, this excludes these user groups from being able to receive services at another institution, since their user record is not shared with another institution. This can be configured for several reasons, such as:
- Some user groups may not be eligible for fulfillment network services because of institutional fulfillment policies
- Some users' records may be considered private and not allowed for sharing because of privacy concerns
Restricted Users rules are configured using the Configuration menu > User Management > Collaborative Networks > Restricted Users option. These rules affect how accounts are pulled from your institution by other institutions.
For more information, see Configuring Restricted User Groups.
Searchable Identifiers
Searchable Identifiers define which user identifiers are searchable via the fulfillment network process for fetching patron information. A typical use case is where not all patrons are eligible for fulfillment network services. Only patrons that are granted the ID types configured in this table are able to get fulfillment network services, and only by using the IDs of the types configured here when identifying at the circulation desk of a remote library.
Searchable Identifiers are configured using the Configuration menu > User Management > Collaborative Networks > Searchable Identifiers option. These rules affect how accounts are pulled from your institution by other institutions.
For more information, see Configuring Searchable User Identifiers.
Cross Consortia Identifiers
if you want user IDs of linked account to be copied from the source institution to the linked account you can use the Configuration menu > User Management > General > Other Settings option to determine the identifiers of which type will be copied over. At minimum, using this option will cause the Primary ID to be copied from the source institution to the linked account. For members of a NZ, this option may be configured in the NZ.
Consortially Unique Identifiers
If the user IDs in the network are fully unique, such as, the same ID is not used for identifying two different patrons in two different institutions, then you may set up the network_users_unique_identifiers parameter to FULL. This way, when patrons approach a desk in your library, there is not a need to first select their source institution before scanning in their ID. By only scanning in their ID, Alma finds the correct record in whatever institution in the network and pulls the user record.
This option is configured using the Configuration menu > User Management > General > Other Settings option, and setting the network_users_unique_identifiers parameter to FULL. These rules affect how accounts are pulled to your institution from other institutions.
For more information, see Configuring Other Settings (User Management).
This option should only be used if you can guarantee that user IDs are 100% unique across the network. If user IDs are not 100% unique across the network, then consult the Ex Libris staff. In cases where there is a high level of uniqueness, a setup may still be done such that unique records are automatically identified without requiring to select the source institution, and where a non-unique ID is scanned in a select option, a pop up is displayed enabling to select the correct record.
Testing Your Setup
Once the above-listed steps have been configured, it is recommended to verify the setup.
The setup needs to be done at two institutions before a test is completed; the institution from which the user record is pulled (institution A in the below example) and the institution to which it will be placed (institution B in the below example).
- Identify a user record in institution A in which you want to receive fulfillment services at institution B.
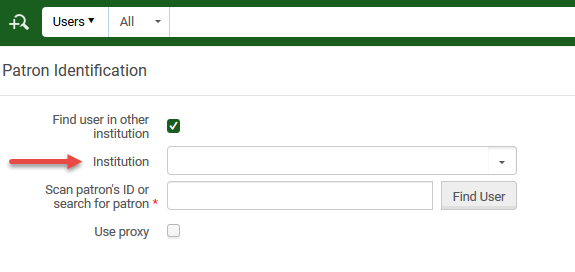
- In institution B, access the Manage Patron Services page.
- Select Find user in other institution. From the drop-down, select Institution A.
- Scan the ID of the record you identified in step 1.
The expected result is a user edit form, pre-populated with the data that institution A enabled to be shared with other institutions, and populated according to the rules you have set up.
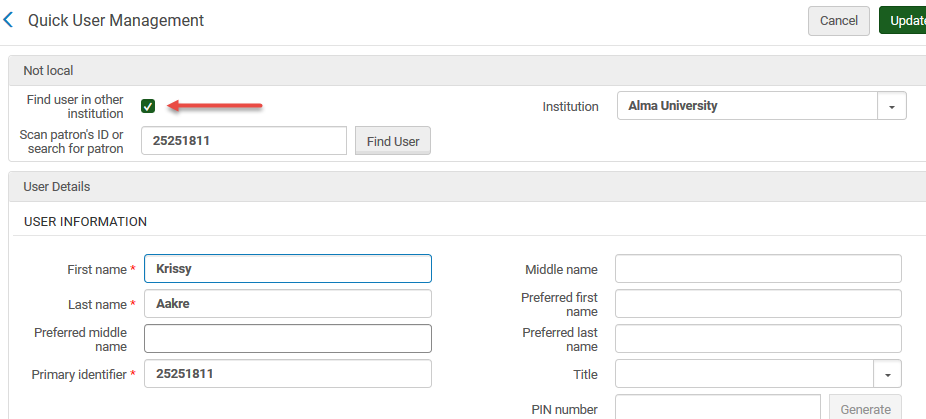
Once the user record is pulled for the first time, the next time it is identified at the circulation desk, the manage Patron Services screen opens up skipping over the step of confirming the user information.
Setting up the Fulfillment Attributes
Walk-in Loans
Institution Relations
Institution relations determine:
- Which institution can potentially deliver items to which other institution
- Which institution can potentially circulate (check in\out) items of another institution
This is configured using the Configuration menu > General > Network Groups > Institution Relations option at the NZ or at the IZ.
For more information, see Configuring Pick Up Anywhere/Return Anywhere.
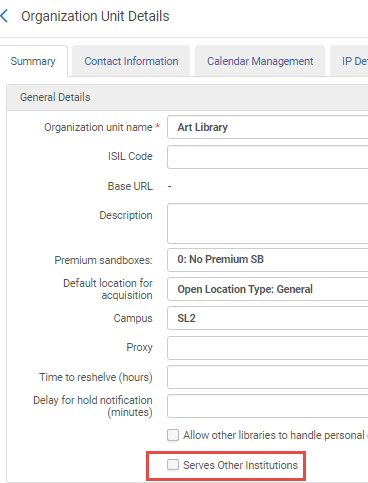
Setting up Libraries
Libraries can check out\in items from libraries of other institutions only if they are set as libraries that serve other institutions.
When configuring a library (Configuration menu > General > Libraries > Add a Library or Edit Library Information), select the Serves Other Institutions check box for libraries that are able to process items from other institutions at their primary desks.
Testing Your Setup
It is now possible to use the Manage Patron Services page to scan in item barcodes from institutions that your institution has 'circulate for' relations with (see above). This is possible only at primary desks of libraries that have been set to service other institutions (see above).
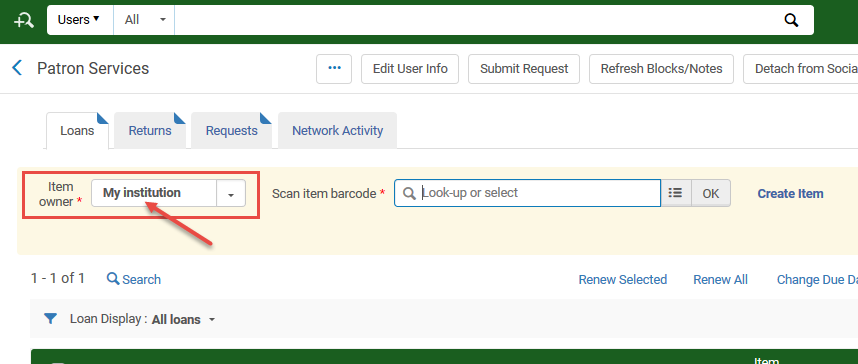
The same option is available in all scan in interfaces: the Scan In page, the Return Items page, and the Returns tab of this page.
Requesting
Pickup Anywhere
To be able to request an item for pickup at another institution, the item’s request policy must have the Pickup Location Policy set to At Any Institution.
- Verify that you have defined such a pickup policy.
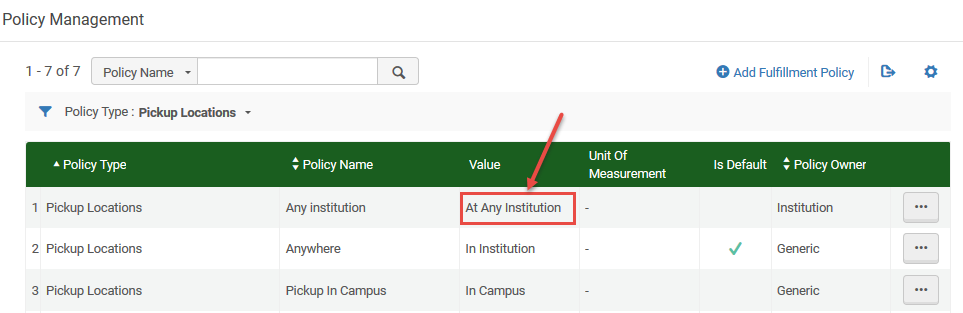 Policy Management
 - Confirm using it at a Time-of-Use (TOU) that you want to apply to items that are requestable for pickup at other institutions.
Testing Your Setup
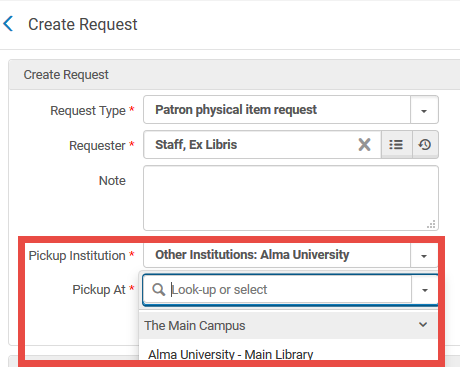
It is now possible to use the Alma request form to request an item for pickup at another institution. Find an item that a known patron is able to request for pickup at any institution as per your rules (use the Fulfillment Configuration Utility to verify the item is indeed requestable for this patron for pickup anywhere), and open its request form.
The request form enables requesting for pickup at institutions that your institution is set up to have Deliver To relations with (see above). Only libraries that serve other institutions (see above) are displayed.
Other Configurations
Primo
Primo can be set up so that opening the GetIt tab of another institution does not automatically create a linked account at that institution unless the patron has explicitly agreed to it. Use the Configuration menu > Fulfillment > General > Other Settings option to set the uresolver_remote_register parameter to Manual. If set to Auto, then the linked account is created without requiring any action from the patron.

Setting up an Automated Fulfillment Network (AFN)
The Automated Fulfillment Network (AFN) is based on a functioning Fulfillment Network (FN). Once the above steps are successfully configured, the library can set up its resource sharing process so that the resource sharing rota creates FN requests at peer institutions instead of resource sharing lending requests.
The AFN setup is practically a regular resource sharing setup, with the only difference being:
- The profile type of the partner records is Fulfillment Network
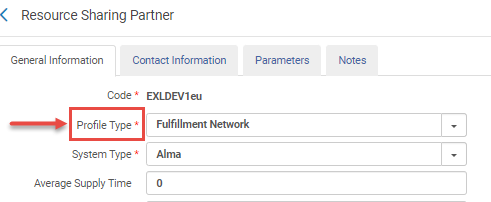 Resource Sharing Partner
 - The locate profiles are set up with the type Fulfillment Network
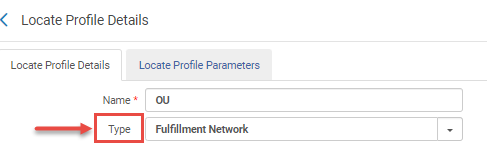 Locate Profile Details