
Configuring Fulfillment Networks
A fulfillment network can be set up for two or more institutions regardless of whether they work with a Network Zone. For general information about fulfillment networks, see Fulfillment Networks.
When a patron from institution A walks into institution B, a circulation desk operator must retrieve the patron’s information from institution A as the first step of managing the patron’s activities. All identifier fields (such as student ID, barcode, etc.) remain non-unique between institutions. Alternatively, Ex Libris can configure shared user identifiers to ensure that one or more user identifiers are identical throughout all of the fulfillment network’s linked institutions. For example, you can set that a specified user name configured at one fulfillment network institution is automatically configured at the network’s linked institutions.
Note that if you use the same identifiers to identify students at multiple institutions, you must ensure that these IDs are unique at all member institutions.
Linked account rules must be configured for a fulfillment network to function correctly. For more information on linked accounts, see Linking Users in Collaborative Networks.
- For each member institution of the fulfillment network, verify that the networkSearchPassword customer parameter is set to the password to be used by all the institutions that are part of the fulfillment network. See Configuring Other Settings (Resource Management).
- Add each institution that is part of the fulfillment network to the Fulfillment Members page. See Configuring Fulfillment Members. This is only necessary if you are not working with a Network Zone institution.
- When the fulfillment network is configured for institutions that are working with a Network Zone institution, you can add network group members on the Fulfillment Networks Management Groups page (see Configuring Fulfillment Networks Management Groups). The Network Zone institution itself is the one that must configure the fulfillment networks management groups.
For information on working with fulfillment networks, see Fulfillment Networks.
Configuring Fulfillment Members
- General System Administrator
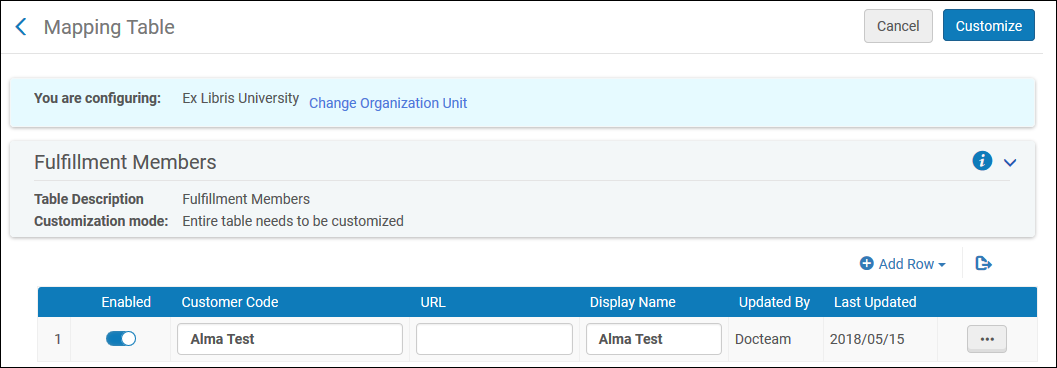
- Select Add Row and enter the following details in the dialog box for each library that is to be part of the fulfillment network:
- Customer code – the Alma institution code
- URL – the base URL used by the institution to access Alma
- Display name – the name of the institution to be displayed in Alma
- Select Add Row. The details for the institution you added appear in the list of mapping table rows. Perform the previous two steps for each institution that is to be part of the fulfillment network.
- Select Save.
Configuring Fulfillment Networks Management Groups
- General System Administrator

To be able to add partners (Fulfillment > Partners) of type 'Fulfillment Network', you have to add a placeholder entry to the Fulfillment Members table (Configuration > General > Network Groups > Fulfillment Member). Only then can you add the partners to the Fulfillment Networks Groups page (Configuration Menu > General > Network Groups > Fulfillment Network Groups). Once you have set up all the Partners in the Network Zone, you can either leave that placeholder entry in the Fulfillment Members table in the Network Zone or delete it. If you decide to delete it, the partners will show as Profile Type 'Fulfillment Network (Not Listed)' in the Fulfillment Partners table, but they will still be functional as Fulfillment Network partners.
- Select Add Group. The Add Group dialog box appears.
- Define a name for the fulfillment network group, add a description of the group (optional), and select Add and Close. The group you defined is added to the list of groups on the Fulfillment Networks Management Groups page.
- Edit the group you defined. In the Add Another Member section, select the campus or library that you want to include in the fulfillment network group, and select Add Campus or Add Library (accordingly). The selected members appear in the list of fulfillment network group members.
Configuring Pick Up Anywhere/Return Anywhere
- Add a relation in the Institutions Relations page:
In the Network Zone (if you are implementing a Network Zone) or each fulfillment network member institution (if you are working in a fulfillment network that is not implementing a Network Zone), open the Institutions Relations Setup page (Configuration Menu > General > Network Groups > Institutions Relations),
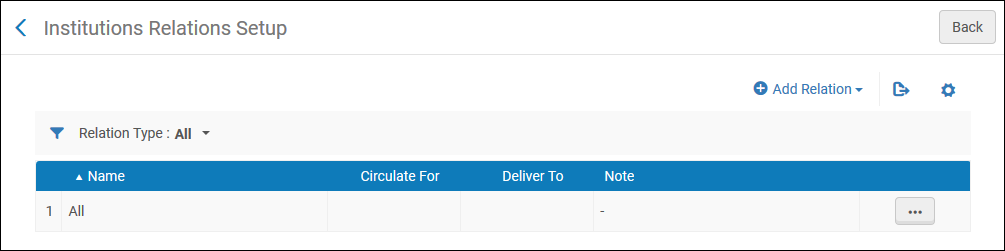 Institutions Relations Page
- Select Add Relation to add a new relation. The Add Relation pane appears. Populate the pane as follows:
- From - select the institution whose fulfillment network behavior is configured. This field is only configured for a Network Zone institution.
- To - configure the institution who participates as a remote institution in the fulfillment process.
- Select Deliver To and/or Circulate For.
- Optionally add a note in Note.
- Select Add Relation to finish. The Add Relation pane closes. The relationship appears in the table on the Institutions Relations page.
Given two institutions, A and B, the following example of configurations exists for configuring institution A:- If Circulate For is selected, patrons of institution A can check out and check in items belonging to institution B.
- If Deliver to is selected, institution A can send its own items to institution B for pickup at institution B.
- Select Add Relation to add a new relation. The Add Relation pane appears. Populate the pane as follows:
- The Pickup Location policy must be set to At Any Institution in a request Terms of Use. This allows picking up items at other institutions in the fulfillment network and must be completed by all institutions regardless of whether they are participating with a Network Zone. See Adding Fulfillment Policies.
- The Serves Other Institutions check box must be selected in each library's summary (on the Summary tab of the Libraries page at Configuration > General > Libraries > Add a Library or Edit Library Information > Libraries). Selecting this check box affects check-ins and check-outs for other libraries as follows:
- The Item Owner drop-down list is available to display when scanning in returns for other institutions. Whether the Item Owner list is displayed also depends on the setup in the fulfillment_network_unique_barcodes parameter. See Configuring Other Settings (Fulfillment).
- Only those libraries that have the Serves Other Institution check box selected are displayed in the Pickup Institution drop-down list when creating a hold request for an item whose location for check out is not at the item owner's library.