
Introduction to the New Title Search Experience
User preferences and configurations remain separate. This ensures that users engaged in different searches as part of diverse workflows can customize the main actions, section displays, etc., for each search without influencing the others.
The following aspects are consistent across all title searches:
-
The same bibliographic metadata fields are available for display in the record and table views.
-
The same actions will be available for the record, regardless of the search type used (with actions relevant to the specific search type appearing prominently).
-
All inventory information for the record will appear .
However, the key differences between the searches remain:
-
The search results: While users can view all inventory types for a title, physical searches only return titles with physical holdings, electronic searches only titles with electronic inventory, and digital searches only titles with digital representations.
-
The available search indexes: Physical, electronic, and digital title searches will continue to offer search options based on data specific to their inventory type.
-
Unique features: Features dependent on specific inventory information (such as "Library scope" in the Physical Titles search or the "Usage type" facet in the Digital Titles search) will remain exclusive to their respective searches.
Streamlined Workflows and Capabilities
Performing Actions Directly from the Search Results
For users with appropriate roles and privileges, many workflows that previously required navigating away from the search are now accessible directly within it. For example:
- Suppressing or unsuppressing a bibliographic record from the General Information section.
- Performing actions on inventory directly from the sections and drawers, including:
- Placing a work order or toggling the missing status in the physical items section.
- Relinking or pushing holdings records to Metadata Editor in the physical holdings section or drawer.
- Activating/deactivating portfolios or testing access in the portfolios section or drawer.


Navigation Links
Alma displays navigation links on the right side of the screen in search results list view, or in the Badges and Icons column of the table view. These links provide quick access to information related to the record, such as it's inventory and related entities.
The navigation links can include both standard hyperlinks and smart links. Standard hyperlinks navigate to a single resource (for example, the Collections section, or a list of related entitied such as orders, requests, courses, licenses, or reminders in a sliding panel). The display of the links can be customized from the gear icon ( ) and selecting Records Customization. In Badges and Icons (Third Column), select the links to hide or display. These links also appear in the Table view (
 ).
).
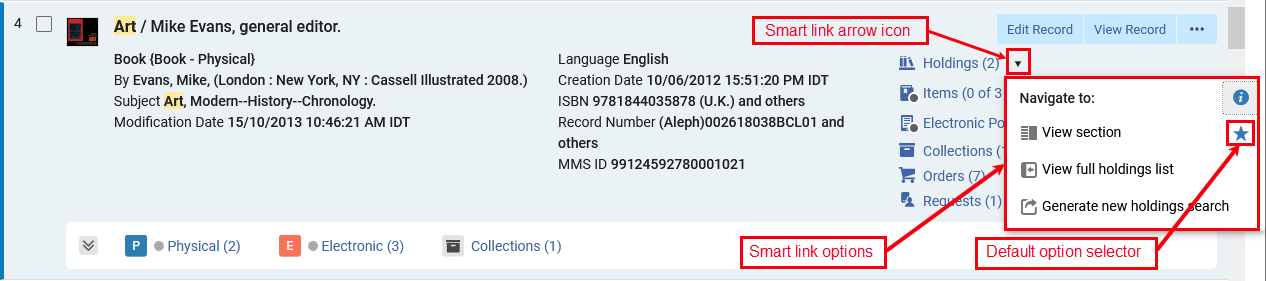
Smart links provide access to multiple resources for a specific entity (for example, its section in the details pane, the full list in a sliding panel, or link to conduct a new search). Smart links work in one of two ways:
-
Selecting the link takes you to your favorite resource (such as a section in the right pane or a full list in a sliding panel). You can customize what the single-click action is for each smart link.
-
Selecting the arrow icon next to the smart link opens a navigation window, which offers all actions available for that smart link. From this window, you can select a link to perform the action or star an action to set it as the favorite (single-click) action for this smart link.
The following image shows the arrow icon and the resulting navigation window that appears when you select it.
The Sliding Panel
Another way the new UX keeps users in context and minimizes the need to navigate away is the sliding panel. This allows users to perform more complex operations that previously required navigating away and losing search context, as a "side quest" - seamlessly returning to the list of resources to continue their main work once they are done.
The sliding panel is used in various workflows such as editing an item, placing an order or adding a title to a collection:

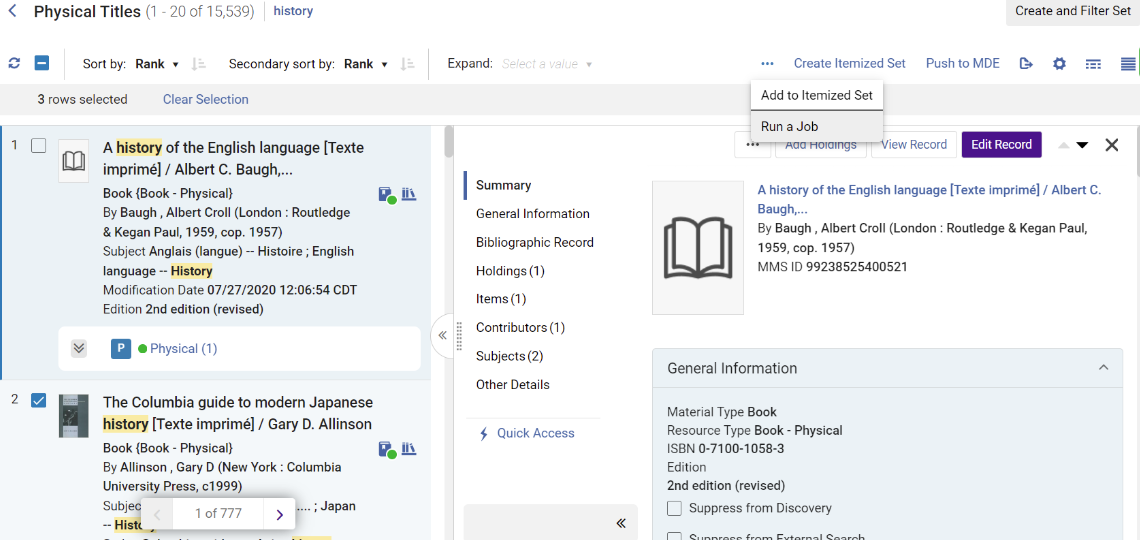
Itemized Sets in Search Results
Itemized sets are fixed lists - each time you check their content or use them, the content is the same. You can use selected search results to create a new itemized set, or add to an existing set's content.
For consortia members, itemized set actions are only available when searching in the institution scope (not in network or combined scopes).
Create an Itemized Set
To create an itemized set of selected results, select the records you want to include in the set by checking the checkbox next to the record - a counter shows the number of selected records.
From the bulk action buttons, select Create Itemized Set to open the Itemized Set Details pop-up.
Fill in the set information and save.

Add to Itemized Set
You can add selected results to an existing itemized search that you are allowed to edit.
Select the records you want to include in the set by checking the checkbox next to the record - a counter shows the number of selected records.
From the bulk action button, select Add to Itemized Set to open a sliding panel with the list of relevant itemized sets according to the search type.
Locate the desired set - search and filters are available.
Select a set to add the records to it.

Run a Job on Selected Search Results
If you have the permissions, you can run a manual job on selected results - this will not create a set, and only run the process.
For consortia members, running a job is only available when searching in the institution scope (not in network or combined scopes).
Select the records you want to run the job on by checking the checkbox next to the record - a counter shows the number of selected records.
From the bulk action button, select Run a Job to open a sliding panel with the list of jobs you are allowed to run on the type of records in your search type.
Select the job and enter the parameters to run the process on your selected records.

The New Search Result Views
Alma's new UX aims to keep users in context, minimize the need to leave the screen to check information or perform tasks, and improve navigation and efficiency. It therefore offers users a selection of possible views, allowing each person to choose the view most comfortable to them when fulfilling their tasks. Many resources and operations are integrated directly into the search page via the details side-pane, and users can easily switch between different views of the search results:
- List View: Provides a brief view, with expandable inventory "drawers" for easy scanning while scrolling.
- Split View: Shows search results and the details side-pane side by side.
- Full Page View: Displays the side-pane only, offering more space for details.
- Table View: Displays limited information in a convenient table for easy comparison.


Display Configuration
In the new title searches, the display of search results can be configured at both the user and institution levels. For more information on user level customizations, see Customizing the Display in Alma.
Administrators can establish institutional defaults, eliminating the need for individual users to configure their display with data relevant to the entire institution. Users, in turn, have the flexibility to adjust these preferences according to their specific needs, enhancing efficiency and usability.
The available configurations include:
- Sections: Reorder or hide sections in the right pane to prioritize the most relevant information.
- Actions: Reorder or hide actions for quick access to primary actions with a single click, and easy access to other commonly used actions.
- Records: Customize which fields from the results list are displayed and their positioning, ensuring easy access to essential information for your tasks.
The fields in the first column are always displayed, fields in the second column are hidden if the list view is narrow
- Facets: Reorder or hide facets to ensure relevant tools for your work are readily accessible.
- Table: Customize which of the available metadata fields are displayed as table columns in the table view, to make working with the table more efficient.
Expanding Tabs
The inventory tabs were enhanced for better usability:
- Tabs are now color-coded by inventory type to help operators easily scan the search results.
- Users with the relevant roles and privileges can perform actions directly from the tabs
- If Expand-all is used, the tabs are loaded gradually and appear when the information is ready, so as not to delay the search results from returning.
Expanding the inventory tabs is available in the Record view only (not Table view). When opening the split view, the tabs get folded.


The Details Pane Sections
The details pane is divided into sections for enhanced navigation and usability, appearing when relevant and collapsible by the user.
Summary Section
Includes the record's title, creator, imprint and MMS ID information, along with links to related records, courses, and licenses (if applicable).
If the record is a linked community record, or a network record in consortia members, a link to the record's community/network view is also provided here.

General Information Section
Includes essential metadata that librarians may need to access easily. For librarians with the appropriate roles and privileges, it also allows for suppressing a record when necessary.

Bibliographic Record Section
Displays the complete bibliographic record, enabling librarians to review it directly from the search results. With convenient up/down arrow navigation between records, librarians can easily compare search results and identify the correct record to work on.

Enhanced Navigation and Linked Open Data Sections
The Linked Open Data and navigation features in the new search experience aim to help librarians easily access related information in external resources or their own catalog - such as linked authority records, information on contributors, other titles on the same subjects, etc.
For Consortia
When working in a network, the navigation and linked open data is derived according to the record's position, so that:
- For network records, the information on linked authority records comes from the network, and searches for records linked to the same contributor or subject are done in the network catalog.
- For local records maintained by the member, the information on linked authority records comes from the local catalog, and searches for records linked to the same contributor or subject are done in the institution's catalog as well.
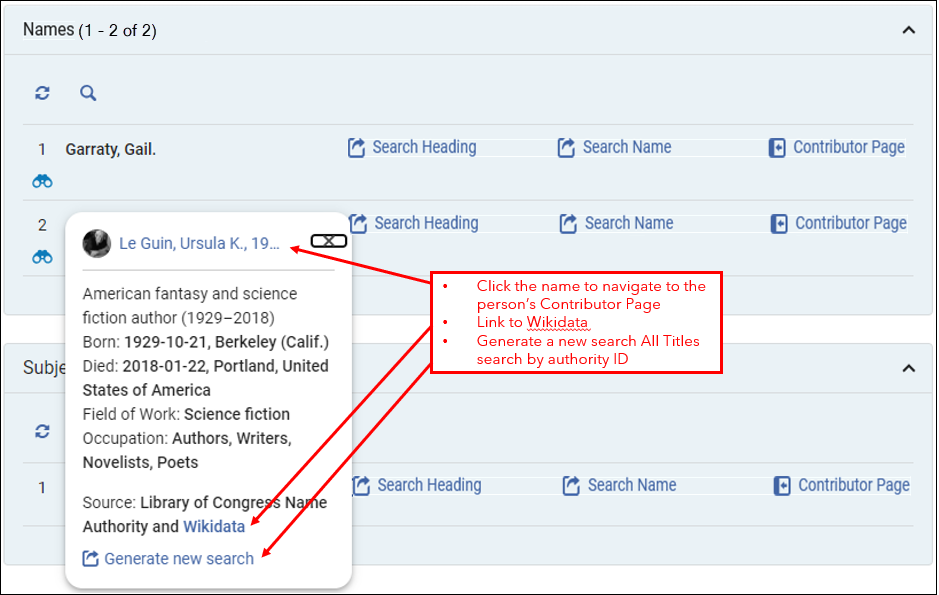
Names Section
The title search uses the creator and Names' bibliographic headings to clearly display information for the librarian, including:
- An info card containing linked data from external resources, when available.
- A link to a contributor page with detailed information from both external resources and the local catalog, when available.
- Information on linked authority records, if they exist – clicking on the binoculars icon opens the linked authority record in a sliding panel.
- Easy navigation to search the catalog for similar resources:
- Search Heading - triggers a search in the “Heading Information” search index:
- If the bibliographic heading is linked to an authority record, the search will find bibliographic records with headings linked to the same authority record.
- If the bibliographic heading is not linked to an authority record, the search will find bibliographic records with headings of the same type and vocabulary, containing the same text.
- Search Name - triggers a Names equals search on the normalized value of the bibliographic heading, in the "Names" index.
- Search Heading - triggers a search in the “Heading Information” search index:

|
Linked Data Info Card
The Linked Data Info Card provides more information on a person. It combines data from the Library of Congress Name Authority and Wikidata. If an info card is available (determined by the linked authority record), the contributor’s name includes an additional oval and card icon (
Info Card - popup
Info cards and Contributors pages are only shown if the record is linked to an authority for which Alma has relevant information to display. Currently, the Linked Data Info Card only appears for headings linked to the LCNAMES authority vocabulary. The Linked Data Info Card can appear in two places:
The link to the Linked Data Info Card works the same from the Summary section and the Contributors section. When selecting the card icon a popup window appears displaying information pertaining to the heading, taken from Wikidata and LCNAMES. Users are presented with a link to Wikidata within the Linked Data Info Card. Upon selecting the Wikidata link, a new tab in the browser opens with the relevant Wikidata entry. Linked Data Info Card displayed
 Wikidata page displayed in new browser tab Wikidata page displayed in new browser tabThe Search Heading link can be accessed from:
InfoCard - Names Section - Generate New Search
View Contributor Page When available, the Contributors Page displays detailed information from both external resources and the local catalog. The page appears in a sliding panel. The View contributor page link is displayed in the following scenarios:
The Contributor Page link can be accessed from the Names section.  Accessing the Contributors Page
From the Contributors Page, users can:
Contributors Page
|


Subjects Section
The right pane includes a new section for subjects, clearly displaying subject bibliographic headings, including:
- Information on fully or partially linked authority records, if they exist – clicking on the binoculars icon opens the linked authority record in a sliding panel.
- Easy navigation to search the catalog for similar resources:
- Search Heading - triggers a search in the “Heading Information” search index:
- If the bibliographic heading is linked to an authority record, the search will find bibliographic records with headings linked to the same authority record.
- If the bibliographic heading is not linked to an authority record, the search will find bibliographic records with headings of the same type and vocabulary, containing the same text.
- Search Subject- triggers a Subjects equals search on the normalized value of the bibliographic heading, in the "Subjects" index.
- Search Heading - triggers a search in the “Heading Information” search index:

Inventory Sections
The inventory sections display the record's inventory, enabling librarians to review and perform actions directly from the search. These sections include:
- A list of inventory by type (holdings, items, electronic portfolios, electronic collections, representations), showing the count of entities of each type associated with the record.
- The first 5 entities of each type, with pagination to navigate the rest if applicable.
- Search and navigation capabilities.
- Export to Excel functionality.
- The ability to perform row actions on inventory directly from the title search.

Export, Generate Search and Actions capabilities - Electronic Portfolios Section

Internal Searching, Pagination and Actions Capabilities - Items Section

Notes Section
In the Notes section, catalogers can view notes added to local bibliographic records directly from the search results, without needing to open the Metadata Editor.
For more information on existing Notes functionality in the Metadata Editor, click here.
The Notes section features include:
- Note display with details (creator, date, and content)
- Sorting by date added, date updated, and note (in ascending or descending order)
- Search options by creator, updater, and note content
- Additional functionalities include refresh, export to Excel, layout options (list or note view), and pagination (up to five notes per page)
- The notes are available for local records only, and are not displayed in the CZ scope.
- Only notes that the user has permission to view in the Metadata Editor are visible in the search results. If a record is locked for editing or the user lacks access to open it in the Metadata Editor, the notes section is not displayed.
- For consortia, notes added to network records will appear when searching in the network scope.

Other Details Section
Includes administrative data such as usage and publishing information.

Collections Section
Shows any collections that the title belongs to, if exist.

Making it Easier to Find What You Need
In the new UX you can perform more focused searches to accurately and quickly identify the records that you need.
Facets
The Facets panel is enhanced to help you filter the search results to only see results that meet selected conditions. The new facets allow you to:
- Save Facets - users who commonly filter their search results in a specific way can now save this, so it will automatically apply to future searches of the same type.
- Select multiple values
- Exclude a value
- Search in the Facets - users can easily and quickly find the value they want to facet on
For more information, see Facets.
Advanced Search
The new advanced search supports a more powerful, refined search, including multiple search criteria and criteria groups that allows the operator to determine the "AND"/"OR" boolean condition for each group. For more information, see, Physical Holdings search.
Local Search Labels
In the new Search UX institutions can add local labels relevant for their local records. These labels can be used for searching, faceting, and when viewing search results.
To maintain control over the number of labels added, only users with Manager or Administrator roles can add labels to records. However, all users can view and search using these labels. Labels can be added and removed for a single record, or as a bulk action on selected records.

Significant Distinctions from the Previous Searches' User Experience
Export
Exporting all or specific fields to Excel is updated in the new user interface. All the data available for export in the classic UX is still included in the new UX export, but there may be changes in column names, column order, formatting, and other aspects.
Libraries using scripts or processes with these exported files need to review the new file format and make necessary adjustments to ensure compatibility.
Thumbnails
If your region supports thumbnail display, it is suggested to configure the thumbnail behavior to "Show for all objects" in the Configuration Menu > Search Configuration > Repository Search when transitioning to the new unified titles search experience. In the new UX, each user has the option to disable thumbnails in their own view, meaning enabling thumbnails institution-wide allows users to individually select whether to view them or not. For more information, see Customizing the Thumbnail Display.
Known Issues
This section describes known issues in the new UX of the title searches released in November 2024 for opt-in. The development team is currently addressing these issues, and they are scheduled for near-term deployment. If you encounter any of these issues, there is no need to report them, as we are already aware. Issues that have been resolved are indicated in the "Issue Resolved" column.
|
Workflow / Area |
Known issue |
Possible workaround |
Issue Resolved |
|---|---|---|---|
|
Contributors and Subjects sections |
Linked authority indications and generating bib heading searches by authority ID will be accurate after the November semi-annual re-indexing |
N/A – functionality will be fully available after indexing is complete |
Resolved by the completion of the semi-annual indexing |
|
Uniform title is shown in the subjects section even when it is not cataloged as a subject |
N/A |
Resolved in February 2025 release |
|
|
Viewing a logical set content |
Do not change sets created in the previous UX while in the new UX and then opt back - the new UX supports more complex queries than the previous UX, which will prevent some sets created / edited in the new UX from working properly in the previous UX. |
We recommend not changing existing sets while the new UX is active, then opting-out of the new UX. |
|
|
The persistent search bar can only be used to change the current set’s search query. |
Create new sets using the regular search (not from inside an existing set) |
Enhanced search query editing and "Save as New" capabilities planned for August 2025 release.
|
|
|
Resource sharing |
When locate is configured to Ignore electronic resources for physical-only requests, using the manual locate for a physical-only lending request shows also electronic resources. |
N/A |
Resolved in April 2025 release
|
|
When creating a borrowing request from repository search, the search bar takes time to update to a titles search. |
N/A |
||
|
Issue when creating manual AFN requests from search
|
Resolved in April 2025 release
|
||
|
Data is gradually displayed in the search results page, for better usability |
Table view doesn’t “shimmer” to indicate data is being loaded |
N/A |
Resolved in January 2025 release |
|
Facets area doesn’t “shimmer” to indicate data is being loaded |
N/A |
Resolved in January 2025 release |
|
|
After working on a PO Line in a sliding panel |
Missing green dot indication on the “refresh search”, to prompt the user to refresh and see updated information |
N/A |
Resolved in January 2025 release |
|
Title search is open in a sliding panel |
Exporting current fields to Excel is not supported in sliding panel |
N/A |
Resolved in January 2025 release |
|
Add selected to itemized set is not supported in a sliding panel |
N/A |
Resolved in January 2025 release |
|
|
The split view button appears, even though it is not functional (in the sliding panel records are always opened in full view) |
N/A |
||
|
Some Alma workflows do not use the new search UX, due to unique functionalities not yet supported:
|
N/A |
February 2025 - relinking inventory to another bibliographic record moved to new UX |
|
|
Opening the portfolio list in a sliding panel |
When working in Firefox, moving a portfolio or attaching a portfolio to an electronic collection sometimes fails |
When moving portfolios, perform a portfolio search in the main Alma page, or work in another browser |
Resolved in February 2025 release |
|
Switching between opening records’ details in split view (side by side) or in full view |
The switch button tooltip is unclear and may be confusing. |
N/A |
Behavior clarified in tooltip in February 2025
|
|
Navigating to the Alma Homepage after performing advanced search |
Advanced search form is not cleared |
Click on “Clear form” when opening the advanced search form |
Resolved in February 2025 release |
|
Using cancel / back button while performing a complex workflow in a sliding panel |
The sliding panel is closed in some scenarios |
Re-open the sliding panel |
Fix planned for August 25 release
|
|
Viewing search results in the Hebrew UI |
Field information is not shown in bold. |
N/A |
Resolved in January 2025 release |
|
Opening a sliding panel search that uses the persistent search bar |
The persistent search bar “jumps” before being available in the sliding panel |
N/A |
Resolved in February 2025 release
|
|
Scrolling between sections in the record details, when some sections were folded by the user |
The indication of the current section being viewed (in the middle menu of the record details) sometimes inaccurately reflects the section the mouse indicator is currently hovering on |
N/A |
|
|
Moving the mouse indicator after hovering on the persistent search bar |
The persistent search tooltip sometimes remains visible |
Refresh the page |
Resolved in February 2025 release |
|
Opening a suppressed bib record’s holdings list in a sliding panel |
No indication that the bib record is suppressed inside the sliding panel: The holdings list summary section only shows an indication that the bib record is suppressed when it is displayed as a side bar – as the sliding panel is narrow, the summary section of the holdings list is always on top, and the information of the bib suppression is not displayed |
The suppressed bib record indication is displayed in the search results page |
Resolved in February 2025 release
|
|
Persistent search bar |
The “sticky” search type behavior, which saves users the need to select a search type for each search, behaves differently for classic and new UX searches: For new UX searches, the value is updated both when performing a new search and when selecting from the list of recent searches - so the user's last selection is always remembered. In the classic UX, selecting a recent search is not remembered in the drop-down, and navigating to another Alma page may change the search type to what was previously used. The difference may be confusing for users. |
Manually select the search type before using recent searches for a classic UX search. |
|
|
Manage sets |
Sets created in the classic UX with special characters in the set name don't show the set query when opening them in the new UX. |
N/A |
Resolved in February 2025 release |
|
Add to itemized set |
When Manage Sets is open in a sliding panel, navigating to the same page using the Alma Menu causes an error. |
Close the Manage Sets sliding panel before navigating to the Manage Sets page using the Alma Menu. |
|
|
Creating a set with special characters in the set name |
The link to Manage Sets sometimes doesn't navigate to the added set. |
Go to Manage Sets and search for the new set. |
|
|
Viewing itemized set content |
The remove selected top bar action is available, but the “remove” row-action for a single record is missing. |
N/A |
Resolved in January 2025 release |
|
Sorting search results by rank |
When sorting search results by rank, some of the title searches weren't correctly sorted |
N/A |
Resolved in February 2025 release |
|
Physical Titles search by location "Not Equals"
|
In Physical Titles search, when searching by location "Not Equals" with multiple locations selected, the search query is not correctly calculated.
|
Search using multiple search conditions with a single location in each
|
Resolved in April 2025 release
|
|
Searching by empty ISBN
|
When searching by ISBN "Is Empty" or "Not Empty" the search query is not correctly calculated.
|
Resolved in April 2025 release
|
|
|
Network Zone Held By
|
Error appears for records with special character
|
Resolved in May 25 release
|
|
|
Suppress from discovery indication sometimes miscalculated
|
Resolved in May 25 release
|