
Patron Driven Acquisitions
This page describes how to work with Patron Driven Acquisitions (PDA). For an in depth view of patron driven acquisitions workflow
see Getting the Most from Alma - Patron Driven Acquisitions.
For information on the overall purchasing workflow including the steps for creating orders in general, see Purchasing Workflow.
To work with Patron Driven Acquisitions (PDA), you must have one of the following roles:
- Purchasing Operator
- Purchasing Manager
Patron Driven Acquisitions (PDA) in Alma represents an agreement for a vendor to send e-resources to an institution that may be of interest to the institution. Resources are imported as a repository file and are published to the discovery layer to be accessed by patrons. To publish to the discovery layer, the relevant setting must be configured on the Import Profile Details page (see Importing Records Using Profiles).
Access is monitored by the vendor; when a predefined threshold is exceeded, the item is considered as if it is purchased and is sent as part of an EOD to Alma. Orders (marked as PDA) are loaded into Alma, and the vendor then sends the relevant invoices. At the end of the defined PDA period, PDA resources that were not purchased can be removed from Alma by the institution.
Patron Driven Acquisitions are managed on the Patron Driven Acquisitions page (Acquisitions > Advanced Tools > Patron Driven Acquisition (PDA)).
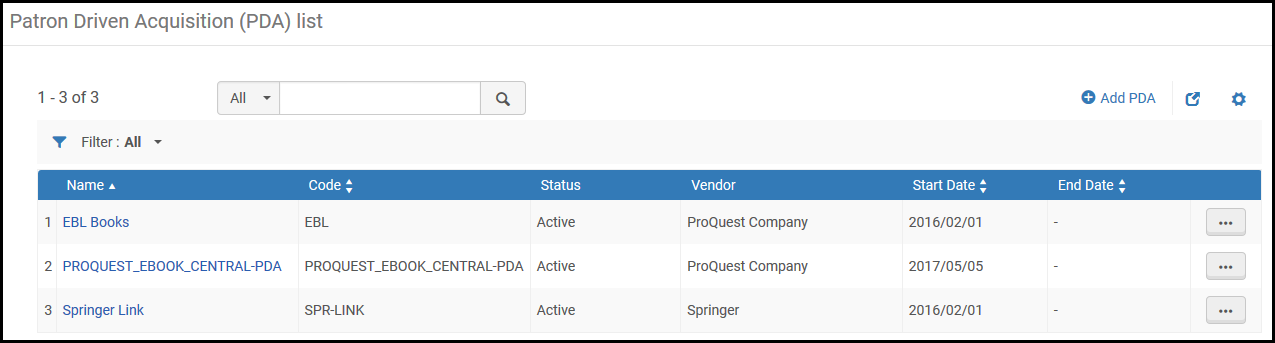
Patron Driven Acquisitions Page
For a detailed presentation on PDA, see Acquisitions - Patron Driven Acquisitions (PDA) Demand Driven Acquisitions (DDA).pptx.
The following steps describe the workflow for working with PDAs.
- Create a PDA. The PDA must be activated to continue in the workflow (see To create a new PDA entry below).
- Manage profiles for the PDA (see To manage PDA profiles below). The profile must be activated to import a repository file.
- The vendor sends a repository import file containing all of the titles that are associated with the PDA. Import the file to Alma (see To import a repository below; also see Importing Records Using an Import Profile). This step creates new bibliographic records and portfolios that are linked to the PDA profile. The titles are then published to the discovery system. The vendor monitors the usage of these titles by the patrons. Titles that are accessed more than a certain number of times (according to the PDA agreement) will be purchased by the library (next step).
- The vendor sends an embedded order data (EOD) file containing the titles that the institution will purchase. Import the file to Alma (see To import PDA orders below; also see Importing Records Using an Import Profile). The import does not create inventory. Alma's matching process verifies that the related inventory items exist and are linked to the PDA and creates the PO lines for these orders (linked to the inventory). Note that only bibliographic records linked to the PDA are considered during the matching process.
Institutions that do not use EOD files must update each portfolio manually:
- Perform a repository search to locate the portfolio; see Searching in Alma.
- Select Order to create an order for the portfolio.
- The vendor sends invoices (using EDI, for example) for purchased titles. At the end of the defined PDA period, PDA resources that were not purchased can be removed from Alma by the institution (see To clean up a PDA entry below).
Instead of managing costs for each title, some institutions pay a specified amount to the vendor, who informs the institution of which titles were purchased. In these cases, you can add a note to the portfolio indicating that the title was purchased. You can add a note to multiple portfolios at once using a batch file in the portfolio loader.You can also perform the following actions on the PDA, as needed:
- Edit – See To edit a PDA entry.
- Duplicate – See To duplicate an existing PDA entry.
- Pause – See To pause a PDA program.
- Terminate – See To terminate a PDA entry.
- Cancel – See To cancel a PDA entry.
- On the Patron Driven Acquisition (PDA) List page (Acquisitions > Advanced Tools > Patron Driven Acquisition (PDA), select Add PDA. The PDA Details page appears.
- Fill in the fields on the page. A description of the fields is provided in the following table.
PDA Details Page Fields Field Description Use Network Zone This field appears only in an institution that is a member of a collaborative network that implements a Network Zone. For an explanation of this option, see Selecting Where to Create New Bibliographic Records. Name (required) A descriptive name for the PDA entry. Code (required) A code for the PDA entry Status (required) Select a status for the PDA. Choose from: - Active
- Canceled
- Draft
The default status is Draft. The status must be set to Active to enable continuing with the PDA workflow.Vendor (required) Select the vendor that is supplying the e-resource. Start date (required) Select the start date for the PDA. End date Select the end date for the PDA. Access threshold The number of access requests made for the e-resource upon which the institution agrees to purchase the resource. This value is for information only; the vendor checks the value and proceeds accordingly. Budget threshold The maximum amount of money that the institution is willing to pay for e-resources after the Access threshold has been reached. Also select a currency from the drop-down list. This value is for information only; Alma does not prevent resources from being accessed, even if the Budget threshold has been reached.Alert Percentage When the PDA usage exceeds the alert percentage of the budget threshold, the PDA Threshold Letter is sent to the contact person after the PDA - Alert PDA Reached Threshold job runs. The PDA - Alert PDA Reached Threshold job is set to automatically run once every day. After importing an EOD file, the job is run to determine whether an email notification is to be sent. For details on importing EOD files, see Importing Records Using an Import Profile.For information on the PDA Threshold Letter, see Configuring Alma Letters.For more information concerning the PDA alert, see the PDA Alerts video (4:33 mins).Contact has been notified This field is selected when the alert percentage was exceeded and an email notification was sent to the contact person. License Select a license or amendment to associate with the PDA. Note that this field is for informational purposes only. Contact Select a contact to associate with the PDA. - Select Save to store the information you entered and return to the Patron Driven Acquisition (PDA) List page.
- On the Patron Driven Acquisition (PDA) List page (Acquisitions > Advanced Tools > Patron Driven Acquisition (PDA)), select Edit in the row actions list or select the PDA name. The Summary tab of the PDA Details page appears.
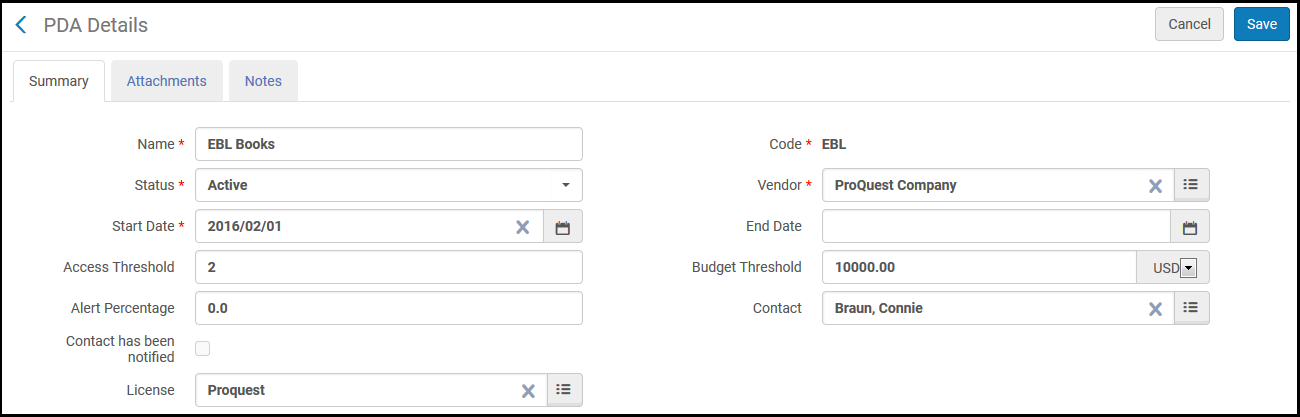 Patron Driven Acquisition (PDA) List Page Summary Tab
 - Edit the PDA Details information as required. For a description of the fields on this page, see To create a new PDA entry.
- For information on the Attachments tab, see Attachments Tab.
- For information about the Notes tab, see Notes Tab.
Select the relevant option in the drop-down at the top of the page (Activate Notes or Dismiss Notes) to either mark notes as active (unread) or to dismiss displayed notes. Notes received are automatically labeled as Active. Dismissed notes are excluded from the Activate Notes facet, but are still included with their respective requests (they are not deleted).
- Select Save to store the information you entered and return to the Patron Driven Acquisition (PDA) List page.
On the Patron Driven Acquisition (PDA) List page (Acquisitions > Advanced Tools > Patron Driven Acquisition (PDA)), select Manage PDA Profiles in the row actions list. The Run Import page appears, where you can manage the profiles associated with the PDA. For details on profiles, see Importing Records Using Profiles.
PDA profiles must be activated to import an EOD or a repository.
If you are working with EBL, ensure that you configure the following properties within your import profile:
- PO line currency – Note that only one currency is supported.
- Decimal point location – Set to 2.
- List price field – Set to 980b.
- Default PO line owner – Must be defined.
- Fund distribution field – Set to 981b (leave percent subfield empty).
- Default fund – Must be defined.
- Vendor invoice number field – Set to 980f in order to package all PO lines with the identical number in this field into one PO and create an invoice from this PO.
On the Patron Driven Acquisition (PDA) List page (Acquisitions > Advanced Tools > Patron Driven Acquisition (PDA)), select Import Repository in the row actions list. The Start New Import page appears, where you select one or more repository files to import. Select Submit to import the selected files. Inventory items are created and published to the discovery system. See Importing Records Using an Import Profile.
On the Patron Driven Acquisition (PDA) List page (Acquisitions > Advanced Tools > Patron Driven Acquisition (PDA)), select Import Orders in the row actions list. The Start New Import page appears, where you import an EOD of the PDA (see Importing Records Using an Import Profile). PO lines are then created, beginning the purchasing workflow (see Purchasing Workflow).
When importing PDA orders, ensure that .mrc files are encoded with MARC8 characters.
- On the Patron Driven Acquisition (PDA) List page (Acquisitions > Advanced Tools > Patron Driven Acquisition (PDA)), select Duplicate in the row actions list. The Summary tab of the PDA Details page opens. See To edit a PDA entry.
The fields contain the same values as the original PDA entry, except that the Name and Code fields are empty.
- Enter values for the Name and Code fields, and modify any other field values, as required.
- Select Save to store the information you entered and return to the Patron Driven Acquisition (PDA) List page.
Select Pause in the row actions list on the Patron Driven Acquisitions (PDA) List page (Acquisitions > Advanced Tools > Patron Driven Acquisition (PDA)) and select Confirm in the confirmation dialog box.
Alma pauses the PDA program, and:
- Suppresses all bibliographic records that were already loaded for this PDA program but not yet purchased
- Prevents new bibliographic records being loaded for the PDA program
Select Resume in the row actions list to resume the PDA program.
For more information about pausing a PDA program, see the Pause PDA Program video (4:11 mins).
Select Terminate in the row actions list on the Patron Driven Acquisition (PDA) List page (Acquisitions > Advanced Tools > Patron Driven Acquisition (PDA)). Alma sets the PDA end date to the current date. Repositories can no longer be imported, although EODs can still be imported.
Select Cleanup in the row actions list on the Patron Driven Acquisition (PDA) List page (Acquisitions > Advanced Tools > Patron Driven Acquisition (PDA)) and select Confirm in the confirmation dialog box. Alma removes inventory items from the PDA that do not have PO lines associated with them.
- To perform cleanup on a PDA, you must first terminate the PDA.
- After cleanup is performed, the PDA status is set to Canceled.
On the Patron Driven Acquisition (PDA) List page (Acquisitions > Advanced Tools > Patron Driven Acquisition (PDA)), select Cancel in the row actions list. and select Confirm in the confirmation dialog box. Alma sets the PDA end date to the current date and removes inventory items from the PDA that do not have PO lines associated with them. The PDA status is set to Canceled. PDA profiles in Canceled status can be removed by selecting Delete in the row actions list.
Canceling a PDA entry performs both the Terminate and Cleanup actions.