
Configuring Remote Storage Facilities
This page describes how to configure remote storage within the institution.
For links to all the main fulfillment documentation pages see Fulfillment.
To configure the remote storage facilities, you must have one of the following roles:
- General System Administrator
Libraries may have remote storage facilities where some of their resources are stored. Patrons do not have direct physical access to these remote storage locations. Instead, a patron must place a request for an item that is in a remote storage facility. The requested item is then delivered to a location from which it can be picked up by the patron. For more information, see Requests to Remote Storage Facilities.
You define which remote storage facilities exist within the institution. When you add a physical location to a library, you can specify that the location has a remote storage facility. For details, see Configuring Physical Locations.
You configure the remote storage facilities from the Remote Storage List page (Configuration Menu > Fulfillment > Locations > Remote Storage) or (General System Administrator only) Configuration Menu > General > Locations > Remote Storage)
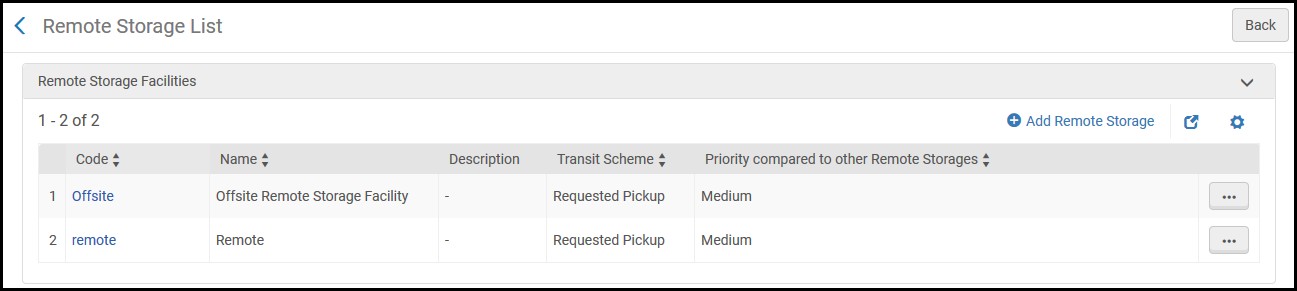
Remote Storage List Page
Remote storage facilities can be configured at the institution level only. Select the required institution from the Configuring filter on the Configuration page.
The following actions can be performed on this page:
- Add a Remote Storage Facility (see Adding a Remote Storage Facility)
- Edit a Remote Storage Facility (see Editing Remote Storage Facility Details)
- Delete a Remote Storage Facility (Delete in the row actions list)
For information on how items requested from a location with "remote storage" checked are added to the xml file that Alma uses to communicate with third-party inventory products, see the Developer Network.
Adding a Remote Storage Facility
You can add a new remote storage facility to the institution. After you add a remote storage facility, the facility will be included in the Remote storage drop-down list when you add a physical location to one of the institution’s libraries. For details, see Configuring Physical Locations.
To add a new remote storage facility:
- On the Remote Storage List page (Configuration Menu > Fulfillment > Locations > Remote Storage), select Add Remote Storage. The Add Remote Storage dialog box appears.
 Add Remote Storage Dialog Box
 - Enter a code (required), name (required), and description (optional) for the new remote storage facility.
- In the Prefer over other locations drop-down list, select from the following options:
- Set as last option - When you select this option, the remote storage location will only be selected if there are no other available holdings.
- Do not prefer over other locations - When you select this option, the remote storage items are considered like any other item for prioritization purposes.
- Prefer over other locations - When you select this option, Alma will select the remote storage location as the preferred holding.
For details on the Resource Request Monitoring page, see Managing Requests and Work Orders. - Select a priority for the storage facility from the Priority compared to other remote storages drop-down list. Suppose a patron requests a specific title, and the title exists in more than one remote storage facility. In that case, the system places the request at the remote storage facility with the highest priority.
- Select an integration profile for the storage facility from the Integration profile drop-down list. If a remote storage system is managed by a system other than Alma, Alma uses the specified integration profile to communicate with the other system. For information on configuring a remote storage system profile, see Requests to Remote Storage Facilities.
- Select the transit scheme for the remote storage facility. The transit scheme defines the location to which to deliver an item that is requested from the remote storage facility for pickup by the requesting patron:
- Owning desk – The item is transferred to the owning desk of the facility that supplies the request, and the item is sent from there to the pickup location.
- Requested pickup – The item is sent directly to the requested pickup location.
- Select the Handles digitization requests locally check box if you want the remote storage facility to digitize requested items.
- Select the Define as In Transit to Remote Storage at return check box to set the item process type to In Transit to Remote Storage when returning an item. This option is used when working with items whose locations are connected to remote storage. When the item is returned to an ASRS, a message is sent indicating that the item is in place; the item's status then changes to Item in Place and the In Transit to Remote Storage process type is removed.
If this option is not selected, Alma indicates that the item is in place even before the item has actually returned to the remote storage location.This option is available only for an ASRS that supports the IR message.
- Allow Manual Description Requests is selected by default. If the check box is deselected, requests with manual descriptions may not be entered for remote storage. In this case the Manual Description option will not appear on the request form.
- Select Add and Close to close the dialog box. The new remote storage facility appears at the bottom of the list of remote storage facilities on the Remote Storage List page.
Editing Remote Storage Facility Details
You can edit the details of any remote storage facility.
To edit the details of a remote storage facility:
- On the Remote Storage List page (Configuration Menu > Fulfillment > Locations > Remote Storage), select Edit in the row actions list for the specific remote storage facility record whose information you want to update. The Edit Remote Storage Facility page appears.
 Edit Remote Storage Facility Page
 - In the Edit Remote Storage section, edit the details as required. See Adding a Remote Storage Facility for details.
- In the Calendar Management section, select Full Calendar and Add Record, as needed, to edit the details that define when the remote storage facility is open and closed. For details, see Adding/Editing Calendar Details.
When adding a record of type Event, you can define the hours that a shuttle leaves the remote storage facility to bring items to the library.
- Select Save to store your changes to the remote storage facility details.