Translatable
Configuring User Groups
To configure user groups, you must have one of the following roles:
- User Administrator
- General System Administrator
You can define user groups to assign to users. User groups are a way to group users by type, such as alumni, faculty, and so forth. After defining user groups, you can assign them to users when adding or editing users (see
Adding Users and
Editing Users). After adding user groups, you must specify the user record types that can be associated with each user group; see
Mapping User Groups to User Record Types.
If you have configured Alma to do so, then after adding a new user with a user group, Alma automatically adds role profiles and/or user registration terms of service to the user (see
Configuring Role Assignment Rules and
Configuring User Registration Rules).
You configure user groups on the User Groups code table (
Configuration Menu > User Management > User Details > User Groups). For more information about code tables, see
Code Tables. For configuring user groups on the institution level see
Configuring Alma.
User Groups Code Table
On this page, you can add, edit, or delete user groups.
- To delete a user group, you need to first delete the group's mapping to user record types before deleting the actual group.
- If your institution is using user groups as fulfillment parameter (e.g., in Fulfillment Unit Rules, Display Logic Rules, etc.), you will need to update the rules with the new user group in order for them to take effect for users in the group.
- Reordering records is not supported for user groups.
- User Group code must not contain non-alphanumeric characters.
- The Translation column is visible only when your institution has enabled languages (Configuration > General > General Configuration > Institution Languages).
Mapping User Groups to User Record Types
To map user groups to user record types, you must have one of the following roles:
- User Administrator
- General System Administrator
You can associate user groups to user record types. When a user of a certain record type (Staff, Public, or Contact) is added or created (see
Adding Users and
Editing Users), only user groups associated with that record type may be selected for that user.
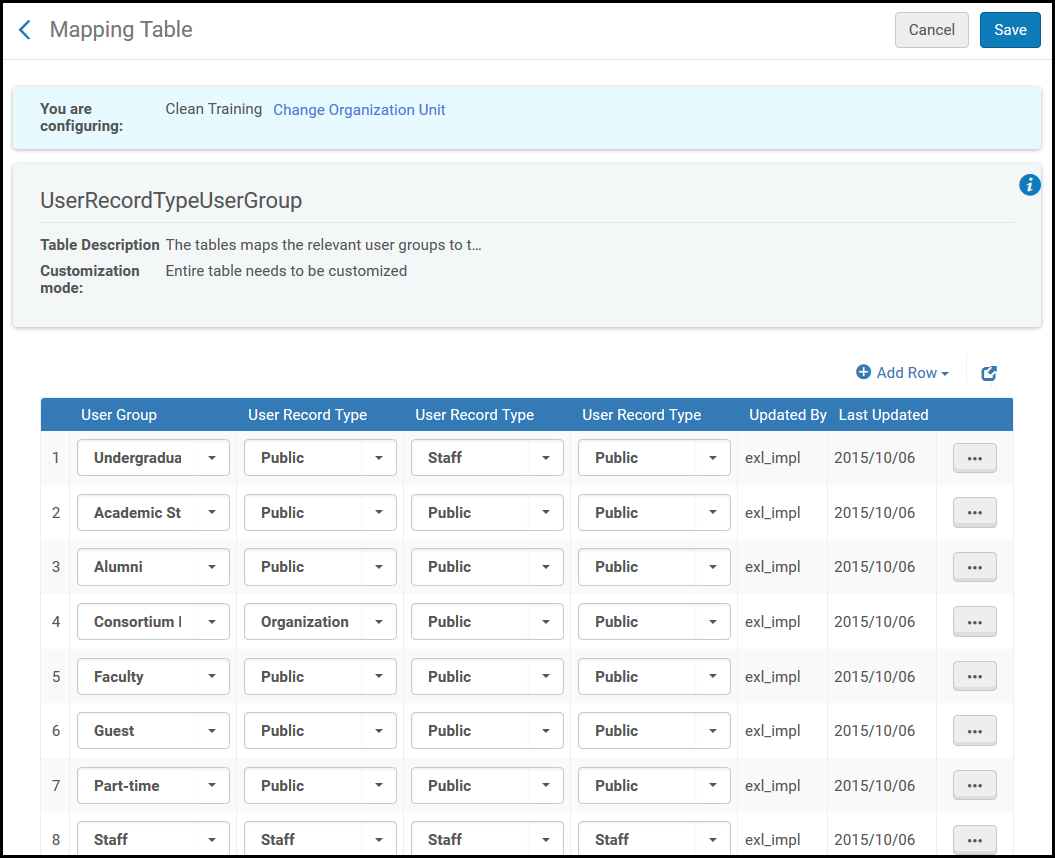
You configure the mapping from user groups to record types on the User Record Type User Group mapping table (
Configuration > User Management > User Details > User Record Type/User Group). For more information about mapping tables, see
Mapping Tables.
You can add, edit, or delete mappings from user groups to user record types. For each user group, select up to three user record types. You can select an empty value for any of the drop-down lists. Using the same value more than once has no effect (it is the same as using it once).
The value Organization should not be used (selecting it has no effect).
User Record Type/User Group Sets Mapping Table
Configuring User Job Categories
To configure user job categories, you must have one of the following roles:
- User Administrator
- General System Administrator
You can define user job categories to assign to users. User job categories are the functions performed in the library by the user, and are a way to group users by type, such as finance, circulation desk, and so forth. After defining user job categories, you can assign them to users when adding or editing users (see
Adding Users and
Editing Users). After adding user job categories, you must specify the user record types that can be associated with each user job category; see
Mapping Job Categories to User Record Types.
If you have configured Alma to do so, then after adding a new user with a job category. Alma automatically adds role profiles to the user (see
Configuring Role Assignment Rules).
You configure user job categories on the Job Titles code table (
Configuration Menu > User Management > User Details > Job Categories). For more information about code tables, see
Code Tables.
You can add, edit, or delete user job categories. You can reorder how the job categories appear in any job category drop-down box, and you can select the default selected job category.
Job Categories Code Table
Mapping Job Categories to User Record Types
To map job categories to user record types, you must have one of the following roles:
- User Administrator
- General System Administrator
You can associate job categories to user record types. When a user of a certain record type (Staff, Public, or Contact) is added or created (see
Adding Users and
Editing Users), only job categories associated with that record type may be selected for that user.
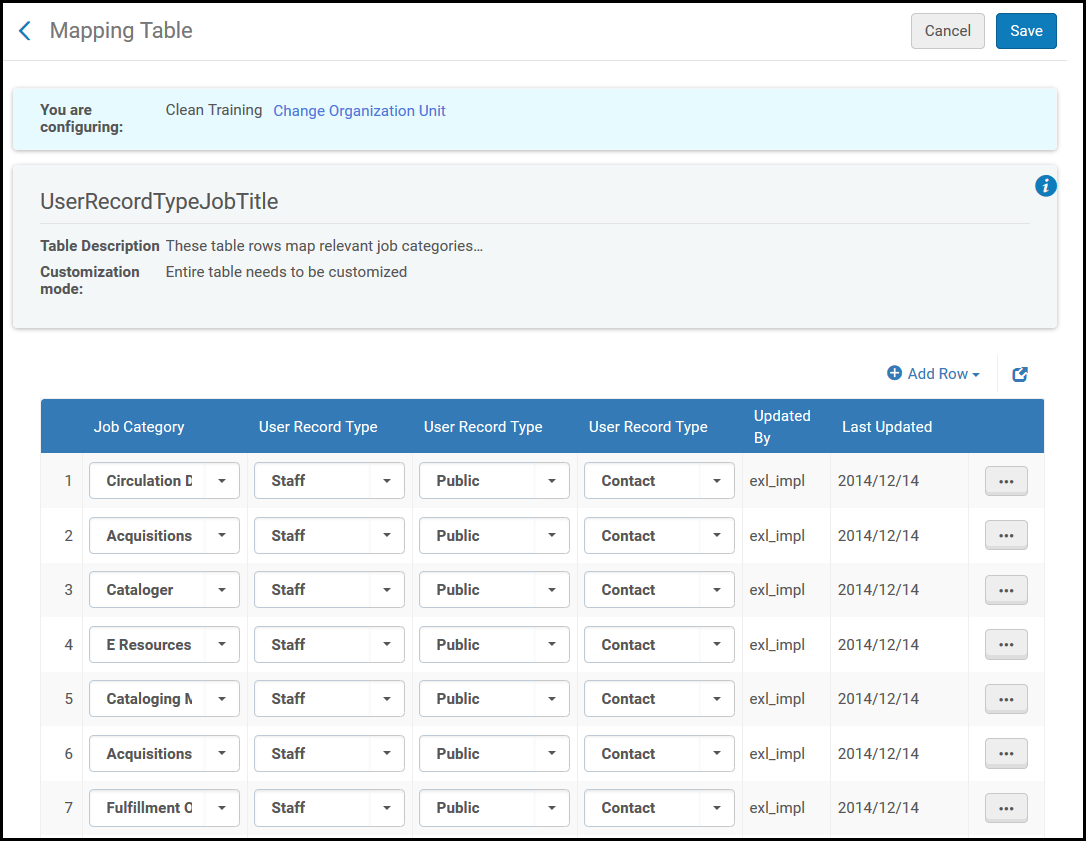
You configure the mapping from job categories to user record types on the User Record Type Job Title mapping table (
Configuration > User Management > User Details > User Record Type/Job Category). For more information about mapping tables, see
Mapping Tables.
User Record Type/Job Title Mapping Table
You can add, edit, or delete mapping from job categories to user record types. For each job category, select up to three user record types. You can select an empty value for any of the drop-down lists. Using the same value more than once has no effect (it is the same as using it once).
The value Organization should not be used (selecting it has no effect).
Configuring the Display of User Names
To configure how user's names appear in Alma, you must have one of the following roles:
- User Administrator
- General System Administrator
You can configure the way user's names appear in Alma. Names appear on the Alma Home Page, in the user menu, and in other locations.
You configure the appearance of names separately for each user record type. For each record type, you can configure what appears as first, second, and third names, as well as the separator, in the following string:
{First display name}{separator}{second display name}{space}{third display name}
Possible values for display names include
firstName, lastName, middleName,
userName (primary identifier),
jobDescription, or
userTitle (honorific) . See
Adding Users. By default, the user's name appears as
lastName, firstName.
You configure user name display options on the Display User Name mapping table (
Configuration > User Management > User Details > User Name Display). For more information about mapping tables, see
Mapping Tables.
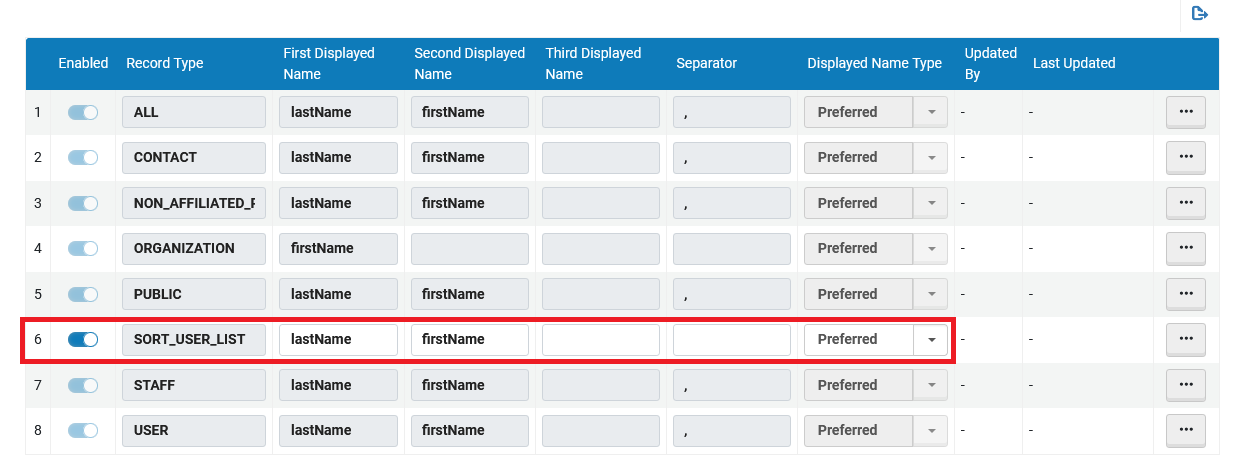
You can edit how the user's name appears for the record types contact, public, and staff. If you disable a row, the default display name lastName, firstName is used for that record type. For each record type, you can select if the Preferred, Main, or Both names are displayed. If both are selected, the preferred name displays in parentheses after the main name.
You can also change the way names are used for sorting, for example, to sort by first+middle name and then by the last name. The configuration can be done by configuring the SORT_USER_LIST line in this table.
The rows for record types All, Organization, and User have no effect.
Display User Name Mapping Table
Configuring User Genders
To configure the list of user genders in Alma, you must have one of the following roles:
- User Administrator
- General System Administrator
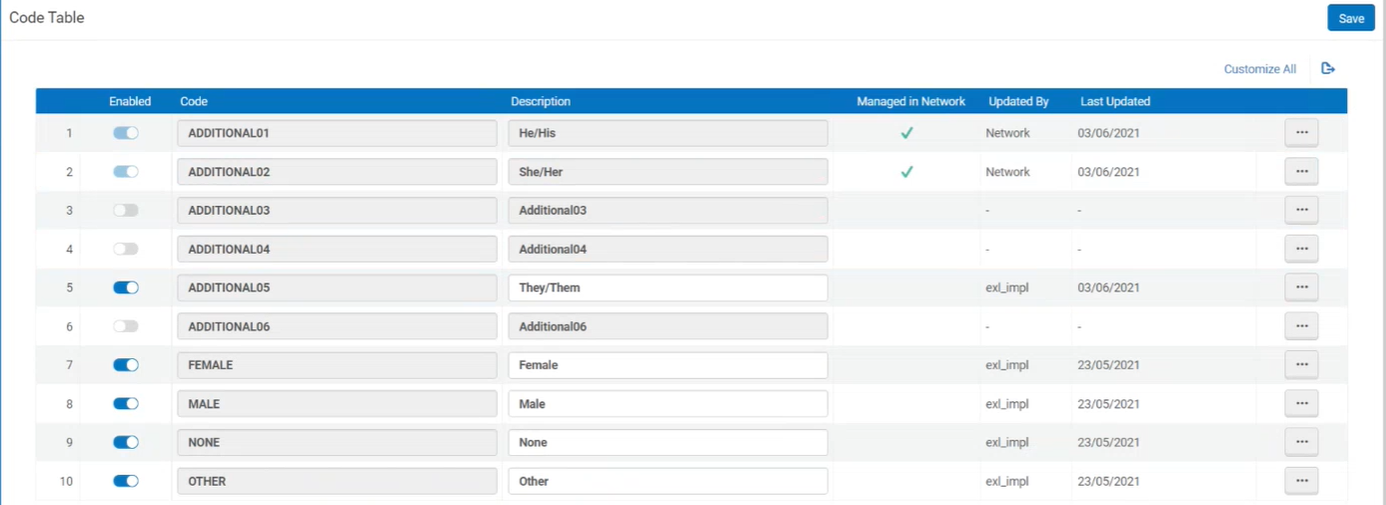
You can configure the list of user genders in the Genders table (Configuration > User Management > User Details > Genders). Once values have been defined, they can be assigned to individual users in the User Details page.
The Genders table contains the four default genders (male, female, other and none). These values can be disabled and their description can be altered. In addition, in "Additional" fields the institution can define its own gender values, up to 10 gender values in a list.
Every change to the gender values will be applied to existing records of all users to which this gender is assigned.
In a Network Zone, genders can be defined from the Network institution, in which case the gender values defined from the network are locked for editing by the member institutions.
Configuring Statistical Categories
To configure statistical categories, you must have one of the following roles:
- User Administrator
- General System Administrator
Statistical categories can be used to associate information about individual users, such as their user group or academic level, with their user accounts, for use in reports or fulfillment-unit rules.
Analytics employs statistical categories to enable you to display or filter Analytics information about users by fields other than user group and job category (which are automatically available for statistical analysis). For example, you may want to break down users by geographical area or by academic degree.
Statistical categories can also be used in fulfillment-unit rules to assign diverse policies to users of different types. For example, they could be used to give graduate students more extensive borrowing privileges than undergraduates.
This section explains how to create statistical categories, which is a three-step process:
- Create statistical category types - Before creating categories, define the various category types. For example: Geographical Area or Academic Degree. See step 1 below.
- Create statistical categories - For each category type, create the categories for that type. For example, for the category type Geographical Area, you might create the categories New York City, Boston, and Paris, if those are the locations of your users. See step 2 below.
- Map categories to types - Assign each category to its category type. - See step 3 below.
Once the required statistical categories have been created, they can be assigned to users. When library-level statistics are activated for an institution, visibility of and access to statistical categories that are assigned to users is limited by the user's scope. The categories themselves are nonetheless defined on the institution level. For additional information, see
Managing User Statistics.
While you can create more than ten category types, only ten can be available to use in Analytics at any one time. For information about selecting the categories to make available, see
step 4 below.
For information about using statistical categories in Analytics reports, see
Users. For information about using them in fulfillment-unit rules, see
Physical Fulfillment.
Creating Statistical Category Types (Step 1)
You can define any number of category types. However, only ten of them are available to use in Analytics at any one time.
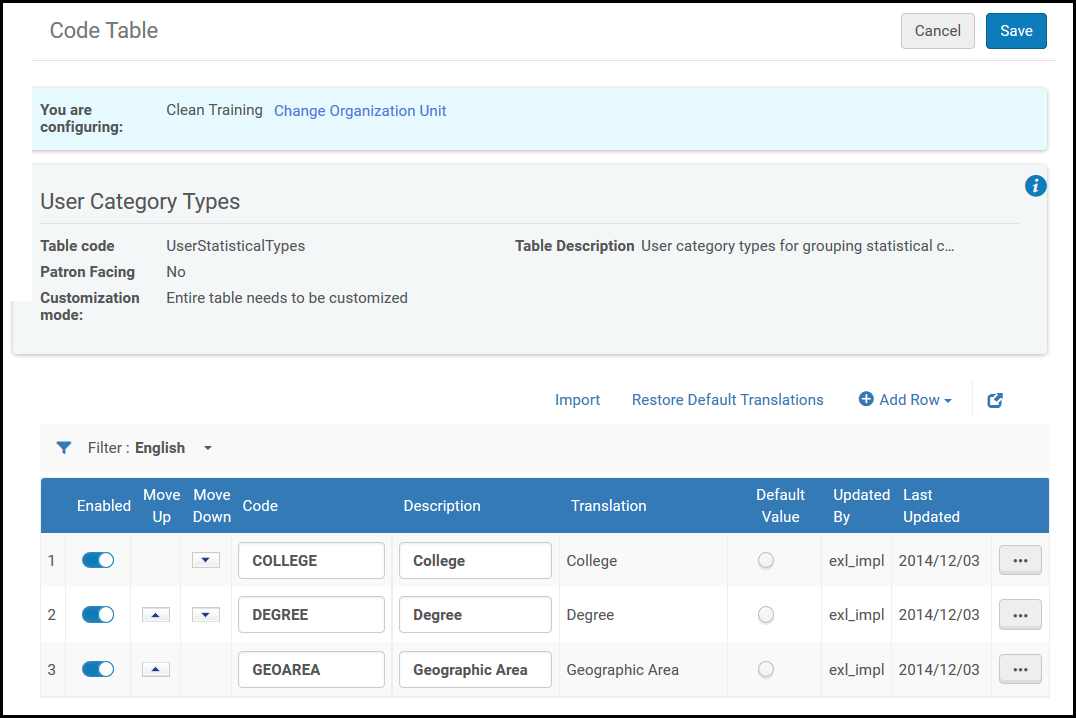
You define statistical category types on the User Category Types code table (
Configuration menu > User Management > User Details > Category Types). For more information about code tables, see
Code Tables. You can add, edit, or delete category types.
User Category Types Code Table
Creating Statistical Categories (Step 2)
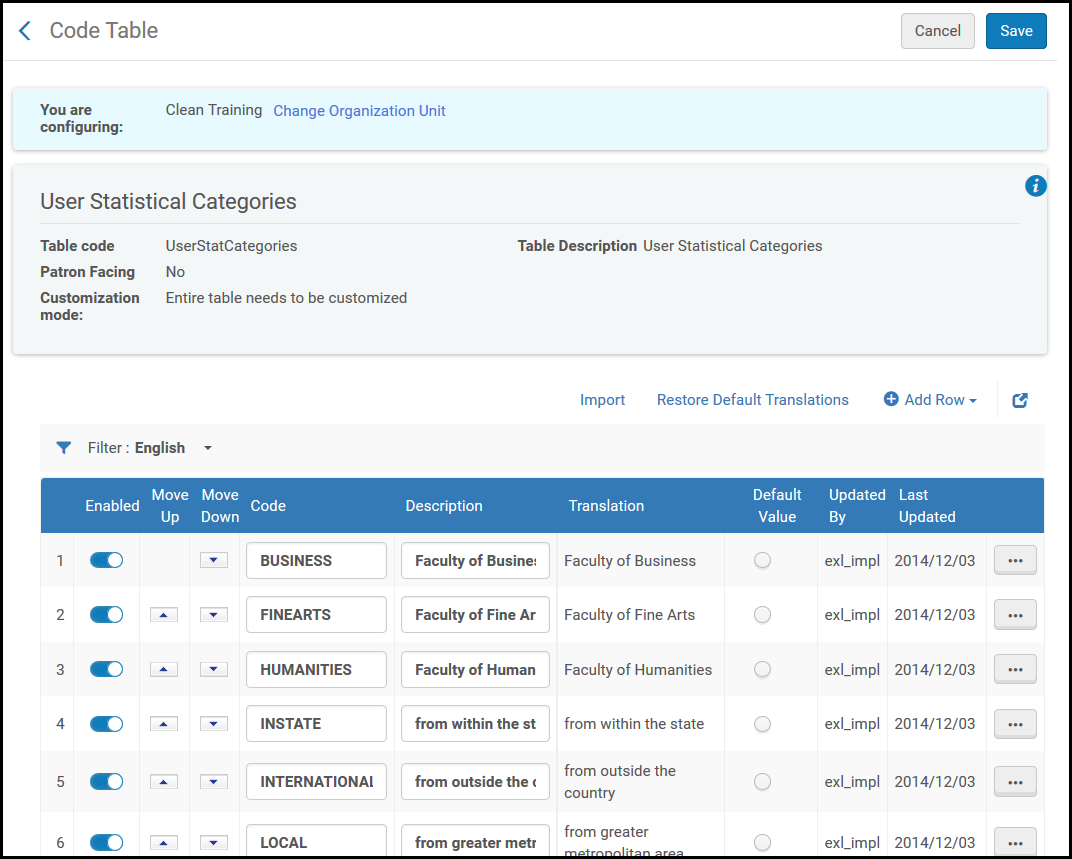
You define statistical categories on the User Statistical Categories code table (
Configuration menu > User Management > User Details > Statistical Categories). For more information about code tables, see
Code Tables. You can add, edit, or delete a statistical category.
User Statistical Categories Code Table
The Statistical Categories/Types link appears on the User Management configuration page only if at least one statistical category and at least one category type are defined
The User Statistical Categories code table is paginated. There is a maximum of 50 rows per page when you have more than 50 rows of user statistical categories configured.

Code Table Pagination
Mapping Statistical Categories to Types (Step 3)
You map statistical categories to types on the Statistical Categories/Types mapping table (
Configuration menu > User Management > User Details > Statistical Categories/Types). For more information about mapping tables, see
Mapping Tables. You can add, edit, or delete mappings, and you can enable or disable them.
A category can be mapped to only one type.
If more than 1000 types are mapped to a statistical category, users will not be able to edit it. The drop down combobox will be read-only. In order to edit the types that are mapped, users need to export the statistical category and apply changes in the exported Excel and then Import the file. See below for more information on exporting and importing statistical categories.
If there are more than 1000 statistical categories, see
Statistical Category in the Advanced Search regarding the codes to use.
Additionally, you can use the export/import option to update multiple lines in one import action.
- In the Mapping table, export the table by selecting the Export icon.
Statistical Categories Mapping Table Export to Excel
- Add rows to the exported Excel as required. The only columns relevant to Statistical Categories that you need to fill in are:
- Column B (Target Code Combo Code) – Fill in the Statistical Category codes that you want to add to the mapping. Verify that they have first been added to the Statistical Categories table using the User Management Configuration menu > User Details > Statistical Categories menu.
- Column D (Source1 Combo Code) – Fill in the Category Type code that that the Statistical Category should map to. Verify that they have first been added to the Statistical Categories table using the User Management Configuration menu > User Details > Category Types menu.
The example below displays adding the Statistical Category code ‘USA’ to the Category type Country (coded COU):
Mapping Table exported Excel
- When the Excel file is complete, select Import in the Mapping Table screen.
- You are prompted to upload the file.
Import Excel file into Mapping Table
- Browse to your Excel file. Select Upload File.
- When the ‘This will replace all existing rows. Are you sure?’ confirmation message appears, select Confirm.
Selecting Statistical Category Types to Appear in Analytics (Step 4)
You can select up to ten statistical category types that you want to make available in Analytics. This is done on the Analytics User Statistics code table (
Configuration menu > Analytics > General Configuration > Analytics > Analytics User Statistics). For more information about code tables, see
Code Tables. Select (up to) ten types in the
Description column. You can also enable and disable a row.
Analytics User Statistics
Analytics reports do not display statistical types that are scoped to a specific library. They display information only for the entire institution.
Statistical Category in the Advanced Search
When searching in Users > Statistical category in the advanced search with more than 1000 statistical categories, an auto-complete option appears after the user types in the first 3 characters. If fewer than 1000 statistical categories exist, a drop-down list that can be managed appears. For details, see Searching in Alma.
Saved facets
Therefore, when updating the Statistical Categories/Types mapping table (see Mapping Statistical Categories to Types (Step 3)) for more than 1000 categories, it is important to add codes that include at least 3 characters.
Configuring User Titles
To configure user titles, you must have one of the following roles:
- User Administrator
- General System Administrator
You can configure user titles (honorifics), such as Mr., Prof., and so forth. User titles are available when adding or editing users (see
Adding Users and
Editing Users). Titles are also available for Alma letters and printouts.
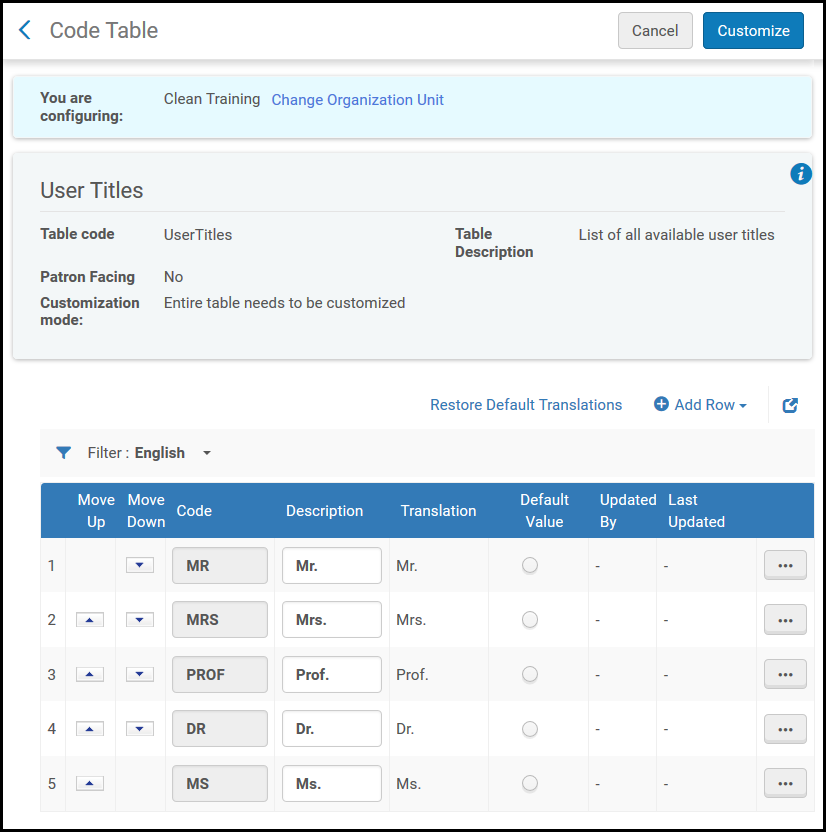
You configure user titles on the User Titles code table (
Configuration > User Management > User Details > User Titles). For more information about code tables, see
Code Tables.
User Titles Code Table
You can add, edit, and delete titles. You can select the order they appear in the drop-down list and the default selected title.
Configuring Library Notices Opt-In
To configure library notices opt-ins, you must have one of the following roles:
- User Administrator
- General System Administrator
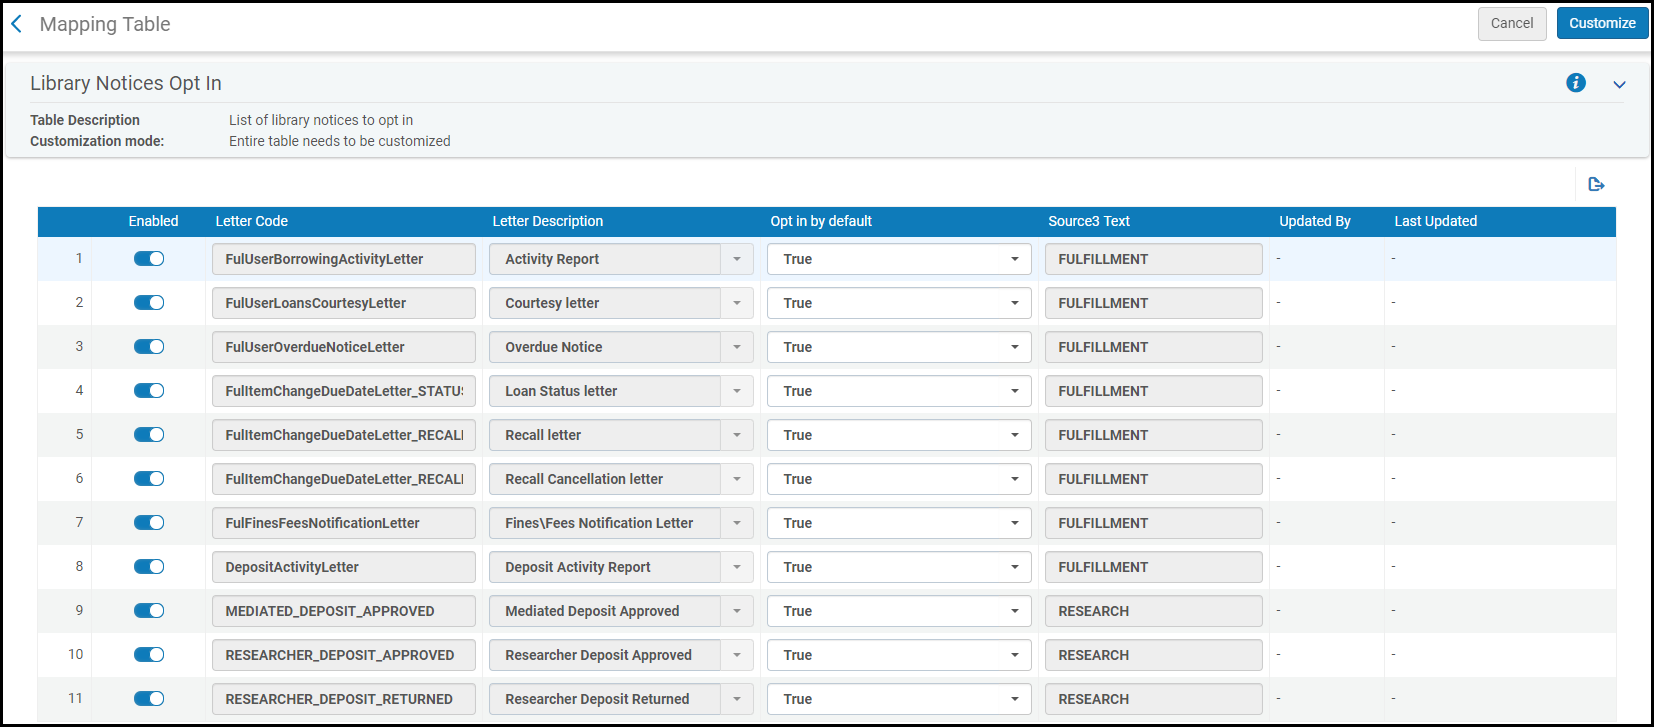
The Library Notices Opt In mapping table (
Configuration > User Management > User Details > Library Notices Opt In) enables you to configure whether users can opt in/out of receiving each patron letter and whether each letter is sent by default or not to all users. For more information about mapping tables, see
Mapping Tables.
User Title Configuration Table
You can enable/disable the ability to opt users out of receiving the following notifications. When disabled, users will not be given the option opt in/out of receiving patron letters. For more information about the individual letters, see
Configuring Letters Overview.
- Activity Report – Borrowing Activity Letter
- Courtesy Letter – Courtesy Letter
- Automatic Loans Renew Letter - Loan renew letter that is sent automatically (Configuration > Fulfillment > Fulfillment Jobs Configuration > Notify Automatic Renewals checkbox)
- Overdue Notice – Overdue Notice Letter
- Loan Status Letter – Loan Status Notice sent for a due date change
- Recall Letter – Loan Status Notice sent about a recall
- Recall Cancellation Letter – Loan Status Notice sent about canceling a recall
- Fines\Fees Notification Letter – Ful Fines\Fees Notification Letter
- Deposit Activity Report – Deposit Activity Letter
- The remaining letters marked for researchers are relevant only for institution's implementing Esploro.
- Do not change the text in column Source 3 Text. This field should be internal and will be removed in an upcoming release.
Select True or False in the Opt in by default column to configure whether users are opted into/out of the letter by default. True means that users are opted in by default.
Changes made to this table automatically apply for all new users created after the change. For existing users, these changes apply only if the user's selected letters list was not changed before customizing this table. For more information, see
Selected Patron Letters in the Adding Users section.
For patrons who do not want to receive certain library notifications, you can disable these notifications for individual patrons (see Selected Patron Letters in the Adding Users section) or for groups of patrons using SIS feeds or bulk user updates, according to library policies. If enabled in Primo/VE, patrons can opt in/out of receiving specific notices in My Library Card > Personal Details.
To customize the label names and translations for these letters see Configuring Display Labels for Library Notices Opt-In for Primo and Configuring Display Labels for Library Notices Opt-In for Primo VE



 Statistical Categories Mapping Table Export to Excel
 Mapping Table exported Excel
 Import Excel file into Mapping Table

