
Roles and Registration Configuration
Configuring Role Profiles
- User Administrator
- General System Administrator
- Add a role profile - See Adding a Role Profile below.
- Edit a role profile - Select Edit in the row actions list and follow the instructions in Adding a Role Profile. For information about applying the changes you make to users to which the role profile was previously applied, see Updating User Accounts to Which a Role Profile Has Already Been Applied below.
- Duplicate a role profile - Select Duplicate in the row actions list and follow the instructions in Adding a Role Profile to edit the profile.
- Delete a role profile - Select Delete in the row actions list and select Confirm in the confirmation dialog box.
Adding a Role Profile
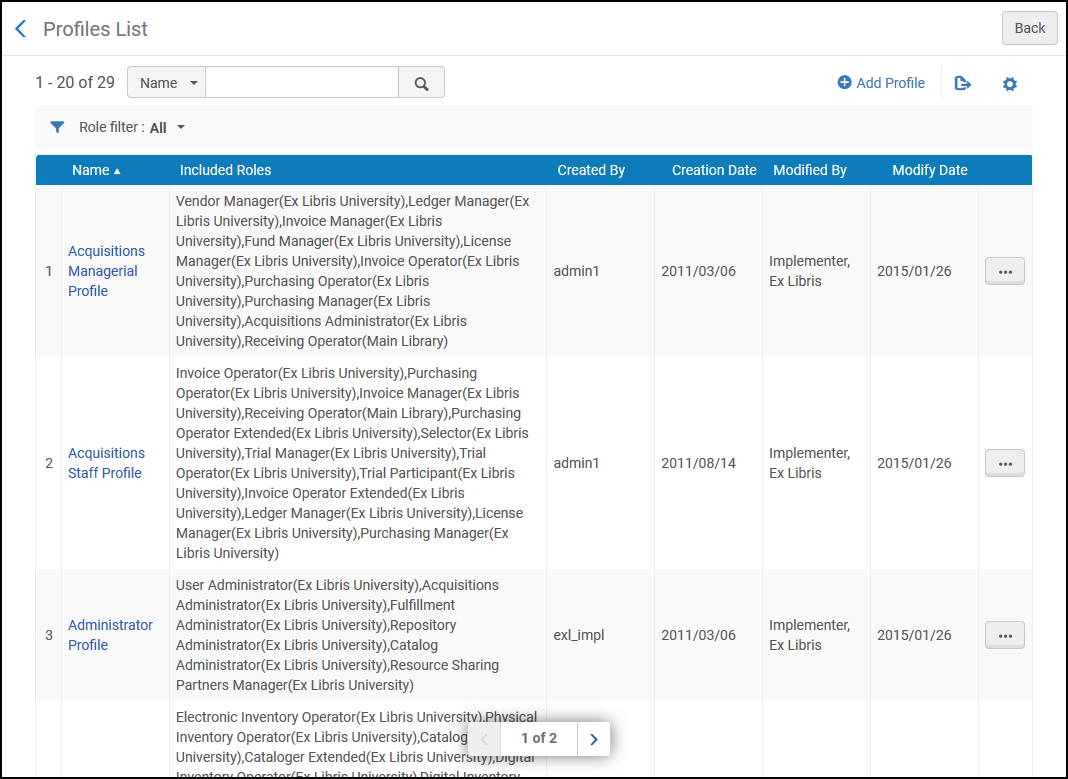
- On the Profiles List page (Configuration Menu > User Management > Roles and Registration > Profiles), select Add Profile. The Profile page appears. This is the first page of a two-page wizard.
 Profile Page
 - Enter a name for the role profile (required), and select Save and Continue. The Profile Roles area appears..
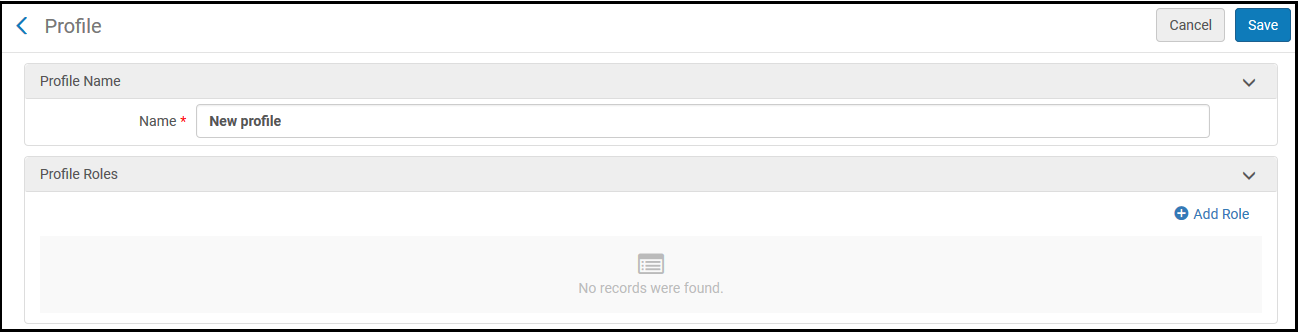 Profile Page – Updated
 - To add roles, select Add Role. The Add New Roles page appears. Follow the instructions in Adding Roles to Users for adding roles manually. After adding roles, they are listed in the Profile Roles area.
Only roles that are activated in a role profile when that role profile is applied to a user are added to that user's account. Roles for which a scope setting is not required (i.e., the scope is always the institution) are activated as soon as they are added. Roles for which a scope is required but has not yet been set in the role profile are deactivated and cannot be activated until they are edited and a scope is selected. Once a scope is set for a role as required, you can activate or deactivate the role manually, under Active, by selecting the button in the role's row.
- Select Save to save the profile.
Modifying a Role Profile
Once a role profile has been created, its name can be changed, and roles can be added and removed from it, as required. These modifications only directly affect user accounts to which the role profile is applied after it is modified. In order to implement them in user accounts to which they were previously applied, you must modify those user accounts, either manually, by running a job, or through the API (see Updating User Accounts to Which a Role Profile Has Already Been Applied below).
You can modify the user account manually in one of two ways:
- Manually adding and removing roles
- Assigning the role profile to the account again. Bear in mind, though, that if you do this, any roles that were added to the role profile after it was previously applied to the user will be added, but roles that were removed from the role profile will not be removed from the user.
- On the Profiles List page (Configuration Menu > User Management > Roles and Registration > Profiles), in the row actions list of the role profile, select Edit. The Profile page opens, and displays the name and ID number of the profile, as well as the list of roles included in it.
- To add additional roles to the profile, select Add Role, and follow the instructions above for adding roles.
- To remove a role, in the row actions list, select Remove.
To remove multiple roles, you can also select the checkboxes of the roles you want to remove, and then select Remove Selected. - To edit the settings of a role, in the row actions list, select Edit. Follow the instructions in Editing Roles Assigned to Users.
- When you have finished modifying the role profile, select Save.
Updating User Accounts to Which a Role Profile Has Already Been Applied
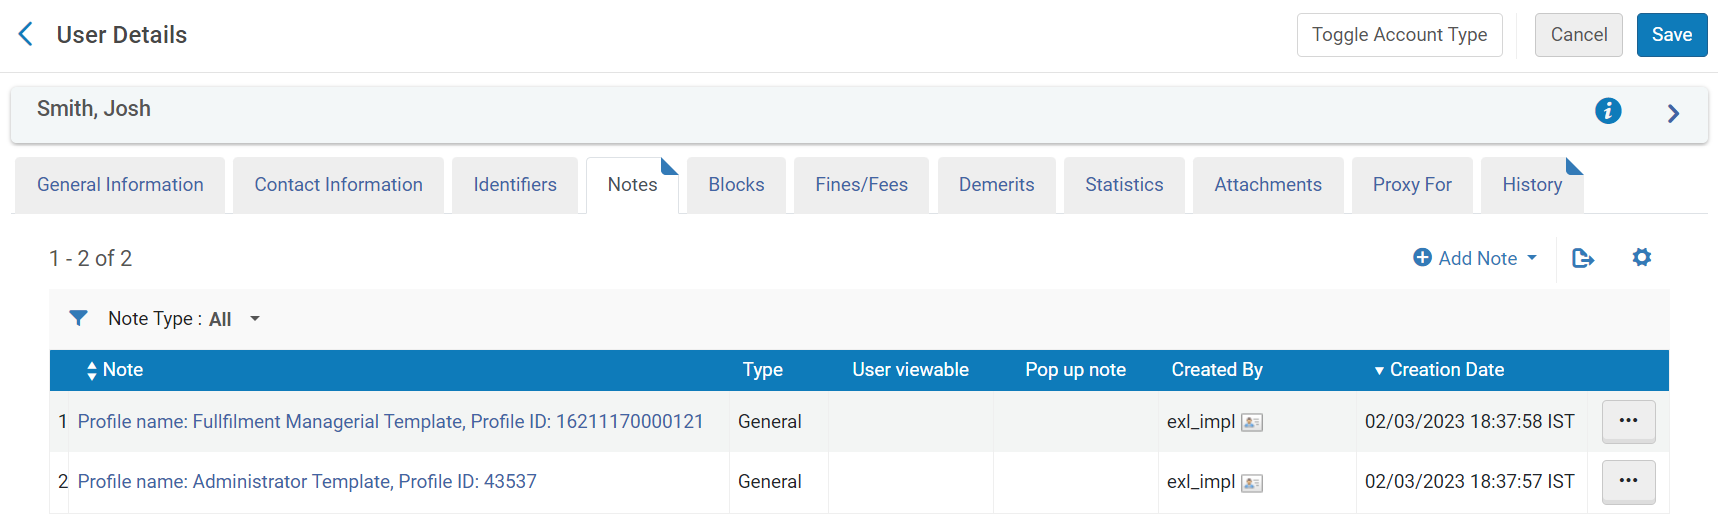
Whenever a role profile is applied to a user account, an internal general note is added to the account. The note includes the name and ID number of the role profile. You can find all user accounts to which a particular role profile was applied in the past (from May 2023, when this feature was introduced, onwards) by searching the user records for the name or the ID number of the role profile. You can also save the search parameters as a logical set, so that you can easily locate these user accounts in the future. The logical set can also be input to the Update/Notify Users job in order to update these users' roles in accordance with the changes you have made to the role profile.
Finding User Accounts to Which a Role Profile Was Applied
You can use Alma's search mechanism to find the user accounts to which a role profile was applied in the past. If you wish, you can also save the search query as a logical set to use as input for a job that can update the roles of these users.
- On the Profiles List page (Configuration Menu > User Management > Roles and Registration > Profiles), in the row actions list of the role profile, select Edit. The Profile page opens, and displays the name and ID number of the profile, as well as the list of roles currently included in it.
- Copy the ID number or the name of the profile.
- Select Back to leave the Configuration menu and return to the main menu.
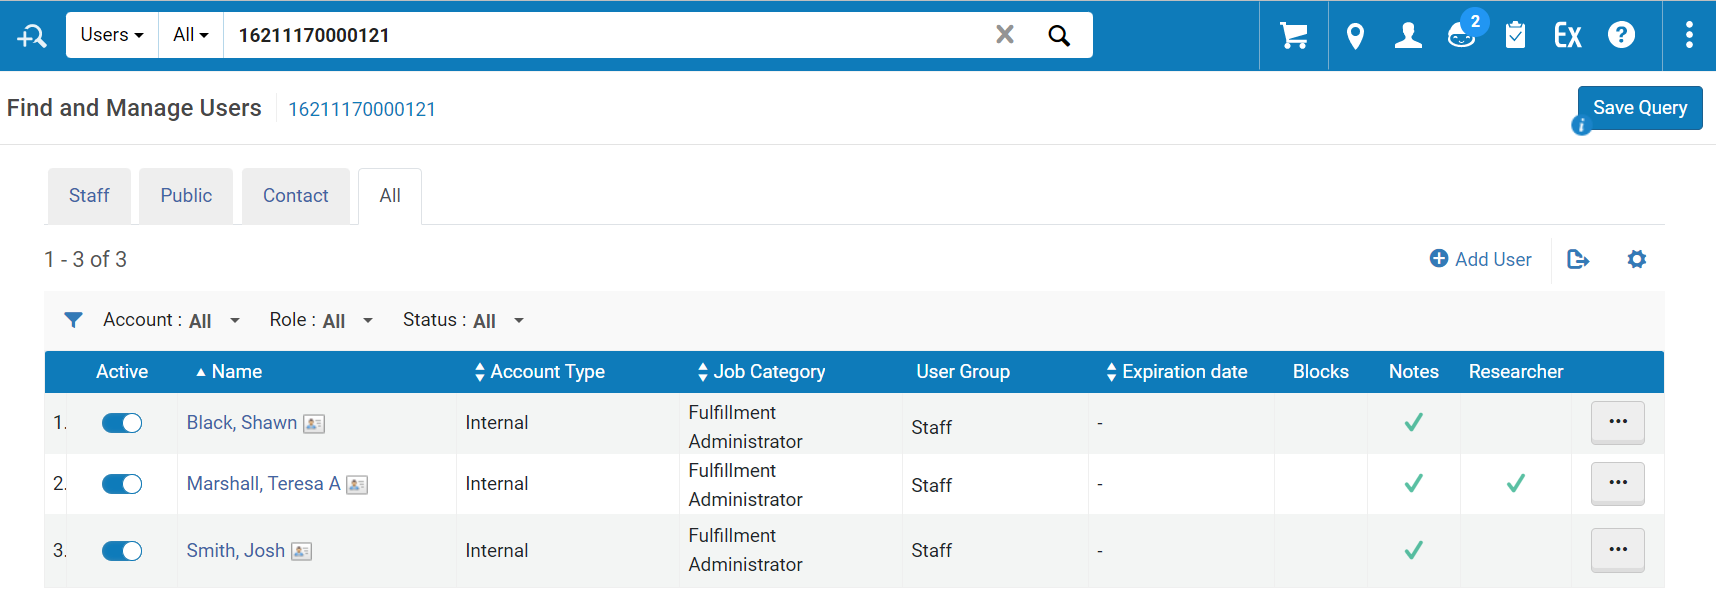
- In the Persistent Search box, select Users > All, enter the ID number or the name of the role profile in the text field , and press Enter. The Find and Manage Users page opens and displays a list of user accounts to which the role profile was assigned in the past.
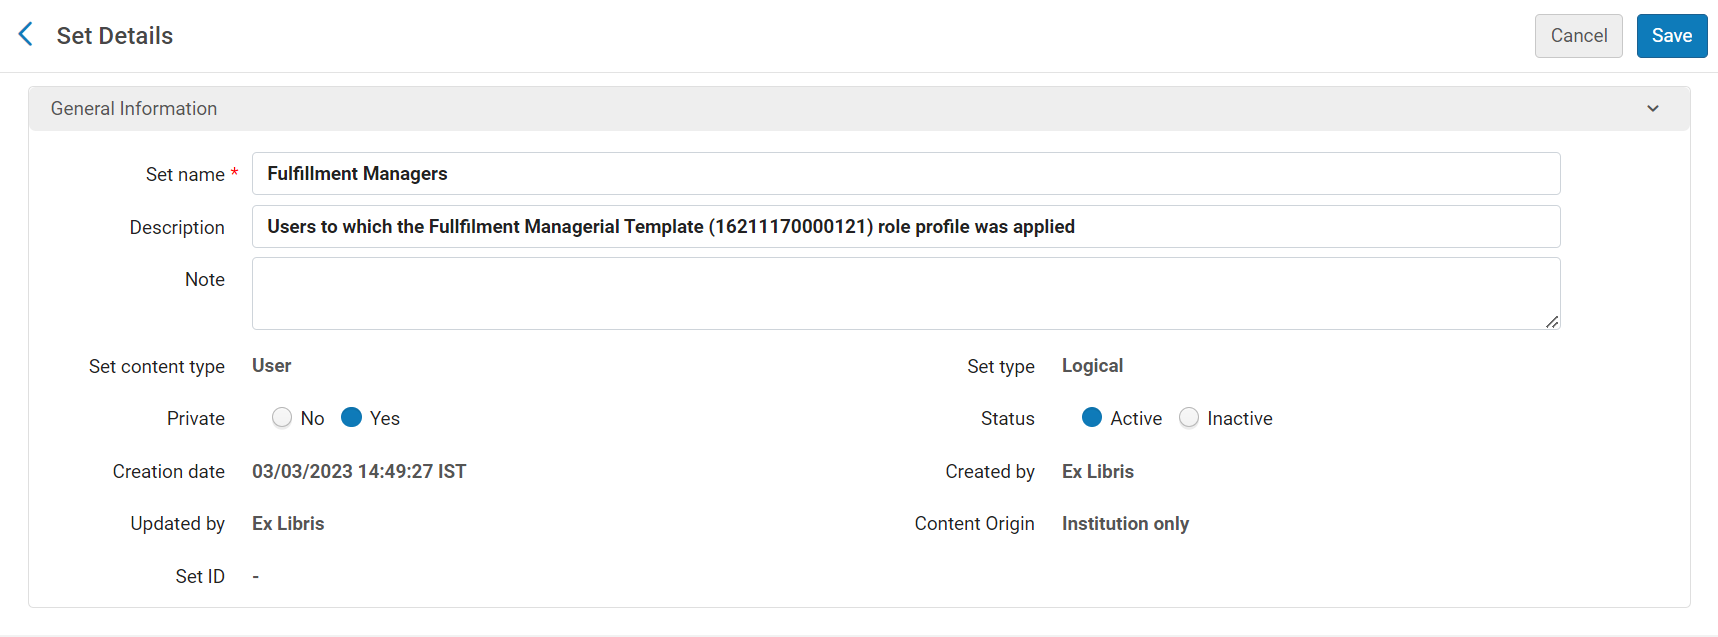
- If you want to save the search criteria as a logical set, select Save Query. In the Set Details page, enter a name for the set, modify the other fields as required, and then select Save. For additional information about sets, see Managing Search Queries and Sets.
Running a Job to Update Users' Roles
For each role you want to add to or remove from the user accounts in the logical set, you can run the Update/Notify Users job. (You can actually add one role and remove one role in the same run, but to add or remove multiple roles, you must run the job multiple times.) For additional information about logical sets and running a manual job, see Managing Search Queries and Sets and Manual Jobs.
- In the Run a Job - Select Job to Run page (Admin > Manage Jobs and Sets > Run a Job), select the Update/Notify Users job, and then select Next.
- In the Run a Job - Select Set page, select the logical set you saved as a query (above), and then select Next.
- In the Run a Job - Enter Task parameters page, select Add role, and/or Remove role, and then select the role to add and/or the role to remove, and the scope for each role you selected. Then select Next.

- In the Run a Job - Review and Confirm page, select Submit. The job runs and the roles are updated in the user accounts.
Configuring Role Assignment Rules
- User Administrator
- General System Administrator
Note that the rules are applied when users are added using the Add User option in Find and Manage Users (Admin > User Management > Manage Users).

- Birth Date - Match users born before, on, or after a specific date.
- Job Category - Match users assigned any of the selected job categories.
- Record Type - Match users of any of the selected record types (Contact, Public, or Staff).
- Status - Match active or inactive users.
- User Group - Match users assigned any of the selected user groups.
Configuring User Registration Rules
- User Administrator
- General System Administrator
- User Group - Match users assigned any of the selected user groups.
- Library - The 'currently at' library if user is being registered at the circulation desk, or the owning library of the item if the patron role is being renewed at the circulation desk following a loan block.
Configuring Users' Ability to View Operator Details
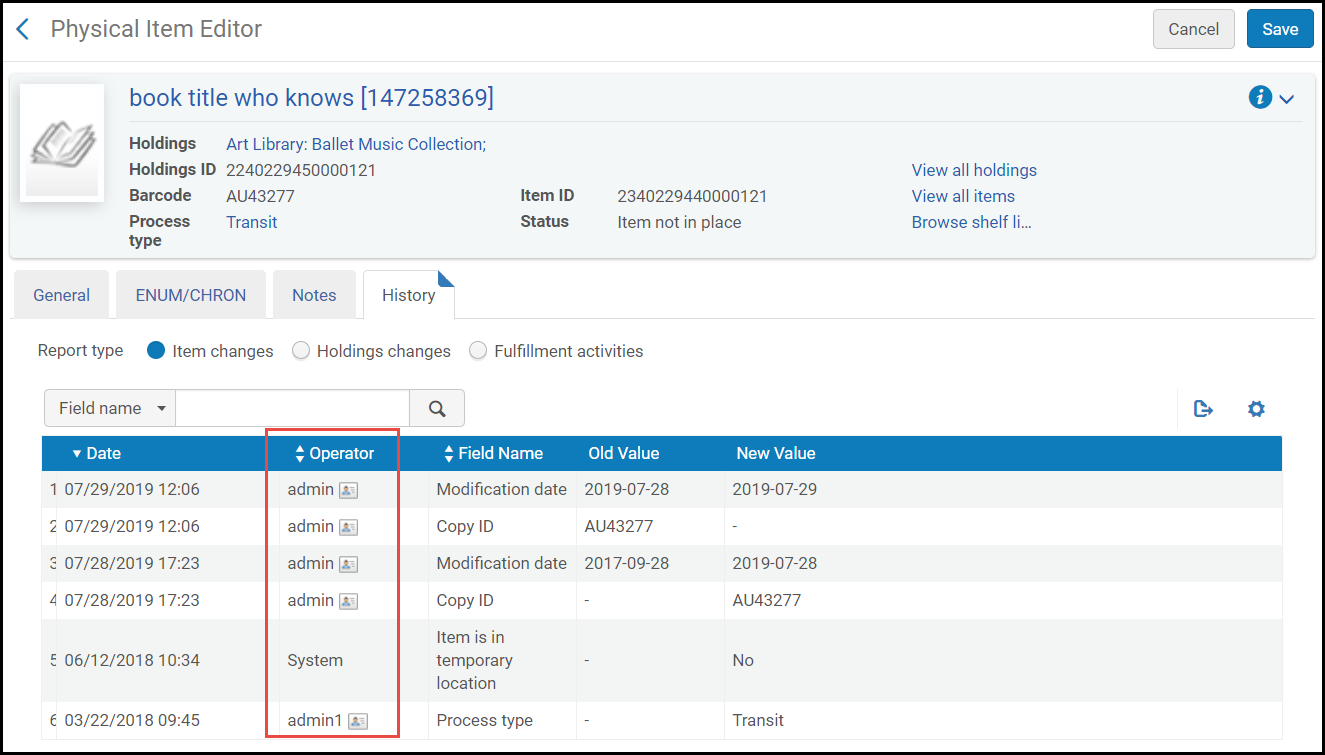
By default, an Operator column appears in the History tab (and some other tabs) on many Alma pages. All users with manager and/or administrator roles can view this column (assuming that they can view the page); users with only operator roles cannot view this column.
On the Manage Operator Details Visibility page (Configuration Menu > User Management > General > Manage Operator Details Visibility), you can configure that only the managers and administrators relevant to specific areas can view the Operator column in the pages in these areas.

On the Manage Operator Details Visibility page, select Hide and select Save and Execute. When Hide is selected, the following roles can view the Operator column in the History tab on the following pages:
| Roles | History Tabs (unless otherwise noted) |
|---|---|
|
|
|
|
|
|
|
|
|
|
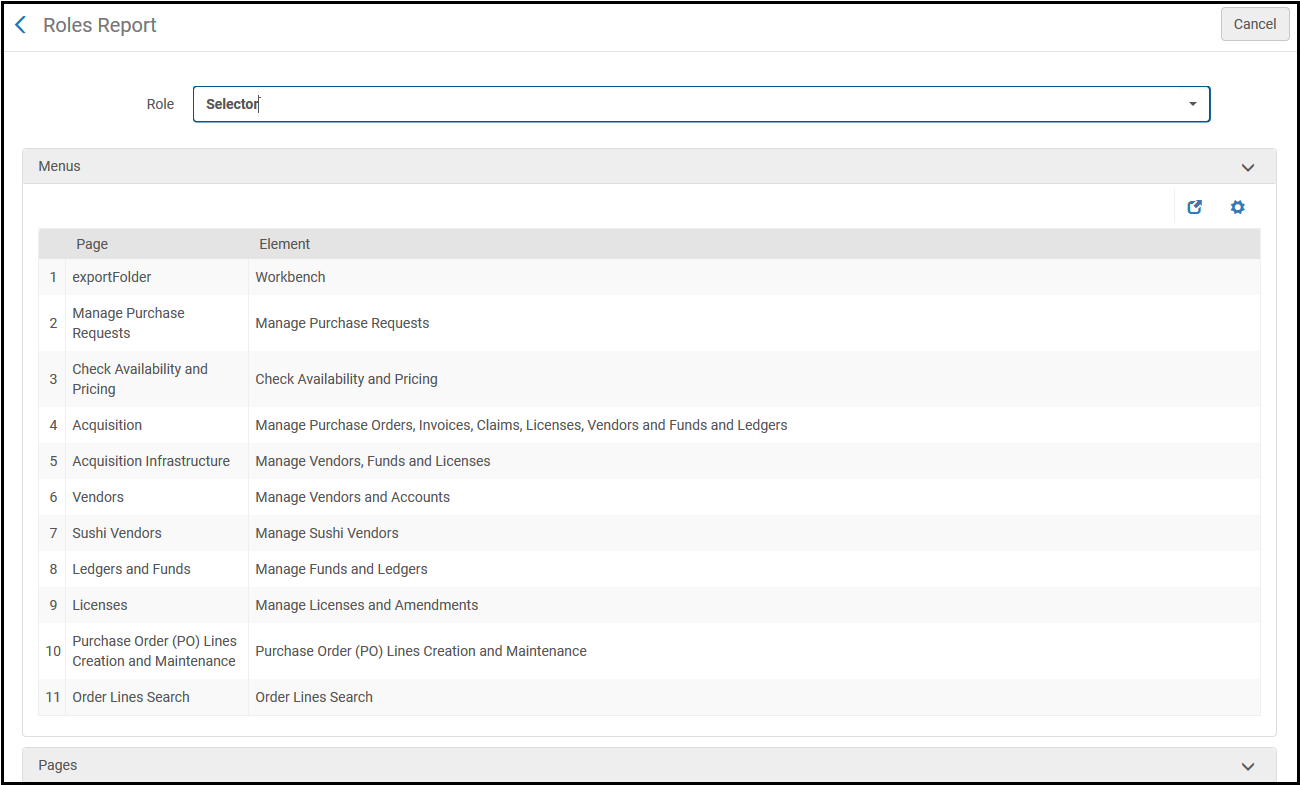
Roles Report
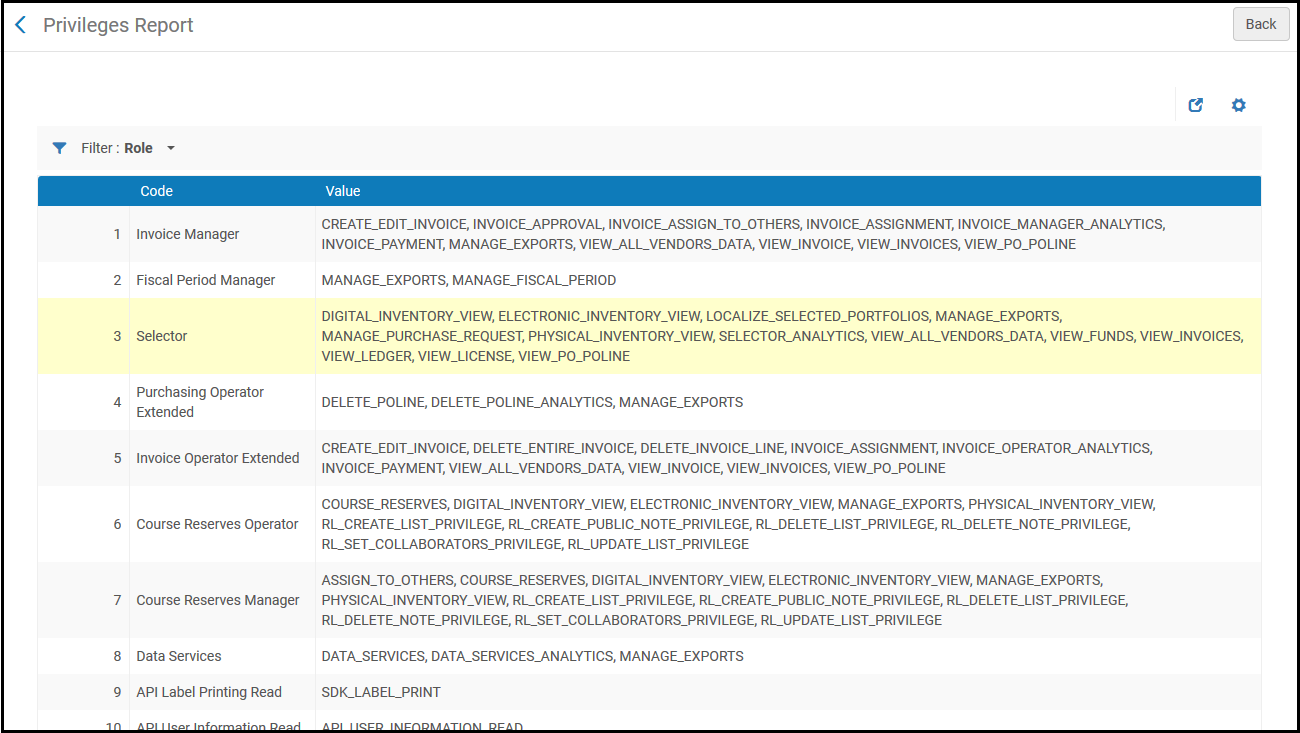
Privileges Report
- Some roles, such as Exlibris (all), SAAS Operator, and Technical Analyst, are internal and cannot be assigned to users.
- Some roles are related to other URM-related products, such as Leganto or Esploro. If you have any questions, contact Ex Libris customer support.
Restricting Users for Editing
The following user roles in Alma can make changes to Alma user accounts:
- General System Administrator
- User Administrator
- User Manager
- Circulation Desk Manager
- Circulation Desk Operator
- Circulation Desk Operator - Limited
- Repository Manager
However, you can prevent these user roles from making changes to specific user accounts (for example, editing contact info). This is a two-step process:
- You define accounts as 'restricted for editing' in the Users Restricted for Editing table (Configuration Menu > User Management > Roles and Registration > Users Restricted for Editing). If a user account has any of the roles defined in this table, or is assigned any of the user groups listed in this table, then this account is considered 'restricted for editing'.
- For the user roles that can make changes to Alma user records (the above-listed roles), you can activate the "Can't edit restricted users" parameter. This prevents these users from making any changes to the ‘restricted for editing’ accounts. See Managing User Roles.
For example: PAT_A is an account assigned a Licenses Manager role. The Licenses Manager has been defined in this Users Restricted for Editing table as ‘restricted for editing’. User USER_B has a User Manager role. Therefore, this user can update user accounts. But the User Manager role is marked as "Can't edit restricted users". This user therefore cannot update PAT_A’s account, but will be able to update other accounts that are not assigned the License Manager role.
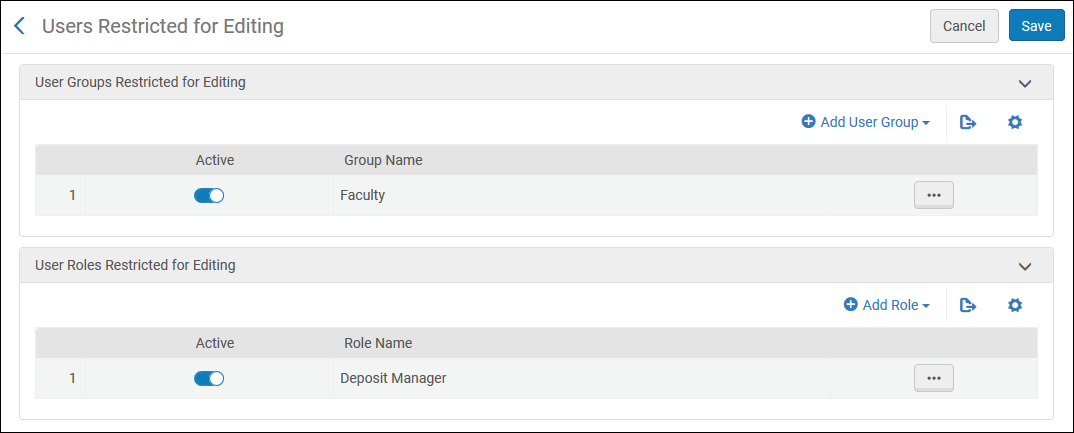
Select Add User Group or Add Role and select the user group or user role that you wish to restrict.