
Browsing the Shelf Listing
When using the browsing feature, Alma retains the settings for "Call Number Level", "Call Number Type", "Library", and "Location". The default value for Call Number Type, controlled by the customer parameter call_number_type, is applied initially for each user. Once a user opts for a call number type, the customer parameter value is no longer considered.
The Browse Shelf Listing option does not appear in Alma for users with the "Physical Inventory Operator" role unless they also have at least one Cataloger role.
Using the Browse Shelf Listing
- Select Browse Shelf Listing (Resources > Cataloging > Browse Shelf Listing); or from within the Metadata Editor, select Search & Browse > Browse Shelf Listing. The following options appear:
- Call Number Level
- Call Number Type
- Call Number
Additional details appear upon accessing the browse shelf listing from a MARC21 or KORMARC bibliographic record. The Call Number editing field is automatically filled with the information from $a and $b in fields 050, 055, 060, 070, 080, 082, 084, and with the information from $h and $i in field 852. In cases where multiple instances of the same subfield are present, the first occurrence is utilized unless the cursor is positioned on a different occurrence, in which case that one is utilized.
- Library
- Location
- Select one of the following filtering options from the Call Number Level drop-down list:
- Holdings call number – This provides holdings-level record links in the results list. This is the default option.
- Item call number – This provides item-level record links in the results list.
- Temporary call number – This provides item-level record links in the results list.
- All – This option provides blended results of all the call number options in the drop-down list. Both holdings-level and item-level record links appear in the results list.
- Select the call number type from the available options in the drop-down list. The call number type that you select determines how the call number information is sorted and appears (is normalized) in the shelf list. The list of options varies depending on what is configured for your system. Some possible options include:
The call number sorting is done on a normalized value. Normalization differs by call number type. In general, there is a default generic call number normalization, which removes leading and trailing spaces, packs spaces, converts everything to lowercase, and adds a left pad with zeros up to 12. This is done for cases that aren’t specifically defined to have their own normalization.
- No information provided - This applies to holdings where the first indicator of the 852 field is a space, blank, or enter with a # in the Metadata Editor. See Holdings with No Call Number Type for more information.
- Library of Congress classification
- Dewey Decimal classification
- National Library of Medicine classification
- Superintendent of Documents classification
- Shelving control number
- Title
- Shelved separately
- Source specified in subfield $2
If you have holdings records with 852$$2, the list will also contain the specific values that exist in your data, allowing you to filter by those values
- Other Schema
- Accession number
- Optionally, select a library from the Library drop-down list.
- After selecting a library, you may also make your shelf list browse more granular by selecting a location from within the library.
- Enter a full or partial left-aligned call number for the Call Number parameter.
- Select Go.
Working with the Browse Shelf Listing Results List
- The matching entry
- The rest of the entries after the matching entry
The call number type that you select determines how the call number information is sorted and appears (is normalized). The sorting options vary depending on what is configured for your system. Some possible options include:
- Source specified in subfield $2
If you have holdings records with 852$$2, the list will also contain the specific values that exist in your data, allowing you to filter by those values.
- Source specified in subfield $2 – UDC
This follows the standard identified in http://www.udcc.org/index.php/site/page?view=about_structure for the UDC (Universal Decimal Classification). - Source specified in subfield $2 – ZTOZ
This handles call numbers using the Tozzer call number standard where the 852 has a first indicator of 7 and $2 contains ZTOZ.
The data indexed for this standard is 852 $h and $i.
Contact Ex Libris to set the parameter for this call number standard. - Source specified in subfield $2 – ZHYL
This handles call numbers using the Harvard Yenching call number standard where the 852 has a first indicator of 7 and $2 contains ZHYL.
The data indexed for this standard is 852 $h and $i.
Contact Ex Libris to set the parameter for this call number standard. - Source specified in subfield $2 – ZHCL
This handles call numbers using the Widener call number standard where the 852 has a first indicator of 7 and $2 contains ZHCL.
The data indexed for this standard is 852 $h, $i, and $c (in the order that they appear in the record).
For Widener call numbers without a numeric suffix, they are treated as if they end in zeros.
Contact Ex Libris to set the parameter for this call number standard.
See Location Information and Temporary Location Information in the Updating Item-Level Information section for more information. - Source specified in subfield $2 – UDC
- Other Schema
- Harvard
This handles call numbers using the Harvard call number standard where the 852 has a first indicator of 8.
The data indexed for this standard is 852 $h and $i.
Contact Ex Libris to set the parameter for this call number standard. - U.S. Geological Survey Library Classification System (USGS)
This handles call numbers using the USGS call number standard where the 852 has a first indicator of 8. See https://pubs.usgs.gov/bul/b2010/b2010.pdf for more information.
Contact Ex Libris to set the parameter for this call number standard.
- Harvard
- Call Number
- Description
- Author - Author information is displayed in the browse results to help libraries that use this data for adding call number cutters.
- Library/Location - The format is determined by the configuration for Library/Location Display (Configuration > Resources > General > Library/Location Display).
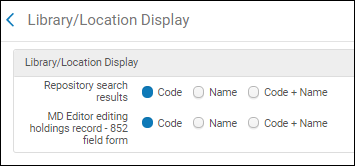 Library/Location Display Configuration
 - Level
All users have "View Only" privileges. Users with role permissions can edit Holdings and Item call numbers by clicking the link in the Level column of the browse results.
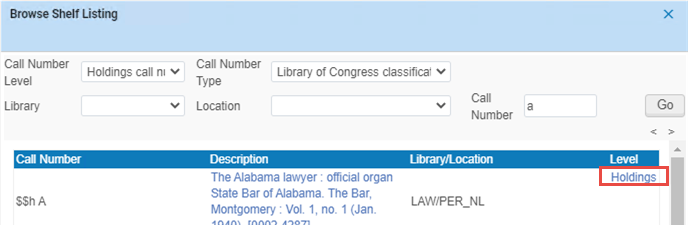
 Browse Shelf Listing Results
Holdings with No Call Number Type
In order for holdings records to appear in the Browse Shelf Listing when the No information provided call number type is selected, the first indicator of the 852 field needs to be a space, blank, or entered as a #. The following methods may be used to achieve the goal of a holdings record with a space in the first indicator of the 852:
- Setting the use_space_as_call_number_type customer parameter to true. See use_space_as_call_number_type for more information.
- Setting the default call number type at the institution or location level.
- At the institution level, set the call_number_type customer parameter to #. See call_number_type for more information.
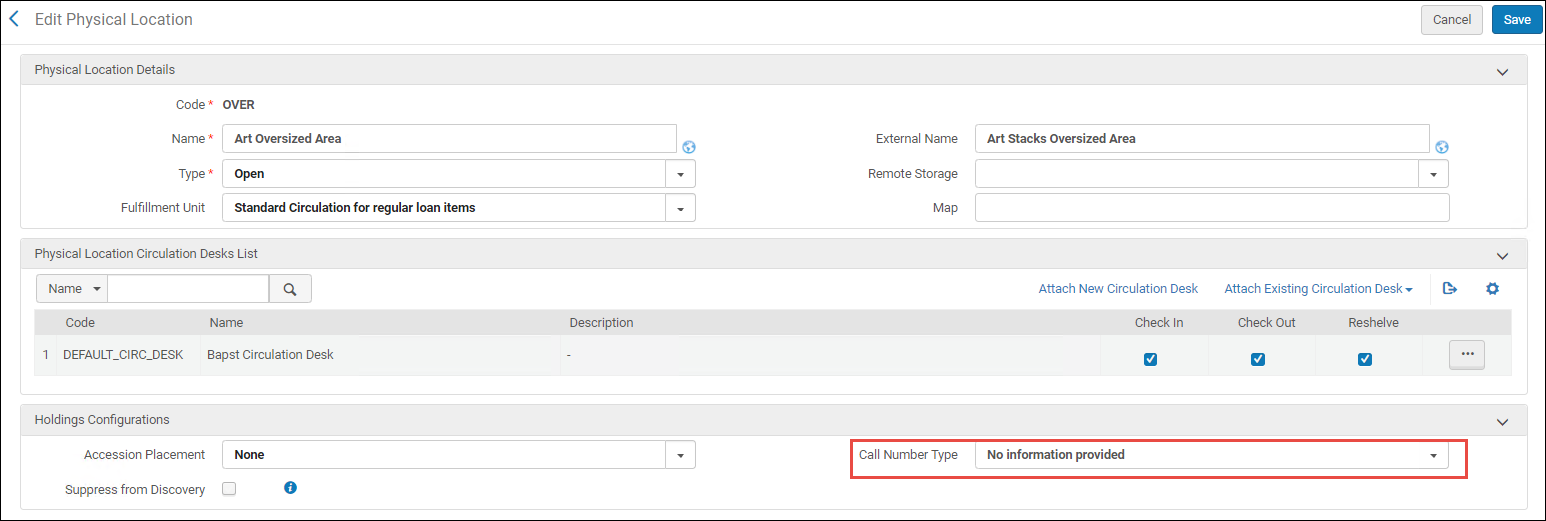
- At the location level, set the Call Number Type parameter to No information provided. In the Fulfillment configuration menu, set the Configuring location to the library (not institution) location that you want to configure and access Configuration > Fulfillment > Locations > Physical Locations. See Configuring Physical Locations for more information.
 Local Level Call Number Type Setting
- Configure call number mapping (Configuration > Resources > General > Call Number Mapping) with a # for the 852 1st Ind parameter to create the 852 field with a space in the first indicator. See Adding a Call Number Mapping for more information.

 Call Number Mapping for the 852 First Indicator
To browse the shelf listing for No information provided holdings, see Using the Browse Shelf Listing for more information.
Editing Holdings-Level Records
The Holdings or All link is only enabled for users with role permissions to edit (for instance, cataloger and so forth). All other users will have View Only privileges.
- Open the Browse Shelf Listing and complete the browse parameters to match your browse requirements. Specifically, you need to select Holdings call number or All for the Call Number Level parameter in order to get results with links to holdings records.
- In the Browse Shelf Listing results, select Holding for the holdings record that you want to edit (or view). The holdings record opens in split screen mode so that you are able to work with both the Browse Shelf Listing results and the holdings record (using the Metadata Editor tools).
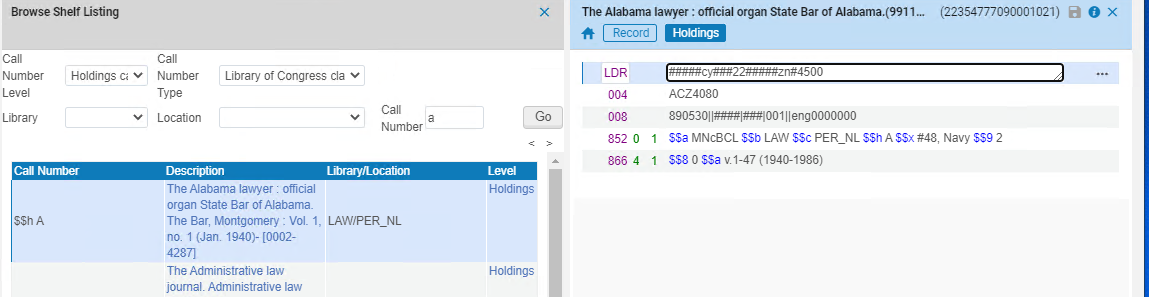 Browse Shelf Listing Results and the Holdings Record in Split Screen Mode
 - When you are done with the holdings record, save any changes and select Edit > Split Editor (with the focus on the Browse Shelf Listing Results).
- Continue your work with the Browse Shelf Listing results.
- When you are finished, select Exit.
Editing Item-Level Records
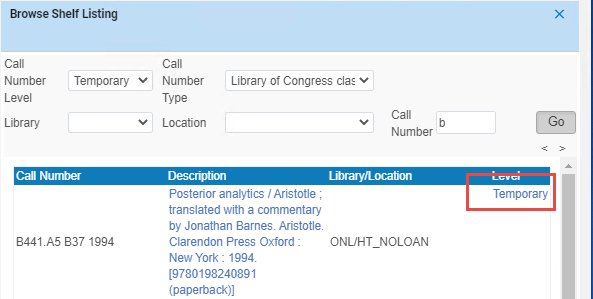
- Open the Browse Shelf Listing and complete the browse parameters to match your browse requirements. Specifically, you need to select Item call number, Temporary call number, or All for the Call Number Level parameter in order to get results with links to item records.
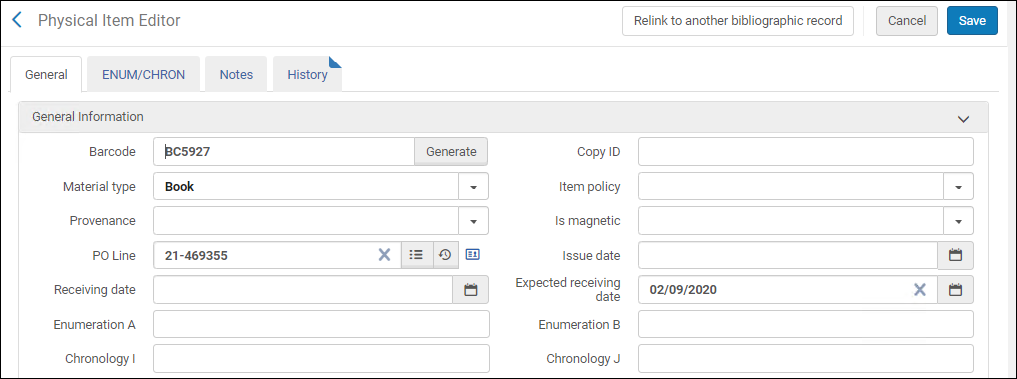
- In the Browse Shelf Listing results, select Temporary for the item record that you want to edit (or view). The item record opens in the Physical Item Editor.
 Item-Level Record Opened in the Physical Item Editor
 - When you are finished working the Physical Item Editor, select Save or Cancel. You return to the Browse Shelf Listing with your previous parameter settings selected.
- Select Go to re-display your Browse Shelf Listing results and continue your work in the Browse Shelf Listing.
- When you are finished, select Back or select another function in Alma.