
Linked Data Enrichment Configuration
Organizations can customize linked data enrichment for MARC records by selecting the authorities they wish to enrich and designate the appropriate subfield ($0/$1). Additionally, they can opt to incorporate Virtual International Authority File (VIAF) URIs and include supplementary authorities for enrichment, such as local authorities supporting URIs (Uniform Resource Identifiers). This empowers institutions to exercise enhanced control over the linked data enrichment process for MARC records.
To configure linked data enrichment, you must have one the following role:
- Resource Administrator
- Repository Administrator
- Catalog Administrator
- General System Administrator
The enrichment process is configured in an editable mapping table (Configuration > Resources > General > Linked Data Enrichment Configuration) for name and subject authorities that enable the following configurations:
- Enable/Disable VIAF for name authorities, as a second URI for authorities that are mapped in VIAF and displayed in the enrichment table.
- Selecting a subfield $0 or $1 for each URI.
It is highly recommended and considered best practice to use subfield $1 for VIAF.
- Selecting the enrichment type (on the fly or permanent).
- If the permanent URI enrichment is activated for an authority in the enrichment configuration, the URI is added permanently to the record in the selected subfield.
- Priority is given to URIs added manually in the Metadata Editor and/or with Alma Refine.
- Users can add rows for additional authorities (local or Community Zone) where they manually add the Alma source code and the VIAF source code.
Configuring Linked Data Enrichment for Name Authorities
The process for on-the-fly or permanent enrichment is configurable in addition to manual methods.
The behavior of ID-based linking currently supports having a single $0 in the MARC field. Permanent linked data enrichment is not compatible with this linking strategy. We understand the need to support multiple $0s in an ID-based linking strategy and will consider this for further enhancements. Currently, if you are interested in permanent URI enrichment using an ID-based linking strategy, we suggest configuring the linked data enrichment configuration to add the URI to $1.
- Access the Linked Data Enrichment Configuration page (Configuration > Resources > General > Linked Data Enrichment Configuration).
- Select Linked Data Enrichment - Names.
A list of Name authorities is displayed. - In the screen that displays the list of Name authorities in Alma, users can do the following:
The Vocabulary Source Code and Authority URI fields are not editable in the list. If you want to change these fields, you need to delete the existing row and add another manually.
Field Description Enabled Enable (  ) or Disable (
 ) the enrichment of the specified Name authority. The designated subfields for URIs and VIAF Links (if added) are accounted for when enabled and discarded when disabled.
Subfield for URI For the specified Name authority, select the designated subfield ($0 or $1) for the URI. Add VIAF Link Indicate (True or False) whether to "add/not add" VIAF Links to the specified Name authority. Adding a VIAF Link enables users to add a second URI for authorities that are mapped in VIAF.
Subfield for VIAF For the specified Name authority, select the designated subfield ($0 or $1) for the VIAF URI. It is highly recommended and considered best practice to use subfield $1 for VIAF.
Enrichment TypeAbility to select the level of enrichment of MARC records as part of the linked data configuration.The options to select from are:-
No Enrichment — This authority is not enriched.
-
On-the-Fly URI Enrichment — Temporarily adds a URI of the linked authority (General publishing or API).
-
Permanent URI Enrichment — The URI is added permanently to records.
If the permanent URI enrichment is activated for an authority in the enrichment configuration, the URI is permanently added to the record in the selected subfield ($$0 or $$ $1). URI displayed for Authority Record
-
Adding URIs for local authorities is supported as long as the authority is added to the configuration mapping table.
-
A local URI is generated for local extensions of Community Zone authorities.
-
Each URI is held in a separate subfield based on the configuration.
-
Adding the URIs is only for MARC21-based records and not for other metadata formats, including BIBFRAME.
Updated By Indicates the name of the users that last updated the Authority URI. Last Updated Indicates the most recent date the Authority URI was last updated.  Add RowEnables users to manually add an Authority that supports URIs to the list. In this manner, users can add support for additional authorities used in the bibliographic heading if they are not part of the existing list.To add a row in the list:
-
Select Add Row.If a user adds an additional URI for an existing vocabulary source code that is active, they receive an error message.
Conditions for Error Message:
If the source code is enabled in the mapping table, the error message is displayed.
If the source code is disabled in the mapping table, allow adding the new row. -
In the displayed dialog window, define the fields:
-
Vocabulary Source Code — Identifies databases and lists containing standard names of persons, organizations, families, meetings, and standard titles for resources and assigns a code to each database or list. For more information, see Name and Title Authority Source Codes.
-
Authority URI — The structure of the URI for the selected vocabulary, which is constant for all entities that are part of the vocabulary. This is usually the DNS hostname (the prefix). To define where to add the entity ID in the URI structure, add a "{0}" in the relevant place in the URI structure.
-
Subfield for URI — see Subfield for URI
-
Add VIAF Links — see Add VIAF Links
-
Subfield for VIAF — see Subfield for VIAF
-
-
Select Add Row.
-
In the Linked Data Enrichment - Names page, select Save.
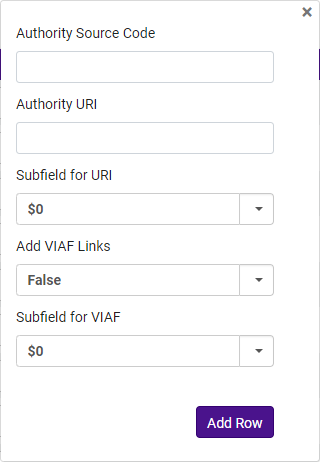 Add Row dialog window
 -
- Select Save.
Configuring Linked Data Enrichment for Subject Authorities
Catalogers can add URIs manually using Alma Refine, the Metadata Editor, or by adding them on-the-fly when publishing or using the API. The process for on-the-fly or permanent enrichment is also configurable.
- Access the Linked Data Enrichment Configuration page (Configuration > Resources > Linked Data Enrichment Configuration).
- Select Linked Data Enrichment - Subjects. A list of Subject authorities is displayed.
- In the screen that displays the list of Subject authorities in Alma, users can do the following:
The Authority Source Code and Authority URI fields are not editable in the list.
Field Description Enabled Enable ( ) or Disable () the enrichment of the specified Name authority. The designated subfields for URIs and VIAF Links (if added) will be accounted for when enabled and discarded when disabled.Subfield for URI For the specified Name authority, select the designated subfield ($0 or $1) for the URI. Updated By Indicates the name of the users that last updated the Authority URI. Last Updated Indicates the most recent date the Authority URI was last updated. Enrichment TypeAbility to select the level of enrichment of MARC records as part of the linked data configuration.Available options are:-
No Enrichment — This authority is not enriched.
-
On-the-Fly URI Enrichment — Temporarily adds a URI of the linked authority (General publishing or API).
-
Permanent URI Enrichment — The URI is added permanently to records.
If the permanent URI enrichment is activated for an authority in the enrichment configuration, the URI is added permanently to the record in the selected subfield ($$0 or $$1).URI displayed for Authority Record-
Adding URIs for local authorities is supported as long as the authority is added to the configuration mapping table.
-
A local URI is generated for local extensions of Community Zone authorities.
-
Each URI is held in a separate subfield based on the configuration.
-
Adding the URIs is only for MARC21-based records and not for other metadata formats, including BIBFRAME.
Add RowEnables users to manually add a URI to the list. In this manner, users select to enrich MARC records if there is already a URI in the $0/$1. To add a row in the list:- Select Add Row.
If a user adds an additional URI for an existing vocabulary source code that is active, they receive an error message.
Conditions for Error Message:
If the source code is enabled in the mapping table, the error message is displayed.
If the source code is disabled in the mapping table, allow adding the new row. - In the displayed dialog window, define the fields:
- Vocabulary Source Code - Identifies databases and lists containing standard names of persons, organizations, families, meetings, and standard titles for resources and assigns a code to each database or list. For more information, see Name and Title Authority Source Codes.
- Authority URI — The structure of the URI for the selected vocabulary that is constant for all entities that are part of the vocabulary. This is usually the DNS hostname (the prefix). To define where to add the entity ID in the URI structure, add a "{0}" in the relevant place in the URI structure.
- Subfield for URI — see Subfield for URI
- Select Add Row.
- In the Linked Data Enrichment - Names page, select Save.
Add Row dialog window -
- Select Save.
Configuring Linked Open Data for Local Authorities
Configuration is available only for institutions with MARC 21 record format activated in the active registry.
Alma introduces the ability to extract a global authority ID from authority headings to enhance linked data capabilities, URI enrichment, and integration with resources such as Wikidata and VIAF. Institutions must configure which global ID to extract from each local authority vocabulary and run the Extract Global Id From Local Authorities job to populate this field based on their settings. This job can be executed on a selected set or all local authority records and does not trigger additional processes such as publishing. It extracts the global identifier and inserts it without a prefix to ensure compatibility with external services. If the global ID vocabulary differs from the authority vocabulary, the configured global vocabulary defined in the configuration is used for matching; otherwise, the authority vocabulary code applies. The Global_Auth_ID field is populated during the creation or import of an authority record and is updated whenever relevant fields change. Records without a global ID have a null value in the authority heading, including Community Zone authority headings.
-
Global ID Extraction & Configuration
- The new job extracts global identifiers from local authority records to be used in linked data workflows.
- If the authority's global vocabulary differs from its local vocabulary, enrichment tools (VIAF, Wikidata) use the configured global vocabulary for matching.
- Linked Data Enrichment Configuration Workflow Updates
- If VIAF is activated for the URI enrichment of the local authority, the system uses the Global_Auth_ID to match to the VIAF ID.
- When enrichment is configured for records copied locally from the CZ, Alma generates a global URI instead of a local URI.
- If no Global_Auth_ID exists or the authority vocabulary is not in the linked data for local authorities enrichment configuration, a local URI is generated.
- Wikidata Workflow Updates
- If an authority heading is based on LC (Library of Congress) Names Authority, it is directly sent to Wikidata.
- If it is a local authority, the system looks for Global_Auth_ID and checks if the vocabulary is LCNAMES.
- If the Global_Auth_ID is not LCNAMES, the system searches VIAF to extract the corresponding LCNAMES before sending it to Wikidata.
- Recommended Best Practices & Linked Data Integration
- Institutions should only create local copies from the CZ when necessary to support linked data functionalities.
- When defining prefixes for global identifiers, institutions must ensure the complete expression is properly formatted.
- If multiple prefixes exist for a vocabulary, priority must be assigned, as only one global identifier per authority record can be extracted.
- After configuring the Global ID extraction (as described below), institutions must run the Extract Global Id From Local Authorities job to integrate data into Alma's workflows.
- If your institution maps a local authority code to VIAF, contact support to configure and upload the corresponding vocabulary.
- VIAF updates in Alma occur monthly, but as of August 2024, OCLC has paused updates until further notice. Ex Libris cannot make any updates within Alma until updates are resumed in VIAF. (https://viaf.org/viaf/data).
- Access the Linked Data Enrichment Configuration page (Configuration > Resources > General > Linked Data Enrichment Configuration).
- Select Linked Open Data for Local Authorities.
- The following screen may display a list of Local authorities in Alma. Users can do the following:
By default, the list displays vocabularies that are configured as managed locally in the metadata configuration.
Field Description Enabled If a list of local authorities is displayed, users can Enable ( ) or Disable () the enrichment of the specified Local authority. The designated subfields for URIs and VIAF Links (if added) are accounted for when enabled and discarded when disabled.
Alternatively, if there are numerous Local authorities listed, users can enable or disable All (Yes/No) the authorities in the list.
Search The search field enables users to quickly search local authorities according to their vocabulary. - To search for an entire list of local authorities according to their vocabulary, select the vocabulary in the drop down menu.
- To search for a specific local authority, type the authority to search for in the text field.
Add RowEnables users to manually add a Local Authority to the list. In this manner, users can add support for additional authorities used in the bibliographic heading if they are not part of the existing list. To add a row in the list:- Select Add Row.
- In the displayed dialog window, define the fields:
- Authority Vocabulary Code — configured drop down list of MARC21 Authority codes activated in Metadata configuration.
- Field with Global Identifier — Presents a drop down list with the options: 035 / 024 / 001 / 010 / 065.
- Subfield with Global Identifier — Text field that can allow the institution to define the subfield.
- Prefix — Text field to identify which identifier to extract when there are multiple similar fields. For more information, see Defining the Prefix for the Configuration.
- Priority — If there are multiple prefixes per vocabulary, a priority for which ID to extract. Insert only consecutive numbers where "1" is the topmost priority.
- Global Vocabulary Code — If the Global ID being extracted is not in the same vocabulary as the target code.
- Select Add Row.
- In the Linked Open Data for Local Authorities page, select Customize.
Defining the Prefix for the Configuration
The prefix extracted is dependent on the MARC field, per the standard's definition, as follows:
- For the 001/010 fields, as per the MARC 21 standard definition (https://www.loc.gov/marc/authority/ad010.html), do not add a prefix.
- For the 065/024 fields:
- If in the configuration the defined subfield is a, the prefix is extracted and compared from $2 or from $a.
- If in the configuration the defined subfield is any other subfield (for example, 0/1), the subfield itself should contain the prefix. (In the case of $0 or $1, the prefix is a URI.)
- For the 035 field, the prefix is extracted from the subfield itself.
Permanent Enrichment
Permanent enrichment is possible when selecting permanent enrichment from the enrichment type in the linked data configuration. The permanent enrichment adds the URIs to the record and runs as part of the linking job and the preferred term correction job. Therefore, if linking to authorities and the preferred term correction is not enabled in your environment, permanent enrichment is not possible.
If the preferred term correction is activated and the configuration is set to add the URI permanently, there are two options:
-
Manual Linking (F3):
- During the manual linking process in F3, a subfield based on the configuration is added to the record.
- The URI of the relevant authority is added, enabling users to view it as part of the record editing process, before saving the record.
-
Automatic Linking:
- If URI enrichment is permanently activated, the Linking and PTC jobs automatically add the URI during the existing nightly jobs.
- The URIs are added to the record if they do not already exist.
- Create a set of the relevant records.
- Run the Unlink bib records from authority records job.
- Wait for the Authorities - Link BIB Headings and Authorities - Preferred Term Correction scheduled jobs to complete.
- If the customer parameter for partial linking, lod_uri_enrichment_for_partial_match, is not activated (meaning partial linking is not desired by the institution), then the URI is not inserted when the match is partial. For more information, see Configuring Other Settings - Resource Management.
- When a user saves a record in the Metadata Editor, this only indicates that the records are to be linked. The actual linking and URI enrichment happen as part of the linking and preferred term correction nightly jobs.
Authority Control Task List: Relevant reports were added to monitor the linking and the addition of the URIs to the records. For more information, see Reporting in the Authority Control Task List.
Overwriting URIs
If the record already has a URI for the same authority and same subfield but with a different suffix (meaning, the same authority, but a different record ID), the following rules apply:
-
Overwrite Existing URI:
- If the record has an existing URI with the same prefix but a different authority record, it will be overwritten.
- This happens when a record is linked to one authority, unlinked, and then linked to another record from the same authority. The previous URI will be removed, and only the new one will be retained.
- The same rules apply for the VIAF URI if enabled.
-
Retain Non-Enrichment Subfields:
- If the record has a subfield that is not part of the enrichment (e.g., an ORCID subfield), this subfield will not be removed.
- For instance, if a record has both an ORCID URI and a Library of Congress authority URI, the ORCID URI will remain in the record.
-
Condition for Overriding:
- The existing URI is overridden only if it shares the same subfield and prefix as the selected configuration, but has a different suffix.
- If the existing URI does not meet these criteria, it will not be overridden, and a new URI will be added alongside the existing one.
Run Normalization Rules to Delete URIs
You can create a normalization rule to remove subfields. For instance, if you have added URIs that need to be removed, or if you want to remove other existing URIs from records, you can do this through normalization rules. For more information, see Working with Normalization Rules.
Import List
A common cataloging workflow involves exporting (see Export List) a list from Alma, working on the list (for instance, adding local authority source codes) and importing the list back to Alma. The exported list is in Excel format that users can edit. Once the list is updated, it can be imported back into Alma.
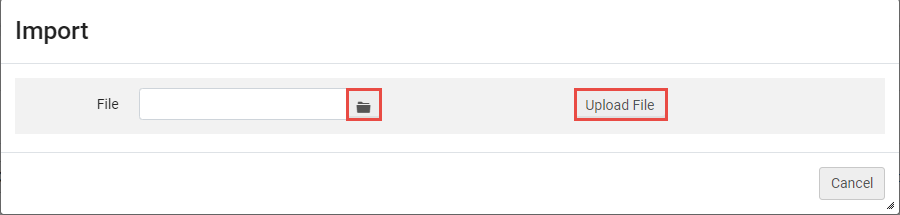
- Select Import.
The Import dialog window is displayed. - In the File field, select the file folder button (
 ).
). - In the explorer window, navigate to and select the Excel file you updated and want to import.
- Select Upload File. The file is imported into Alma, and the list is updated in the Names or Subjects Linked Data Enrichment pages.
Export List
Staff users can export the list of entries (Names or Subjects) to an Excel spreadsheet. The created Excel is then downloadable to a user-defined directory.
- Select the Export list icon (
 ).
). - Select Excel. The file is generated by Alma and a "Save As" explorer window is displayed requiring the user to select a directory to save the file.
- Select Save.

Manage Column Display
Users can decide which columns are displayed in the list.
- Select the Manage column display icon (
 ).
). - In the pop-up window, select (
 ) or deselect (
 ) the desired columns to display.
 - Select Done.
If changes were made (a column was removed or included), the Manage display icon is altered to include a green dot (
 ) to indicate the change. The removed column is displayed at the bottom of the list if users wish to re-include it.
