
Creating and Editing BIBFRAME Records and Templates
In Alma, a BIBFRAME record can represent either a Work or an Instance. Each type of record has its own purpose and required information. Below are general tips and guidance to help you create each type successfully.
To create, manage templates, edit record action (for works and instances), delete work, delete instance, you must have one of the following roles:
- Cataloger
- Catalog Administrator
For more explanations on the BIBFRAME model, see Overview of the BIBFRAME Model.
Creating a New Record
- Select Resources > Cataloging > Catalog BIBFRAME Records.
- Select Create New Record.
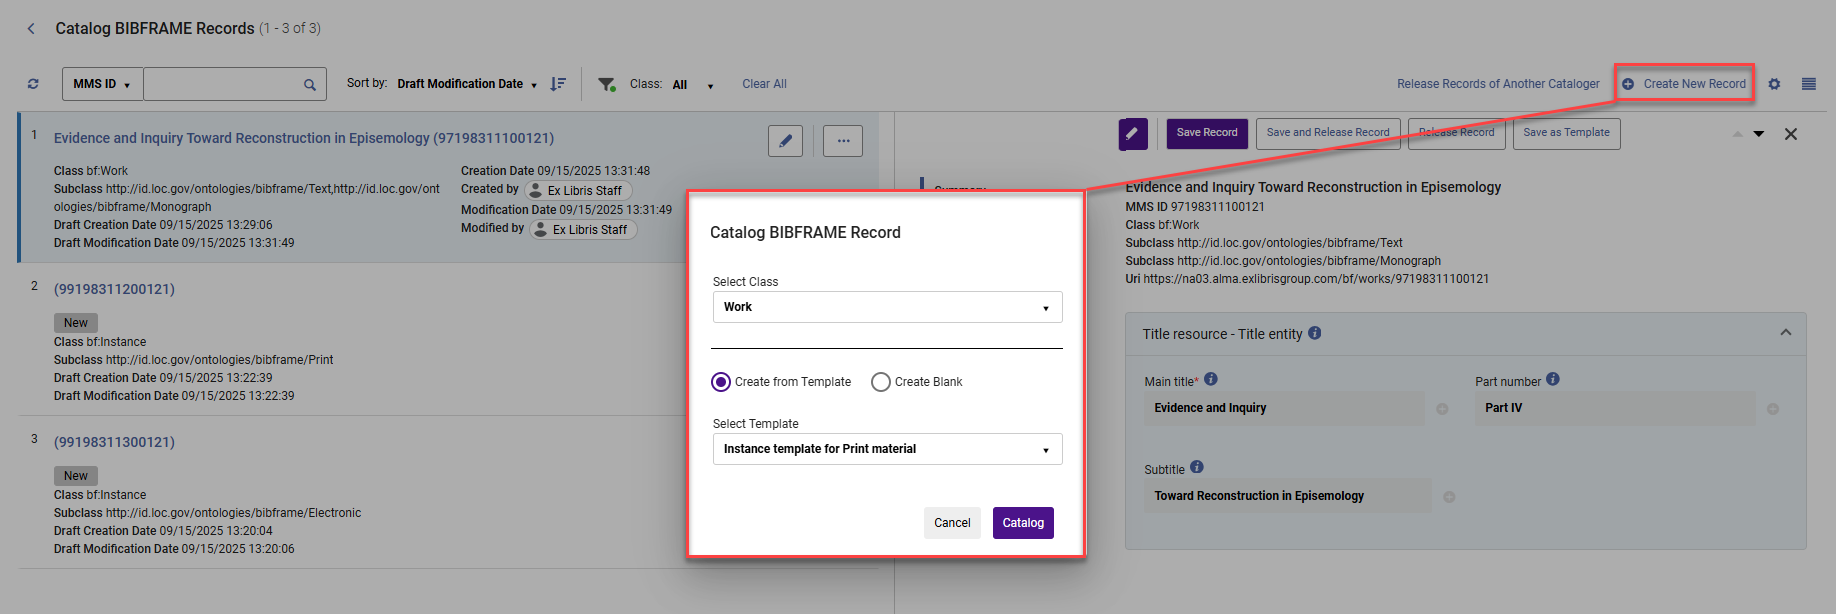
- Select Class Work or Instance.
- Select whether you want to catalog a record from a Template or a Blank form.
- Selecting Create from Template generates a list of templates relevant to the selected class (the subclass is already set in the template structure). Selecting Catalog (which becomes active after choosing a template) opens the cataloging template form.
- Selecting Create Blank generates a list of subclasses to select. Selecting Catalog (which becomes active after choosing a subclass) opens the cataloging form.
Creating a Work
A Work represents the conceptual essence of a resource: what the resource is about, rather than its physical form.
To create a new Work, Select a subclass to define the type of Work (e.g., Monograph, Serial). If you create a new Work from a template, there is no need to select a subclass, as it is already set in the template structure. You can then add and edit fields or sections as needed.
The Title section is mandatory. It uses the property bf:title and the class bf:Title, and includes the field bf:mainTitle. This section is automatically included in all Alma default templates and is automatically added when creating a new Work record or template from scratch.
You can add more fields to the title section or include additional sections or fields as needed to describe your resource.
- Include key information such as:
- Title
- Subject
- Place
- Genre
- Language
- Classification
- Contributors (this is divided into two sections: Primary Contribution and Contribution. Both use the property bf:contribution, but they are associated with different classes: bf:PrimaryContribution and bf:Contribution).
If you delete the Title section and do not replace it, you cannot save the Work record.
Creating an Instance
An Instance describes a specific physical or digital manifestation of a Work, such as a printed book, an eBook, or a microform.
When creating an Instance record, Select a subclass to define the type of Instance (e.g., Printed, Electronic, Microform, Secondary Instance). If you create a new Work from a template, you do not need to select a subclass, as it is already set in the template structure. You can then add and edit fields or sections as needed.
The Title section (with the property bf:title and the class bf:Title, and includes the field bf:mainTitle) and the Instance Of field (links the Instance to an existing Work in Alma) are two mandatory elements for each instance. These required elements are included in all Alma templates and are automatically added when creating a new Instance record or template from scratch. If you remove either the Title section or the Instance Of field, you cannot save the Instance record.
You can customize the record by adding more fields or sections.
- Include additional key information such as:
- Publisher details (place and date of publication)
- Physical description (for printed formats)
- Identifiers
- Media type
- Edition statement
Editing a BIBFRAME Record
Once you have created and saved a BIBFRAME Work or Instance, you have two options for continuing your work:
- Continue editing directly in the LOD editor (Linked Open Data editor).
- Access the record later through persistent searches:
- Works appear in the Works Search.
- Instances appear in the All Titles search.
Each BIBFRAME entity has an Edit Record action. Selecting Edit Record opens the record in the form editor. From here, you can make changes and select Save Record to instantly update the record.
If you make changes and want to continue later, select Save Draft. The working copy of the record is saved as a draft within the LOD editor and can be accessed from the resource menu later.
The draft becomes a record that can fully function when selecting Save Record.
For more information, see Record Management in the Alma LOD Editor.
The documentation on searching and indexing for BIBFRAME records is available as part of the indexing documentation. To streamline the process, the indexed information is extracted from BIBFRAME based on on-the-fly conversion to MARC21. For more information, see BIBFRAME Search Indexes and Work Search.
While editing a record, whether within the editor or within the persistent search, you Save as Template and save the record's structure as a new template, with or without the values of the specific record.
This editing functionality also supports records imported into Alma. The LOD editor can be used to edit any element defined in the BIBFRAME or BFLC ontologies.
In the All Titles search, the Edit Record action is shared across all metadata formats. However, when editing a BIBFRAME Instance, this action opens the LOD editor instead of the Metadata Editor (MDE).
Changes made in Alma to an imported record are stored and visible within Alma only. The original URI for the entity (typically created in an external editor) still resolves to the original version of the data. Alma maintains a link to the Alma version using an OWL:sameAs attribute, so if the Alma URI is used, it resolves to the updated version stored in Alma.
Creating a Template
Alma’s LOD editor templates are designed to streamline the cataloging process by providing reusable structures for common types of records.
You can create templates in the following main ways, depending on your workflow:
- Creating a template from a record in the LOD editor (Resources > Cataloging > Catalog BIBFRAME Records)
- Creating a template from the Templates Management page (Resources > Cataloging > Manage BIBFRAME Templates)
Creating a Template from a Record
While creating or editing a record, you can save a record as a template with or without record content. This is a quick way to turn a well-structured record into a reusable starting point for future cataloging.
- From the record, select Save as Template. The Save Template window appears.
Save as Template Options Field Default Value Description Save Template with Record Content Unchecked If Save Template with Record Content is selected, the template also contains the input content values. ActiveChecked-
Only active templates are listed when creating a new record from a template.
-
In the management list, all templates include an Active/Inactive indication.
-
Templates can be manually changed as a one-off action by changing the toggle position or by using the bulk action.
-
Inactive templates can be duplicated, deleted, and edited as active templates
-
If the template is Public, the creator or the Catalog administrator can set it to inactivate/activate.
-
If the template is Private, only the creator can set it to inactivate/activate.
-
Out-of-the-box templates can only be set it to inactivate/activate by the Catalog administrator.
PrivateChecked-
Templates marked as private can be viewed, managed, and deleted by the owning user and the Catalog Administrator with privileges for Cataloging.
-
Out-of-the-box templates are hard-coded as public, and cannot be edited.
 Save Template
 -
- Select Save to save the new template with the class, subclasses and field taken from the edited record.
The template can be managed and edited in the Template Management Page (Resources > Cataloging > Manage BIBFRAME Templates).
Creating a Template from the Templates Management Page
To manage and create templates, select Resources > Cataloging > Manage BIBFRAME Templates. You can then:
- View default templates provided by Alma (see Alma Default Templates).
- Create your own templates by selecting Add New Template.
- Edit an existing template.
- Duplicate an existing template.
- Delete an existing template.
Each template is automatically assigned a default name, which you can edit. You can also add a description to clarify the template’s purpose for other users.
The workflow for creating a template from the Manage BIBFRAME templates page is the same as for creating a record. You need to select a class and subclass for the template, and then you can add sections and fields as needed.
Once a template is created, the class and subclass cannot be changed. If you need a different class or subclass, create a new template instead.
If you select a template from the record creation workflow and later select Save as Template again after making changes, Alma creates a new template, and does not overwrite the existing one.
Alma Default Templates
Alma provides built-in templates for Work and Instance records (including Monograph and Serial) as part of the editor.
The default templates are:
- Read-only – they cannot be edited.
- Available for use when creating new records.
- Duplicable – you can copy them to create your own customized templates.
- Marked with an Alma label to identify that they are default templates.
Below is a list of the Alma default templates:
- Alma - Work: Monograph: Text
- Alma - Work: Serial: Text
- Alma - Instance: Print (Monograph)
- Alma - Instance: Print (Serial)
- Alma - Instance: Electronic (Monograph)
- Alma - Instance: Electronic (Serial)
Bulk Actions for Templates
Templates can be activated/inactivated/deleted in bulk.
- Select the relevant templates. The bulk actions are enabled.
- Select whether to Delete Selected/Activate Selected/Deactivate Selected templates. The bulk action is applied.
- Delete Selected — this prompts a confirmation message and deletes the selected template. The current delete privileges are checked (as if a one-off template is deleted).
If an out-of-the-box template is marked for deletion, it is not deleted, and the message report, for example: Action completed on 1 of the 2 selected items.
- Activate Selected — this changes the status of inactive templates to active. Active templates remain active.
- Deactivate Selected — this changes the status of active templates to inactive. Inactive templates remain inactive.
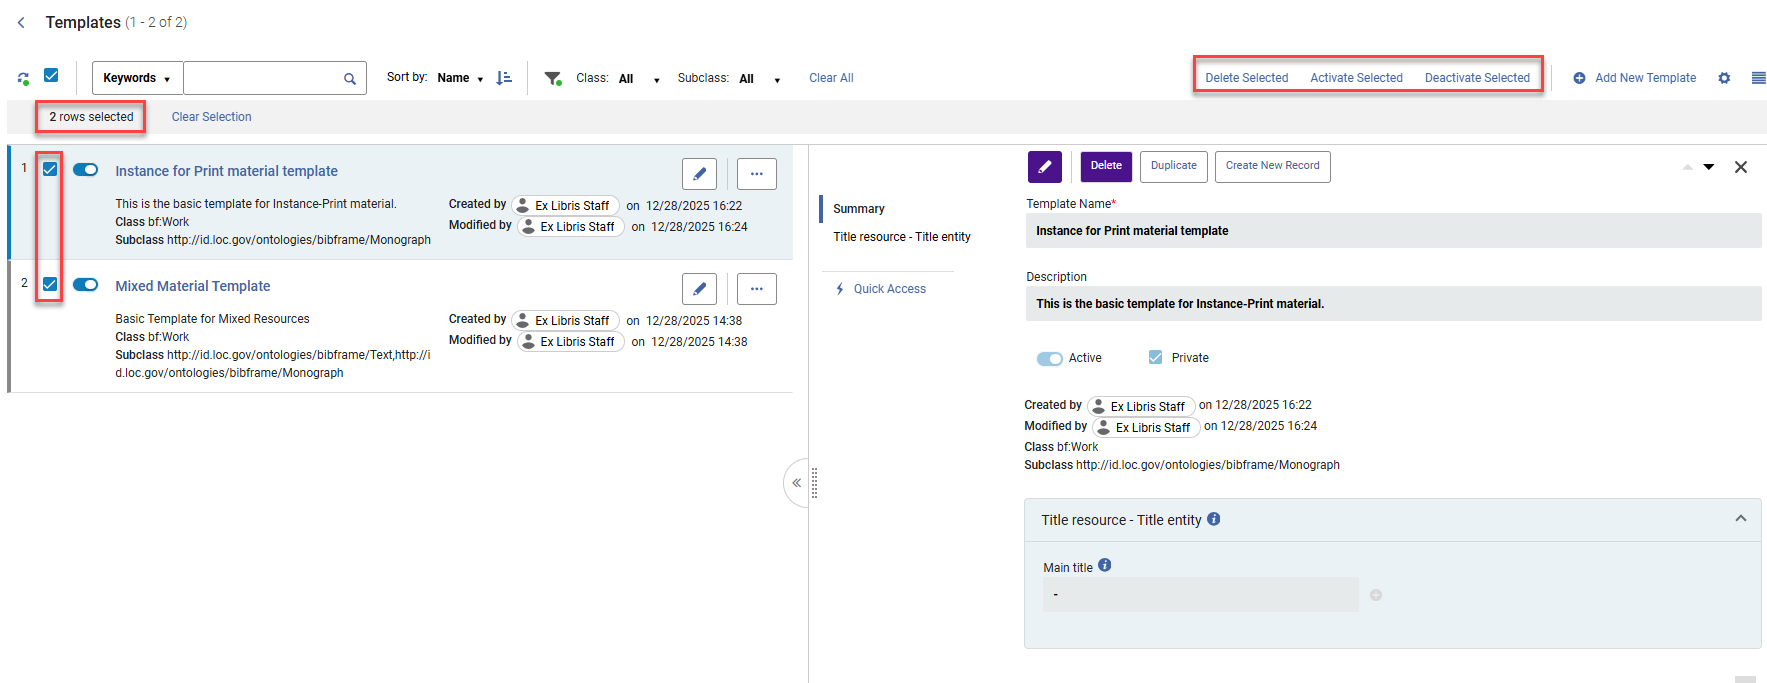
- Delete Selected — this prompts a confirmation message and deletes the selected template. The current delete privileges are checked (as if a one-off template is deleted).
Template Field Facets: Active/Inactive and Public/Private
The template fields are available as facets under:
Status:
- All
- Active
- Inactive
Scope:
- All (does not include private templates for other staff members except for the Catalog Administrator, who can see all templates)
- My Templates
- Public Templates
Templates and Record Independence
A template is not linked to any specific record. Instead, it serves as a starting structure for creating new records. Once a record is created and saved, it becomes independent of the template it was based on.
When you later edit that record, the form display is generated based on the structure of the record itself, not the original template. This ensures that any changes made to the template do not affect existing records, preserving their integrity and preventing unintended issues.
Record Management in the Alma LOD Editor
The LOD editor (Linked Open Data editor) lists all working copies of records (Works and Instances) that are being processed for each specific user. This includes:
- Records recently created and not yet released by the cataloger
- Records are being edited within the persistent searches and have not yet been released
- Draft records — records in the editing process for which the Save Draft action is activated
Record Lock
When a BIBFRAME record is being edited, it is locked to other catalogers. This prevents other users from modifying the same record and perhaps overriding changes. In addition, a locked record cannot be overlaid by an import or updated by an update job.
Other users who attempt to edit the record see a locked by indication.
When exiting the LOD editor without selecting Release Record or Save and Release Record, the record remains locked and is listed in the left pane.
To control how long other users are locked out from using the record, set the working_copy_lock_timeout setting (see working copy lock timeout for more information). The default value is one hour.
The records edited in the LOD editor continue to appear in the left pane until you release them or until the working_copy_lock_timeout setting expires for a record and a different user subsequently edits it. When you are finished working on a record, ensure that you release it by selecting Save and Release Record.
LOD Editor – Actions
| Action | Description |
|---|---|
| Edit Record | Edit the record, create a working copy, and check out the record to the user until it is released. |
| Save Record | Saves the changes made to the record in the repository, but does not release the record. To release the record, use the Release Record option. |
| Save and Release Record | Save the record and release it. When you release a record, it is unlocked and no longer available in the left pane of the LOD Editor. |
| Release Record | Release the record without saving changes. When you release a record, it is unlocked and no longer available in the left pane of the LOD Editor. |
|
Save Draft
|
Save the record as a draft without validation routines. Your changes are saved, but they are not updated in the repository at this time. The record remains checked out to you and is available for you in the left pane of the LOD Editor, and is not available to other catalogers for editing.
Draft records are deleted if they have not been modified for thirty days.
|
| Save as Template | Saves the record's structure as a new template, with or without the values of the specific record. |
| Save Template with Record Content | Enables users to create a record using the template. |
| Release Records of Another Cataloger | Only users with the Catalog Administrator role can use this action. It enables them to release and unlock all records belonging to another cataloger, regardless of whether those records are locked in the LOD editor or MDE. |