Modifying Lists and Items
For more information, watch Modifying Lists and Items.
Modifying List Details
Once a list is created, you have the flexibility to modify a list as necessary. For information about creating lists, see Creating a List.
Editing a List
After creating a list, you can:
- Change list title
- Marking a List as a Sample List
- Change the list status (Library staff only)
- Add a syllabus using a URL or upload a file — Instructors have this option when configured by the institution.
- Add tags
- Add list dates — Note: Setting the list date does not impact the list visibility.
- Set a Creative Commons license — Note: This declaration applies only to the list, not to the item materials on the list.
- Select Edit list from the list actions.
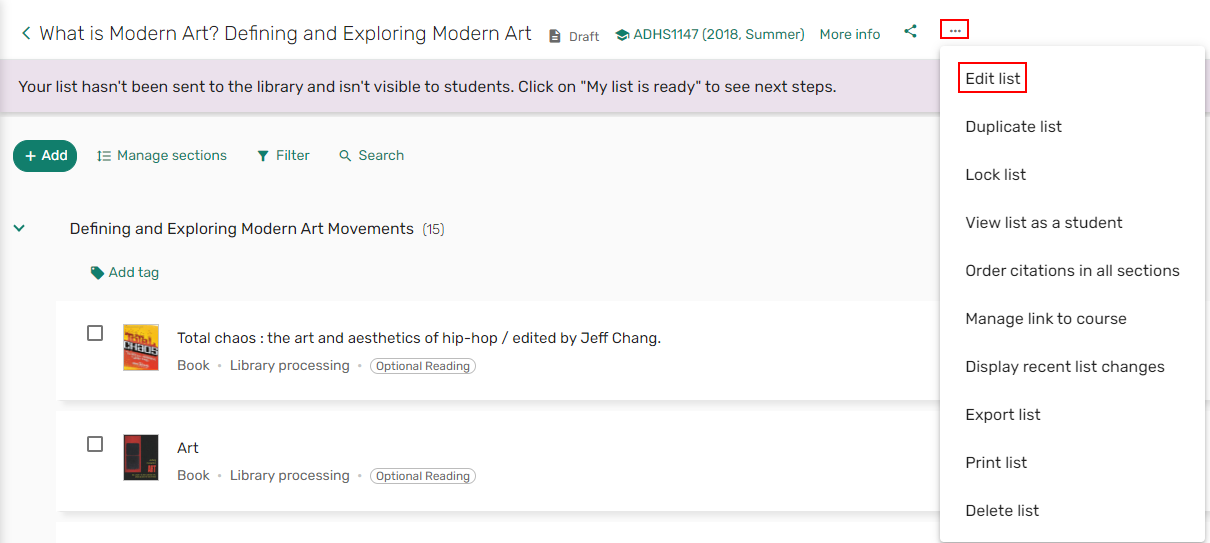 Edit list action
 - Make your changes and select Save.
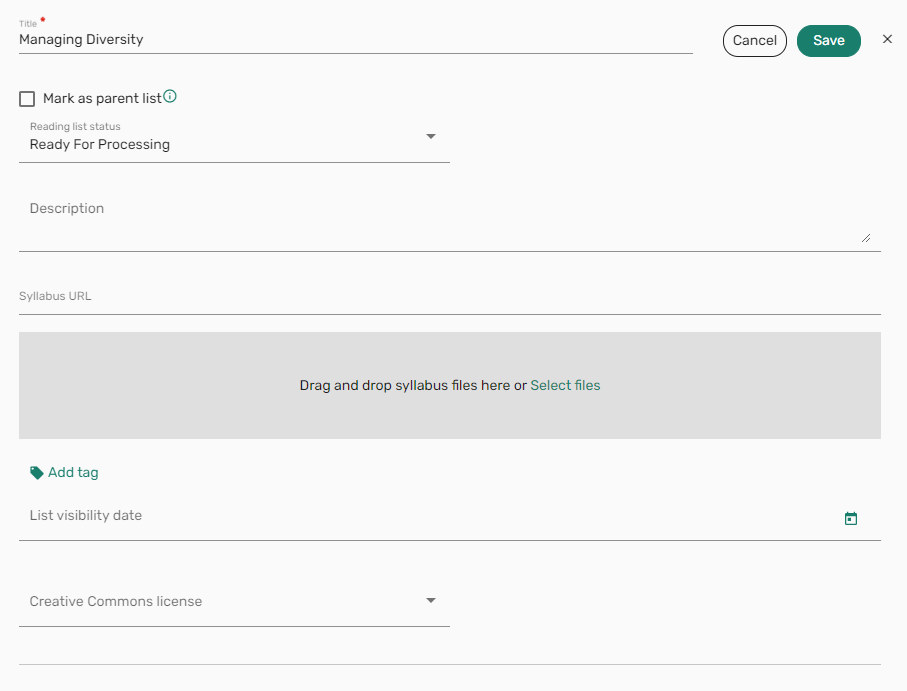 Edit list form
Managing a List's Collaborators
A user must be a list owner or collaborator in order to edit a list.
- Select List info. The current collaborators are displayed.
 More info
 - Select Manage collaborators to manage the collaborators for the list.
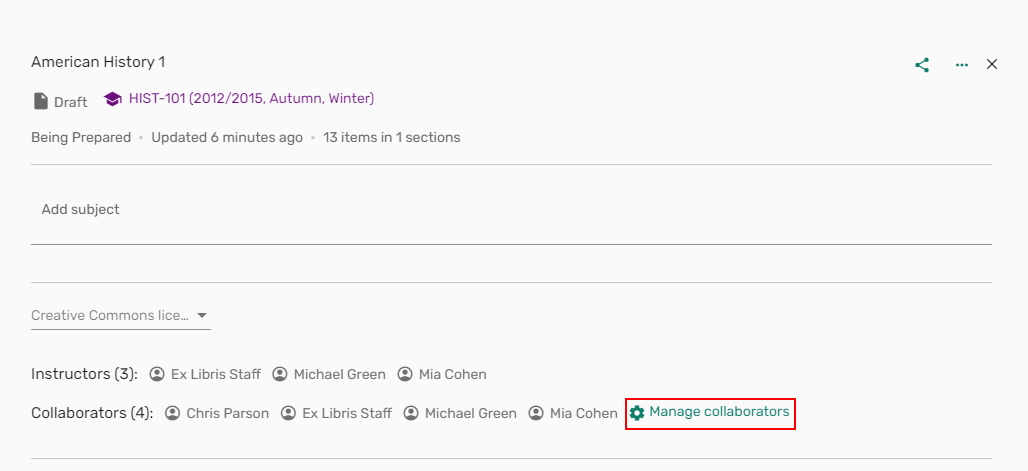 Manage collaborators option
 - Select Add collaborators.
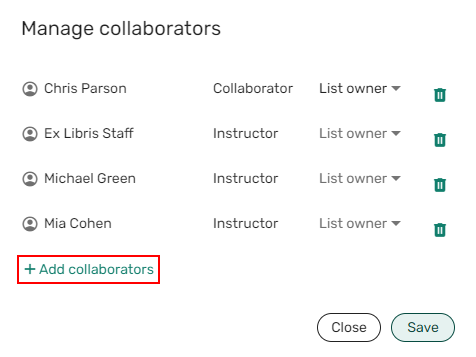 Add collaborators
 - In the Search for collaborators field, enter all or part of a name, and select the name from the drop-down list.
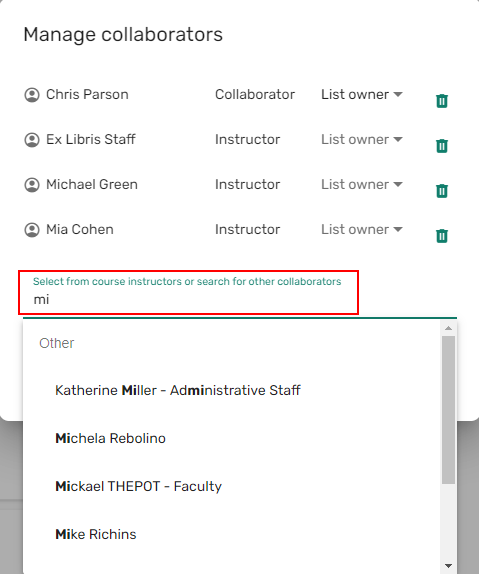 Search for collaborators
 - You can toggle permissions for each user between List owner and Can edit list.
- Select Save. Leganto sends the collaborators an invitation email.
- If a user is already a collaborator, select Can edit list > List owner to change the user to an owner.
- To change an owner to a list editor, select List owner > Can edit list.
- To remove a collaborator from the list, select the trash icon
 beside the user's name.
- A list owner can add or remove other collaborators.
- A collaborator with permission to edit a list cannot add other users as owners or collaborators and cannot delete the list.
- The list creator is the list’s first owner. The list creator does not have more privileges than any other owner of the list.
- When configured, course instructors are automatically added as collaborators for a course's lists and can only be removed by library staff removing them from the course record in Alma.
Each list must have at least one List owner.
Any user with one of the following roles can be added as an owner or collaborator:
- Instructor
- Fulfillment Services Operator
- Fulfillment Administrator
- Fulfillment Services Manager
- Course Reserves Operator
- Course Reserves Manager
- Leganto Course Operator
Marking a List as a Sample List
Sample lists can be used as templates for other lists and/or courses. List owners, Leganto course operators, and librarians can assemble lists of resources (such as for a specific course or a specific topic) and indicate that the list is a sample list. Other instructors can easily discover sample lists and can copy the full list, specific sections, or individual items to their own lists.
When configured, the Edit list form in Leganto includes a checkbox to Mark as sample list.

The list is marked with a Sample indicator.

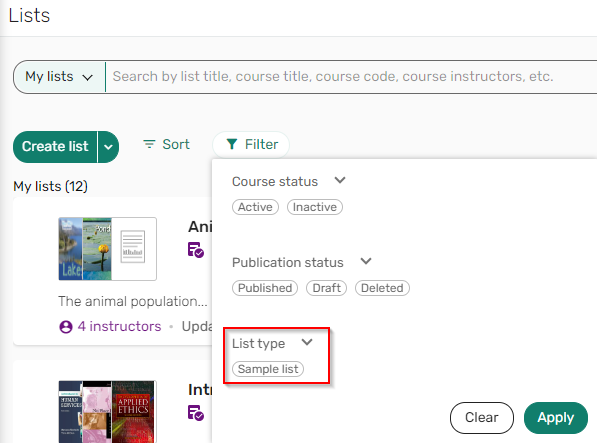
When enabled by your institution, lists can be filtered by Sample list using the List > Filter > List type. As with other types of lists, instructors can only discover and access sample lists that have been published to All Students or Anyone.
If you duplicate a sample list, the Sample tag is removed from the new list and the Mark as sample list checkbox is cleared.
Newer List Indication
When configured by your institution, a banner message appears notifying you that a newer version of a list is available.
The banner is only displayed for lists associated with a course.
A newer version is created when the list is duplicated or when the library rolls over the reading lists at the start of a new term. You can select the message to navigate to the newer list or dismiss the message by selecting the X.

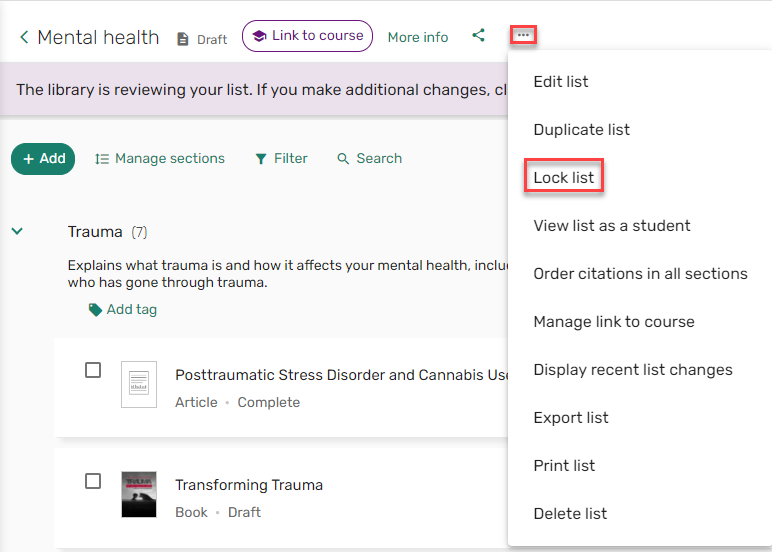
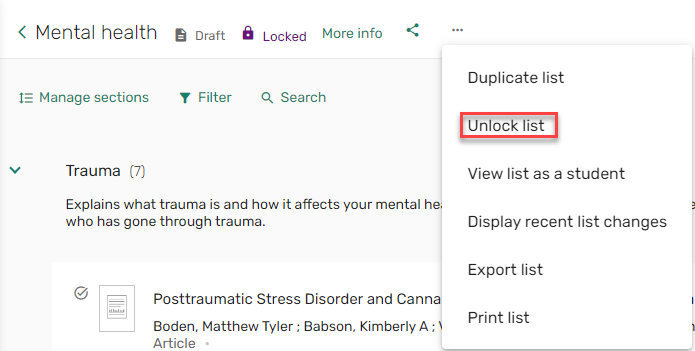
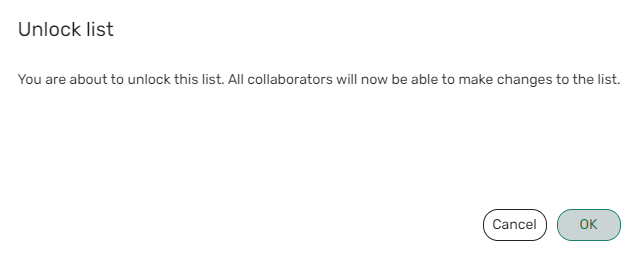
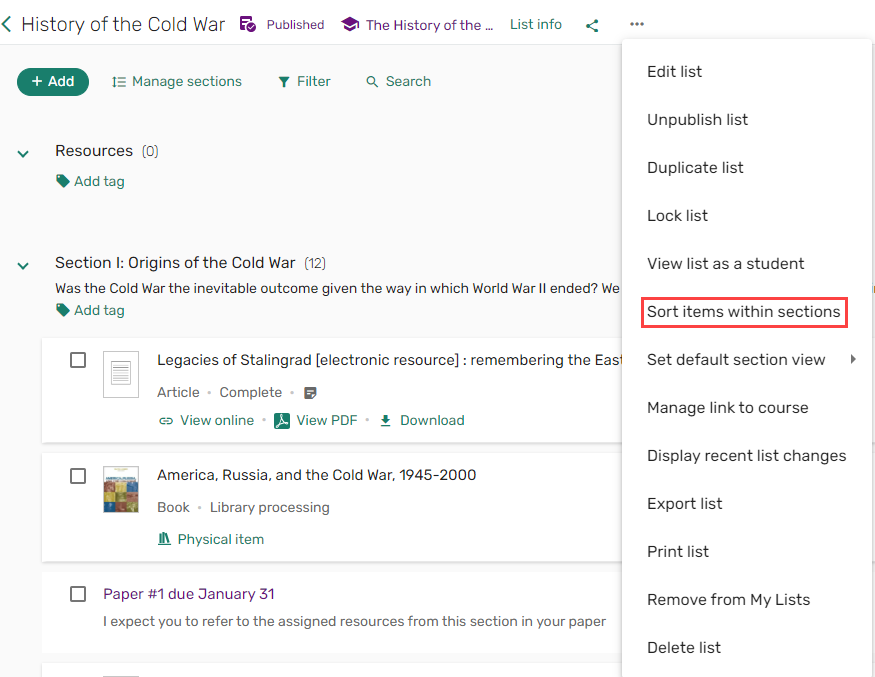
Locking and Unlocking a List
You can lock a list that you own. Additionally, list collaborators can also lock lists. No changes can be made in a locked list and the list appears without any editing options. Only a librarian or the user who locked the list can unlock the list. A locked list can be duplicated.
From the list menu, select Lock list.

From the list menu, select unlock list.
Managing a List's Subjects
The list of subjects is maintained by your library. Subject tags, as well as the plus sign  to add subjects appear on the More info screen.
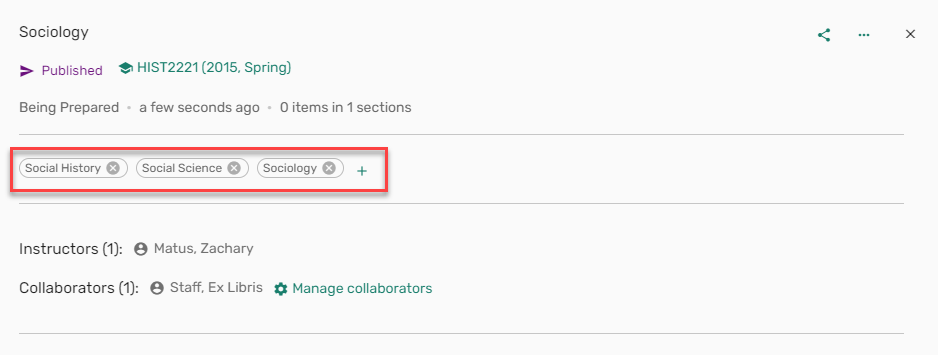
To remove a subject, select the X on the subject tag.

Associating a List with One or More Courses
Associating a reading list with a course is recommended for enabling several list features.
- Students can find the list when accessing Leganto using an LMS link to the associated course or by searching for the course.
- Lists that are associated with a course inherit the start and end dates of the course, as well as the number of participants.
- When is enabled by your institution, a list can be associated with multiple courses. When a list is associated with multiple courses, the list uses (by default) the earliest start date and the latest end date and is set to a number of participants equal to the total number of participants for all associated courses.
- When enabled by your institution, you can initiate digitization and/or copyright clearance requests for the items on the list.
- When configured by your institution, instructors associated with a course are automatically made owners of all lists associated with the course.
- You cannot change the course association of a list if any of the items in the list have approved copyright requests.
- If the course is associated with a campus, the campus appears in the list information area and when searching for items in the library.
- From the list menu, select Link to course
 Link to course
OR
From the list actions menu, select Manage link to course.
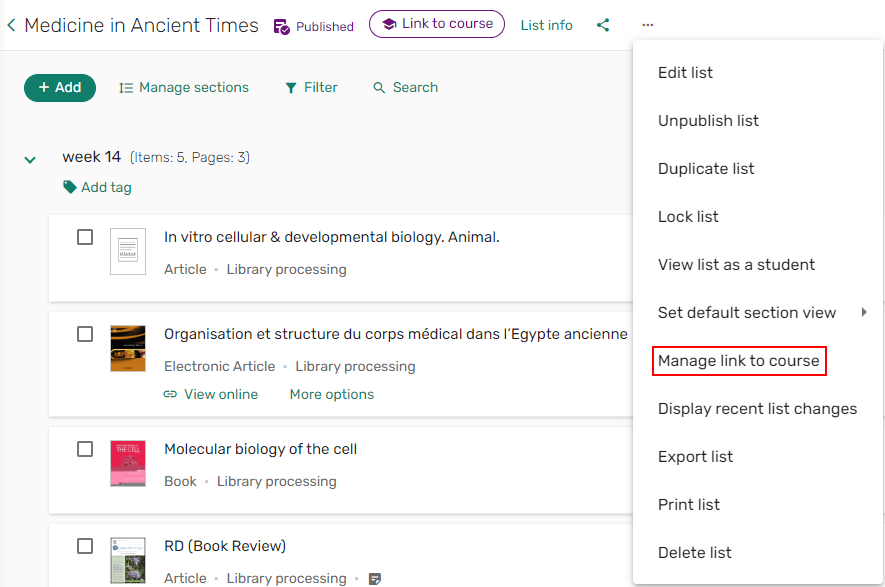 Manage course association
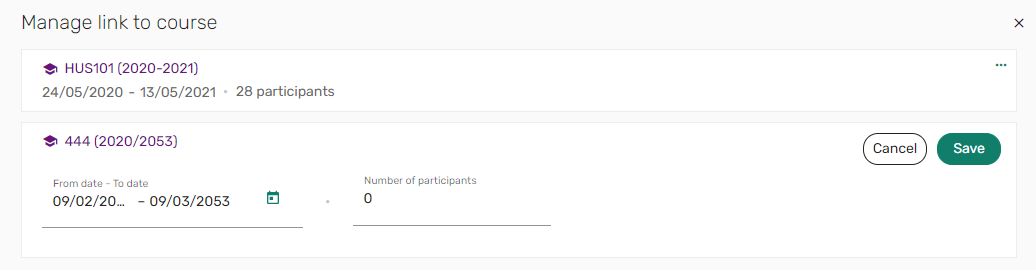
 - In the link Link to course field, begin typing a Course code or Course name, and select a course to associate with the list.
- If you are a librarian, additional information about the course appears. When configured, instructors can change the Number of participants, and the start and end dates.
Changing the dates of a course sets the default dates for lists created for this course; it does not change the dates of any existing lists.
- Select Save to apply your changes.
 Manage link to course
The course is associated.
 Associated course
- From the list menu, select Link to course
Link to course
OR if a course is already associated,
From the list actions menu, select Manage link to course.
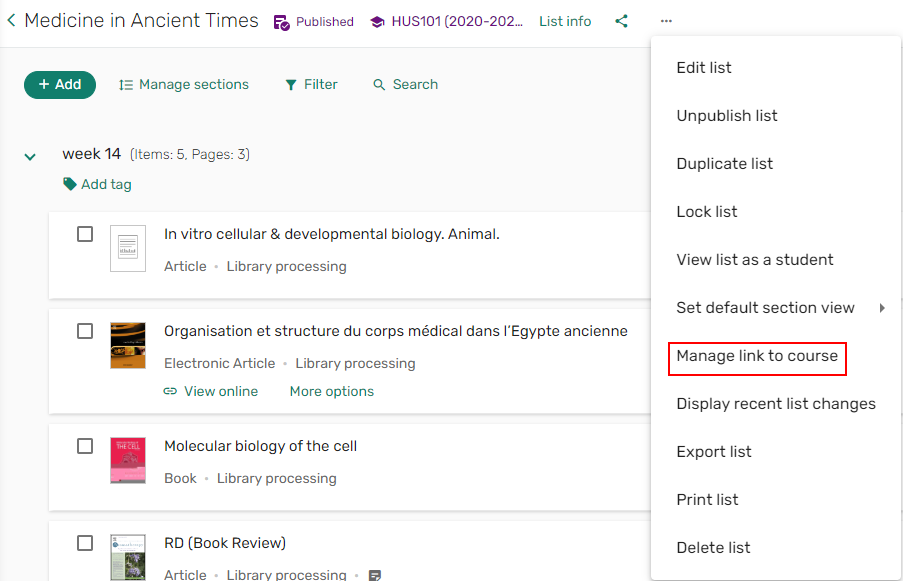 Manage course association
 - In the Manage link to course pane, select Add another course.
- In the Link to course field, begin typing a Course code or Course name, and select a to associate with the list.
- If you are a librarian, additional information about the course appears. When configured, you can change the Number of participants, and the start and end dates. Changing the dates of a course sets the default dates for lists created for this course; it does not change the dates of any existing lists.
- Select Save to apply your changes.
 Manage link to course
The courses are associated.
 Multiple associated course
- From the list actions menu, select Manage link to course.
- In the Manage link to course pane, select the ellipse ... on the course you want to remove.
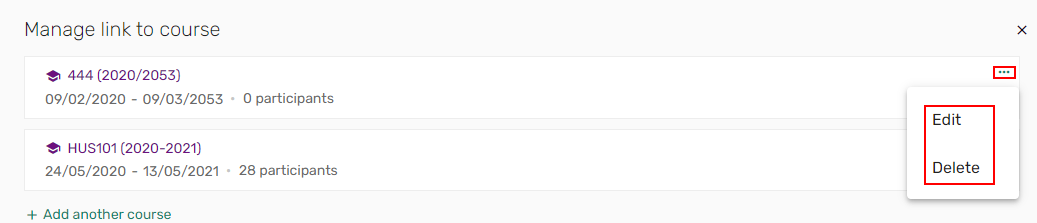 Edit/Delete associated course
 - Select Edit to edit the course dates or Number of participants and select Save, or select Delete to remove the associated course. The course information is modified/removed.
Viewing and Adding Suggestions for a List
After suggestions are added to a list, users can view those suggestions and decide if they want to add those items to the list or remove them from the Suggestions list.
- From the right pane, select the Suggestions
 icon.
icon.
 Suggestions icon
 - Use the Drag icon
 to drag the item to a section in the list
OR
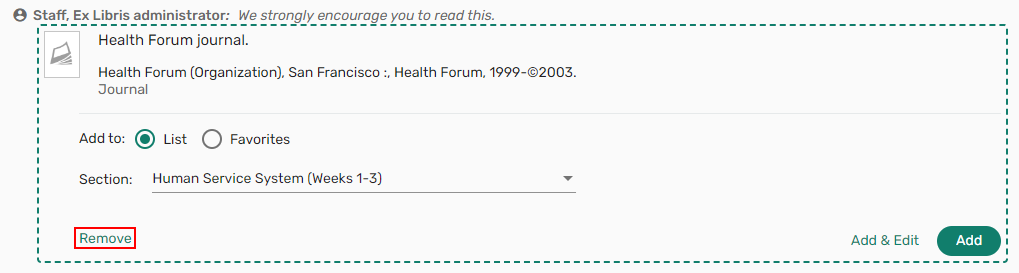
Select the Add to list icon
 . The add item options pane expands.
 - Select Add to: List.
- Select the Section to which you want the item added.
- Select Add to add the item
OR
Select Add & Edit to add the item to the section and open the Edit item pane.
 Add suggestion
- From the right pane, select the Suggestions icon.
Suggestions icon
-
Select the Add to list icon
. The add item options pane expands. -
Select Remove to remove the item from the Suggestions list.
 Remove suggestion
 -
A confirmation message is displayed confirming that you want to remove the suggestion from the Suggestions list.
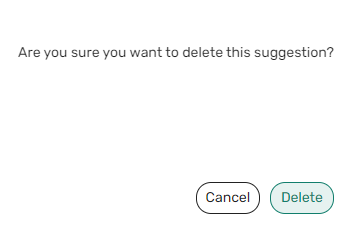 Delete suggestion confirmation message
Offering a Citation Replacement for an Existing Citation
Leganto supports replacing citations in bulk. For example, this feature can be used to replace citations with newer editions or to replace physical citations with electronic citations. The library can configure whether citations are replaced immediately, or whether the replacement appears to instructors as a suggestion.
Citations with a Copyright Status of Approved cannot be replaced.
After being confirmed by your library, suggestions are added to each of the items in Leganto. Additionally, a system tag New Edition Available is added to each item, and you can filter by the New Edition Available tag.

Instructors receive an alert letting them know about new suggestions. They can select the alert to filter the list to see items with new edition suggestions.
The banner is only displayed for Librarians, Leganto Course Operators, and List Owners.

Instructors can select the banner to see items with new edition suggestions.
Instructors can also filter to see items with new editions using the New Edition Available tag.
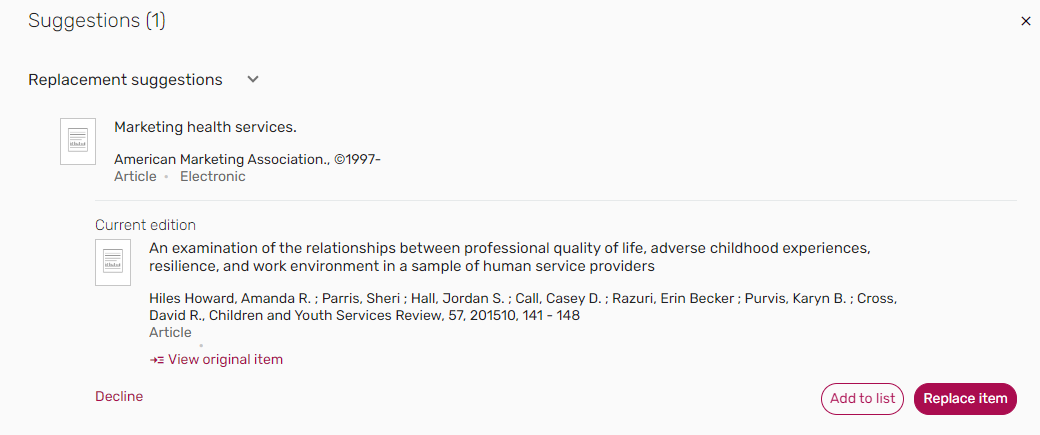
The details of the Replacement suggestions are viewable from the Suggestions pane and the Related items tab on the Full details of an item.
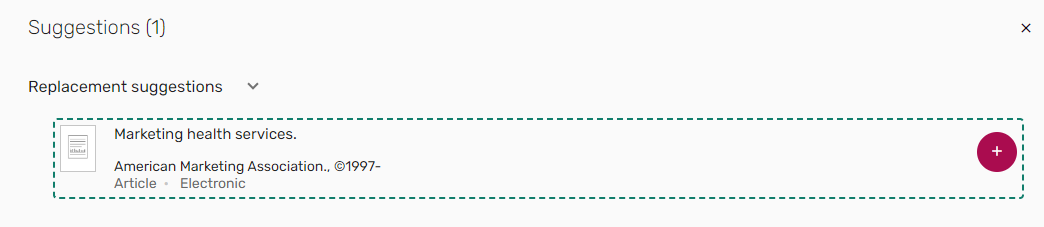
Selecting the suggested item opens the full suggestion, which includes the details of the original item and a link to the original item. From either the Suggestions pane or the Related items tab of the original item, instructors can choose to replace the item, which re-links the citation to the new MMS ID, updating the citation metadata. Other existing information about the citation, including usage information, tags, and notes, is preserved. The instructor can instead choose Add to list, which keeps the original item and adds the suggestion as an additional resource on the list. Alternatively, the instructor can choose to decline the suggestion, which removes the suggestion and the tag.
Alternatively, your institution can enable citations to be replaced immediately rather than sent to instructors for approval. Once library staff has selected a new item to use as a replacement, they are presented with a confirmation screen.
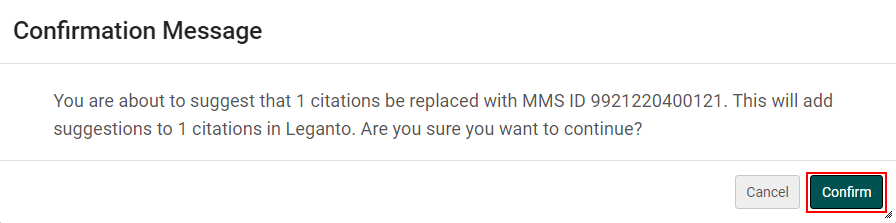
After selecting Confirm, all the citations that were selected for replacement are linked with the MMS ID of the item chosen as the replacement item. The citation metadata and inventory update, but tags, notes, and usage information are preserved.
Modifying Sections
For information on creating, duplicating, editing, and deleting sections, see Editing a Section.
Managing Section Tags
When enabled by your library, you can add section tags. The list of tags is maintained by your library. Tags appear beneath the section name.
- From a section, select Add tag or the plus icon
 and select the tag from the drop-down list.
 Add section tag
OR
From the section action menu, select Edit section and select Add tag or the plus icon
and select the tag from the drop-down list.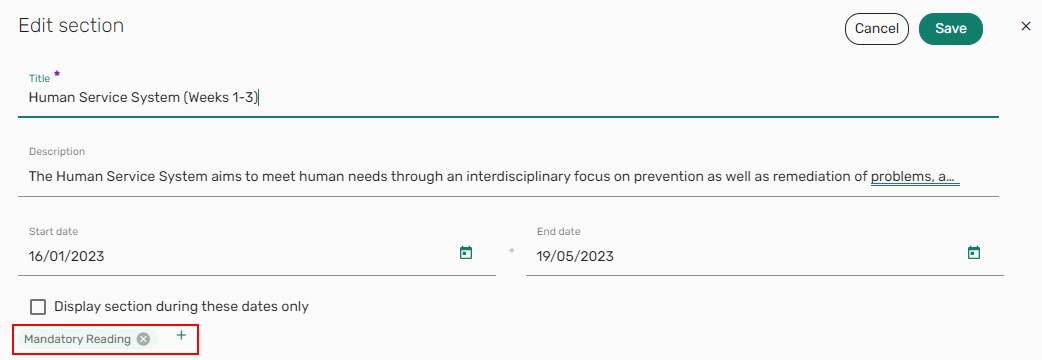 Edit section add section tags
- Select the X in the tag box. The tag is removed.
Viewing Information About a Section
Information about a section appears below the section name.

To edit this information, see Editing a Section.
The information includes the number of items in the section, their total pages (including only those items for which this is defined), and the dates configured for the section. The description and section tags appear beneath the section name.
Moving Sections Within a List
Sections can be moved within a list.
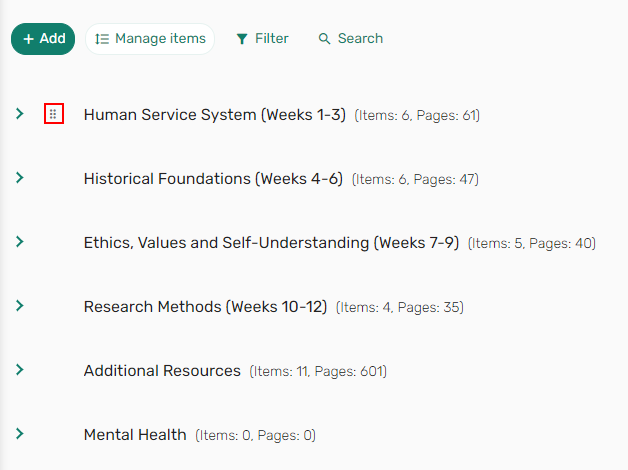
- From the list menu, select Manage sections.
 Manage sections toggle
 - Select the Drag icon
 and drag and drop the section to your desired location within the list.
 Order sections
To drag and drop a section, the section must be collapsed.
 Drag a section
 Drop a section
To copy a section to the same list or to another list, see Duplicating a Section.
Locking a Section
When enabled by your institution, you can lock a section for editing using the Lock section option in the section menu.
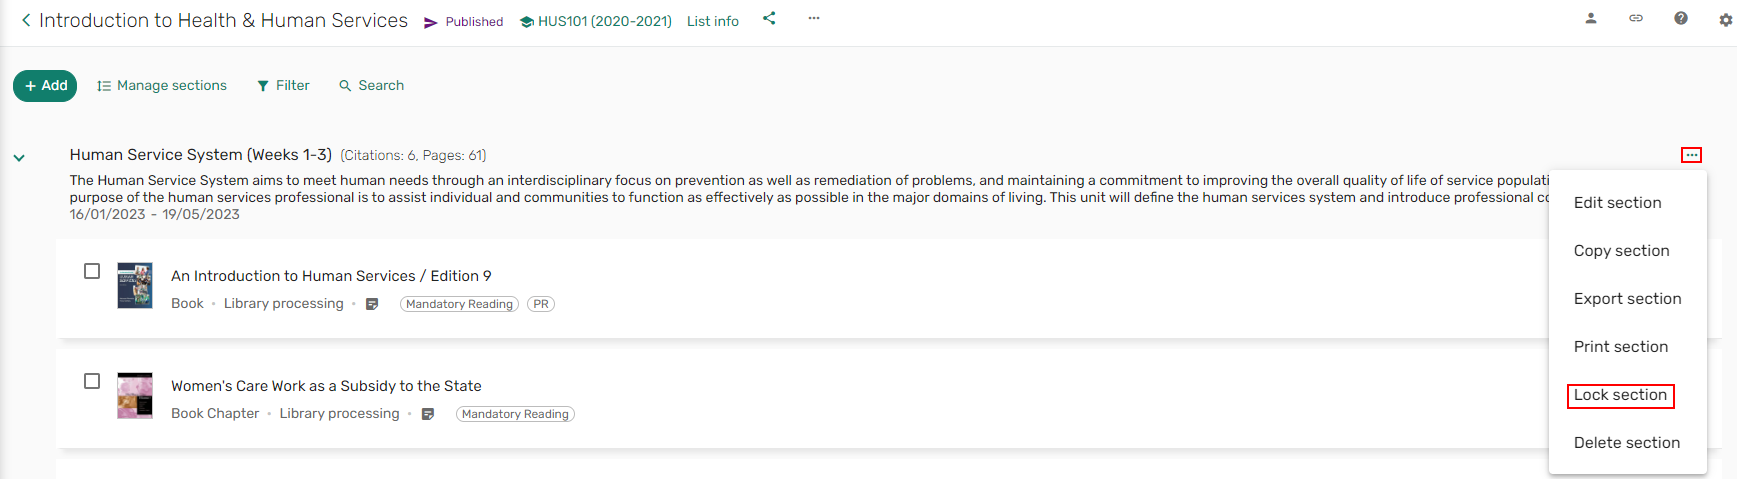
If you select the Lock option, you receive a notification that a locked section cannot be changed until it has been unlocked again by the owner who locked it. In Leganto, if the list has multiple owners, only the owner who locked the section can unlock the section.
When a section has been locked, a Locked  indicator appears next to the section name.

When you hover over the Locked indicator, the name of the user who locked the section appears in a tooltip.

Only users with the following roles can lock sections: Librarians and Leganto Course Operators. Instructors who are list collaborators can also lock a section.
Only the user who locked the section can unlock it.
If you locked a section, you can unlock it by selecting Unlock from the section menu.
If you duplicate a locked section, the duplicated section will not be locked.
When a section is locked, only the following actions are available for the section until the section is unlocked:
- Copy section
- Export section
- Print section
- Unlock section
Managing a Section's Visibility to Students
A section is visible to students only when a) the list is visible to students (see Publishing a List) and b) the date is not currently one where the section is hidden from students (see Adding a Section to a List). A section is not currently visible icon appears on hidden sections.
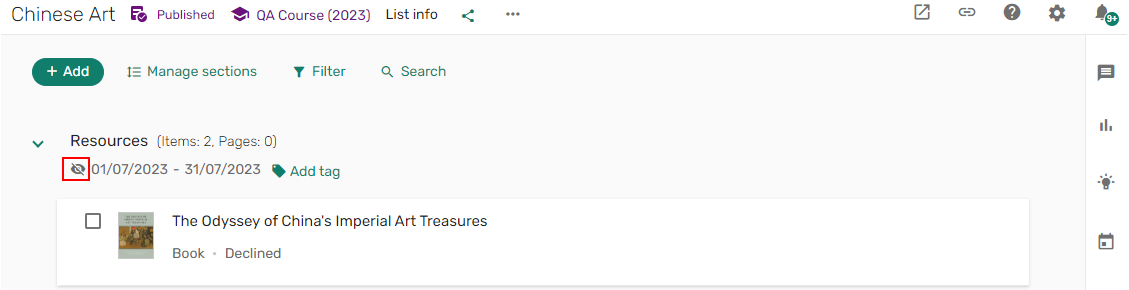
Even when a section is visible, section items and materials may not be visible; see Hiding Items from Students.
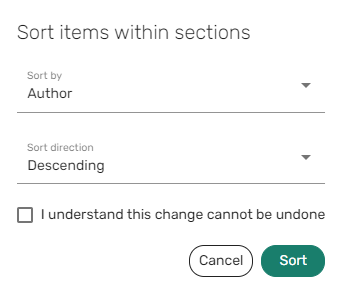
Ordering Items Within a Section
When configured, you can sort all items in each section by author or title, and by by descending or ascending order. Additionally, you can reorder specific items in a section.
- From the list menu, select Sort items within sections. The Sort items within sections window opens.
 Sort items within sections
 - Select whether to Sort by Author or Title.
- Select whether the Sort direction should be Descending or Ascending. Note: The default Sort direction is Ascending.
- Check the checkbox I understand this change cannot be undone to confirm you want to proceed.
- Select Sort. All items in each section are sorted according to your selections.
 Sort items within sections
- Select the item and use the Drag icon
 to drag and drop the item to your desired location in the section,


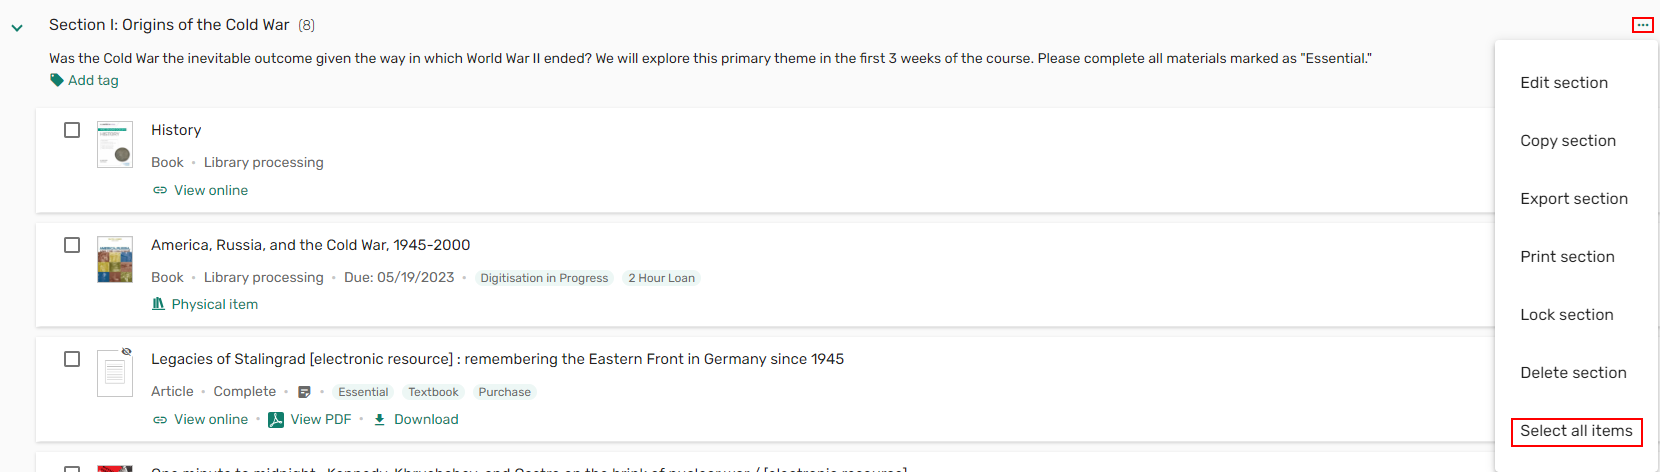
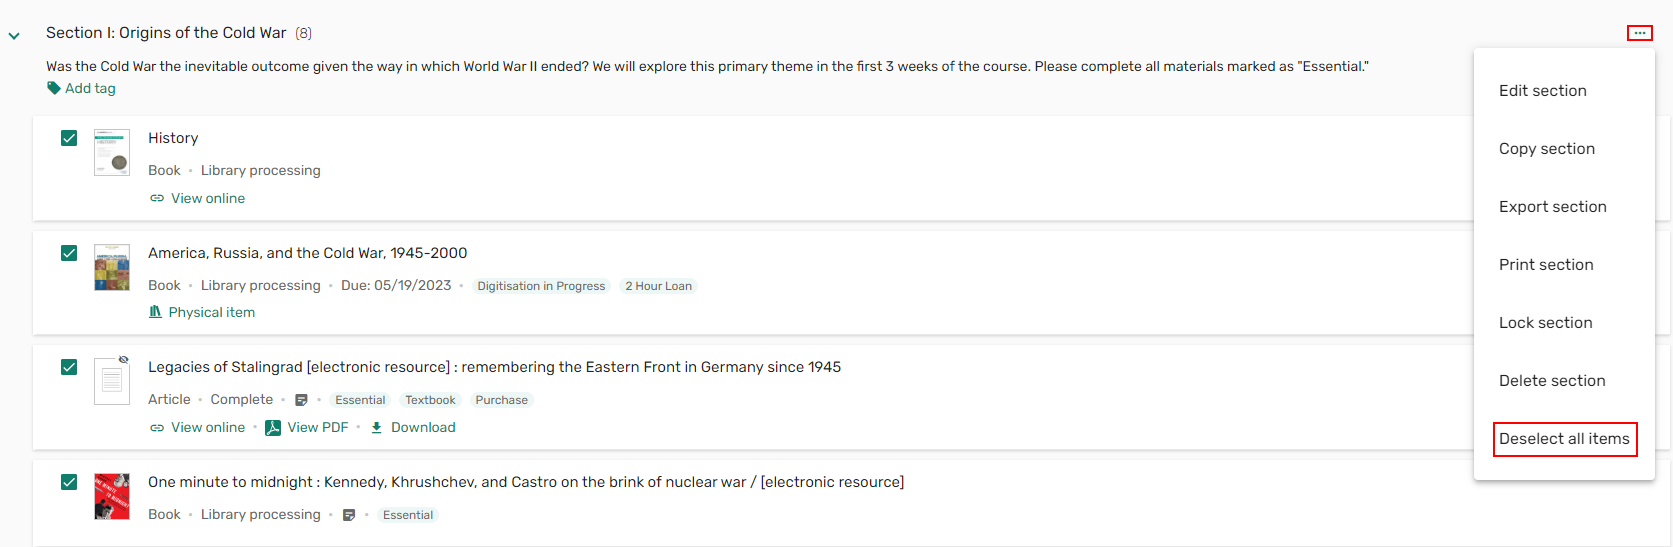
Editing Sections in Bulk
When sections are collapsed, users can apply actions to sections in bulk.

Modifying Items
For information on adding items, see Adding Resources.
Managing Item Tags
When enabled by your library, you can add tags to items. The list of tags is maintained by your library.
- Either select an item to expand it and select Add tag or the plus icon and select the tag from the drop-down list.
The item must be expanded to add tags.
 Add item tag
OR
Select Full details or from the item action menu, select Edit item > Item Actions tab and select Add tag or the plus icon
and select the tag from the drop-down list.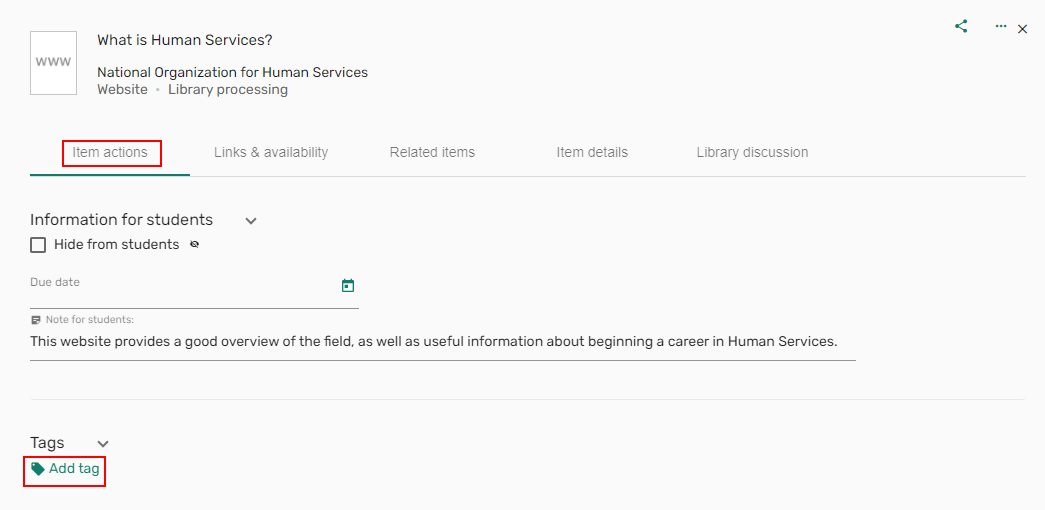 Edit item add item tags
- Select the X in the tag box.
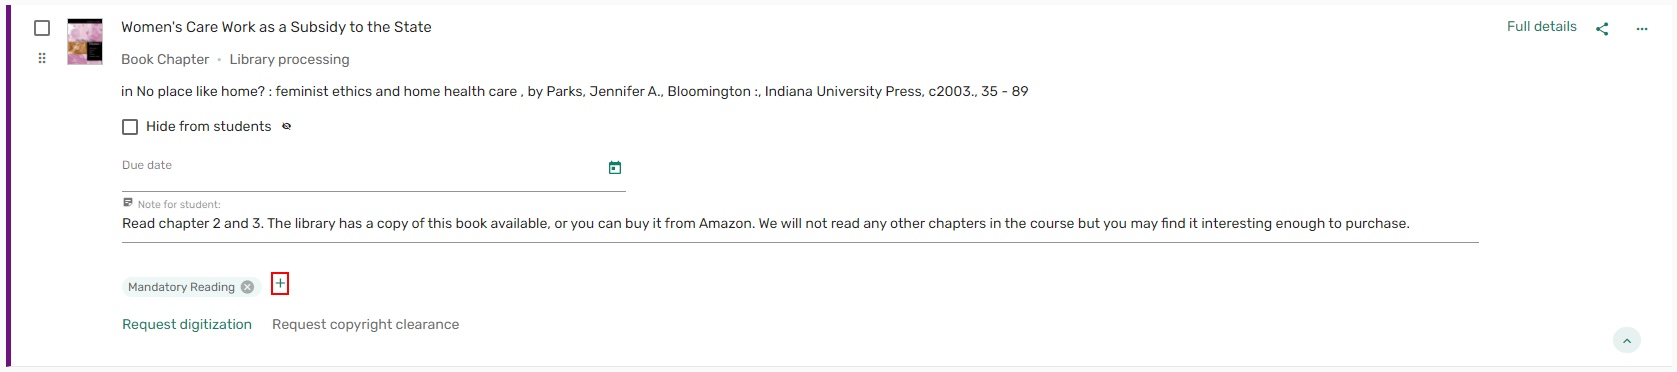
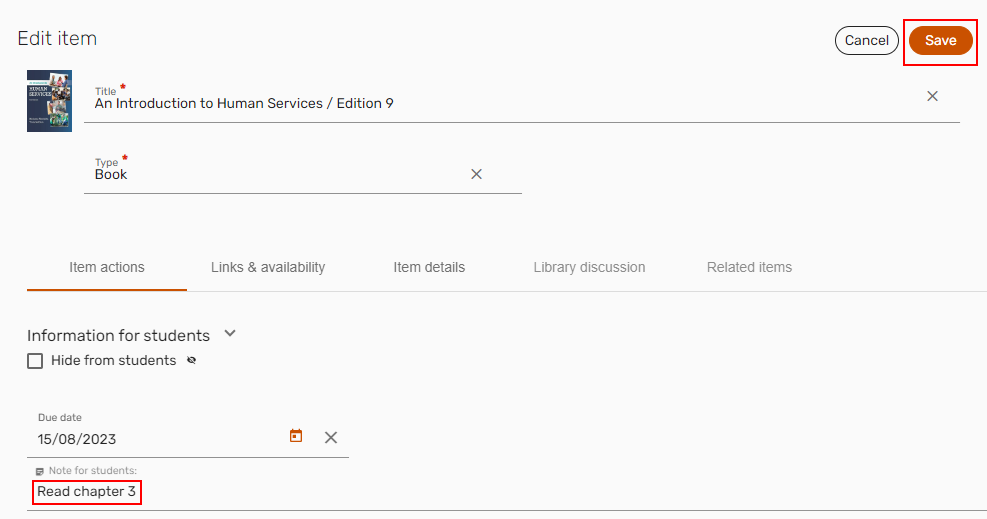
Notes for Students
When expanding an item, you can add notes for students or view notes that are already added.
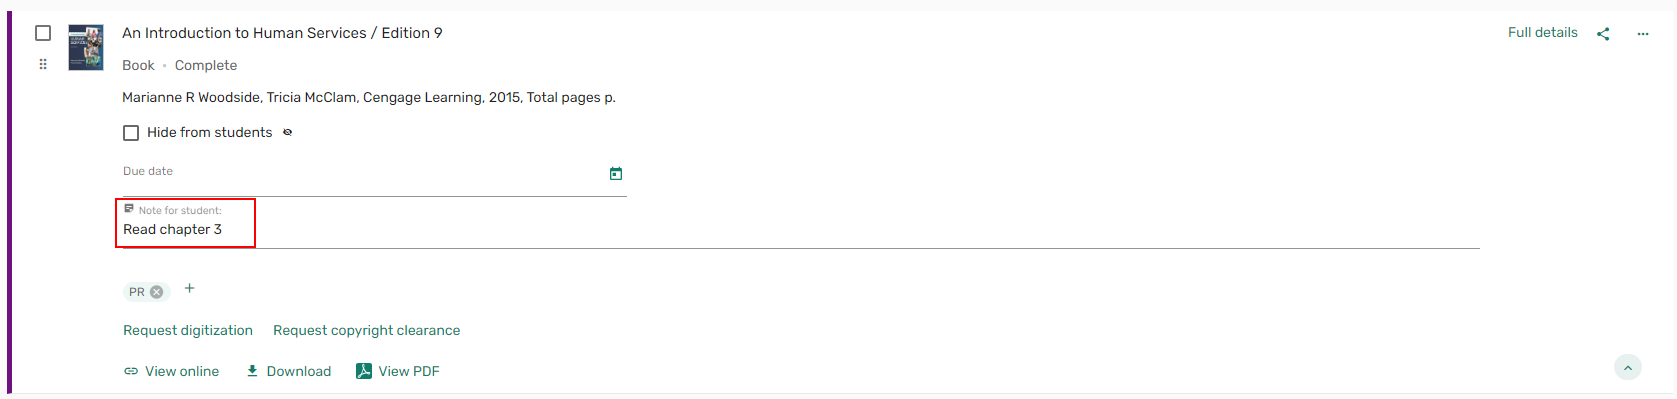
You can also add/view Notes for students from the item Full details pane > Item actions tab.
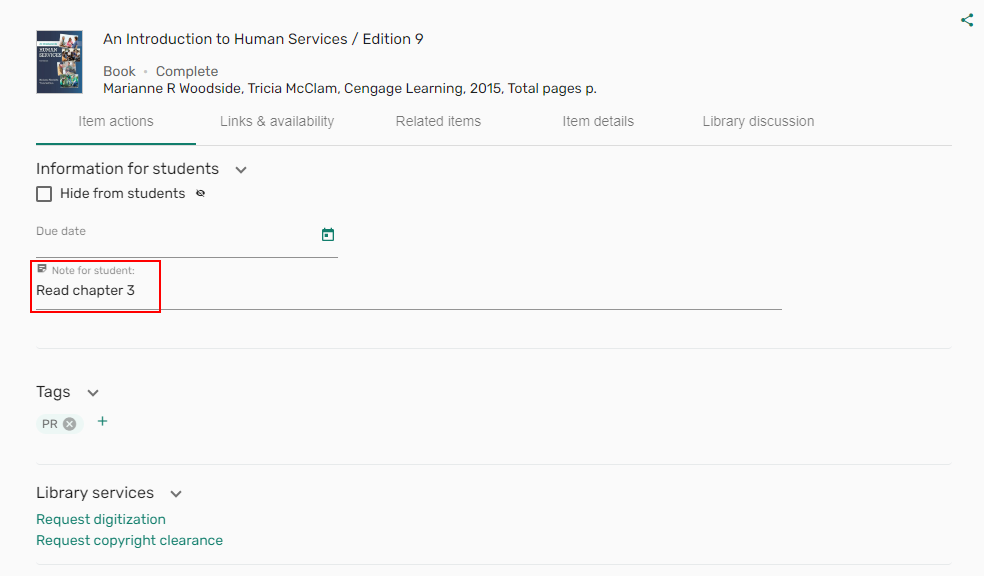
Notes for students can be formatted or linked using the floating format menu when adding the note. Any changes to the note are automatically saved.
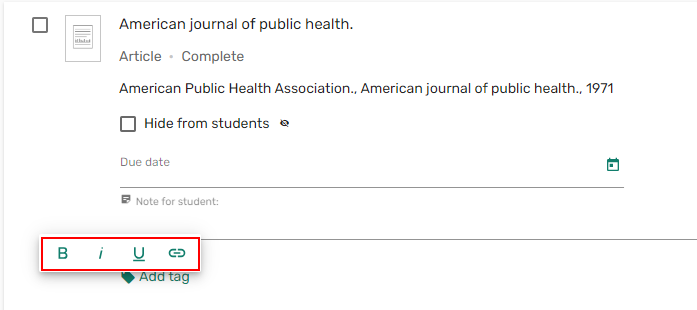
Adding a URL to Student Notes
 icon.
icon.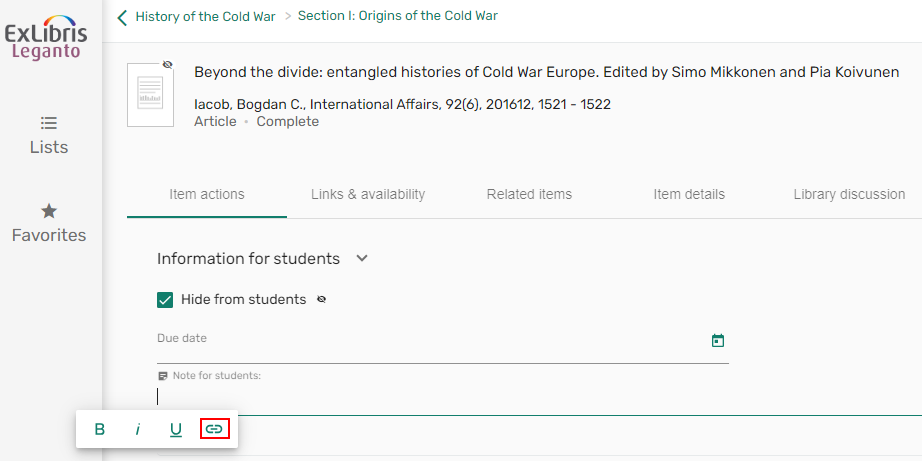

 icon to open the link.
 icon to apply a green formatting or a thick underline.
 icon to edit your link.
 icon to remove the hyperlink.
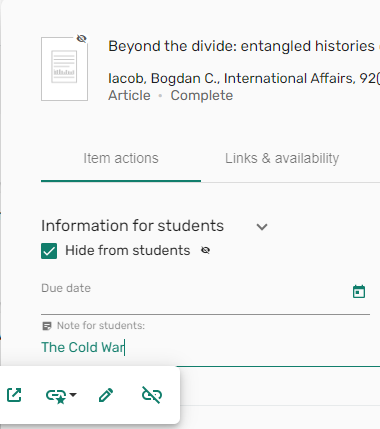
Hiding Items from Students
By default, all items are displayed by default but can be hidden from students.
- Expand an item
OR
From an item Full details > Item actions, check Hide from students. A hidden
 icon appears next to the item thumbnail and the item is not viewable by students.
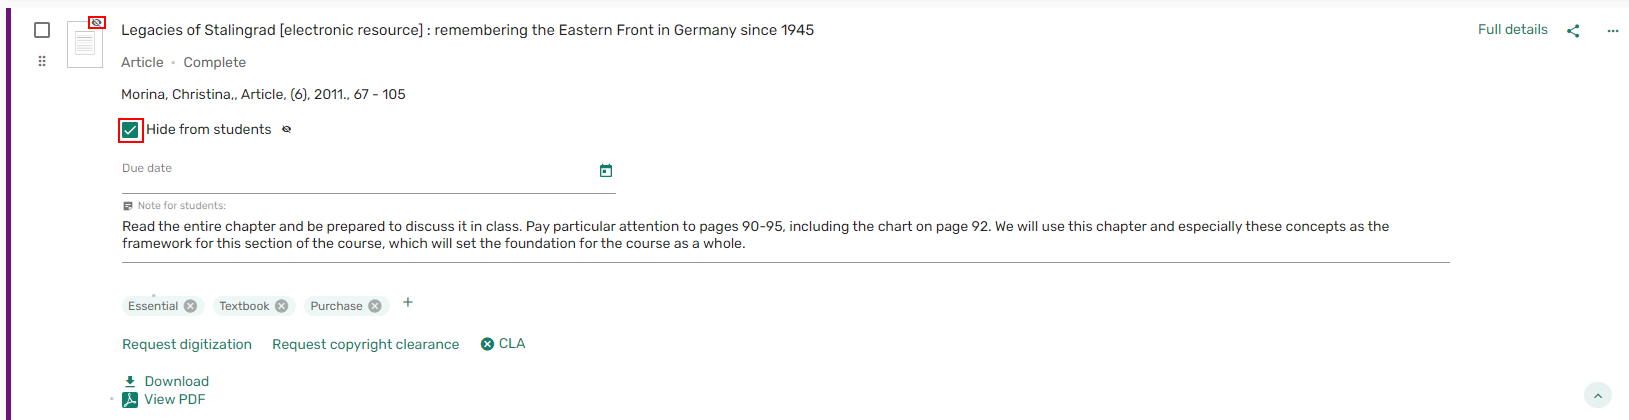 Hide from students - expanded view
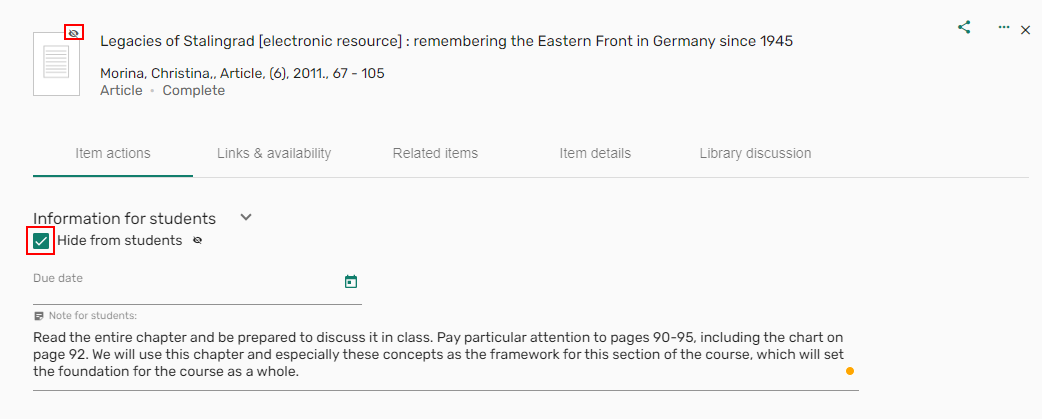 Hide from students - Full details view
If an item is not marked as complete on a list, when configured, you can hide the item from students. When not configured, incomplete items are displayed; however, students do not have the option to download a file if one exists. Students cannot open links for items that require copyright.
Managing an Item's Due Date
You can edit an item's due date, which is the date by which the student should read/review the resource.
Expand an item or from an item, select Full details.
In the Due date field, select the calendar icon  and select the date.
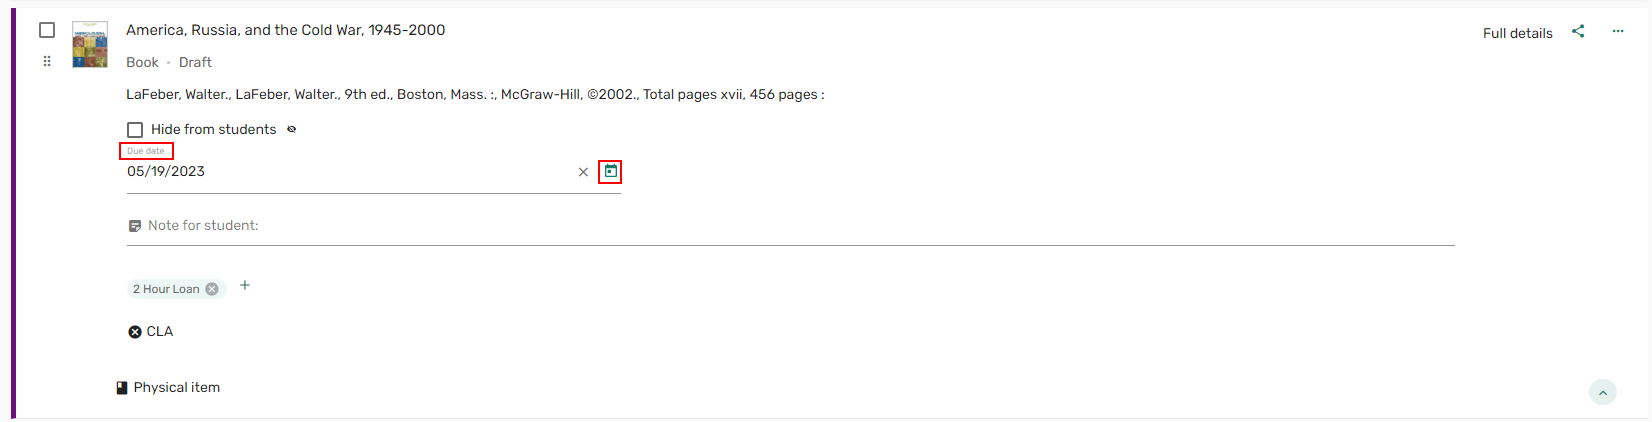
An Upcoming due dates icon  indicates how many items have due dates approaching.
![]()
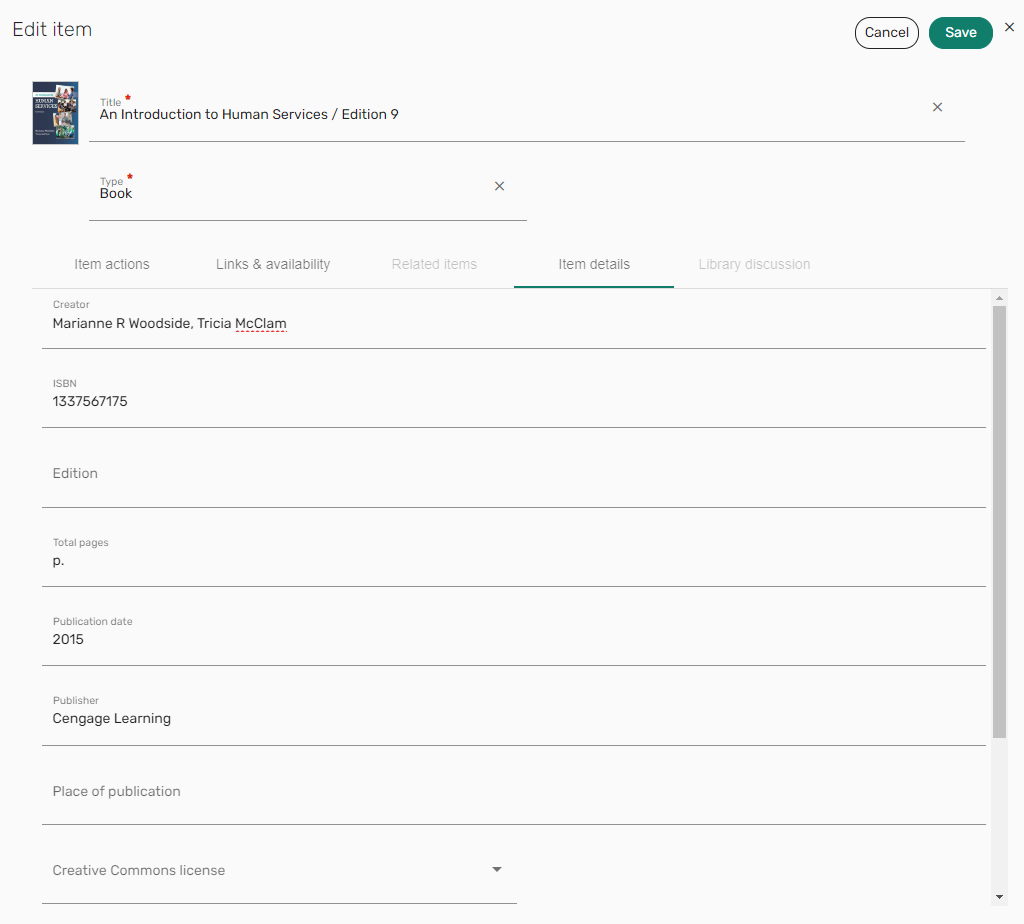
Editing Items
After adding an item, you can edit the item.
- Select Edit item from the item actions. The Edit item pane opens.
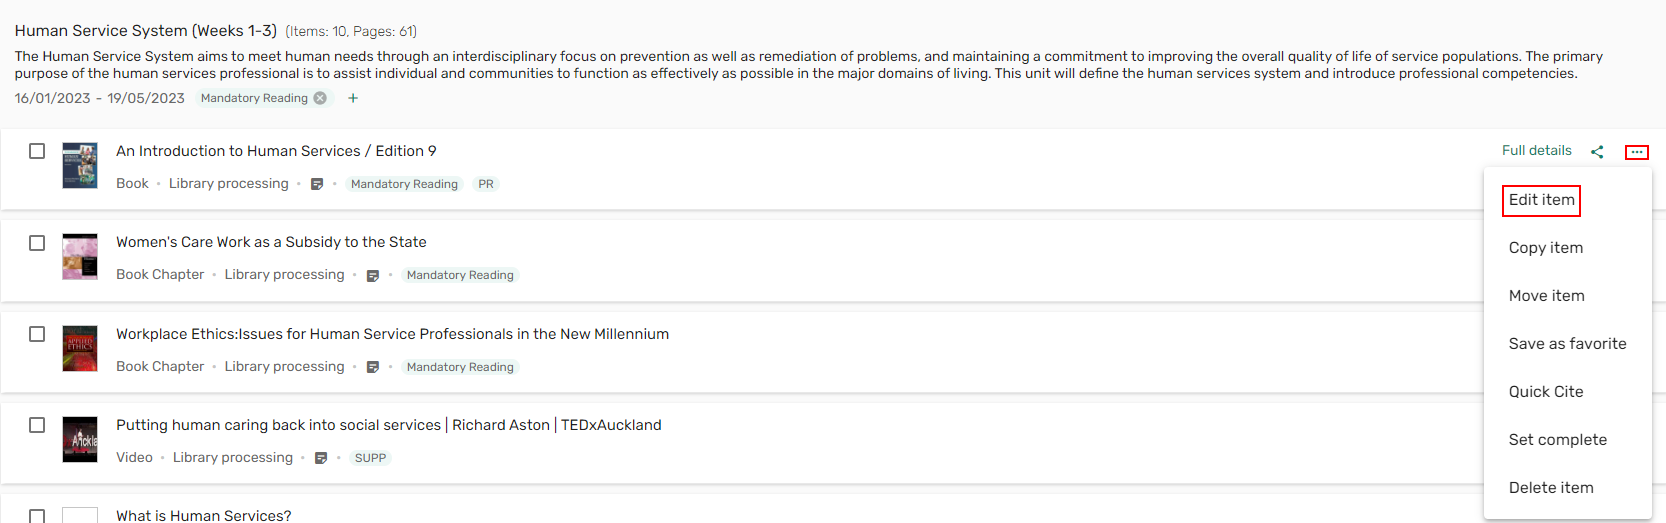 Edit item action
 - The pane defaults to the Item details tab. Make your changes on the relevant tabs and select Save. Your changes are saved.
 Edit item pane
When adding a Note for students while editing an item, the item must be saved for the note to be saved.
Managing an Item's Electronic Links and Physical Ability
The Links & availability tab presents electronic links, digital files, and physical availability for an item, when available. Physical availability includes the barcode, status, and location, and may include options to make requests for the item. When configured, you can select whether to hide or display this information (all physical availability) to students.
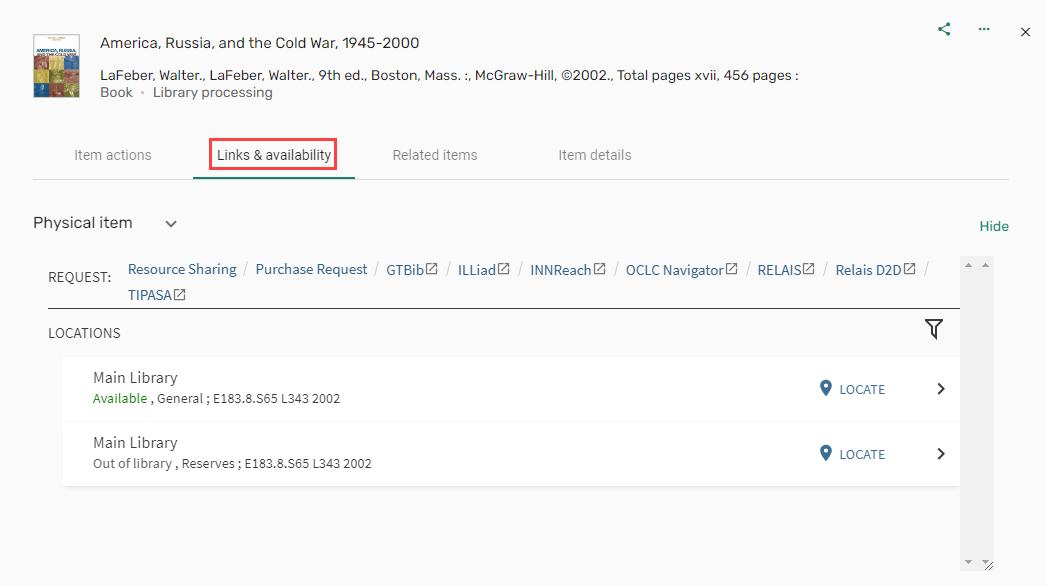

Other availability, including electronic, digital, and file uploads include the following row actions for each availability link when made available by your library:
- Mark the link as broken. This notifies the library to fix the issue at their discretion.
- Hide/display the link to students. For more information, see Enabling Broken Link Reporting.
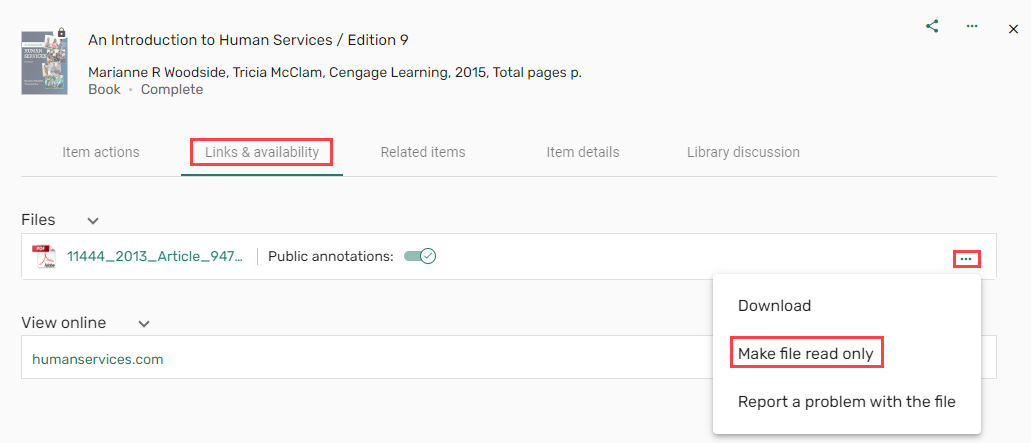
Managing an Item's Files
To prevent students from downloading or printing files, instructors and librarians can set files attached to items as read only. Your institution can configure PDFs to open in a new tab.
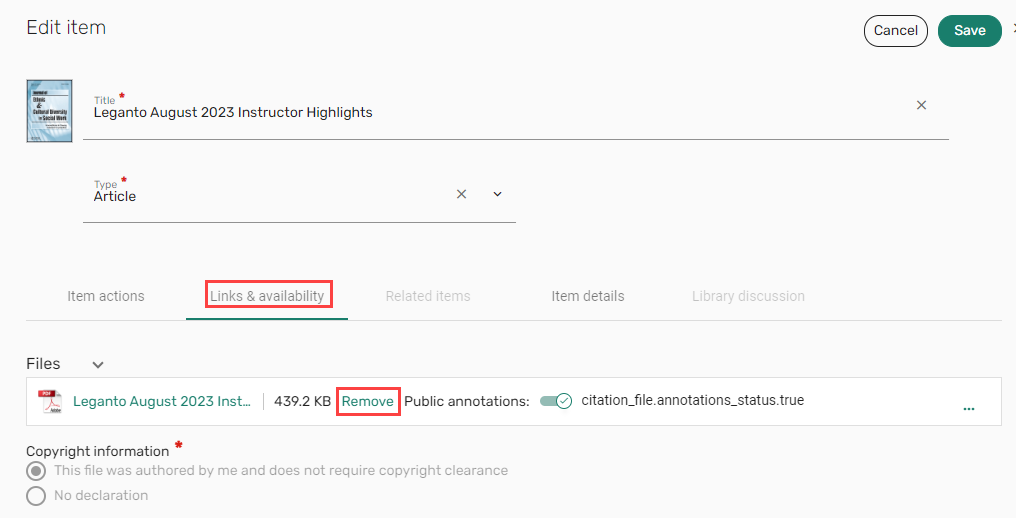
Additionally, when configured, instructors can remove files that have been added to items.
- Select an item and select Full details.
- From the Links & availability tab, select the ellipse (...) and select Make file read only. Students will not be able to download or print the file.
 Make file read only
You cannot delete a file if:
- A copyright request was approved for the citation.
- The file is a CCC (pay-per-use) file.
- From the item action menu, select Edit item.
- From the Links & availability tab, select Remove. The file is removed from the item.
 Remove file
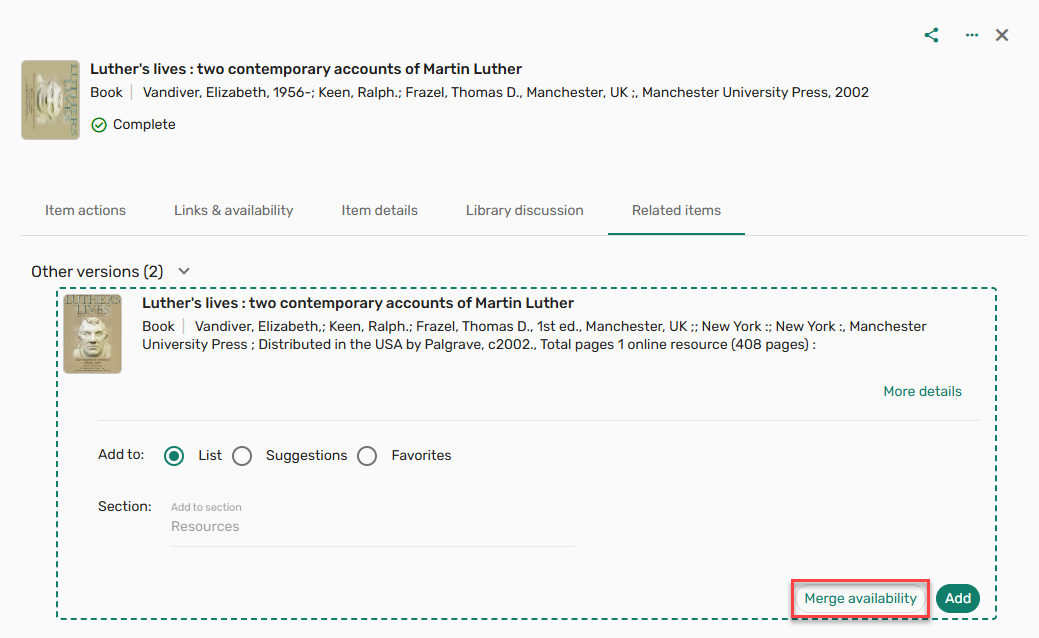
Adding Related Items
When enabled by the library, related items (Recommendations in the Classic UI), if any, (bX, videos including Alexander Street Press (ASP), and/or shelf browsing) are listed on the Related items tab offering suggestions related to the citation.
From the Related items tab, you can:
- View and add items related to the item. Related items can be dragged and dropped to a list, or be added using the + icon, or by expanding the item and adding the item to the list, as a suggestion, or as a favorite.

- View and merge other versions of the item. This applies to cases where both a physical and electronic version of an item are available, and one of those versions exists in the list. For example, if a physical item is added to a list, and electronic version is also available, when selecting Merge availability, the link to the electronic version is added to the Links & availability tab. This eliminates the need to add both versions of the item to the list.
Editing Items in Bulk
When enabled by your institution, the section action list includes a Select all items/Deselect all items action to either select all items or deselect all items in a section.
You can apply the following actions to an item in bulk:
- Delete
- Add/Remove tags
- Add/Clear due dates
- Add/Remove notes for students
- Apply public annotation permissions
- Copy — up to 10 items can be copied at a time. Items are added to the bottom of the selected section.
- Move — up to 10 items can be moved at a time. Items are added to the bottom of the selected section.
- Add to favorites
- Export
- Move items up/down
These actions can only be applied to This list for lists that are not locked and lists you own.
When editing items in bulk, if any of the selected items are part of a locked section, some of the bulk actions are disabled, and a message is displayed indicating that some of the selected items are locked, and therefore, some actions are disabled.
When editing items in bulk, if any of the selected items is a note, a toast indicates that a note is included in the selection and therefore, some of the editing options are disabled.
- Select at least one item, and either check the Select all
 checkbox to select all items in the list or select the bulk action checkbox for each item to which you want to apply an action. The bulk action menu becomes available.
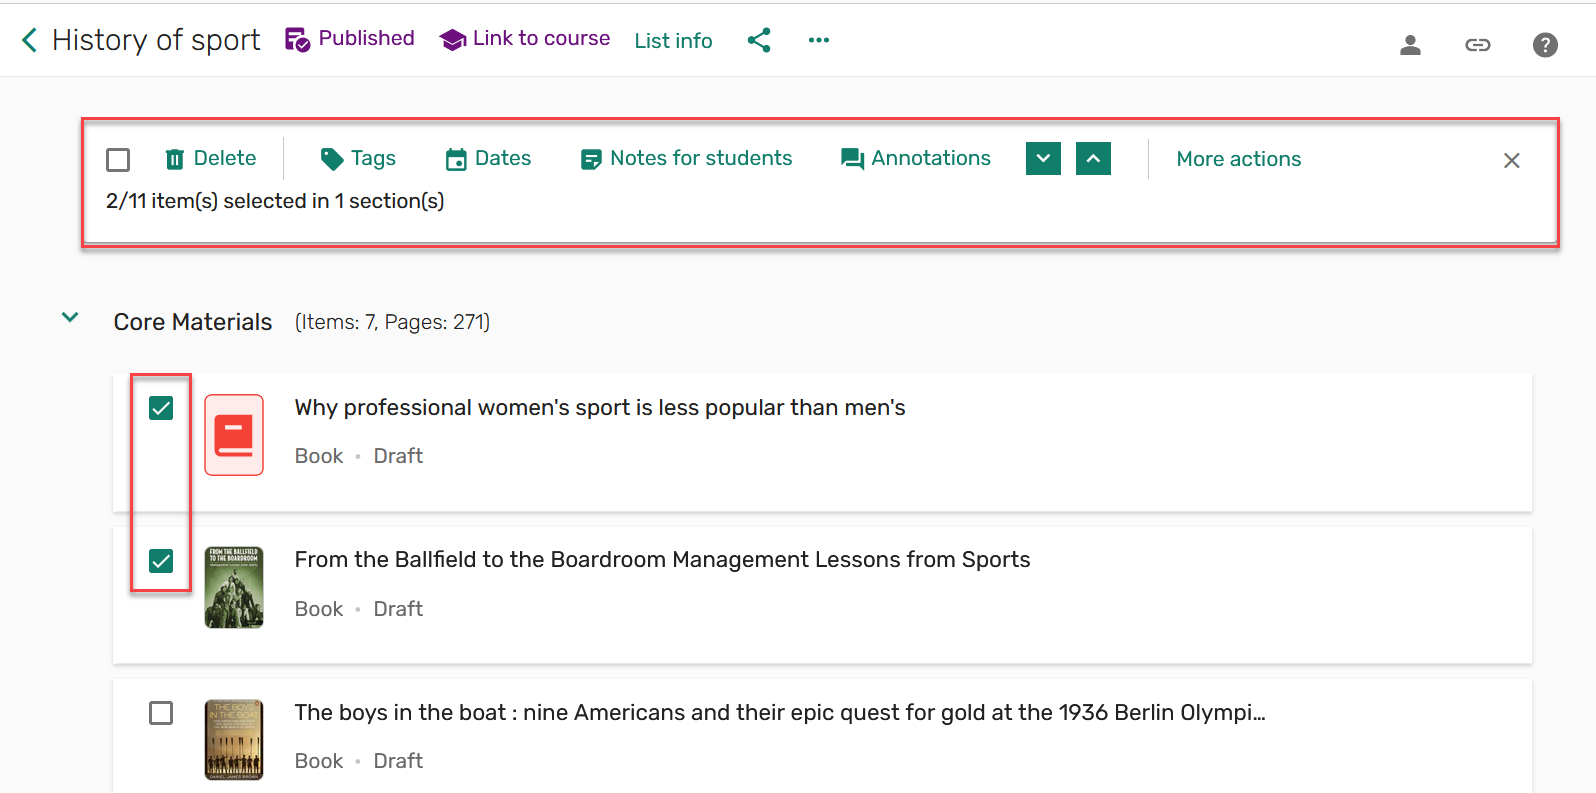 Bulk item actions
 - Select the action to apply to the items and select Save. The action is applied to all selected items.
- Either uncheck the Select all checkbox to deselect all checked items in the list or manually uncheck the selected checkboxes. The bulk action menu is hidden.
Copying Items
Items can be copied to other sections on the list or copied to other lists.
When copying an item with a note for students, the note is copied in the following scenarios:
- Duplicating a list in Alma
- Copying a section to a different/same list
- Coping an item in Alma/Leganto to a different/same list
- Moving an item to a different/same list
-
Select the item and select the Copy item action.
 Copy item
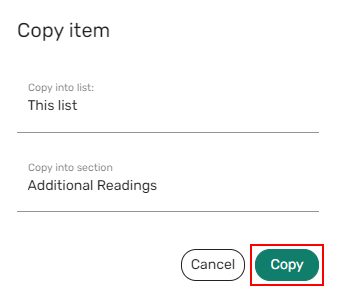
 - Select the section to which you want to copy the item and select Copy. The item is copied to the selected section on the current list.
 Copy item to another section
OR
Select the list and section to which you want to copy the item and select Copy. The item is copied to the selected section on the selected list.
 Copy item to another list
Moving Items
Items can be moved to other sections on the list or moved to other lists.
- Select the item and either use the drag icon
 to drag and drop the item to the desired section in the list.
 Drag an item to another section
OR
Select the item and select the Move item action.
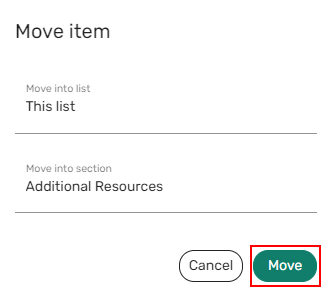
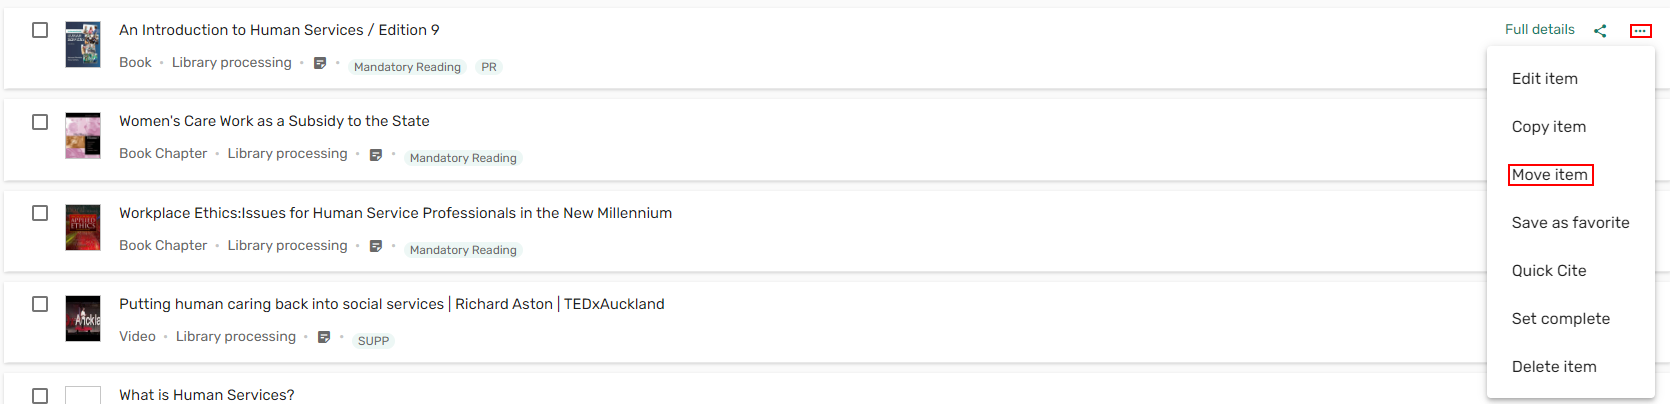 Move item
 - Select the section to which you want to move the item to and select Move. The item is moved from its current section to the desired section.
 Move an item to another section
Copying and Moving Items To/From the Clipboard
Users can copy or move items to a specific place within the list or another list using a clipboard. The clipboard option is available on the existing copy and move workflows, both when copying and moving individual items, and when copying and moving items in bulk. The clipboard acts as a place to temporarily store the items while they are being copied and until they are moved.

Moved items and copied items behave differently in the clipboard. As items are copied to the clipboard, the clipboard counter increases. As items are moved to the clipboard, the items change to a disabled state within the list, and the clipboard counter increases. The clipboard counter reflects the total number of items added to the clipboard during a session. Once the session ends, the clipboard clears, and the icon is no longer displayed. If the session ends before a moved item is moved to a new location, it is returned to the original position within the list when the session ends.

Items can be copied or moved to a list or to the favorites by expanding the item and selecting List and the list and section or selecting Favorites and Add & Edit or Add.
Items cannot be copied/moved to locked lists.

Items can be copied or moved to a specific place within the current list using the drag and drop functionality.

Items can be copied or moved to sections on the current list or removed from the clipboard in bulk by selecting the checkbox next to each item.

Saving Items as Favorites
Items can be saved as favorites for later use. For more information on Favorites, see Saving Resources as Favorites.
- Select the item and select the Save as favorite action.
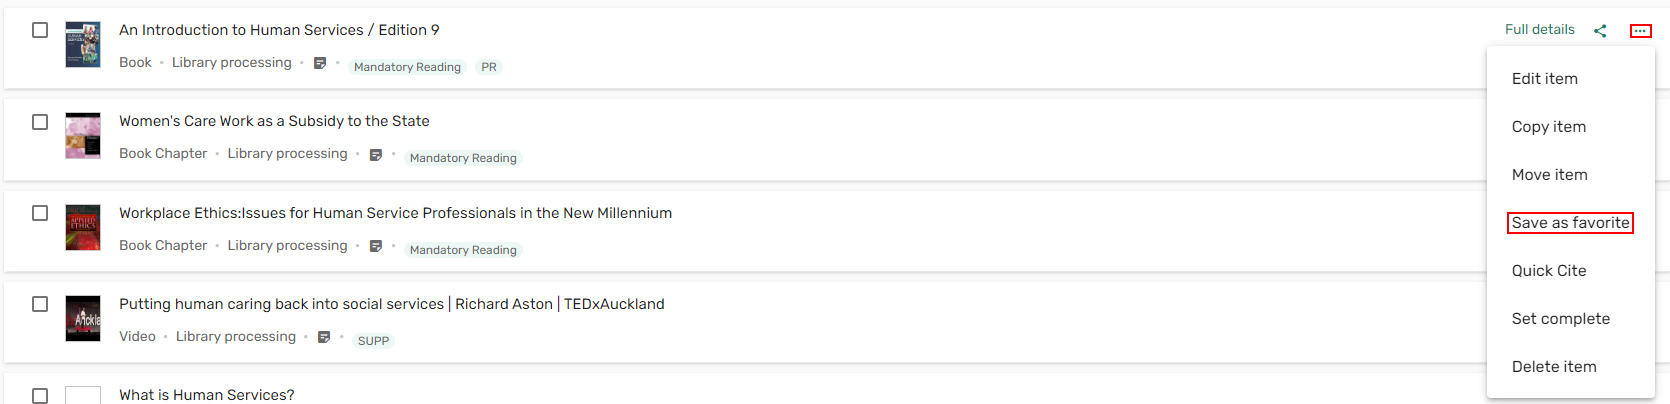 Save as favorite
The item is copied to the Favorites list.
 Item copied to favorites confirmation
Exporting a Single Item in a Specific Reference Format (Quick Cite)
You have the option to copy the default item style set by your library.
- Select the item and select the Quick Cite action.
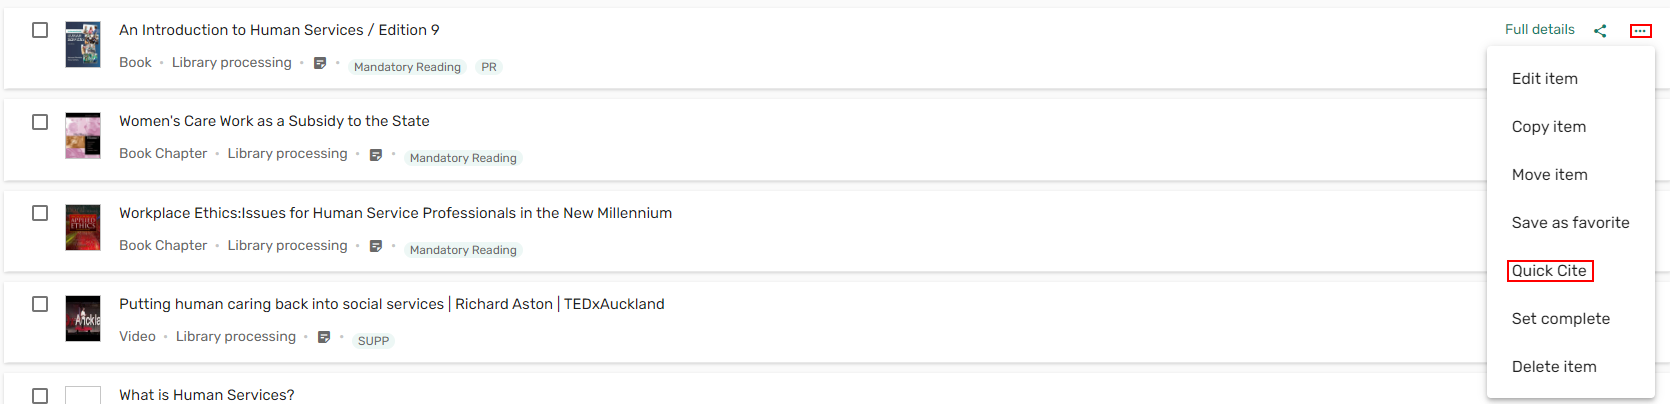 Quick Cite
 -
If relevant, select the Bibliography style, and select Copy to clipboard. Your item is copied to your clipboard to be pasted to your desired location.
 Copy to clipboard
When generating and exporting formatted items from Leganto, additional authors can be treated as contributors when configured. Otherwise, additional authors are treated as editors.
Exporting an Item to RefWorks
When configured, you can export items to RefWorks.
- From the item action list, select Export to RefWorks. A toast is displayed confirming that the item has been exported to RefWorks.

Exporting Items in Bulk
You can export multiple items in bulk.
- Check the items you want to export. The menu option displays an Export option.
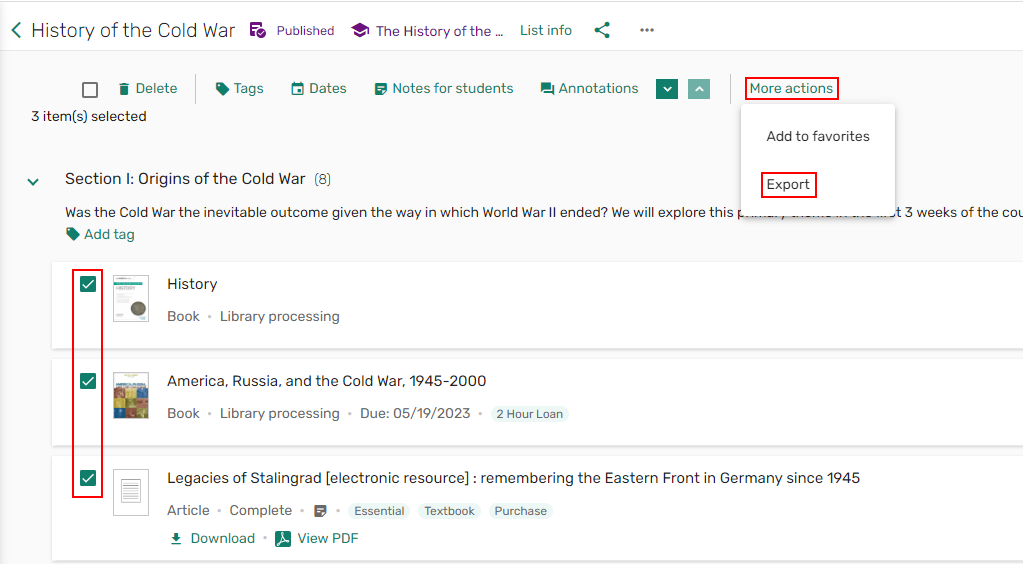 Export multiple items
 -
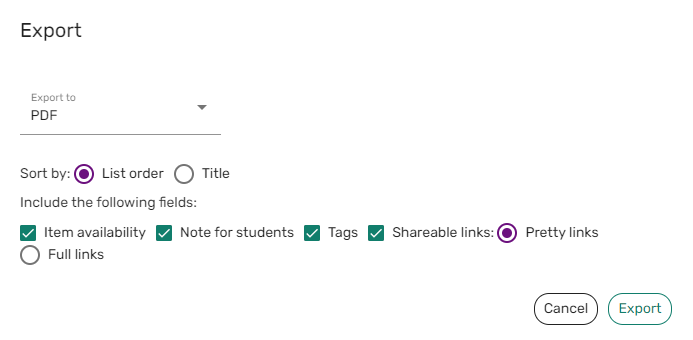
Select Export. The Export window opens.
-
Select the Export to format.
You can export to Microsoft Word (RTF), PDF, Microsoft Excel (XLS), RIS, EndNote (ENW), Leganto (.lgn) formats.
-
Depending on the exported format selected, you may have the option to select whether to Sort by: List order or Title. Depending on the exported format selected, you may have the option to include any of the following fields:
- Item availability
- Notes for students
- Tags
- Shareable links — when configured (see Exporting Shareable Links).
- Pretty link
- Full links
If you export to RTF format, you can select a bibliographic style before exporting the file.
-
Select Export. Your section is exported.
 Export to options
Setting Items as Complete
A librarian or Course Operator can set an item as complete directly from the item menu. This option is not available for instructors.
- Select the item and select the Set complete action.
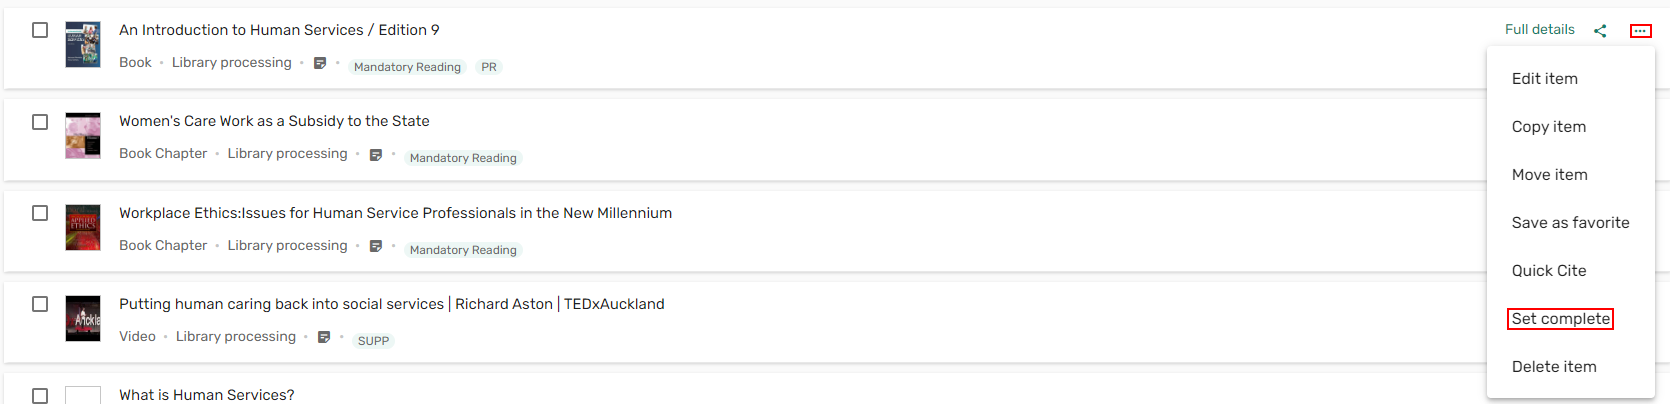 Set complete
The item is marked as Complete.
 Item marked as Complete
Unless configured (see Showing Complete Status on Brief View), the status of items marked as complete Complete are not displayed in the brief view.
Removing an Item
When necessary, you can remove items from a list.
- Select Delete item from the item actions. The Delete item confirmation window opens.
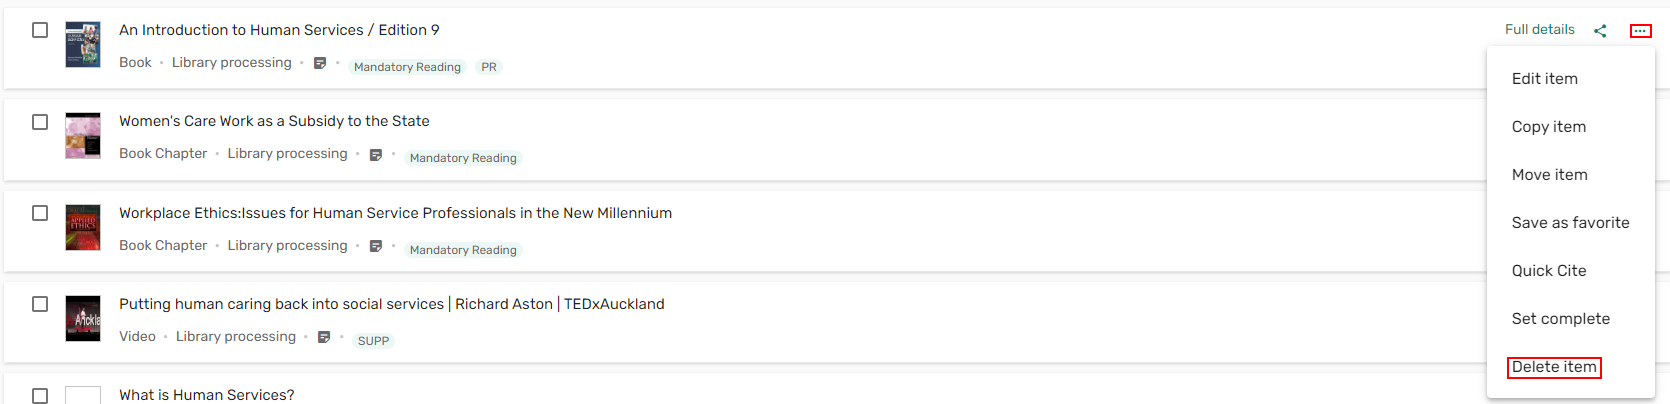 Delete item action
 - Select Delete to remove the item from the list.
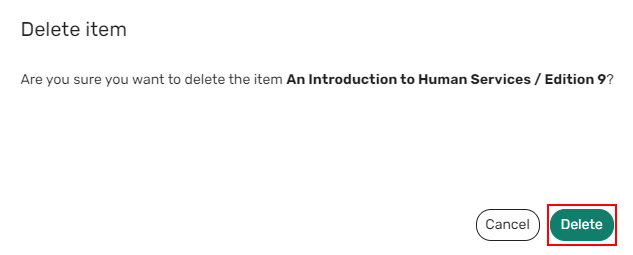 Delete item confirmation
Restoring Deleted Citations from Recycle Bin
Leganto includes a recycle bin for instructors and library staff to restore deleted items. The recycle bin is available for items deleted manually from Leganto or Alma, items deleted in bulk in Leganto, and items deleted when a section is deleted in Leganto.
The recycle bin is only visible when it contains items.
If a list is deleted, the items are not added to the recycle bin. If an item is deleted by an Alma job, it is not added to the recycle bin.
The recycle bin is available at the list level in Leganto, and contains only items deleted from that list. A counter indicates how many items the recycle bin contains. When enabled, users receive a notification informing them that an item was deleted.
Items in the recycle bin are considered deleted; therefore, these items are not included when searching or filtering citations.

Deleted items remain in the recycle bin for up to 30 days (when the Clean logical deleted lists job (Admin > Manage Jobs and Sets > Monitor Jobs) is enabled. See Scheduled Jobs.) Librarians, instructors, list owners, and Leganto course operators can view the recycle bin and restore deleted items.
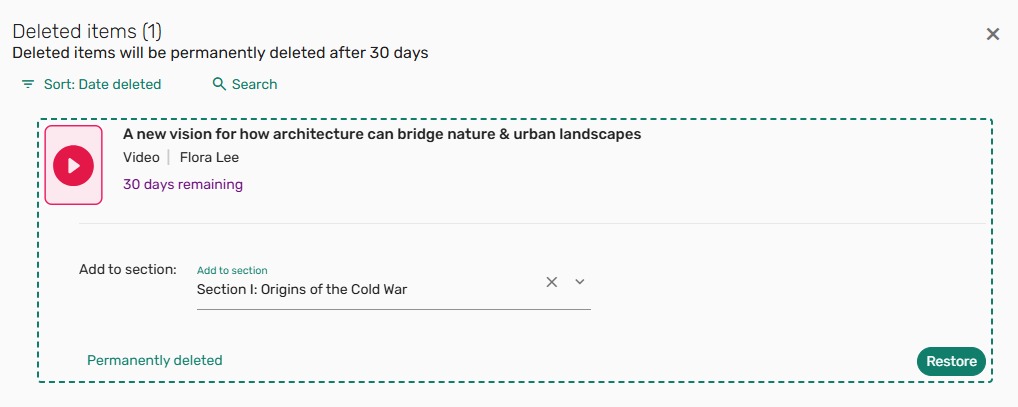
If the item is added back to the list, the Date modified for restored items is the date the item was restored.
When restoring a deleted item with an In process copyright status, the copyright record is not restored. When restoring a deleted item with an Approved copyright status, the copyright end date is updated to the deleted date. Restoring deleted items with a DCS copyright or a Bolk clearance are managed similarly to when an item is deleted.
All other information about the citation, including tags, notes for students, due dates, and usage, are preserved.
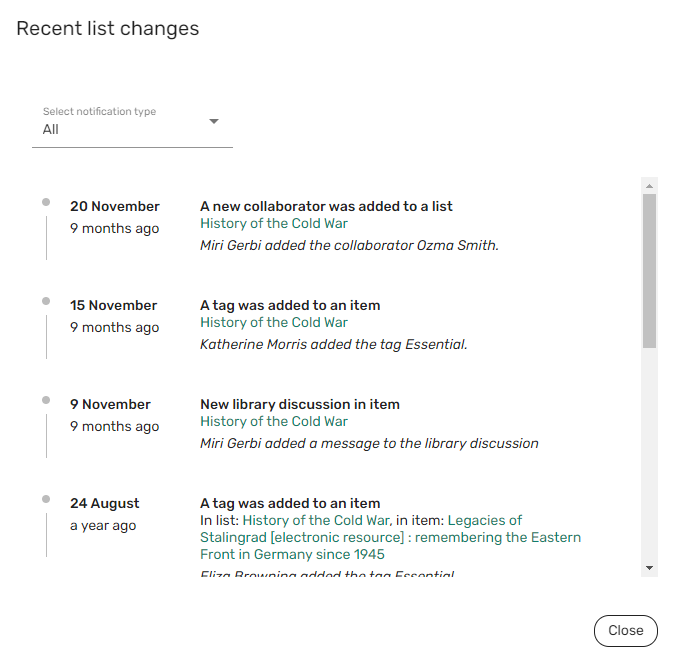
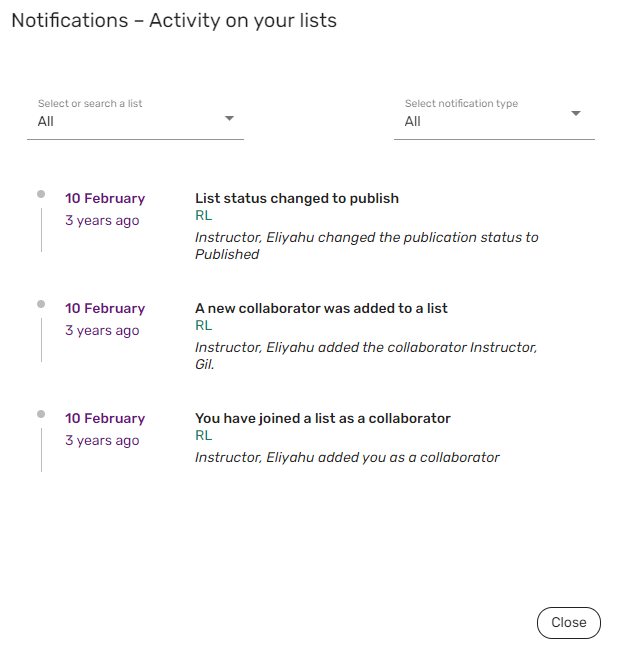
Viewing Notifications / Recent List Changes
You can view notifications or recent changes about a list from the Notifications icon. For more information, see Viewing and Managing Notifications.
![]()
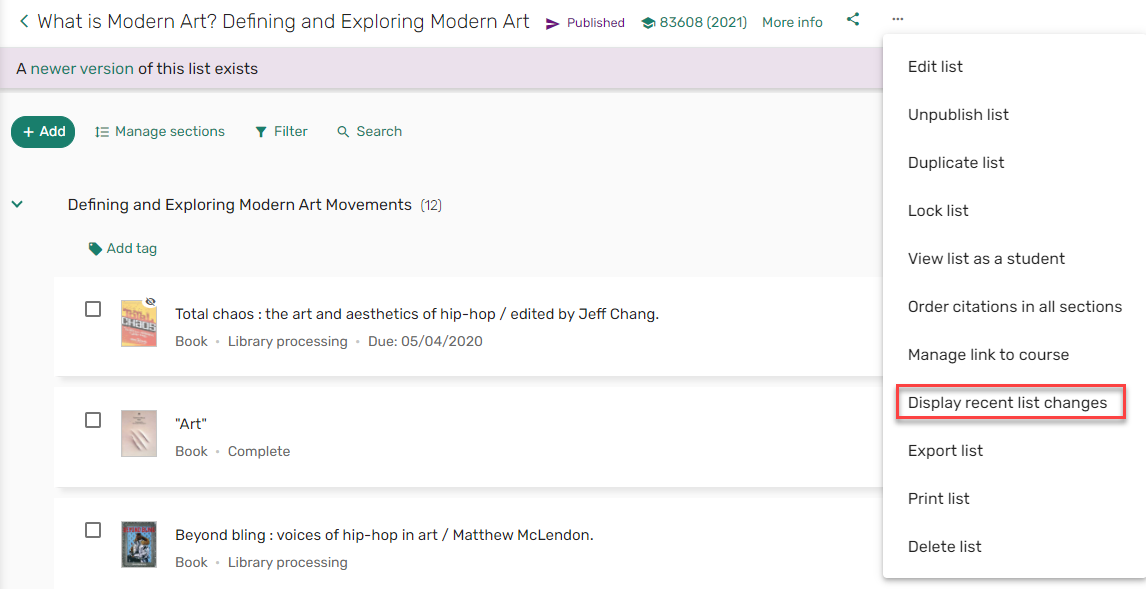
Alternatively, select Display recent list changes from the list actions.