
Go VE: Converting Collaborative Network Features to Primo VE
Primo VE supports collaborative network functionality for consortia with or without an Alma Network Zone. For more details, see Go VE: Getting Started with Collaborative Networks.
This guide provides information on how to transfer collaborative network functionality from Primo to Primo VE and configure additional related functionality in Primo VE.
This page contains only the consortia-related features. To see other Primo VE configuration options, see Step 3: Configuration.
Background
Main Principles and Differences between Primo and Primo VE
Before you begin to configure collaborative network features in Primo VE, it is helpful to understand the main principles of collaborative networks in Primo VE and the differences between Primo and Primo VE. Most of the information is relevant for consortia with and without the Alma NZ. There are some elements that are relevant specifically to consortia with an Alma NZ (Network Zone):
-
Central index – Primo VE builds a central index with the entire consortium's data, which includes records managed in the NZ and records managed in each member institution. The central index allows institutions in a consortium to search both their institutional data and the entire network and to see the availability statuses from their institution and other institutions.
-
Normalization – In Primo, and especially for consortia with an Alma NZ, a consortium publishes full network data in one pipe using a unified normalization rule file that includes requirements from all institutions, which may include required changes in the out-of-the-box fields or new local fields. In Primo VE, this coordination, re-normalization of the data, and re-indexing is not required, and changes are applied immediately in most cases:
-
Display fields – every institution can define its own display field normalization rules (whether to modify default display fields or local display fields) with no relation/coordination with other institutions. The changes at institution level affect only that institution using either of the following methods: bibliographic field mapping and normalization rules mapping.
-
Local search and facet fields (using bibliographic field mapping method) – this type of local field functions the same way as display fields, and every institution can create these fields independently.
-
Local search and facet fields (using the normalization rules mapping method) – Because this type of local field affects other institutions, coordination with other institutions is necessary if an institution needs to create this type of local field. Other institutions cannot use this local field for search and facets with normalization rules, but they can use it with other methods: local display field and local search and facet (using bibliographic field mapping method).
To learn how to define local fields, see Adding a Local Field.
-
-
View it from other institutions/campuses service – Unlike Primo, Primo VE allows users to see the electronic availability status of records in other institutions and campuses. For more info see View It - Other Institution.
-
Dedicated consortium facets – Primo VE automatically creates configurable facets that are related to consortia, such as other Institution facets and Library facets. For more information, see Brief Results Page.
-
Central management and configuration – Primo VE allows a consortium to manage several elements centrally using the NZ institution and to distribute them to the member institutions. For more information, see Central Management in Collaborative Networks. This is relevant for consortia with an Alma NZ as this functionality is managed in the NZ.
-
Union view – Primo VE has a built-in union view. This view is set up and maintained with the NZ institution, and it is not associated with any member institution. Typically, this is done when a consortium wants a central view that is associated with the consortium's NZ institution and not one of the member institutions. This view is neutral and will display all holdings as "other institution holdings" and will offer View It services only for materials that are available for all in the NZ. When users attempt to sign in, they will be prompted to sign in to a specific institution, which allows them to access View It and Get It services for the specified institution. This is relevant only for consortia with an Alma NZ.
Documentation and Training Videos
In preparation for this task, it is recommended that you familiarize yourself with the following documents and videos:
-
Overview and Topologies (5-6 min)
-
Discovery Overview and Configuration (8-10 min)
-
Local Fields for Consortia (5 min)
Preparation
Before configuring consortia related features in Primo VE, we would like to give you some guidelines about the consortia related aspects and functionality to analyze and prepare yourself before working with Primo VE. This preparation is divided into two levels: consortia and institution.
Step 1: Determine Configuration Needed at the Consortia Level
For your consortium, check the following configurations in Primo to see if they need to be added to your Primo VE configuration:
-
Check normalization rules – in most of the consortia there is one unified normalization rule. You should analyze this normalization rule and define:
-
Local fields – Determine which local fields are relevant to all institutions and those that are relevant to specific institutions. For information on how to convert local fields used in Primo, see Go VE: Converting Local Fields in Primo to Primo VE.
-
Display fields – Check to see if the out-of-the-box display fields were modified in the normalization rules. For information on how to convert display fields, see Go VE: Customizing the Default Display Fields in Primo VE.
-
Local resource types – check if you have defined local resource types and if so, define the local resource types that relevant to all institutions and those that are requested by specific institutions. For information on how to convert local resource types from Primo to Primo VE, see Go VE: Converting Local Resource Types in Primo to Primo VE.
This configuration is relevant to consortia with Alma NZ. For consortia without an Alma NZ, every institution manages its own normalization rules.
-
-
Central package – The ability to create a central customization package exists in both Primo and Primo VE. It allows consortia to create a base customization that member institutions can use to create custom packages for their institutions. Note that the customization packages are copied from Primo to Primo VE during the enablement process. This configuration is relevant for consortia with an Alma NZ.
-
Union view – If you currently using a central Primo view branded as the consortia office and your consortium has an Alma NZ, this might be relevant for you.
Step 2: Determine Configuration Needed at the Institution Level
Here is the list of consortia-related features that can be configured at the institution level. For information regarding other Primo VE configuration options and available features, see Step 3: Configuration.
-
Scopes – you can divide your scopes into the following groups:
-
Institutional records – These scopes include data that belongs to your institution only. Meaning, all the records that are cataloged in your institution are available for your institution (even if they are cataloged in the NZ). Determine the subset of every scope defined in Primo. For more information, see Go VE: Converting Primo Scopes to Primo VE.
-
Entire network records – These scopes contain the whole consortium data or a subset of data from the entire network (such as a scope that contains all the records in the network that have physical availability). Out of the box, the Entire Network scope is created in your view so that you have the ability to search in the full consortium data.
-
-
Views display functionality – Determine whether to configure the following Primo VE features that were not available in Primo:
-
Facets – For each type of facet, you can specify the following options:
-
whether to include the physical inventories from your institution only or from all the members in the Held by library option in the Availability top-level facet.
-
whether to include libraries from member institutions in your library facet or display them in a separate facet.
-
whether to display the Institutions facet.
-
-
Get it and View it from other institutions – In addition to the Get it from other institutions option that exists in Primo, Primo VE also allows you to display the electronic inventory from other institutions, and in case you have campuses in the institution, to display electric availability from other campuses. This is for display only, and the user cannot access the full text. If this information is necessary for your users (for example, they can walk to another institution/campus to access the full text), you can enable this functionality.
-
Configuration
Step 1: Create Local and Display Fields in the Collaborative Network
After you have determined which local fields are needed by all and specific institutions, you may begin their configuration in Primo VE:
-
Create local fields that are required by all institutions. This can be done in central management from the NZ by using local fields 51–100, which permit their changes to be distributed and applied to the member institutions automatically. For more information, see Define Local Fields Centrally.
The following example describes how to manage local fields centrally in Primo VE:
-
Open the Define a Local Field page in the NZ, select a local field that can be managed centrally (local_field_51 - local_field_100) and configure its mapping. For more details on how to create local fields, see Adding a Local Field in Primo VE.
In the following example, local_field_51 is defined to display all subfields from the MARC21 502 field: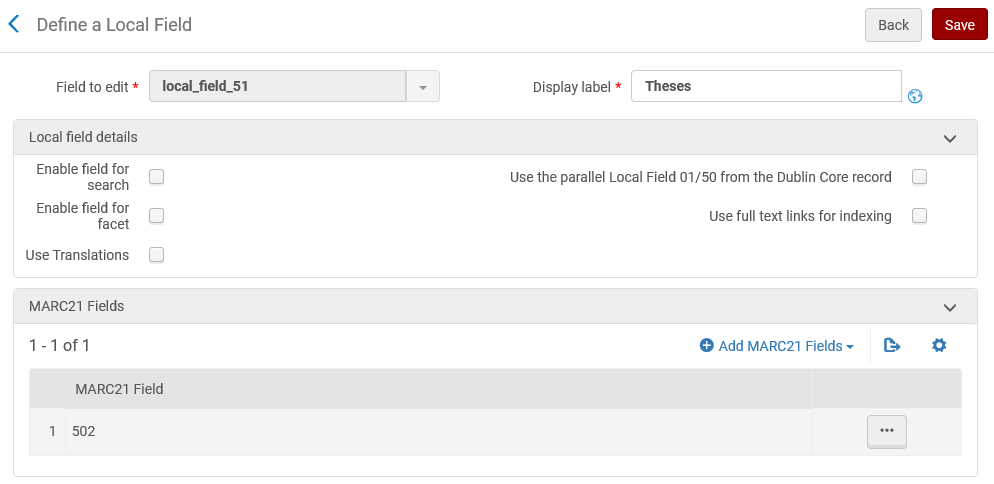 Define a Local Field Page
 -
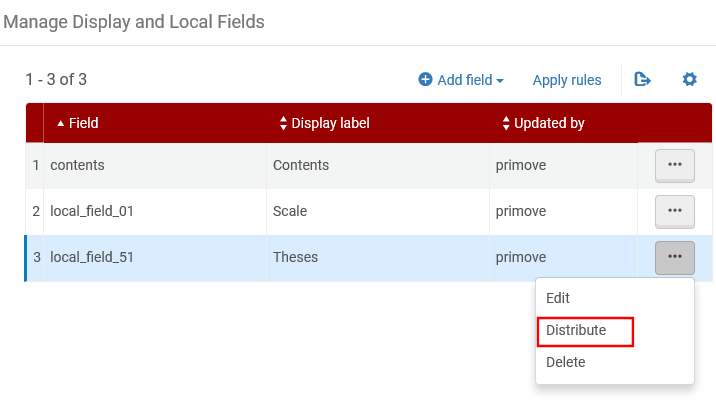
If you want to pass this field and its settings to all member institutions, select the Distribute row action on the Manage Display and Local Fields page:
 Manage Display and Local Field Page
 -
Decide whether to override all member institution's settings, and then select Confirm. If you decide not to override the settings, the local field will be added only to institutions that are not already using the local field.
 Distribute to All Members of the Consortium
-
-
For each member institution, open the Define a Local Field page in your institution and create any local fields needed specifically for your institution. As explained in the Background section, most of the local fields do not affect other institutions.
For more information on how to convert local fields in Primo to Primo VE, see Go VE: Converting Local Fields in Primo to Primo VE. -
For each member institution, open the Define a Display Field page and customize any display fields that need local customization based on modifications to your normalization rules in Primo.
Step 2: Create Local Resource Types in the Collaborative Network
After you have determined which local resource types are needed by all and specific institutions, you may begin their configuration in Primo VE:
-
For local resource types that required by all institutions, we recommend that you create them in the Alma NZ and distribute these fields to all member institutions. For more information, see Define Resource Types Centrally.
-
For local resource types that are required by specific institutions, we recommend that you create them in the specific institutions. These local resource types affect only institutional data that is created locally (not local records that are linked to the NZ record).
If you want to create local resource types for records that are available in your institution but are cataloged in the NZ, you should create them centrally in the NZ.
Step 3: Create Scopes in the Collaborative Network
After you have determined which scopes (institutional or entire network) are needed, you may begin their configuration in Primo VE:
-
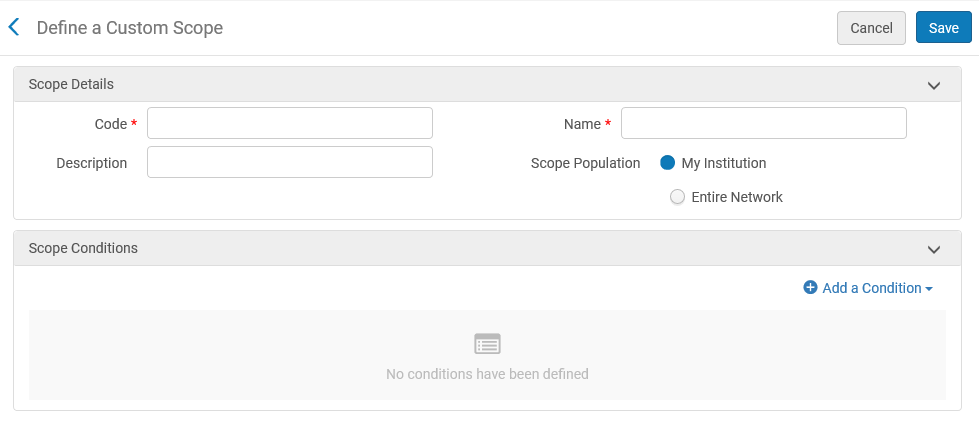
On the Define a Custom Scope page, specify the Scope Population (My Institution or Entire Network):
Specify the Scope Population -
Specify the conditions under which this scope applies. For more information, see Go VE: Converting Primo Scopes to Primo VE.
-
The conditions for the My Institution population are similar to single institution configurations and are based on the following categories: Inventory, Local Fields, and Metadata.
-
The conditions of the Entire Network population are based on the following categories: Entire Network Inventory (which includes availability based on physical, digital, and electronic), Other Institution Inventory (which includes other institution, external data source, and libraries and locations), Metadata (such as additional title and alternative title).
For example, the following scope includes all records from the entire network that have physical copies availability:
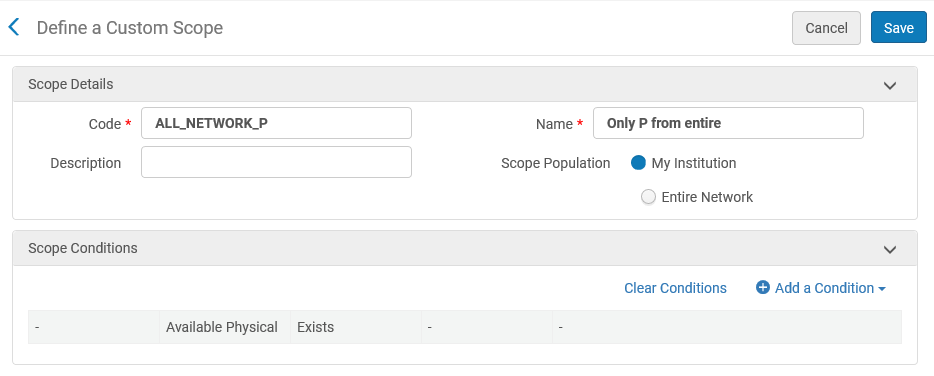 Example Custom Scope
 -
Step 4: Define Discovery Network Settings in the View
On the View Configuration page, define the settings that are specific to consortia. For more information about this configuration, see Display Functionality.
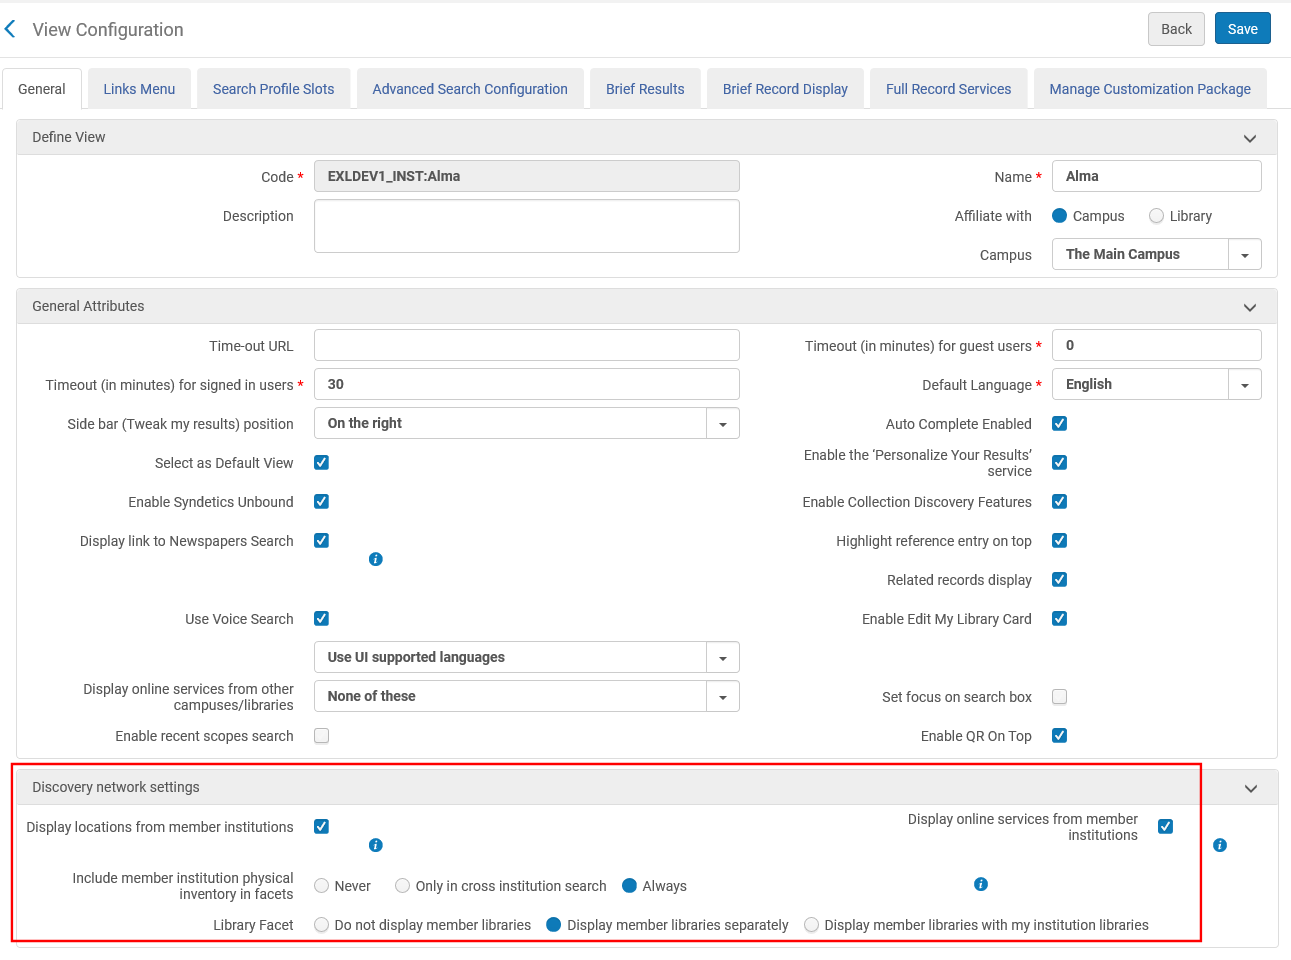 View Configuration Page