
Managing App Roles
![]()
- You configure the default app role and the association between app roles and customer roles when you manage app roles on the Select app role to change page (see below).
- You can enable/disable app roles for services and other features on this page; however, the best practice is to configure the app roles each service and feature at the same time that you configure the service or feature. For more information, see Enabling/Disabling Services in Apps.
Managing App Roles
- Profile - The profile for which this app role applies. For more information about profiles, see Customizing End-User Access to Services.
- Description - The display name of the role as it appears in other areas of the App Manager.
- Priority - Not in use.
- Default role - Assigned to any end-user. For more information, see Configuring End-User Authentication Types.
- Customer role - The customer role to which this app role is associated. For more information about customer roles, see Configuring Customer Roles.
- Menu options - The static content services to which this app role is associated. The best practice is not to manage this here, but instead when you are managing the service; see Working with Static Content and the Content Menu.
- Home page feeds - Not in use.
- RSS categories - The RSS categories to which this app role is associated. The best practice is not to manage this here, but instead when you are managing the category; see Configuring Default RSS Feeds.
- Standard RSS feeds - Not in use.
- Standard alert groups - The alert groups to which this app role is associated. The best practice is not to manage this here, but instead when you are managing the alert group category; see Configuring Alert Groups.
- Resources - Not in use.
- Maps - The maps to which this app role is associated. The best practice is not to manage this here, but instead when you are managing the map; see Adding Maps.
- Location categories - The location categories to which this app role is associated. The best practice is not to manage this here, but instead when you are managing the category; see Adding Map Location Categories.
Configuring Customer Roles
- Name - The code the institution sends to the App Manager. For more information about this field, contact Ex Libris customer support.
- Description - The display name of the customer role as it appears in the dropdown list when configuring app roles.
Importing Roles in Bulk
You can import lists of app and customer roles to add to the system in bulk. In order to do this, you must begin by exporting the list of existing roles, so that you can use this as a template for the list you will import. You can then add additional roles to the template, and import it into the system to add the roles to it. The template is an Excel file.
- Navigate to App Settings > Enterprise Roles > Import / Export Roles. The Import / Export Roles page opens.

- Select Export. An Excel file containing the existing roles is downloaded to your computer.
- Open the file for editing. The first sheet, containing instructions, is shown.
- In the Customer Roles sheet (tab), add additional customer roles, and in the App Roles sheet (tab), add additional app roles, as required. Note that the customer roles that appear in the Customer Roles sheet are available in the App Roles sheet, under Customer Role Name, to be matched with app roles.
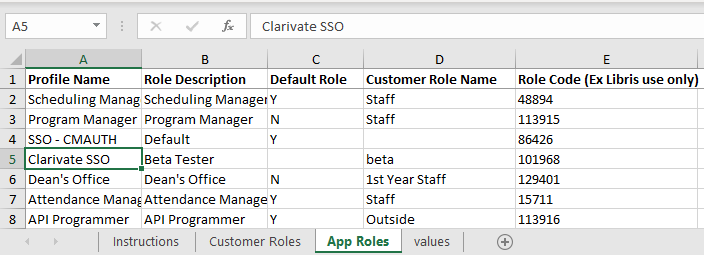 App Roles Sheet of the Excel File
 - Save the updated file on your computer.
- In the Import / Export Roles page (App Settings > Enterprise Roles > Import / Export Roles), select Choose File, and then select the file you saved.
- Select Submit. The additional roles are added to the system, and the message Data updated successfully appears.
Assigning App Roles to Users in Bulk
You can import a list of user email addresses in order to assign an app role to the users in bulk. In order to do this, you must begin by exporting the list of existing users to which the role is assigned, so that you can use this as a template for the list you will import. You can then add additional users to the template, and import it into the system to assign the role to those users. The template is an Excel file.
- Navigate to App Settings > Enterprise Roles > App Roles. The App roles page opens.
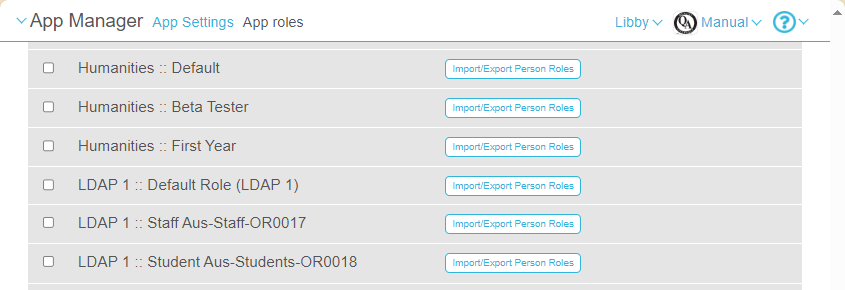
- For the role you want to assign to the users in the list, select Import/Export Person Roles. The Import / Export Persons of Default Role page opens.
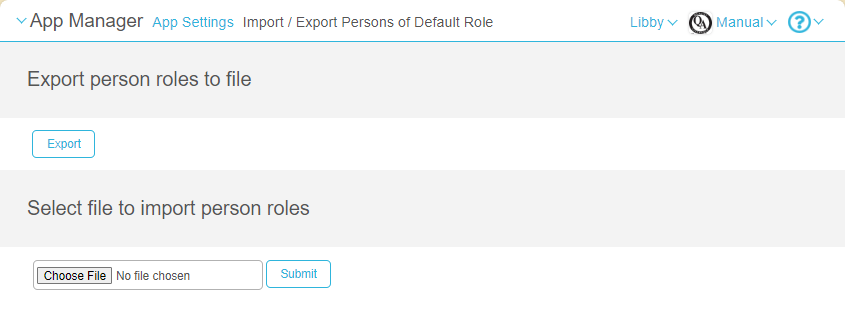
- Select Export. An Excel file containing a list of the existing users who have the role is downloaded to your computer.
- Open the file for editing. The list of users is shown.
- Add additional users, as required.
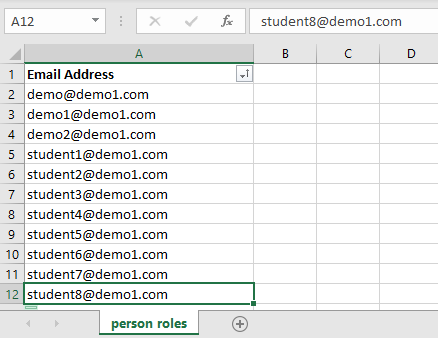 List of Users with the Specified Role in the Excel File
 - Save the updated file on your computer.
- In the Import / Export Persons of Default Role page, select Choose File, and then select the file you saved.
- Select Submit. The additional users are assigned the role, and the message Data updated successfully appears.