
How to Load Representations to an existing Alma Digital record
- Product: Alma Digital
Description
We have existing descriptive metadata records (BIBs) in Alma that we would like to generate representations (REPs) for and attach files.
Resolution
1. In Alma go to: Admin > Run a Job: Generate Representation from Existing Bib Job
This job can be run for a set of records and creates a REP from the BIB's 856 $u.
Note: only one REP is created.
Alma will not create multiple REPs for a BIB, even if there are multiple 856 $us.
Parameters:
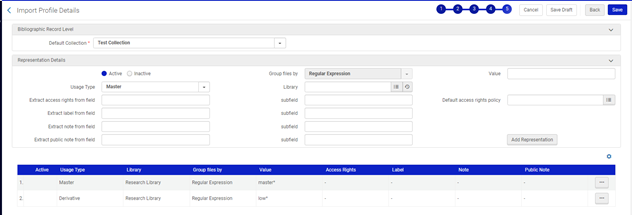
You must define a default collection for every REP to be assigned to a collection (mandatory).
Add the collection to Alma if it doesn’t exist before you run the Generate Representation from Existing Bib job.
-
Usage Type: “Master” or “Derivative”
-
Library: The library that will own the REPs.
-
Access rights: The field and subfield in the associated BIB from which to extract the access rights policy name to assign to the REP.
If the BIB doesn’t include this information, select the Default access rights policy.
Note: you must configure the Alma-D access rights policies if you plan to map them from the BIB:
Alma Configuration: Fulfillment > Copyright Management: Access Rights -
Default access rights policy: the default access rights policy when there is no access rights policy referenced in the BIB
-
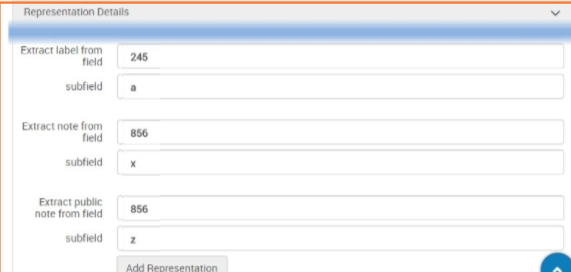
Extract label from field/subfield: the field and subfield from which to extract the REP’s label.
-
Extract note from field/subfield: the repeatable field and subfield from which to extract the internal REP notes.
-
Extract public note from field/subfield: the field and subfield from which to extract the REP’s public note.
REP public notes appear in the Primo View It services page.
2. Add Digital Representation
In Alma go to: Resources > Create Inventory > Add Digital Representation
Using this workflow, you can manually add a REP to an existing or new BIB, one-by-one.
Files should be placed in an accessible folder and uploaded to Amazon S3 or your PC.
Select ‘Existing Title’ for an existing BIB.
The Collection for the REP you are creating, should already be configured in Alma.
a. Uncheck the ‘Remote’ option
b. Search for an existing title in Alma
c. Select the Collection (mandatory) from the list
d. Select Usage Type (mandatory): Master or Derivative
e. Select the library (mandatory) from the list
f. Select fields for retrieval notes, access rights, etc.
g. Upload files: select folder (Amazon S3) or add files (drag and drop files) from your PC
A single REP can be uploaded from a remote Digital Repository.
3. File Uploader and Import Profile
These methods enable creating REPs and uploading files in bulk.
Requirements:
a. Creating a ‘Digital’ Import profile
b. Preparing an input file
c. Preparing files for REP creation
d. Create ingest for Digital Uploader or preload files into Amazon S3
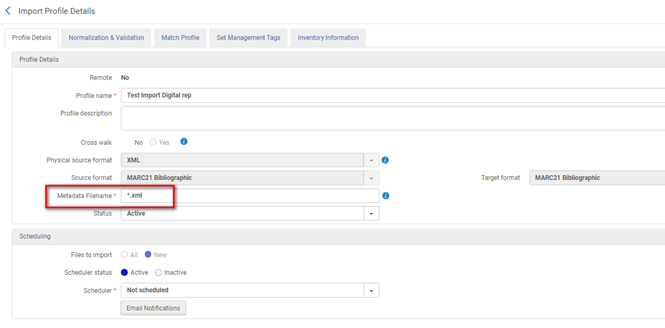
Import profile example:
Select the source format and input metadata file name:
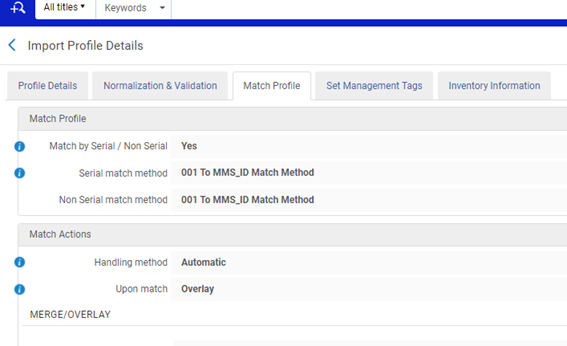
If an Alma BIB already exists, you can match based on the BIB’s 001:
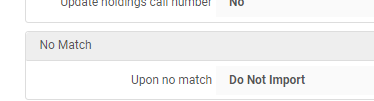
To add REPs to only matched records, select Upon no Match: Do not Import
To create REPs for existing Alma BIBs, prepare set of records and export them in MARC XML.
Example MARC XML file:
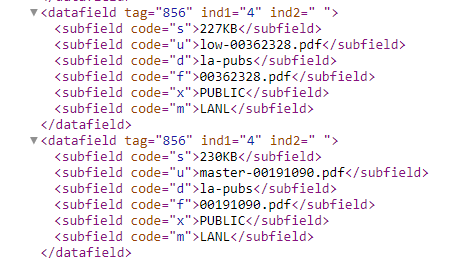
Add the REP details, Select Collection, then select BIB fields from which to populate the access rights, notes label, etc.
Note: you can define a value to differentiate master and derivative files.
Note: Alma creates an Amazon S3 folder for the import profile.
Files can be uploaded from Amazon S3 or from PC folder.
The Digital Uploader workflow can be used to upload files for a specific import profile.
In Alma go to: Resources > Advanced Tools > Digital Uploader
1. Add new Ingest
2. Name the ingest
3. Add files: manually or drag and drop folder with metadata and corresponding files into an ingest
4. Select ‘Upload All’, then ‘Submit’
5. Select Import Profile from the drop-down menu
6. Click ‘Run MD Import’
