
Configuring User Blocks
This page describes how to configure user blocks including demerits, consortial blocks, overdue loans, etc. For configuring block preferences see Loans.
For links to all the main fulfillment documentation pages see Fulfillment.
Configuring User Block Descriptions and Definitions
For the how-to that guides you through the process of setting up librarian- and system-assigned blocks to patrons, see How To Set Up Blocks to Prevent Loaning, Renewing and Hold Requests for Patrons.
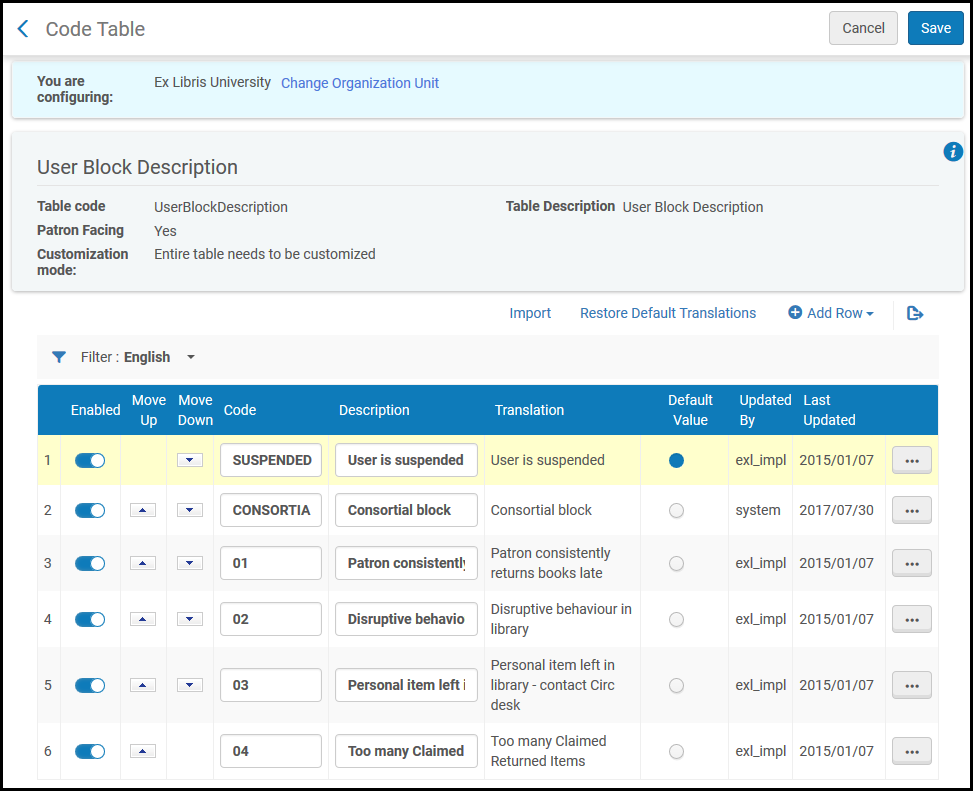
- Import a list of user block descriptions from a file
- Add a new user block description
- Delete a user block description
- Enable/disable a user block description
- Reorder the list of user block descriptions
- Modify the code or description fields
- Select one description to be a default value in the list
- Add a set of user block definitions (see Adding User Block Definitions)
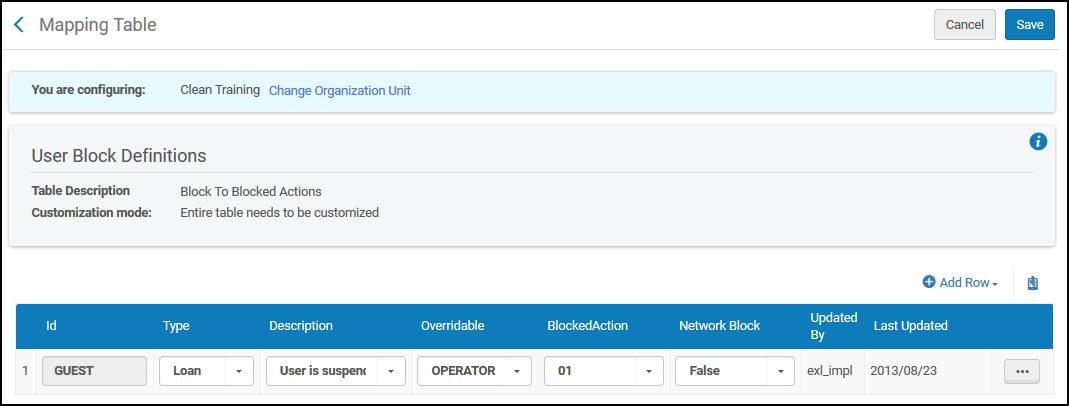
- Edit a set of user block definitions (modify settings on the User Block Definitions Mapping Table page. You cannot change the ID that is defined for a user group definition).
- Delete a set of user block definitions (select Delete)
Adding User Block Definitions
- On the User Block Definitions Mapping Table page, select Add Row and enter the ID for the new user block definition in the Id field.
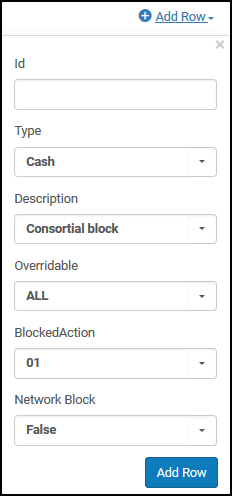 Create New Mapping Row Section of the Mapping Table Page
 - Select the following information from the respective drop-down lists:
- Description – Describes the block action; the reason for the block. This list includes all of your user block descriptions. See the User Block Descriptions code table for defining descriptions, above.
- Blocked action – Select the blocked action from one of the following:
These blocked actions are preconfigured in Alma. To configure additional blocked actions, including a block for resource sharing requests, contact Ex Libris Support.
- 01 – loan
- 02 – loan, renew
- 03 – loan, renew, hold
- Type – Select the type of block from one of the following:
The Type value is for information only and does not impact the system, with the exception of the Demerit and Consortial Block type, whose values should not be changed. For information on configuring demerits, see Configuring Demerits. For information on configuring consortial blocks, see Configuring Consortial Blocks.
- Cash
- Consortial block
- Demerit
- General
- Loan
- Resource sharing requests
- User
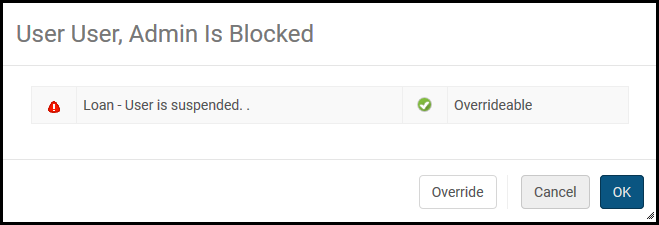
- Overridable – Select whether the block is overridable from one of the following:
- ALL – The block is overridable by any circulation desk operator
- NONE – The block is not overridable
- CIRCDESC – The block is overridable only by a circulation desk manager
- OPERATOR – The block is overridable by a circulation desk manager or a circulation desk operator (and not a user with circulation desk operator – limited permissions)
- Network Block - Select whether the block will be copied when creating or refreshing a linked account.
- TRUE - Copy the block
- FALSE - Do not copy the block. This is the default.
- Select Add Row. The new user block definition is displayed at the bottom of the list of defined user block definitions.
- Select Save to store the new set of user block definition.
Configuring Demerits
- General System Administrator
- Fulfillment Administrator
Enabling the Demerit System
- demerit_enable – Set this field to true to enable demerit functionality.
- demerit_history_days – Specify the length of the demerit tracking period in days. If the user's demerit points exceed the value specified in the demerit_maximum_threshold parameter during the demerit tracking period (that is the last number of days specified by this parameter), the system places a block on the user.
- demerit_maximum_threshold – Specify the maximum number of points allowed during the tracking period.
- demerit_suspension_days – Specify the length of a user's suspension period in days.
Configuring Demerit Points
-
On the Demerit Points mapping table page (Configuration Menu > Fulfillment > Patron Configuration > User Demerits), in Add Row, enter the following fields to define the points assigned to a user group and material type.
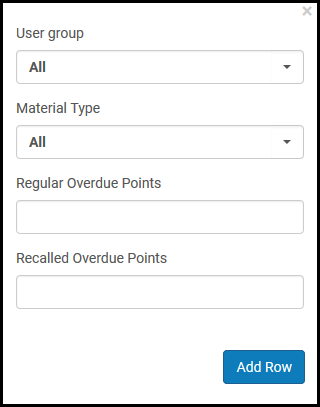 DemeritPoints Mapping Table
- User group – Select a specific user group or All.
- Material Type – Select a specific material type or All.
- Regular Overdue Points – Enter the number of demerit points to apply to overdue items (not recalled overdue items).
- Recalled Overdue Points – Enter the number of demerit points to apply to recalled overdue items.
- Select Add Row.
Alma uses the following priority to decide which mapping row to use when assigning demerit points to a user:
- Both the user's group and the material being returned match the values in the table.
- The user's group matches the value in the table and the Material Type is set to All in the table.
- The returned item matches the Material Type value in the table and User Group is set to All in the table.
- Both User Group and Material Type are set to ALL in the table.
- If no match is found, no demerits are assigned.
For example, if the following demerit rows are defined and an alumnus returns a non-recalled manuscript late, the system assigns one demerit point to the alumnus:
Example Demerit Point Mapping Rows User Group Material Type Regular Overdue Points Recalled Overdue Points Undergrad Book 3 5 All Manuscript 3 6 Alumni All 1 2
- After you have added all of your demerit point definitions, select Customize to save your changes to the table.
Configuring the Demerit Block
Monitoring the Blocks Job
Configuring Consortial Blocks
- General System Administrator
- Fulfillment Administrator
- Set up any blocks that will be sent to the target in the User Block Definition table with the Network Block field set to True. See Configuring User Block Descriptions and Definitions.
- Set up Linked Account rules with the Copy Networks Block field set to Yes. See Configuring Linked Account Rules.
- In the User Block Description table, create a record if one does not already exist with code CONSORTIA. Enter CONSORTIA in the Code field and Consortial block in the Description field.
- In the User Block Definitions table, create a record with Type and Description fields set to Consortial block. To ensure that this block is not copied back to the source, set the Network Block field to False. See Configuring User Block Descriptions and Definitions.
- Setting the Network Block field to True is not supported! It is not possible to copy blocks from a linked account to the source record in the patron's home institution.
- Consortial blocks may be used when the linked accounts do not use consortial IDs. If consortial IDs are used, neither account is considered primary. Therefore, refresh actions (and copy of consortial blocks) from one account to the other do not take place.
Configuring User Blocks Due to Overdue Loans
Configuring an Overdue-Loan Blocking Policy
- Access the User Block Description table (Configuration Menu > Fulfillment > Patron Configurations > User Block Description). Add a new row with code OVERDUE (see Configuring User Block Descriptions and Definitions).
- Access the User Block Definitions table (Configuration Menu > Fulfillment > Patron Configurations > User Block Definitions). Add a new row of type Loan using the overdue loan block that was created in the prior step.
- Access the Fulfillment Terms of Use (Configuration Menu > Fulfillment > Physical Fulfillment > Terms of Use and Policies).Add a new loan Terms of Use or edit an existing one (see Configuring Terms of Use).
The Block When Overdue Terms of Use does not block by default.
- To create the block, select the blank line from the drop-down, and select Add Policy from the Actions menu.
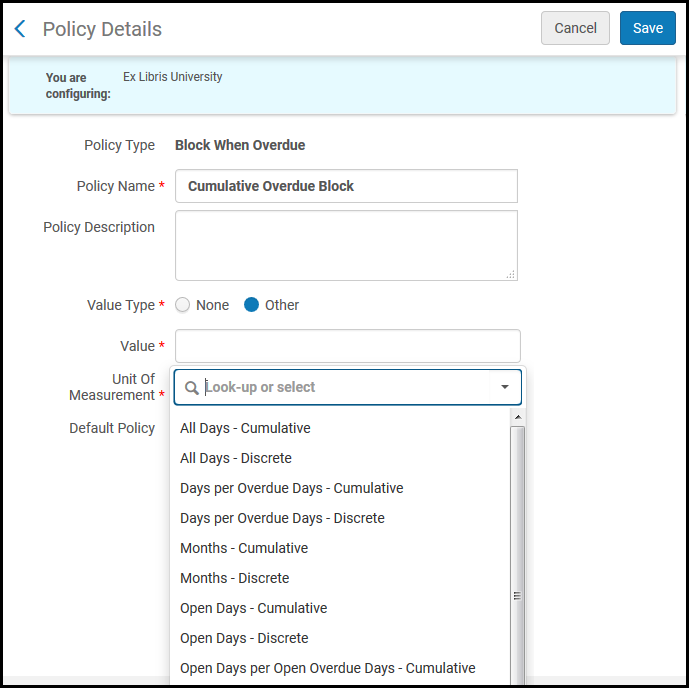 Add Blocking Policy
 - On the Policy Details page, select Value type of Other. Enter a number in the Value field. Then select from the Unit of Measurement drop-down list. Overdue blocks may be calculated based on number of overdue days accumulated across multiple loans (cumulative) or based on the overdue days of a single loan (discrete). If an applicable Block When Overdue policy has a cumulative unit of measurement, the expiry date is calculated as the latest block expire date plus the number of days as defined by the policy. If a cumulative value is not chosen, the expiry date will be according to the policy only, without considering existing blocks. Overdue blocks are calculated based on full 24 hour days. If the unit of measurement is for days, the block is applied for a full day (24 hours between return date and due date).
If Days per Overdue Days - Discrete or Open Days per Overdue Days - Discrete is selected as a unit of measurement, the calculation is <Overdue/Open overdue days> * <Value>.Available values for Block When Overdue are:
- All Days - Cumulative
- All Days - Discrete
- Days per Overdue Days - Cumulative
- Days per Overdue Days - Discrete
- Months - Cumulative
- Months - Discrete
- Open Days - Cumulative
- Open Days - Discrete
- Open Days per Open Overdue Days - Cumulative
- Open Days per Open Overdue Days - Discrete
- Weeks - Cumulative
- Weeks – Discrete
- None
- Select Save.
- On the Terms of Use Details page, select Maximum Period for Overdue Block. The maximum overdue block period policy affects the calculation of the overdue loan block's expiry date. If a block's expiry date is calculated to be later than the maximum, the block will be shortened to match the limit. The default policy does not set a maximum overdue block period.
- To create the maximum block policy, select the blank line from the drop-down, and select Add Policy from the Actions menu.
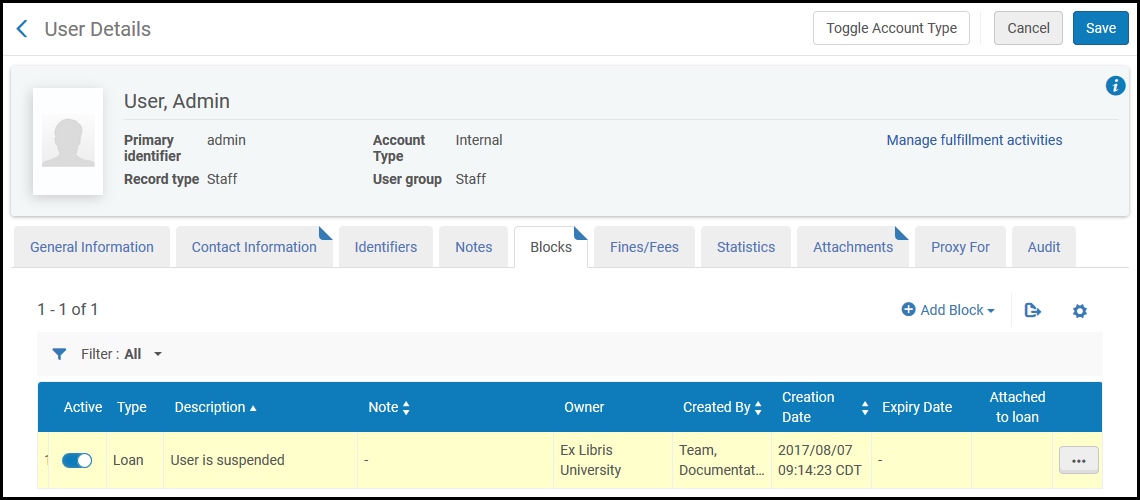
Viewing User Blocks
The user record includes information about active blocks on the user.
- In the persistent search box, search for the user (see Searching in Alma). The user account appears in the list of users in the Find and Manage Users page. If blocks exist for the user, a checkmark appears under Blocks in their row.
- To see details about the blocks, select the user. The User Details page opens.
- Select the Blocks tab to see details about all the active blocks on the user.
Automatically Removed User Blocks
User blocks that have passed their expiry date are automatically removed when the Users - Remove blocks job runs. Overdue blocks that were previously created by the Overdue and Lost Loan Profiles job are removed automatically when the loan is renewed or marked as lost.
- Access Monitor Jobs. Find the Users - Remove Blocks job.
- Within the report, select the link Delete user overdue loan block.
For more information about patron blocking due to overdue loans, see the Patron blocking due to overdue loans video (11:22 mins).