Managing Patron Services at a Circulation Desk - New Layout
The information on this page applies to the new layout for managing patron services.
- Circulation Desk Manager (logged in to a circulation desk)
- Circulation Desk Operator (logged in to a circulation desk)
- Circulation Desk Operator - Limited (logged in to a circulation desk)
Overview
This page describes how to manage patron services in Alma. It describes how to work with loans, returns, requests and fines/fees. It includes an overview of the page layout and information on working with patrons. References to information on working with fulfillment networks are also included where relevant.
For a presentation showing the new layout and streamlined workflow at the circulation desk, see The Manage Patron Services Page Circulation Desk.pptx.
For links to all the main fulfillment documentation pages, see Fulfillment.
The Managing Patron Services Page
Most of the activities for managing patron services are carried out on the Managing Patron Services page which is described in this section.
Examples of activities that are not carried out on the Managing Patron Services page are creating relationships between libraries and between institutions. See Main Activities for Managing Patron Services for more information.
Accessing the Manage Patron Services Page
You access the Manage Patron Services page by entering the patron's ID as described below.
To access to this page you need to ensure that the location is set to a circulation desk.
-
Navigate to Fulfillment > Manage Patron Services.

-
Scan the patrons' ID, or in the Scan patron’s ID or search for patron field, search for the patron in the database (see Selecting a Patron). If the patron is not registered you will need to register them (see Registering and Importing Patrons).
If the patron is acting as a proxy for another patron (see Managing Proxy Users) select Use proxy, and then select Go. The Proxy for field appears. Select the target patron.
If you have an RFID reader you can scan in the reader card (see RFID Support). -
Select Go. The Manage Patron Services Page appears.
Layout of the Manage Patron Services Page
The page is divided into two main sections.
Left Pane: Fulfillment activities and user information

Right Pane: Details for the selected item in the left pane
Selecting an item in the hand pane opens the details window.

Left Pane: Fulfillment Activities and User Information
The left pane is divided into five areas:
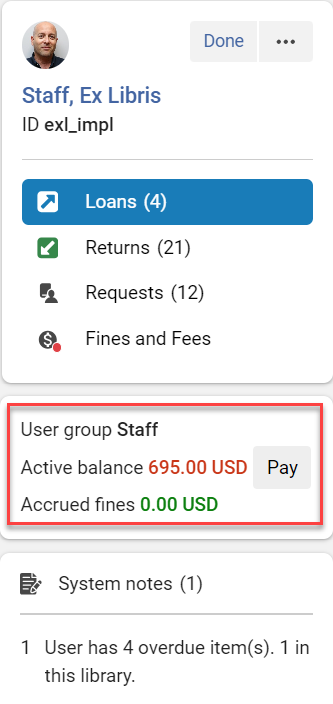
User Information
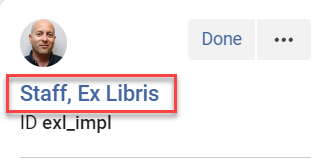
Select the user first and last name to view the full user details.
-
User name (First and Last)
-
User ID

For accessing the quick user details see Quick User Management.
See Managing Users for more information on working with users in Alma.
User Details, Actions and Letters
Select the Actions menu icon to access the following information and letters:

-
Quick User Management — Displays a summary of the user details. To view the full user details select the user name. For more information see Basic User Information.
-
Add/Renew Patron Role - Add a patron role to a user, as well as view and update the patron role's expiration date (see Renewing Patrons).
-
Detach from Social Account - Select this to disassociate the social login from the patron (see Detach from Social Account).
-
Send Activity Report — Manually send the Borrowing Activity Letter to the patron, which lists patron activity, including loans, overdue items, and active fines. This letter is also triggered by the Renew bulk actions (see Bulk Actions for Loans).
-
Send Requests Report — Manually send the Ful Requests Report Letter to the patron listing all requested items, broken down by Not Active, In Process, and On Hold Shelf.
-
Send Return Receipt — Manually send a Return Receipt to the patron for items returned to the circulation desk during the current session. This letter is also triggered when returning items for a patron/s (see Returning Items).
-
Send Loan Receipt — Manually send the Loan Receipt Letter to the patron for items borrowed at the circulation desk during the current session. This letter is also triggered when creating loans (see Working with Loans).
Fulfillment Activities
Display and update details for the following fulfillment activities:
-
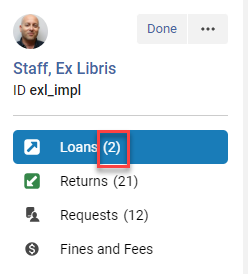
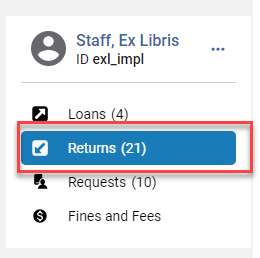
Loans — Displays the loans for the currently selected user. See Loaning (Checking Out) Items for more information.
-
Returns — Displays the returns for the currently selected user. See Returning Items for more information.
-
Requests — Displays the requests for the currently selected user. See Managing Patron Requests for more information.
-
Fines and Fees — Displays the fines and fees for the currently selected user. See Viewing Fines and Fees and Receiving Payments for more information.
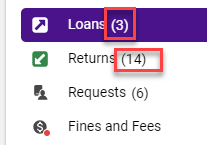
You can access the various tabs with keyboard shortcuts as below:
- Loans: Alt + 1
- Returns: Alt + 2
- Requests: Alt + 3
- Fines and Fees: Alt + 4
Additional User Information
This section displays additional information for the selected user.
The display of information in this section is configurable from Configuration > Fulfillment > Patron Configurations > Patron Services User Card Fields. For the fines and fees information see also Viewing Fines and Fees for a Patron. Note that you may need to refresh the page after updating the display configuration.
-
User Group — The user group is required for some operations such as a bulk change on the Due Date fields. See Configuring User Groups.
-
Active balance — The balance of fines and fees. This may include transferred balance depending on the include_transferred_finesfees_in_alma_limits parameter. Next to the Active balance is the Pay button which can be used to pay all the fines (see Paying Fines in Bulk).
-
Accrued fines — Additional fines that may still be increasing, because the patron has not yet returned an overdue loan. For information on accrued fine calculations see Viewing Fines and Fees.
-
Total fines — All fines for this user.
-
Transferred Balance — When bursar fees are set to Exported status, they appear as transferred balances.
-
Email — The patron’s preferred email.
-
Phone — The patron’s preferred phone number.
-
Address — The patron’s preferred physical address.
-
Resource sharing library — The patron’s resource sharing library.
User and System Notes
For working with notes on loans see Managing Loan Notes.
-
System Notes — These include system generated notes such as patron role expiration, overdue items, items on hold shelf, etc.
-
User Notes — Add and view user notes by selecting Manage notes. The User Details pane opens with the Notes tab selected and the existing notes displayed. Select Add Note to add a new notes. The user notes contain information on items waiting for pickup. The number of items only refer to local items. Items from other institutions will not be included in the calculation. Users can also add notes when overriding loans (see Managing Loan Notes). For more information on the User Notes tab, see Managing Users.
Right Pane: Details for Selected Item in Left Pane
The right hand pane displays details for the item selected in the left pane (see Layout of the Manage Patron Services Page), and in some cases the fields here can be edited. Whether or not this details pane appears depends on the settings for split view (see Views).
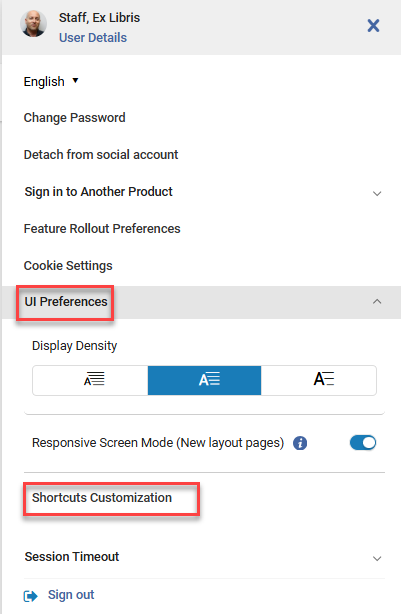
Customizing the Display of Information on the Patron Services Page
For instructions on customizing the display of information see Customizing the Display in Alma.
Customization to the Network Activity tab and changing its display does not impact (and is not impacted by) customization and changes to the display for the main Patron Services page.
Switching Between the Various Views and Displays on the Patron Services Page
Enabling Sound Alerts for Blocks
If the system is set up for sound alerts when blocks occur at the circulation desk (see Configuring Circulation Desks), a user can toggle those alerts i.e., switch them off and back on. Once enabled for a circulation desk, users of that desk will see the sound icon in the scan bar, indicating that sounds are enabled.
A user can shut off the sound alerts by selecting the sound icon. The sound icon changes to indicate that sound alerts are now shut off (for this Alma user only).

When the User block is presented, the Alma operator can select Override, Cancel or OK. Selecting OK will sound the alert during the loan process while selecting Override will not sound an alert during the loan process.
Exporting Records from the Patron Services Page
For instructions see Exporting Records to Excel.
Main Activities you can Perform to Manage Patron Services
Manage Loans
The patron can loan (checkout) items by arriving at the circulation desk to receive the requested material which is currently on the active hold shelf. Alternatively, the patron may bring the desired item directly from its permanent location (that is, without having ordered in advance) to the circulation desk. The barcode is scanned at the circulation desk. See Loaning Items for more information.
When the patron returns the loaned item, the barcode is scanned at the circulation desk. The item is displayed in the Returns list. See Returning Items for more information.
Reloaning an item that is already on loan causes a renew.
Manage Requests
The Circulation Desk Operator/Manager can view a list of items requested by the patron. They can create a request, automatically populating the request with this user's data. A physical title will have three options for the type of request to be created: Patron Physical, Booking, and Digitization. An electronic title will have an option for Document Delivery.
Requesting in the Managing Patron Services page is done at the title level, unlike the Physical Item search which can be at any level. Therefore the searchable attributes are title attributes, and not item-level attributes such as barcode.
For more information, see Managing Requests.
Manage Fines and Fees
Fees may be charged for library services (such as digitization), or fines may be levied if, for example, a patron damages a book. The Circulation Desk Operator/Manager can view a patron’s fines/fees and receive payments from a patron if the circulation desk is configured to receive payments. Email and/or SMS notifications may also be set up to notify patrons of their fines and fees. See Managing Fines and Fees for more information.
Manage Patron Information
The Circulation Desk Operator/Manager can view and edit patron information, register patrons configure which fields appear in the patron forms. See Managing Patrons for more information.
For more information, see Patron Services Overview. (2:41 min)
Work with Fulfillment Networks
View Fulfillment Network Activities
Activity across all linked institutions can be viewed from the Network Activity tab. See Fulfillment Networks for more information.
Scan Items from Other Institutions
If you are part of a fulfillment network and you have a Circulate For relationship, the Institution drop down list appears for scanning in items.

Select the relevant institution before scanning in the barcode. This applies to returns and loans. If the network uses item barcodes that are unique across the network (the same barcode is never shared by two items in the network), then the Institution drop down can be configured to not appear by setting the fulfillment_network_unique_barcodes parameter as described in Configuring Other Settings.
For more information see Fulfillment Networks. See also Registering Patrons from Other Institutions.
Detach from Social Account
If the patron has a social account attached, select Detach from Social Account to disassociate the social login from the patron. For more information see Social and Email Login. This can also be accessed from the User Details section (see User Details, Actions and Letters).
Configure Page Timeout
The Patron Services page is set by default to time out after two minutes of inactivity. Optionally, you can configure the Patron Services page time out to be between 1 and 30 minutes by modifying the patron_services_timeout_minutes setting on the Customer Parameters Mapping Table page (see Configuring Other Settings).
Export Records
See Exporting Records for more information.
Managing Patrons
This section describes how to work with patron' records and manage patron services.
Patrons must be registered before you can provide services to them (see Registering Patrons) .
Selecting a Patron

The display of the Use proxy checkbox depends on the Staff role and institution preferences (see Managing Users).
The following text describes how to select a patron from your institution. For selecting patrons from other institutions see Registering Patrons from Other Institutions in the Fulfillment Network.
-
On the Patron Identification page (Fulfillment > Checkout/Checkin > Manage Patron Services), either scan the patrons' ID, or in the Scan patron’s ID or search for patron field, search for the patron in the database in one of the following ways:
-
Begin typing the name of the patron. From the third character on, a dropdown list appears, and displays the first ten names that begin with the sequence of letters you typed. (Note that this not necessarily the same list as the one you would see if you performed a full search, as in the next option.)
-
Perform a full search: Select
 . The Find and Manage Users window opens. Use the search features to find and select the patron. The window closes, and the patron's name appears in the Scan patron’s ID or search for patron field.
 -
Select the patron from a list of recently accessed patron records: Select
 , and then select the patron from the list. (Note that this list only contains patron records that were during the current session. Due to privacy concerns, this list is emptied each time you log out.)
-
-
If the patron is acting as a proxy for another patron (the "target" patron), and their account is configured to support this proxy relationship (see Managing Proxy Users), select Use proxy, and then select Go. The Proxy for field appears. Select the target patron.

-
Select Go. The Patron Services page opens, with the patron's record displayed in it, and the Loans option selected. For details on patron loans, see Loaning Items.
If the patron is blocked, a pop up message appears. If the operator has the relevant privileges they can override the block (see Block Preferences). For more information see Patron Account Configuration and Configuring User Blocks.
Besides patron selection, the Patron Identification page also provides the following options:
-
Go To Return Items – Return multiple items (see To return multiple items).
You can also press Alt + R on your keyboard to return patron items on the Manage Items Returns page.
-
Register New User – Register patrons; see Registering Patrons. Note that this should be used for patrons only and not for staff users.
Editing Patron Information
-
On the Patron Identification page, select the patron account that you want to modify and select Go (see Selecting a Patron). The Patron Services page opens.
-
To view and edit a summary of the user details, on the Patron Services page select Quick User Management from the actions menu at the top of the left pane.

The Quick User Management page opens. Update the information (see Adding Users and Editing Users). -
Select Update User to save the changes.
-
For full user details, on the Patron Services page, select the username link the top left panel (see User Details).
Note that for quick and full user details, you cannot edit the primary identifier or any other user identifier.
Registering and Importing Patrons
Learn about how Alma creates a linked user in a non-home institution when a user in a fulfillment network requests an item from that institution using their home institution's Primo in the Request from a Member Institution video (5:59 mins).
Registering New Patrons
- On the Patron Identification page (Fulfillment > Checkout/Checkin > Manage Patron Services), select Register New User. The Quick User Management page appears.
- Follow the instructions in Adding Users. When you are done, select Update User.
| Section | Field | Description |
|---|---|---|
| User Information | Primary identifier | A generated value is prefilled in this field. See Configuring User ID Generation. You can change the value. |
| User Management Information | Patron has institutional record | Whether the patron is external or internal. Possible values are:
Users are normally managed as external users by an external system, such as the Student Information System. External user records are synchronized with Alma using the User integration profile. Internal users are defined (see Managing Users) for users that are not managed in an external system. For example, internal users can be defined for community patrons who are not students, or for alumni. For an in-depth explanation of user management in Alma, see the Development Network.
Institutions whose Student Information System (SIS) does not offer authentication services, can create users as external in Alma, but assign passwords for them directly in Alma. In this case, all the user information is managed from the SIS, but the passwords are stored in Alma and managed by the Ex Libris Identity Service. For these users, the "Password" field remains available in this section. To activate this behavior, please contact Ex Libris customer support. |
| User Identifier | Value | A generated value is prefilled in this field. See Configuring User ID Generation. You can change the value. |
Registering Patrons from Other Institutions in the Fulfillment Network
You can register patrons who belong to another institution in the fulfillment network, and who walk in to your institution. For information on working with Fulfillment Networks see Fulfillment Networks. For information on scanning an item from another institution see Scan Items from Other Institutions.
For information on InnReach see Visiting Patrons in an InnReach Network.
-
On the Patron Identification page (Fulfillment > Checkout/Check-in > Manage Patron Services), first check to see if the patron was already registered. Search for the patron ID.
 Search for Patron in Local InstitutionIf the patron’s ID is found, proceed with the loan on the Patron Services page. Otherwise, continue to the next step.
 -
Search for the ID at the patron’s home institution:
-
Select Find user in other institution to open the Fulfillment Network search fields.
Note that the check box only appears if your institution is part of a fulfillment network.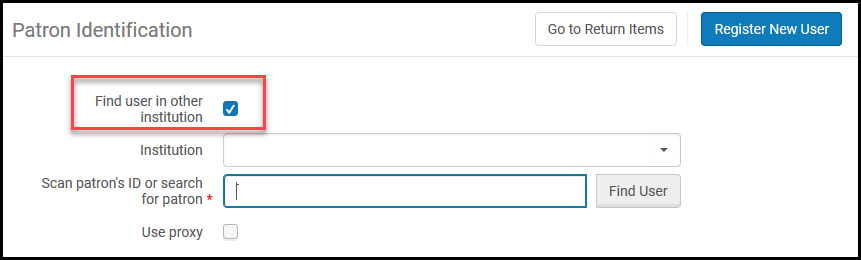 Search for Patron at Another Institution
 -
Select the patron's home institution in Institution.
-
Enter patron search criteria in the field labeled Scan patron’s ID or search for patron. Valid search criteria include patron ID, first name, last name, or email address. The searchable identifiers can be configured by an admin; see Configuring Searchable User Identifiers. The search must be an exact match. If the search yields more than one result, an error is returned. If the search is successful, the available fields are populated. The patron's local ID will be their primary ID at their home institution.
-
To search for a patron by fields other than patron ID, ensure that fulfillment_network_search_by_all is set to true.
-
If an institution has defined hidden identifiers, these identifiers are not used for searches in a fulfillment network unless fulfillment_network_search_by_all is set to true. For more information, see Configuring Other Settings.
-
Your network may be set up not to require selecting an institution from a ‘Find user in other institution’ drop down. Instead, a "Find user in all network institutions" option causes Alma to search for the ID first in the local institution and if not found then in all other participating institutions. Alma automatically finds the user record at any of the network institutions and pulls its information from its institution. Of course, this option should be activated only if the patron used IDs that are unique across the entire network. For this option, set the network_users_unique_identifiers parameter to FULL.
-
-
Select Find User.
-
The Quick User Management page appears and displays the patron’s contact information, which was retrieved from the patron's home institution. Enter the patron’s ID in Primary identifier. For more information, see Adding Users.
In a fulfillment network containing members of a Network Zone, Alma may be configured to copy automatically primary identifiers (and other identifiers, such as barcode) from the user’s home institution.
-
-
Select Update User to create the register the patron for your local institution.
The Patron Services page appears, allowing you to manage patron services.
Importing Patrons from a Student Management System
You can import patrons in the Patron Identification page as described below. See also Selecting a Patron.
-
Configure the integration profile with the online import fields as detailed on the Student Information Systems page.
-
When the integration profile is configured, the Import users from User Management System checkbox appears on the Patron Identification page (Fulfillment > Checkout/Check-in > Manage Patron Services). Search for a patron's ID on the Patron Services page. If the ID is not found, select this checkbox.
 Online Import
 -
Scan or type the patron’s ID from the the student management system in the User Identifier field.
-
Select Find User.
-
If the ID is found in the student management system, the Quick User Management page appears and displays the patron’s information that was retrieved.
-
Select Update User to create the patron in the local institution’s Alma. The Patron Services page appears, enabling you to manage patron services.
-
If the patron’s ID does not exist in the external system, select Save to locally register the patron. The new patron information will be transmitted to the student management system.
Renewing the Patron Role
The patron role expiry is separate from the user expiry. A patron role can expire while the user is still active. If the user expires however, you will not be able to access that user.
You can renew the patron role in the following two ways:
-
You can add a patron role to a user, as well as view and update the patron role's expiration date in the Renew Patron Role box. To access this, select Add/Renew Patron Role from the actions menu at the top of the Manage Patron Services page (see User Details, Actions and Letters. You can also access this when selecting Renew from a blocked item.
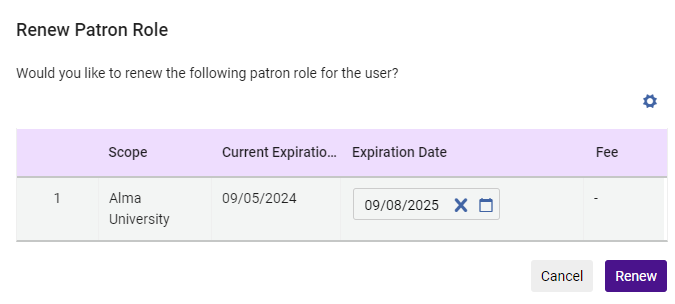
You can hide/display the Scope and Expiration Date by selecting the gear icon. A green dot on the gear icon indicates that the display was updated.

Renewing a patron role is only allowed if the scope is at the "institution/specific library" which the operator is currently at.
The Expiration Alert Period that is defined in the User Registration Terms of Use will be used to warn (in the User Notes area of the Patron Services Workbench) about an expected expiry of the patron role in the current library or institution.
You can set the Expiration date manually if you have the Edit Patron Role Expiry Date Privilege. To activate the privilege, contact Ex Libris support
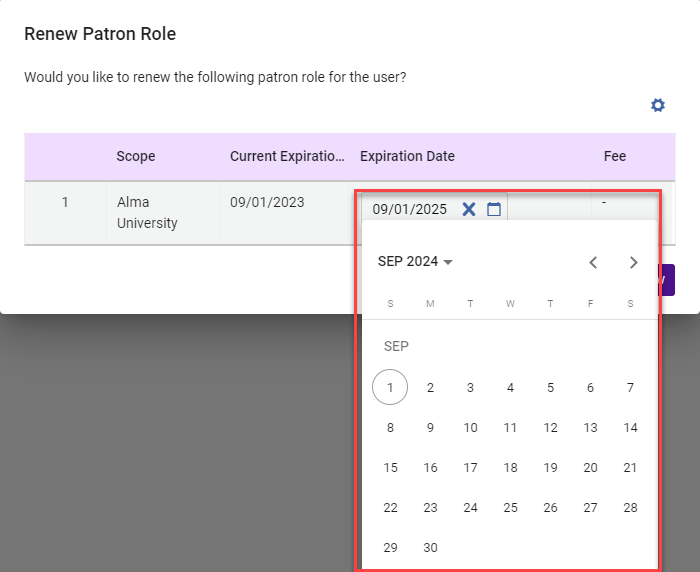 Update Expiration Date
 -
Select the user name at the top left of the User Details menu to view the user details.
Navigate down to the User Roles section and update the Patron role.
You can add the new patron role either in the institution or the scope the desk operator is currently in (depending on the User Registration Rules).
Configuring Patron Information
To configure patrons including limits that can leading to blocking the patron account when reached and user authentication (login options), see Patron Account Configuration.
It is also possible to configure which fields appear in user registration forms. For more information see Configuring Patron Registration.
Managing Loans
Accessing the Loans Page
The Loans page displays the items that were loaned for the patron.
-
On the Patron Identification page (Fulfillment > Checkout/Checkin > Manage Patron Services), enter the patron’s name in the Scan patron’s ID or search for patron field and select Go. The Patron Services page appears. You can also enter a proxy user. For more details see Selecting a Patron.
-
Select the Loans tab on the left pane. Alternatively you can access this using the keyboard shortcut Alt + 1.

The Loans page appears.

Selecting the Done button returns you to the previous page for example the Patron Identification page. In addition, depending on the configuration (Configuration > Fulfillment (scoped to a library) > Circulation Desks > Edit (from the row actions menu) > Printing Information), the Loan Receipt and Return Receipt letters are sent. If you exit the page without selecting Done, these letters are not sent. You can also send these letters manually - see User Details, Actions and Letters.
Viewing a Patron’s Loans
Viewing Loan Information
You can view information for patron loans as described below.
This information applies to the current institution. To view loan information from other institutions in fulfillment networks see Fulfillment Networks.
-
Navigate to the Loans page (see Accessing the Loans Page).
-
The list of loans for the patron appears.
In some cases, the results of actions that are performed for loans are not visible until the display is refreshed. To refresh the display select Refresh (
 ) above the task list.
When the Alma display can be refreshed, the Refresh icon changes to indicate this.

-
In the left hand pane, you can view the number of loans for the patron. Note that this applies to all the loans, not only those for the current session (see Status in Filtering Loans).
-
The information that displays in the loan record can be customized (see Customizing the Display).
-
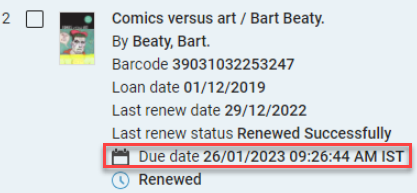
The renewal information appears on the record. For information on renewing loans see Renewing Loans.

-
The Owning library and Call number are displayed on the record.

For more information about adding the Call Number to fulfillment pages, such as the Loans display above, and selected letters, watch the Call Number Added to Fulfillment Pages and Letters video (1:02 mins). -
If a note exists for an item, a link to that note appears on the record.

- The note/s are also displayed in the Notes section on the right hand side. (For more information see Managing Loan Notes).

-
You can customize the display, including the available actions for loans (see Customizing the Display).
-
If a loan is overdue or fines and fees exist for the item, badges indicating this appear on the record.

-
The status for the loan appears on the record (renewed, lost, recalled, etc.).

If requests exist for the item, a link/s to the request/s displays on the record.

-
Depending on the configuration settings of the circulation desk (see Adding a Circulation Desk), a Loan Receipt letter may be sent automatically to the patron when you select Done. A single letter is sent for all loans performed in the current session. You can choose to send it manually from the Patron Services page by selecting Send Loan Receipt (see User Details, Actions and Letters) before you select Done to end the session. For information on customizing letters, see Configuring Alma Letters.
The Loan Receipt letter is not sent automatically if you do not select Done to close the current session; it is only sent when you select Done.If the loan status or the due date of a loan is changed, a Loan Status Notice letter is sent to the patron immediately (See Due Date).
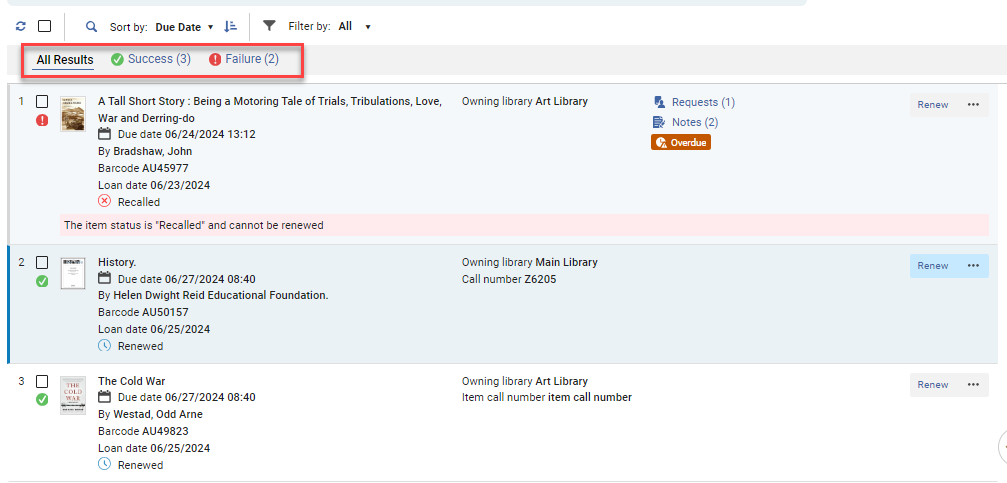
Searching for Loans
You can search for loans by selecting the Search icon.
The search option only displays when All is selected for the loans filter (see Filtering Loans).
![]()
Select the field to search on and enter the search text.

Filtering Loans
From the Filter by drop-down list, select one of the following:
-
All – displays all loans for the patron.
-
This session – displays loans from the current session only.

The default for this drop-down list is determined by the remember_last_loan_display parameter (see Configuring Other Settings).
Whatever filters were selected in this list for a session are used by Alma in the next session when entering the page.
Sorting Loans
You can sort the list of loans.
The sorting option only displays when All is selected for the loans filter (see Filtering Loans).
Viewing the History for a Specific Loan
-
On the Patron Services page (see Selecting a Patron), select the Loans tab on the left hand pane.
-
In the Filter by drop-down list, select All.
-
In the row actions of the loan, select Loan history. The Loan Audit Trail page appears in a sliding panel, displaying the actions taken on the specified loan for this patron.
 Loan Audit Trail Page
| Action | Description |
|---|---|
| Normal | Indicates that the item was checked out. This is an item’s initial status. |
| Recalled | The item was recalled by the library |
| Renewed | The item was renewed by the patron |
| Lost | The item has been declared lost, based on the configured lost loan profiles (see Configuring Overdue and Lost Loan Profiles) |
| Lost with overdue charge | An overdue fine was incurred when the item was declared lost |
| Claim returned | The user claims to have returned the item |
| Claim returned with overdue charge | An overdue fine was incurred when the item was claimed returned |
| Reading room with user | The resource is in the library, in use by a user (patron) |
| Reading room on shelf | The resource in the library, on the shelf but reserved for a user (patron) |
| Web change forward | The loan’s due date has been moved forward |
| Web change backward | The loan’s due date has been moved backward |
| Bulk change forward | The loan’s due date has been moved forward by a job |
| Bulk change backward | The loan’s due date has been moved backward by a job |
| Automatic renewed | The loan was renewed by an automatic renewal job |
| Undo return | The SIP2 machine cancels the Check in message |
| Undo renew | The SIP2 machine cancels the Renew message |
| Item was found | An item declared Lost or Claimed returned has been found |
| Loan | The loan was initiated for the item |
| Overdue Notification | An overdue notification was sent for this loan |
The Operator column appears only for managers and administrators. See Configuring Users' Ability to View Operator Details.
How to View the Queue of Requests for an Item
-
On the Patron Services page (see Selecting a Patron), select the Loans tab on the left hand pane.
-
On the item you want to view the queue of requests for, select the Requests link.

-
A sliding window opens to the right displaying the queue of requests for that item.

Viewing Policies for Loans
You can view policies that would take effect for the item if it were loaned to the indicated patron.
-
On the Patron Services page (see Selecting a Patron), select the Loans tab on the left hand pane.
-
In the Filter by drop-down list, select All.
-
In the row actions of the loan, select View Policies. The Fulfillment Configuration Utility page appears.
The displayed information includes the Fulfillment Unit Name, Fulfillment Unit Rule, and Terms of Use associated with the item, as well as the due date and overdue fine information. For details, see Viewing Fulfillment Configuration Information.
Display Options for Loans
For the various display options such as split view, table view, customizing the display, etc., see Views.
Exporting Loans
For exporting records see Exporting Records.
Working with Loans
Loaning Items
You can loan (checkout) an item on the Loans page as described below.
Reloaning an item that is already on loan causes a renew.
-
Go to the Loans page (see Accessing the Loans Page).
-
In the Scan Item Barcode field, scan or enter the barcode of the item being loaned. If your institution is part of a fulfillment network see Scanning Items from Other Institutions.
For scanning items using RFD see RFID Support.

Alternatively, select the Pickup icon to open the Physical Items repository-search page.
Search for the item, and then select it.

The Physical Items page closes, and the barcode of the item is inserted into the Scan item barcode field.
If you manually enter a barcode that does not exist, a message is displayed indicating that the item was not found. You can select Create Item (appears if you have the Physical Inventory Operator role) to create an item with the barcode. For details on creating a new item, see To create a new item to be entered into the repository.
-
Select OK. The loan is created, and appears in the list of loans at the top of the list.
If any blocks apply, a pop up will appear and the user will not be able to perform the loan. If the operator has the relevant privileges they can override the block (see Block Preferences).
-
When you have finished performing all the actions you need to perform for this patron in this session, select the Done button to end the patron session.

You are returned to the Patron Identification page.
-
After selecting Done, depending on the configuration, a Loan Receipt letter may be sent automatically to the patron. For details on configuring the sending of receipts automatically, see Creates loan receipt in Configuring Circulation Desks. For details on customizing the letter, see Configuring Alma Letters. This letter can also be sent manually (see User Details, Actions and Letters).
Updating the Due Date for Loaned Items
This action can also be done in bulk (see Bulk Actions).
If the new due date is after the expiry date of the patron, the date is altered to match the patron expiry date. When this happens a warning message appears to inform you that the due date has been changed. In order for the warning message to display, shortened_due_date_notifications must be set to MESSAGE or MESSAGE_EMAIL. For more information, see Configuring Other Settings.
If the item was borrowed through resource sharing, this date is corrected by subtracting the Delivery Delay value (configured on the Resource Sharing Partner page; see Resource Sharing Requests). For example, if the due date when receiving the item is May 16, 2012 and Delivery Delay = 4, the Due Date value displays as May 12, 2012, to allow 4 days for item delivery and ensure that the item arrives by its actual due date of May 16.
You cannot change the due date on a loan if a calendar is not defined for the specified library. See Configuring the Institution/Library Open Hours for more information.
-
On the Patron Services page (see Selecting a Patron), select the Loans tab on the left hand pane.
-
In the row actions of the loan, select Change Due Date. The Select Due Date dialog box opens.
-
Select the New due date box and select the due date from the Calendar dialog box.
-
Optionally, select the time due in the At field.
When the time is not specified, the system uses the closing time of the new due date. If the library is closed on that date, the Closed Library Due Date Management Policy is invoked (see the Closed Library Due Date Management Policy entry in Fulfillment Policy Types.)
-
Select Change Due Date. The new date is saved on the loan.
An Item Change Due Date Letter is sent to the patron with the new due date and saved as an attachment to the user record. See Configuring Letters for more information.
A Fulfillment Administrator can change the due dates of all loans that are planned for a specific date as a bulk action, such as when the library wants to close on a specific date for some unplanned maintenance work. The system automatically corrects due dates that occur when the library is closed, depending on the library's predefined policies. See Bulk Actions for details.
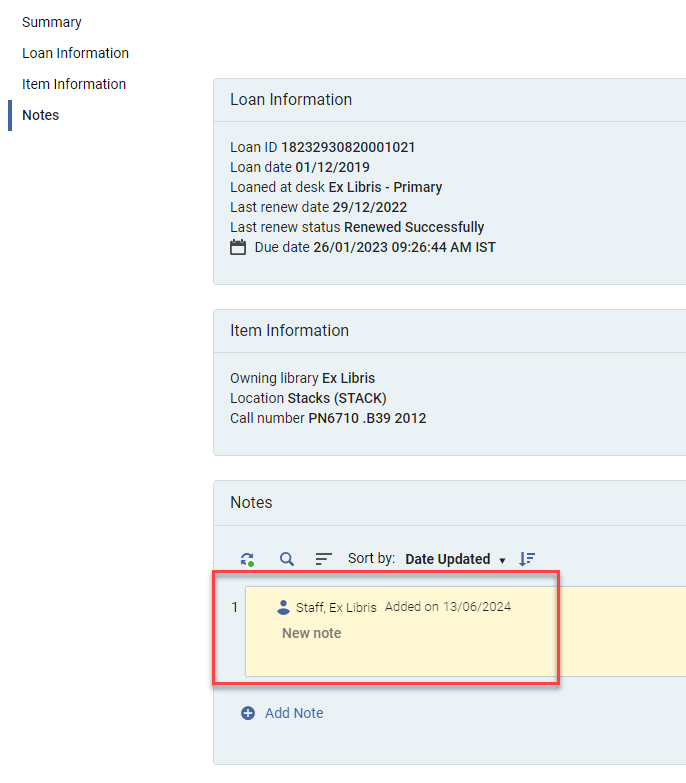
Managing Loan Notes
You can add new loan notes, and edit or delete existing loan notes. Loan notes remain visible after a loan is returned. These notes are specific to the loan. For user notes and system notes see User and System Notes.
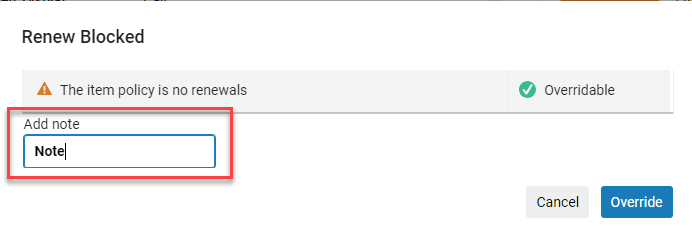
Notes are also generated when users with the relevant privileges override a blocked action, for example renewing an item when the policy states that it is not renewable. This applies to system generated notes for the overridden loan, in addition to notes that the user added when overriding the loan.
-
On the Patron Services page (see Selecting a Patron), select the Loans tab on the left hand pane.
-
Select the relevant item and then Add Note.

-
Enter the note text and select Save to add the note.
-
Added notes display in the list of items.
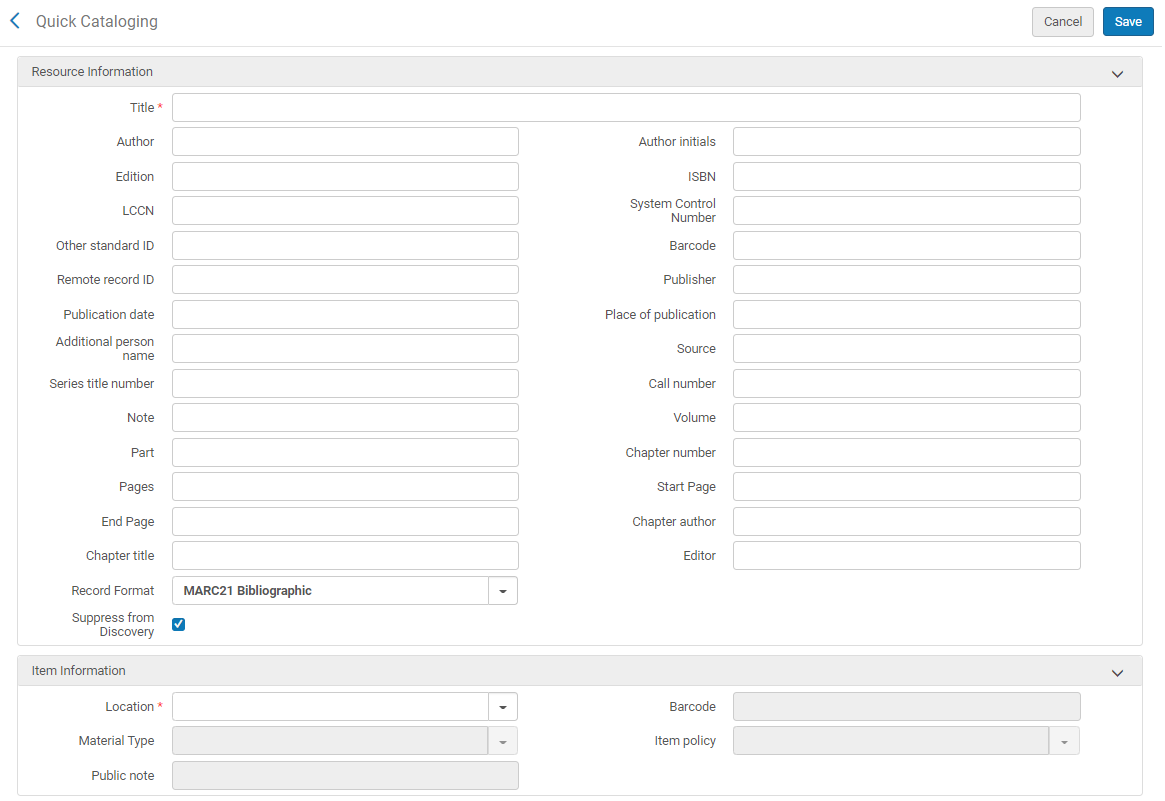
Creating a New Item During a Loan Process
-
On the Patron Services page (see Selecting a Patron), select the Loans tab on the left hand pane.
-
Select Create Item.

The Choose Holding Type box appears.

-
Choose the holding type and, where relevant, the citation type, and select Choose. The Quick Cataloging page appears.
 Quick Cataloging Page
 -
Add the resource and item information and select Save. For information about the fields, see Adding a New Book or Journal Article. A new item is created and entered into the repository. It can then be searched for in the Scan item barcode field in the Loans tab.
An Acquisition Technical Services work order is also created when you complete this process. For an in-depth overview of work orders, see Configuring Work Orders. To manually create a Work Order see Creating Work Orders for Loans.
Note that Alma does not submit a request for the item to be picked from the shelf, since the item is going out on a loan. It will be going into work order when it returns.
Creating Work Orders for Loans
Select the Work Order button in the list of loans or within the specific loan, to manually create a work order for a loan.

The Place Item in Process page appears. Select the relevant Process Type and then select Submit.
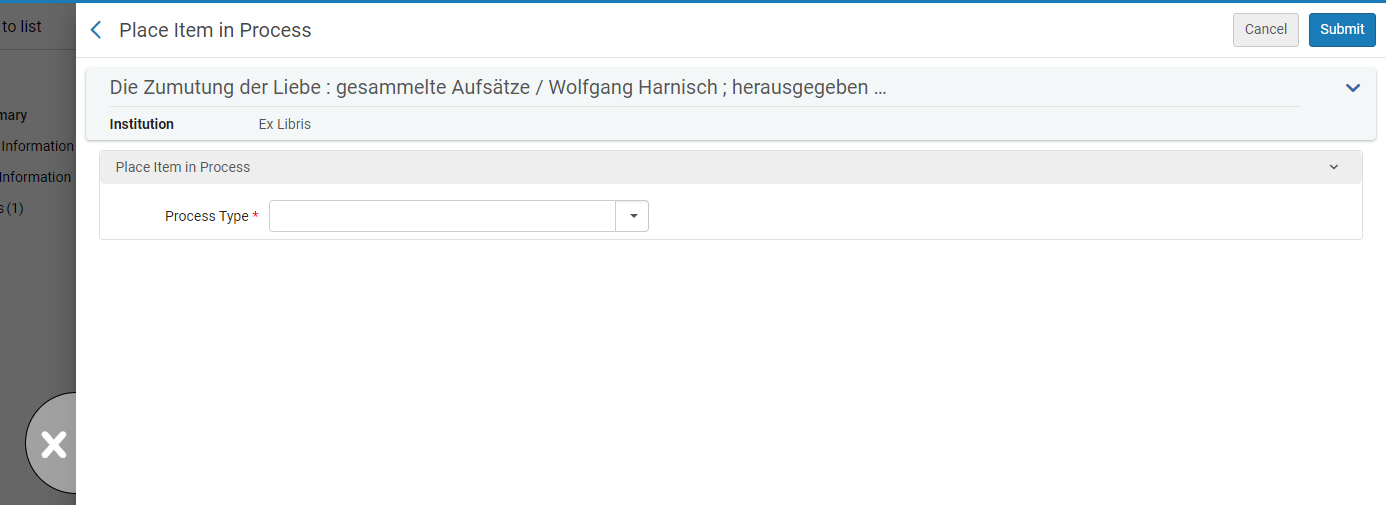
For more information see Creating a Work Order Request.
Renewing Loans
You can renew a loan by selecting the Renew button for the loan.

The Loan Status is updated to Renewed and the Last renew date and Last renew status are updated.
-
If you renew an item before its due date, the new due date is calculated from the date of renewal and not from the previous due date. For example, if an item is due on July 15 and is renewed on July 10, the new due date is calculated from July 10, according to the TOU.
-
When a loan renews to the current time, it means that the renewal due date calculated by the system is in the past. This occurs if the user is expired or if the due date policy is a fixed date in the past.
-
If Patron Renewal is added to a Resource Sharing Workflow Profile of Type = Lending, the patron can request renewals from the Primo loan list. Renewal is possible only if allowed by the loan's terms of use, as it is for non-resource sharing related loans.
To renew items in bulk Bulk Actions for Loans.
If any blocks apply, a pop up will appear and the user will not be able to renew the loan. If the operator has the relevant privileges they can override the block (see Block Preferences).
Reloaning Items
Depending on the Reloan Limit policy, an item that was recently returned by a patron may not be immediately reloanable to the same patron. Depending on the policy chosen, you may receive a block message when the loan is attempted. A different copy of the same title with the same material type is considered as a single item for this policy. This policy only applies to items that include the same Description (or both have an empty Description) under the same bibliographic record. If the policy is set to none or the time frame for reloaning has passed, the loan will successfully execute. See Reloan Limit.
Working with Lost and Returned Items
For an overview of the workflow in managing lost items, see Managing Lost Loans.
Indicating an Item as Lost
You can mark a loaned item as lost.
-
On the Patron Services page (see Selecting a Patron), select the Loans tab on the left hand pane.
-
In the Filter by drop-down list, select All.
-
In the row actions of the lost item, select Lost from the row actions list...

...or in the details pane for the item.

A message displays with the fine/fee information.
-
Select OK. The item status changes to Lost.
-
Information about the loan is added to the Fines/Fees tab of the User Details page (see Editing Users). The fines on the Fines and Fees page for Managing Patron Services is also updated (see Fines and Fees). In some cases, a Fines badge may appear on the loan record.
.png?revision=1)
-
To see the list of loans sorted by status, select Loan Status in the Sort by dropdown list.

For additional information about handling lost items, see Managing Lost Loans below.
Indicating an Item as Found
You can mark a lost item as found.
-
On the Patron Services page (see Selecting a Patron), select the Loans tab on the left hand pane.
-
In the Filter by drop-down list, select All.
-
In the row actions of the lost item, select Found Item from the row actions list ...

...or in the details pane for the relevant item.
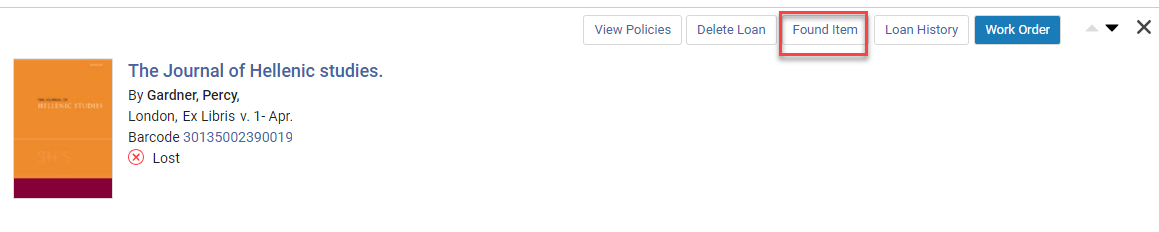
-
Select OK.
-
The loan reverts to its previous status, and the item remains checked out to the patron. Depending on the lost-item fee policies configured for the item, some or all of the lost-item fees charged to the patron may be returned (for information about configuring fine and fee policies, see below).
-
On the Patron Services page (see Selecting a Patron), select the Loans tab on the left hand pane.
-
In the Filter by drop-down list, select All.
-
Select the checkboxes for the lost items that were found.

-
Select the Found Selected button.

-
The loans revert to their previous status, and the items remain checked out to the patron. Depending on the lost-item fee policies configured for the item, some or all of the lost-item fees charged to the patron may be returned (for information about configuring fine and fee policies, see below).
For additional information about handling lost items, see Managing Lost Loans below.
Indicating an Item Was Claimed Returned
If the patron claims a loaned item was returned, you can mark the item as Claimed returned.
It is not possible to make an item Claimed Returned once it has been marked as Lost. In the event that a patron approaches to advise that a resource is returned when that resource is in the Lost status, we recommend marking the loan as Found and then as Claimed Returned. For additional information about handling lost items see Managing Lost Loans below.
-
On the Patron Services page (see Selecting a Patron), select the Loans tab on the left hand pane.
-
In the Filter by drop-down list, select All.
-
In the row actions of the loan, select Claim Returned. The status of the item changes to Claim returned.
-
The item’s Process Type value is Claimed Returned, and the item remains requestable and is considered to still be on loan.
Due dates cannot be changed on loans in "Claimed Return" status.
Managing Lost Loans
-
Manually, when a patron notifies the circulation desk that the item is lost
-
Automatically, if the system is configured to automatically change an item’s status to Lost when it is overdue for a specified number of days

-
You mark an item as lost in one of the following ways:
-
Selecting the item as Lost in the Loans tab of the Patron Services page (see Indicating a Lost Item).
-
Configuring an item to automatically be marked as lost after it is overdue for a specified number of days. This is done on the Lost Loan Profile Record page (Configuration Menu > Fulfillment > Physical Fulfillment > Overdue and Lost Loan Profile, select Add Overdue and Lost Loan Profile). For details, see Configuring Overdue and Lost Loan Profiles.
-
-
If a lost item is subsequently found, you can mark it as found in one of the following ways:
-
Selecting the item as Found on the Loans tab of the Patron Services page (see Indicating an Item as Found).
-
Scan the barcode of the item as a return (see Returning Items below). When you do so, the item is marked as found and returned. Depending on the lost-item fee policies configured for the item, some or all of the lost-item fees charged to the patron may be returned (for information about configuring fine and fee policies, see below).
-
-
You can mark an item as Claimed Returned. Note however that It is not possible to make an item Claimed Returned once it has been marked as Lost. For more information see Indicating an Item Was Claimed Returned. By default, overdue fines accumulated prior to the item being claimed as returned are applied to the patron's active balance, but no new overdue fines accrue from that point onward. (This functionality, however, can be configured using the overdue_at_claim_return_loan parameter. For details, see Configuring Other Settings.)
-
You can search for items marked as lost by performing an advanced search in the repository. Select the Advanced Search link and in the Physical Items column, select Process Type. On the Advanced Search page, select Equals and Lost in the drop-down lists and select Go. For details on advanced searches, see Performing an Advanced Search.
You can also configure the following:-
Lost items can be excluded from appearing in Primo (configurable in Configuration Menu > Resources > Record Export > Exclude Process Types from Publishing). For details, see Excluding Resources with Specific Process Types from Publishing.
-
Lost items can be configured as searchable but not as requestable. This is done on the Fulfillment Rules Editor page (Configuration Menu > Fulfillment > Physical Fulfillment > Fulfillment Units, select Edit from the row actions list for a Fulfillment Unit and select the Fulfillment Unit Rules tab). For details on configuring Fulfillment Unit Rules, see To add fulfillment unit rules:.
-
-
You can configure policy types for lost loans which determine how lost loans are handled. Parameters are configured in Fulfillment Configuration (Configuration Menu > Fulfillment > Physical Fulfillment > Advanced Policy Configuration > Add Fulfillment Policy) by selecting the following fulfillment policy types:
A lost item fine cannot be refunded.For details on selecting policy types, see Configuring Policies.
-
Lost Item Fine – The fine which the patron is required to pay for losing the item.
-
Lost Item Replacement Fee – The amount charged to the patron for the institution to replace the item.
-
Lost Item Replacement Fee Refund Ratio – The percentage of the lost item replacement fee that the institution is willing to refund to the patron if the lost item is found.
-
-
You can create a fulfillment set that displays a list of all items lost from a specific date (Fulfillment > Advanced Tools > Create Fulfillment Sets, and configure the Loan status value as Lost). For details on configuring fulfillment sets, see Managing Fulfillment Sets. You can then view the fulfillment set on the Manage Sets page (see Managing Search Queries and Sets).
-
If the close_paid_lost_loan parameter is set to true, when an on-loan item's status is changed to Lost and the last lost or replacement fee is closed, the loan status is changed to Lost and paid and the loan is removed from the active loans list. The loan will be considered complete and not accrue further fines or be counted in patron limits (see Configuring Other Settings (Fulfillment)). You can close Lost and Lost and paid loans by running the Close lost loans job (see Running Manual Jobs on Defined Sets). This job closes all loans in the fulfillment set, regardless of status. Any fines or fees associated with the loan remain on the patron's record. If a lost item is returned after the loan has been closed by the job, the patron is not refunded for the replacement fee. When the parameter is set to false, the loan remains active in the loan list until the Close Lost Loans job is executed and the item process type is changed to Lost even if the patron paid the lost fees.
-
If the rs_use_tou_for_lost_item parameter is enabled, then the lost loan settings will be applied to resource sharing requests (see Other Settings).
If an item is determined to be lost and the policy for a lost loan is Not Requestable, the Requests - Recalculate After Inventory Update job detaches the request from the item and potentially cancels the request (if no other items can be used for fulfilling the request). If the item is found, this job re-links the request to the item. For details, see Requests – Recalculate after Inventory Update in Viewing Scheduled Jobs.
Deleting Loans
You can delete items from the Loans page as described below.
-
Select Delete Loan from the row actions menu...

...or from the details pane.

-
The item is deleted from the Loans tab.
-
The item’s status changes to Missing (for lost loans) or In Place (for other loans).
Bulk Actions for Loans


Returning Loans
- Returns tab (see Returning Items)
- Actions menu in the Loans tab (see below)
- In the Loans tab select Return Item from the actions menu for the relevant loan.
- The item disappears from the Loans list, and appears in the Return list if you navigate to it. This applies also to loans marked as lost.
- The counter in the Loans list is decreased by 1 and the counter in the Returns list is increased by 1.
Managing Returns
When an item is returned, you scan its barcode and return it to its proper location, which may be in a different institution. You can also view the loan and usage history of returned items. When scanning in a barcode for a return, if the barcode cannot be read, you can search for the item. Note that if the item does not have a barcode, you must first assign a barcode to the item record before scanning in or returning the item.
-
Individually – For items loaned to a specific patron (see Returning an Item for a Specific Patron).
-
In Bulk – For items loaned to more than one patron; used to streamline operator workflow and enhance productivity (see Returning Multiple Items). For these items the return date can also be modified, for example to handle items that were returned the previous day.
-
The item was already returned (see Indicating an Item Was Claimed Returned).
-
The item was lost (see Indicating a Lost Item).
Scanning in an item twice will log an in-house loan (usually applies when an item is scanned but not checked out such as a non-circulating item that is used by a patron, then scanned and re-shelved by staff). See In-house Usage FAQ for more information.
Accessing the Returns Page for a Specified Patron
The Returns page displays the items that were returned for a selected patron. To access the page for returning multiple items without first selecting a specific patron, see Returning Multiple Items.
-
On the Patron Identification page (Fulfillment > Checkout/Checkin > Manage Patron Services), enter the patron’s name in the Scan patron’s ID or search for patron field and select Go. The Patron Services page appears. You can also enter a proxy user. For more details see Selecting a Patron.
-
Select the Returns tab on the left pane to access the Returns page. Alternatively you can access this using the keyboard shortcut Alt + 2.

Selecting the Done button returns you to the previous page for example the Patron Identification page. In addition, depending on the configuration (Configuration > Fulfillment (scoped to a library) > Circulation Desks > Edit (from the row actions menu) > Printing Information), the Loan Receipt and Return Receipt letters are sent. If you exit the page without selecting Done, these letters are not sent. You can also send these letters manually - see User Details, Actions and Letters.
Returning Items
- Returns tab (see below)
- Actions menu in the Loans tab (see Returning Loans)
Returning an Item for a Specific Patron
You can return an item for a patron by going to the Returns tab for that patron, and then entering the barcode for the item. To return multiple items that may be for multiple patrons, see Returning Multiple Items.
-
On the Patron Services page (see Selecting a Patron), select the Returns tab on the left.
-
In the Scan item barcode field, scan or enter the barcode of the item being returned.

Alternatively, select to open the Physical Items repository-search page, search for the item, and then select it. The Physical Items page closes, and the barcode of the item is inserted into the Scan item barcode field. If your institution is part of a fulfillment network see Scanning Items from Other Institutions. For scanning items using RFD see RFID Support. -
Select OK. The item is returned, and appears in the list of returned loans at the top of the list.
-
Where relevant, mark the Place directly on hold shelf checkbox as follows:
This field is only displayed when the Has hold shelf processing option is selected when configuring a circulation desk (see Configuring Circulation Desks).

-
Enabled – The item is to be placed directly on the hold shelf. An On Hold Shelf Letter is sent to the patron, indicating that the item is ready for pickup at the hold shelf (see Configuring Alma Letters).
-
Not enabled – The item is not yet ready for the hold shelf and is to be designated for hold shelf processing (that is, preparing the item for the hold shelf, such as checking the item’s condition). After hold shelf processing is complete, scan the item into the relevant circulation desk. The item is placed on the circulation desk’s hold shelf, and an On Hold Shelf Letter is sent to the patron, indicating that the item is ready for pickup at the hold shelf (see Configuring Alma Letters).
-
-
When you have finished performing all the actions you need to perform for this patron in this session, select Done to end the patron session. You are returned to the Patron Identification page.
Depending on the configuration settings of the circulation desk (see Creates return receipt in Configuring Circulation Desks), a Return Receipt letter may be sent automatically to the patron when you select Done. For configuring the letter see Return Receipt Letter. A single letter is sent for all returns performed in the current session. If the desk is not configured to have this letter sent automatically, you can choose to send it manually from the Patron Services page by selecting Send Return Receipt before you select Done to end the session (see User Details, Actions and Letters).
- The Return Receipt letter is not sent automatically if you do not select Done to close the current session; it is only sent when you select Done.
- Returning an item can also activate other letters, depending on the next step of the item for example On Hold Shelf Letter, Transit slip, Resource Request slip, Hold shelf slip, Personal delivery letter, etc.
Returning Multiple Items
To speed up the process of handling returns when you have multiple returns to perform, you can use the Manage Item Returns page. This enables you to return multiple items without having to select a specific patron. On this page you can also override the return date.
- Open the Manage Item Returns page (Fulfillment > Return Items).
 Manage Item Returns PageIf your institution is part of a fulfillment network see Scanning Items from Other Institutions.
 - Scan or enter the item barcode in the Scan item barcode field. Alternatively, select to open the Physical Items repository-search page, search for the item, and then select it. The Physical Items page closes, and the barcode of the item is inserted into the Scan item barcode field. For scanning items using RFD see RFID Support.
- Where relevant, mark the Place directly on hold shelf checkbox as follows:
This field is only displayed only when the Has hold shelf processing option is selected when configuring a circulation desk (see Configuring Circulation Desks).

- Enabled – The item is to be placed directly on the hold shelf. An On Hold Shelf Letter is sent to the patron, indicating that the item is ready for pickup at the hold shelf (see Configuring Alma Letters).
- Not enabled – The item is not yet ready for the hold shelf and is to be designated for hold shelf processing (that is, preparing the item for the hold shelf, such as checking the item’s condition). After hold shelf processing is complete, scan the item into the relevant circulation desk. The item is placed on the circulation desk’s hold shelf, and an On Hold Shelf Letter is sent to the patron, indicating that the item is ready for pickup at the hold shelf (see Configuring Alma Letters).
- Select OK. The item details are displayed on the Manage Item Returns page.
 Manage Item Returns PageDepending on the configuration settings of the circulation desk (see Creates return receipt in Configuring Circulation Desks), a Return Receipt letter may be sent automatically to the patron when you select OK. For configuring the letter see Return Receipt Letter.
If the desk is not configured to have this letter sent automatically, you can choose to send it manually from the Patron Services page by selecting Send Return Receipt before you select Done to end the session (see User Details, Actions and Letters). This option does not appear in the page if the desk is configured to send the letter automatically.Returning an item can also activate other letters, depending on the next step of the item for example On Hold Shelf Letter, Transit slip, Resource Request slip, Hold shelf slip, Personal delivery letter, etc.You can use the following keyboard shortcuts on the Manage Item Returns page:- Alt + Ctrl + L – Opens the patron identification page (see Selecting a Patron)
- Alt + Ctrl + C – Clears the list of returned items
- Alt + Shift + X – Returns to the Alma homepage
- If needed, modify the return date. One reason to modify the return date would be for items that were returned in an overnight drop box during the previous day. You can modify the return date for all items scanned in from this point onwards (in this session), or for a specific returned item as follows:
The return date defaults to the current date. The date should only be set to current date or a date in the past.
- To modify the return date for all items scanned in from this point onwards (in this session), on the Manage Item Returns page update the date in the Override return date field and the time in the At (HH:MM) field.
 The Override return date and time option only appears when the Supports overriding return date option is active (see Configuring Circulation Desks).
 - All items scanned in on the Manage Item Returns page from now onwards, in this session, will receive the date that was entered in the Override return date field.
- Alternatively, you can select the Change Return Date button for the relevant returned item in the Manage Item Returns page.

-
The updated date is applied to this item.
- To modify the return date for all items scanned in from this point onwards (in this session), on the Manage Item Returns page update the date in the Override return date field and the time in the At (HH:MM) field.
- If required, select Work Order (see Creating Work Orders from Returned Items) or select Loan History from the row actions menu (see Viewing Loan History).
- Select Done to exit the page, or select Go to Patron Services to open the Patron Identification page.
For details on switching between the different views such as table view, split view, etc., see Views.
Returning Items for Resource Sharing
For detailed information on in-house loans, see In-House Use and Alma Analytics Reports for In-House Use.
Returning Items in Fulfillment Networks
Alma can be configured to allow a patron to return items to any member of a fulfillment network, regardless of the institution from which the patron checked out the item. This feature is called Return Anywhere. For example, if University A and University B are members of the same fulfillment network, a patron could check out a book at University A and check it in at University B. See Fulfillment Networks.
Creating Work Orders from Returned Items
You can create a work order by selecting the Work Order button (on the record or in the right hand pane) for the returned item.

For more information see step 2 in Creating a Work Order Request.
Viewing a Patron's Returns
This information applies to the current institution. To view information for returns from other institutions in fulfillment networks see Fulfillment Networks.
Viewing the Return Information
You can view information for the items returned by a patron as described below.
-
Navigate to the Returns page (see Accessing the Returns Page).
-
The list of returns for the patron appears. Note that viewing all the returns for a patron requires the View All Loan History privilege. Otherwise, only the returns for the current session are displayed. Please contact Ex Libris support if you would like to disable this privilege.

-
In the left hand pane, you can view the number of returns for this patron. If the user has the View All Loan History privilege, this number applies to all the returns, not only those from the current session (see Filtering the Display of Returned Items).
Searching for Returns
To search for items first select the Search icon.
![]()
Select the relevant field in the Search drop down list and enter the search text.

The sorting option only displays when All is selected in the filter (see Filtering the Display of Returned Items).
Filtering the Display of Returned Items
From the Filter by drop-down list, select one of the following:
-
All – displays all loans that have been returned by the patron.
-
This session – displays items that have been returned during the current session.
This filter only displays when the user has the View All Loan History privilege. Please contact Ex Libris support if you would like to disable this privilege.
Whatever display options were selected in this list for a session, are used by Alma in the next session when entering the page.
Sorting the Display of Returned Items
You can sort the list of returns by selecting the relevant field in the Sort by field.
The sorting option only displays when All is selected in the filter (see Filtering the Display of Returned Items).
Badges Indicating Additional Information for Returned Items
For each returned loan, if notes or requests exist or the item is overdue, this is indicated by a relevant badge. See also Managing Loan Notes.
Viewing Loan History for a Patron in the Returns Tab
- Select the Returns tab on the left.
- Make sure that All is selected in the Filter by dropdown.
- The privilege to view a patron’s loan history can be disabled by Ex Libris. Please contact Ex Libris support if you would like to disable this privilege.
- Loan history may be anonymized. It is possible to configure how loan records will be anonymized by using the Loan Anonymization Rules. For more information, see Configuring Anonymization.
Display Options for Returns
For the various display options such as split view, table view, etc., see Views.
Exporting Returns
For exporting returns see Exporting Records.
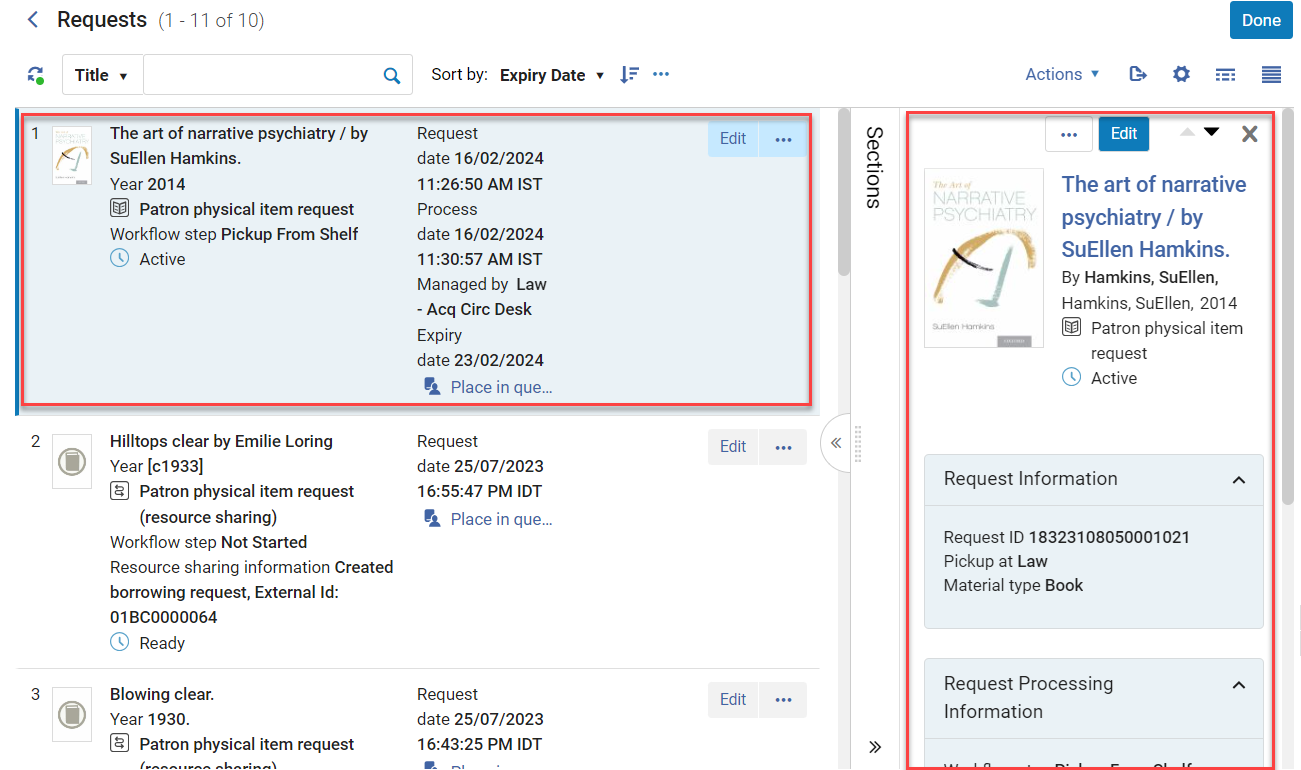
Managing Patron Requests
Accessing the Requests Page
The Requests page displays the items that were requested for the patron.
This information applies to the current institution. To view loan information from other institutions in fulfillment networks see Fulfillment Networks.
-
On the Patron Identification page (Fulfillment > Checkout/Checkin > Manage Patron Services), enter the patron’s name in the Scan patron’s ID or search for patron field and select Go. The Patron Services page appears. You can also enter a proxy user. For more details see Selecting a Patron.
-
Select the Requests tab on the left pane. Alternatively you can access this using the keyboard shortcut Alt + 3.

The Requests page appears.
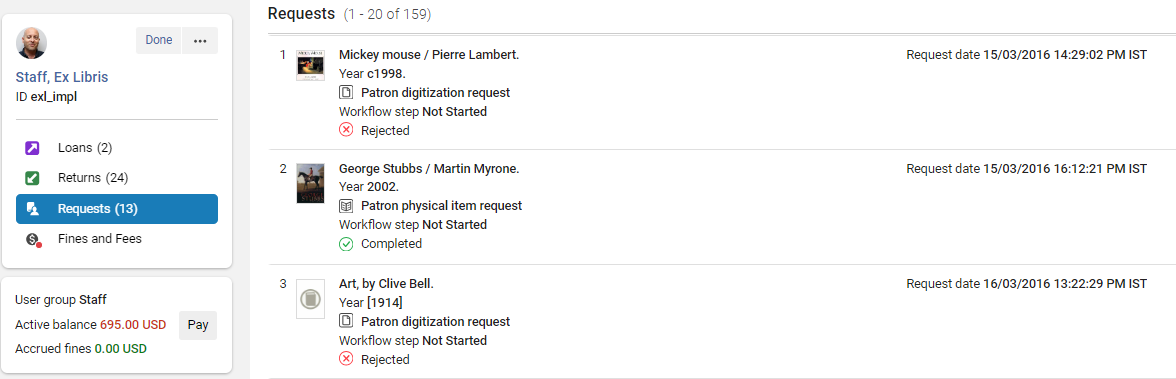
The Resource Sharing Request field indicates the status of the resource sharing request. If no resource sharing request exists, the value of this field is No.
Selecting the Done button returns you to the previous page for example the Patron Identification page. In addition, depending on the configuration (Configuration > Fulfillment (scoped to a library) > Circulation Desks > Edit (from the row actions menu) > Printing Information), the Loan Receipt and Return Receipt letters are sent. If you exit the page without selecting Done, these letters are not sent. You can also send these letters manually - see User Details, Actions and Letters.
Requesting Items
You can request an item by searching for it and then selecting Request (see Creating a Request from the Institution) or by selecting Create Request on the Requests page as described below.
For information on other ways of creating requests see Creating a Request from the Institution.
-
Go to the Requests page (see Accessing the Requests Page).
-
From the Actions menu select Create Request.

-
Enter a search term in the search box or select a title from the pickup list. The Select request type is filled automatically per the selected request type in the last submitted request form.

-
Select Create.
-
The Create Request sliding window appears.

-
Enter the details and select Submit. For details on the fields in a request see Fields Updated Automatically by Alma for Submitted Requests.
-
The new request appears at the top of the list with the details in the right hand pane.
-
For details on which fields are automatically updated by Alma for submitted requests see Creating a Request from the Institution.
-
The Expired badge displays for expired requests and the and/or On Hold Shelf badge displays for requests on the hold shelf. See Updating the Expiry Date and Managing the Hold Shelf for more information.
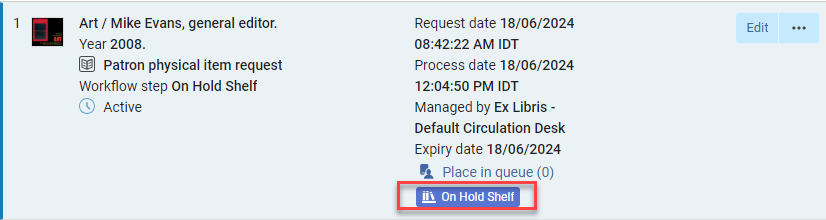
The system note is also updated for items on the hold shelf.
For institutions in a fulfillment network, items on the hold shelf belonging to another institution may be seen in the Network Activity tab. For more information, see Viewing Network Activity.
-
The barcode displays in the request details after scanning in the item.
Editing Requests
You can edit a request from the main window or from the side pane.
-
Go to the Requests page (see Accessing the Requests Page).
-
Select the Edit button on the record.

-
The Create Request window opens where you can edit the details.

Cancelling Requests
You can cancel as described below.
-
Go to the Requests page (see Accessing the Requests Page).
-
From the Actions menu for the specific request select Cancel, or select the Cancel button in the details window.

-
The Confirm Request Cancellation window appears. Update the details and select Confirm.
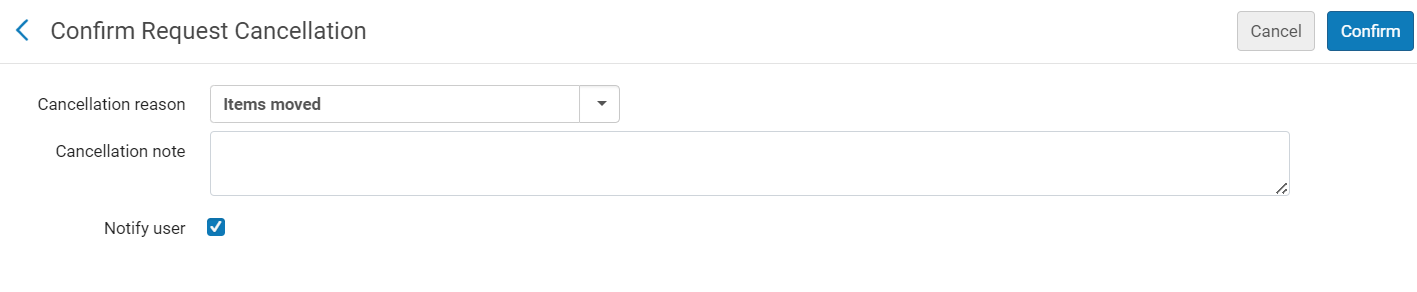
-
If Notify user was selected, the Cancel Request Letter is sent to the patron (see Letter List).
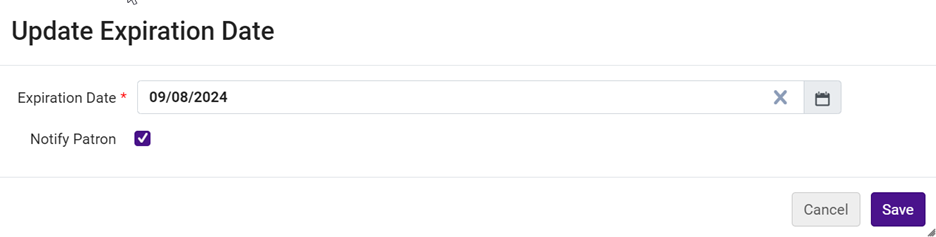
Updating the Expiry Date for Requests
You can update the expiry date for a request in four different areas in Alma:
- Manage Patron Services -> Request tab (if the workflow step is "On Hold Shelf")
- Monitor Requests & Item Processes from Fulfillment > Monitor Requests and Item Processes (if the workflow step is: "On Hold Shelf")
- Active Hold Shelf (from the Fulfillment menu)
- Expired Hold Shelf (from the Fulfillment menu)
-
From the Actions menu for the specific request select Update Expiry.

-
Update the date and then select Update Expiry.
-
The request is updated with the new date.
-
If the Notify Patron checkbox is marked (default), the Hold Shelf Expiry Update Letter is sent (see Letters).
Viewing a Request Title in Search Results
You can open a request title in search results as described below.
-
In the Requests page, from the Actions menu for the specific request select View Title in Search.

-
The All Titles page appears.

Searching on the Requests Page
You can search for requests by typing a search term for the Title in the Search box at the top of the page.

Filtering Requests
You can filter the requests using the drop-down filters at the top of the page.

Type
You can filter on the request types that are available for the user configuration and the patron privileges.
Status
You can filter on the following statuses:
-
All – Displays all items that have been requested by the patron.
-
Current – Displays items that are currently active (not completed).
-
History – Displays the completed and canceled requests. Note that only requests that were canceled after being scanned and completed will be displayed here. Requests that were canceled while the item was in process will not be displayed (see Resource Request Monitoring).
Workflow Step
You can filter on the workflow step types that are available per the user configuration and patron privileges.
Clear All Filters
Select the Clear All button to clear all the filters and reset to default.
Sorting Requests
You can sort the list of requests.

Display Options for Requests
For the various display options such as split view, table view, customizing the view, etc., see Views.
In some cases, the results of actions that are performed for requests are not visible until the display is refreshed. To refresh the display select Refresh () above the task list.
When the Alma display can be refreshed, the Refresh icon changes to indicate this. ![]()
Exporting Requests
For exporting records see Exporting Records.
Managing Fines and Fees
You can update the institutional bursar on a regular basis with the user fines and fees managed by the system using a Bursar integration profile. For details, see Bursar Systems.
For more information assigning a fine/fee to a specific item, see the Link Fee to Inventory video (2:56 mins).
Accessing the Fines and Fees Page
-
On the Patron Identification page (Fulfillment > Checkout/Checkin > Manage Patron Services), enter the patron’s name in the Scan patron’s ID or search for patron field and select Go. The Patron Services page appears. You can also enter a proxy user. For more details see Selecting a Patron.
-
Select the Fines and Fees tab on the left pane. Alternatively you can access this using the keyboard shortcut Alt + 4.This tab requires the View Fines Fees privilege. If this privilege is not enabled, the Fines and Fees tab will not display.

The Fines and Fees page appears.

An indicator displays if fines and fees exist for this patron.

Selecting the Done button returns you to the previous page for example the Patron Identification page.
Viewing Fines and Fees
This information applies to the current institution. To view information for fines and fees from other institutions in fulfillment networks see Fulfillment Networks.
Viewing the Fines and Fees for a Patron
In some cases, the results of actions that are performed for fines and fees are not visible until the display is refreshed.
To refresh the display select Refresh () above the task list.
-
Navigate to the Fines and Fees page (see Accessing the Fines and Fees Page).
-
The list of fines and fees appears.
-
In the left hand pane, you can also view information showing the various payment balances (see also Additional User Information).Viewing this information requires the View Fines Fees privilege.

The active and accrued balances are displayed by default. The active balance may include transferred balance depending on the allow_activity_on_transferred_finesfees parameter (see Configuring Other Settings (Fulfillment)). Accrued fines are not included in the calculation of the debt limit that, if reached, would prevent the patron from borrowing additional items (see Patron Configurations).Accrued fines are calculated only if the patron does not have more than 100 overdue loans.The following balances are hidden by default but can be configured to display by enabling them in the Patron Services User Card Fields page (Configuration > Fulfillment > Patron Configurations > Patron Services User Card Fields):
- Disputed balance - The balance of disputed fines and fees.
- Transferred balance - When bursar fees are set to Exported status, they appear as transferred balances. See also the note regarding bursar fees above.
- Total fines - The total value of all the fines for this patron.
-
The Type, Owner and Status information is displayed on the left of the record.

-
Each record in the Fines and Fees area displays the original amount of the fine/fee.

-
All transactions for a fine/fee can be viewed by selecting Transactions.


-
If a fine/fee is partially paid, the original amount as well as the new balance are displayed. In addition, the record is marked with a Partially Paid indicator. The Transactions list is also updated.

-
If a fine/fee is partially waived, this is also indicated on the record. The Transactions list for the fine is also updated.

-
At the top of the Fines and Fees page, you can view the total number of fines displayed on the page (according to the applied filter/s), as well as the balance for them.

This is the same total displayed in the left hand User Information pane (see Additional User Information), if no records are selected. -
If some of the records are selected, the number of selected records as well as the balance for those selected records will be displayed.
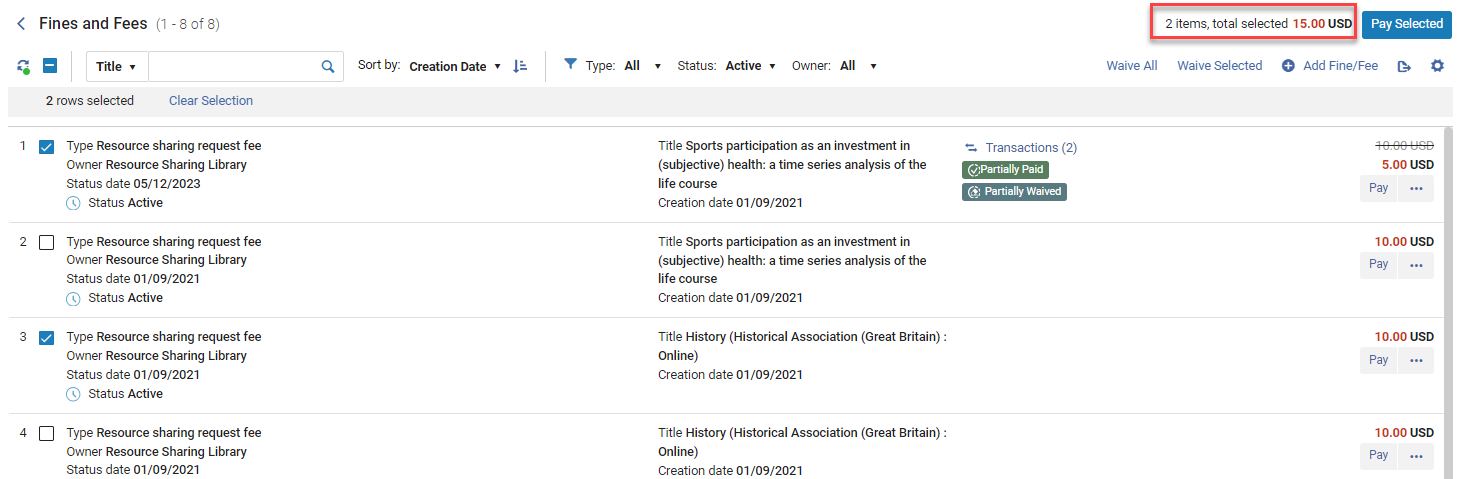
In this case, the balance will be different from the one displayed in in the left hand User Information pane (see Additional User Information) which shows the total balance. -
Selecting the Done button returns you to the previous page for example the Patron Identification page.
Searching for a Patron's Fines and Fees
You can search for fines and fees by selecting the Search icon and then entering search text for the relevant field in the dropdown list.
![]()
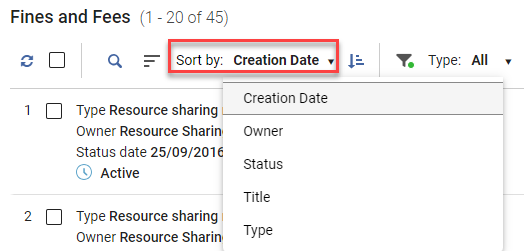
Sorting a Patron's Fines and Fees
You can sort the list of fines and fees.
Filtering the Patron's Fines and Fees
You can filter the list of fines and fees by Type, Status and Owner. Select Clear All to reset the filters to the default.

Display Options for Fines
For the various display options such as split view, customizing the display, etc., see Views.
Exporting Fines
For exporting records see Exporting Records.
Adding Fines and Fees
You can add new fines and fees as described below.
If the fine or fee is listed as owned by Library on the Fine Fee Type Definition mapping table (see Configuring Fines/Fees Behavior), you must be at a circulation desk to add the fee.
In order to register a Credit, select the Credit fee type and enter the amount as a positive sum. When you save it, the Credit fee appears in the Fines/Fees list with a negative amount. If you select the Credit fee type, the Comment field is mandatory.
- In the Fines and Fees page (see Accessing the Fines and Fees Page) select Add Fine/Fee at the top of the page.
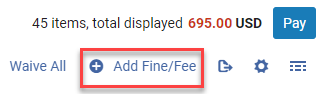
- Add the amount (cannot be negative).

- Update the Type, Owner, Barcode, and add a Comment as needed.
- The types are those configured for manual creation on the Fine Fee Type Definition mapping table; see Configuring Fines/Fees Behavior.
- Libraries are selectable only if the fee type has been defined as 'allow a library scope'.
- When adding a barcode, the fine/fee is associated with the item specified by the barcode. The barcode appears on the fine/fee.
- If you select the Credit fee type, the Comment field is mandatory.
- Select Add - the new fine is added to the list and the updated amount is indicated on the record
The patron's active balance is updated with the amount added; if the fine/fee is subject to VAT, VAT is included to the amount. (The VAT columns are hidden by default on the page. To configure the VAT, see Configuring Fines/Fees Behavior.) For a Credit type fee, the amount is subtracted from the balance. For all other fee types, the amount is added to the balance.
- The active balance in the left pane is updated (see Viewing Fines and Fees).
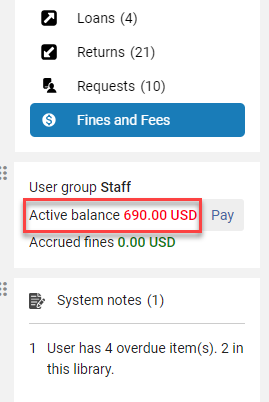
- The active balance at the top of the page is also updated.

Paying Fines and Fees
- Circulation desk must be setup for receiving payments (see Payment Information).
- The operator must have the Pay Fines Fees Privilege.
Paying Specific Fines and Fees
This section describes how to pay a specific fine/fee. See also Paying Fines and Fees in Bulk.
-
In the Fines and Fees page (see Accessing the Fines and Fees Page) select the Pay button to the right of the fine that you want to pay.
Paying fines requires the Pay Fines Fees Privilege.

-
In the Pay dialog box, you can pay the full amount, or a partial amount.

If you pay a partial amount, this is reflected on that specific record as described in Viewing Fines and Fees. In addition, you can insert a larger amount to pay the fine. In this case the Add change to balance checkbox appears enabling you to create a credit balance. That credit will be displayed in the additional user information on the left hand pane (if configured) as described in Viewing Fines and Fees. In this case, a new fine of type Credit is added to the list of fines.
-
Under Payment method, select a payment method (such as Cash, Credit Card, or Online). For information on online transactions, see Recording Online Payments Manually.
Payment method options can be customized. For example, you can change the Check option to Cheque. To customize payment methods, contact Ex Libris Support.
The information here is only a report i.e., the actual payment is implemented by the institution's payment method/system and not by Alma.
-
Update the Transaction and Comment fields as needed and select Pay. The payment is recorded and the updated balance appears in the following places:
-
On the specific record for which the fine was paid.
-
In the active balance at the top of the page for all the fines (or for the selected ones if records were selected as described in Viewing Fines and Fees).
-
In the active balance in the left hand summary pane (see Viewing Fines and Fees).
-
The Fine Fee Payment Receipt Letter is sent (if configured). See Fine Fee Payment Receipt Letter in Letter List and the Print receipt? parameter in Configuring Circulation Desks.
-
Specific fines and fees can also be paid in one of the following ways:
-
Self-check machines – If the self-check integration profile has been set up with the Extended Fines and Fees extension type, the SIP2 Fee Paid action can receive the following field pairs: For details on self-check machines, see Self-Check Machines.
-
BZ – Payment transaction number, to attach to payment section
-
EK – Fee to be paid
-
Web service – See https://developers.exlibrisgroup.com/alma/apis/users.
Paying Fines and Fees in Bulk
You can pay selected fines or pay all the fines at once.
Paying fines requires the Pay Fines Fees Privilege.
- In the Fines and Fees page (see Accessing the Fines and Fees Page) select the fines that you want to pay.

- Select the Pay Selected button at the top of the page. All selected fines are paid.

If the user changes the amount then only that partial amount will be paid. - The payment is recorded and the updated balance appears in the following places:
-
On the specific record for which the fine was paid.
-
In the active balance at the top of the page for all the fines (or for the selected ones if records were selected as described in Viewing Fines and Fees).
-
In the active balance in the left hand summary pane (see Viewing Fines and Fees).
-
-
The Fine Fee Payment Receipt Letter is sent (if configured). See Fine Fee Payment Receipt Letter in Letter List and the Print receipt? parameter in Configuring Circulation Desks.
- In the information summary pane on the left (see Additional User Information) select the Pay button.

- Alternatively, select the Pay button at the top of the page (with no fines selected).

- All fines are paid.
If the user changes the amount then only that partial amount will be paid.
- The payment is recorded and the updated balance appears in the following places:
-
On the specific record for which the fine was paid.
-
In the active balance at the top of the page for all the fines (or for the selected ones if records were selected as described in Viewing Fines and Fees).
-
In the active balance in the left hand summary pane (see Viewing Fines and Fees).
-
-
The Fine Fee Payment Receipt Letter is sent (if configured). See Fine Fee Payment Receipt Letter in Letter List and the Print receipt? parameter in Configuring Circulation Desks.
Waiving Fines and Fees
You can waive specific fines and fees, or waive them in bulk.
To enable waiving a fine or fee (including a credit), you must ensure that the specific fine/fee is configured as waivable on the Fine Fee Type Definition mapping table (see Configuring Fines/Fees Behavior). When paying or waiving a fine or fee, the transaction creator is the circulation desk (indicated in the Currently at: field at the top of the page). If no circulation desk indicated in this field, the transaction creator is indicated as Not at desk.
If a lost item is waived, there is no reduction in the active balance. Instead, the waived amount is displayed as a credit.
Waiving Specific Fines and Fees
-
In the Fines and Fees page (see Accessing the Fines and Fees Page) select the Waive option from the row actions menu for the fine that you want to waive.
Waiving fines requires the Waive Fines Fees Privilege.

-
In the Waive dialog box, you can waive the full amount, or a partial amount.

-
Select the relevant Waiving reason and add a comment as needed. The list of waiving reasons is predefined by a system administrator; see Configuring Reasons for Waiving Fines/Fees.
-
Select Waive to complete the operation.
-
The details are displayed on the record.

-
The Transactions list is updated.

-
The active balance in the left pane summary is also updated.

Waiving Fines and Fees in Bulk
You can waive all or selected fines in bulk. You can also do this using the dedicated job as described in Waiving Fines and Fees in Bulk Using a Job.
-
In the Fines and Fees page (see Accessing the Fines and Fees Page) select the fines that you want to waive. If you do not select any items, all the fines will be waived.

-
Select the Waive Selected button to waive the selected fines.

-
Update the information and select Waive.

-
The balance is updated in the left pane summary (see Additional User Information in Left Pane: Fulfillment Activities and User Information).
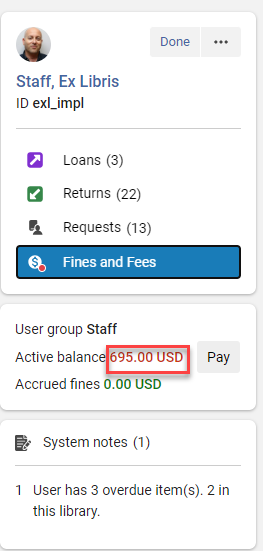
It is also updated in the balance at the top of the page.

-
In the Fines and Fees page (see Accessing the Fines and Fees Page) select Waive All from the Actions menu.

-
Update the information and select Waive.

-
The balance is updated at the top of the page and in the left pane summary (see Additional User Information in Left Pane: Fulfillment Activities and User Information).
Disputing Fines and Fees
You can dispute specific fines and fees as shown below.
-
In the Fines and Fees page (see Accessing the Fines and Fees Page) select the Dispute option from the row actions menu for the fine that you want to dispute.

-
In the Dispute dialog box you can enter a comment and select Dispute.

-
Comments added to a dispute display in the record.

A disputed fee:
Is not included in the user’s Active Balance Is not displayed on the list of fines in Primo Is not factored when invoking a block based on the amount due.
For example:
- A patron cannot borrow items when the amount they owe is $100 or greater
- The patron owes $100, but has disputed $20 of that amount
- Alma views the patron as owing $80, and the block is not invoked
-
After disputing a fine, you can select Restore from the row actions menu to cancel the dispute. The original amount of the fine or fee is restored and the balances are adjusted.

Linking Fines and Fees to Items
You can link a specific fine to an item as shown below.
-
In the Fines and Fees page (see Accessing the Fines and Fees Page) select Link to item from the row actions menu for the relevant fine.

-
In the Link to Item dialog box enter the barcode for the item to link to and select Link to Item.

-
The barcode for the linked item displays on the fine.

Recording Online Payments Manually
-
On the Fines and Fees page (see Accessing the Fines and Fees Page) select the Pay link. The Payment Details dialog box appears.
-
Select Online from the Payment method drop-down list.
-
Enter the payment amount and transaction ID, which are both listed in the user’s transaction confirmation email.
-
Select Send.
Sending Patron Notifications for Fines and Fees
Known Issues
|
Workflow / Area |
Known Issue |
Suggested Workaround |
Resolution Date |
|---|---|---|---|
| Alt + number shortcuts to the Loans/Returns/Requests/Fees tabs | The alt + number shortcuts to Loans/Returns/Requests/Fees tabs do not work out of the box. |
|