Configuring the Services Page
Introduction
As a link resolver, Alma provides services for searches performed in sources other than Alma (such as Summon or Google Scholar). Alma’s link resolver uses the Services page, which is a dedicated page that displays a record's services (such as access to full text).
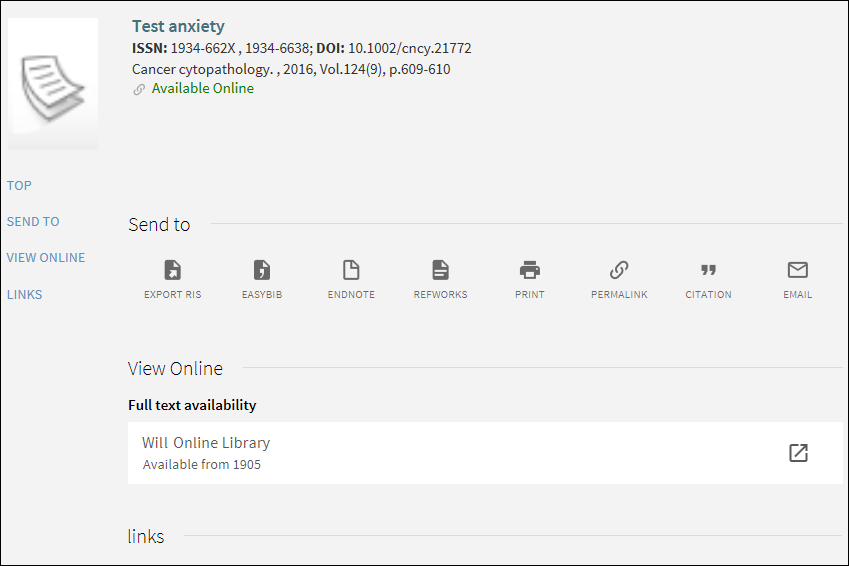
In order for third-party sources to display Alma services, you must instruct the sources to send a base URL in the following format to Alma:
Where the base URL includes the following elements:
-
Alma_domain – Specify the domain for your Alma's server.
-
Alma_institution_code – Specify the institution code defined in Alma.
-
view_code – Specify the code that is defined for your view on the View Configuration page. For example: 01MY_INST:Services.
For example:
If your vendors do not support the above format, which includes a question mark (?) before the parameters, use the following format:
For example:
Adding the Services Page
The Services Page allows users to view or request material form your library.
If you are either renaming the Services page or changing the default Services page, inform Summon Support prior to the change to ensure that Summon is linking with the correct view ID for your Services page.
-
On the Views List page (Configuration Menu > Discovery > Display Configuration > Configure Views), select Add to open the View Configuration page.
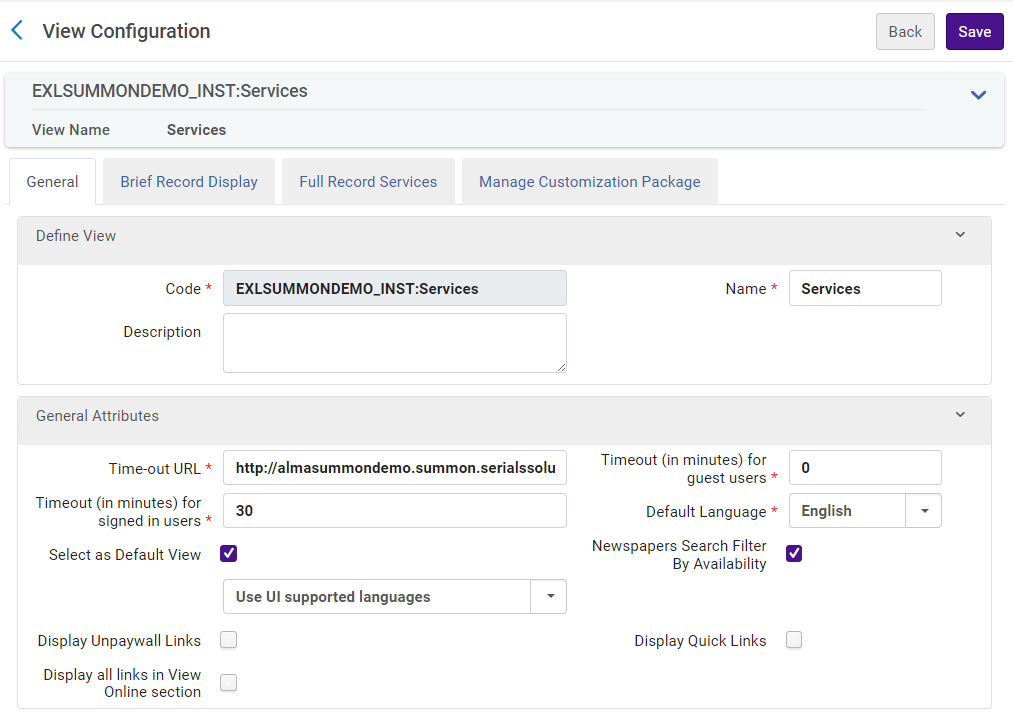 View Configuration Page - General Tab
 -
Specify the following fields on the View Configuration Page:
View Configuration for Summon Field Description Code
Enter Services. After saving the view, the system will automatically prefix the code with the institution code.
Name
Enter Services.
Description
Optional text to describe the view for internal use.
General Attributes:
Time-out URL
Specify the redirection URL for the Services page after a timeout.
Timeout (in minutes) for guest users
The time in minutes when a session is timed out due to inactivity for guest users. A setting of 0 indicates that there is no timeout period.
When a session times out, the system clears all personal parameters and refreshes the page, leaving the user within the context of the page.
Timeout (in minutes) for signed-in users
The time in minutes when a session is timed out due to inactivity for signed-in users. A setting of 0 indicates that there is no timeout period.
When a session times out, the system clears all personal parameters and refreshes the page, leaving the user within the context of the page.
Default Language
Select the default language that the system will use for the Services page.
Select as Default ViewIndicates which view is used when staff users select the Display in Discovery option from the Alma repository search results.
Display Unpaywall Links
When selected, links to PDF full text in Unpaywall are embedded directly into the brief display. For more information, see Integrating Unpaywall for Discovery.
-
If a record contains Quicklinks and Unpaywall links, Primo VE displays only the Quicklinks.
-
When this functionality is enabled and the record has no additional links (such as Quicklinks, Unpaywall links, and general electronic service links), an empty Links section is displayed with the following message, which is customizable by modifying the description for the fulldisplay.unpaywall.noLinks code in the Full Display Labels code table: No links are available for this record.
When selected, links to PDF/HTML full text for CDI records are embedded directly into the brief display to provide a convenient and quick way for users to access full text with a single click. Quicklinks provides links to both free to read content and paywalled content.
If a record contains Quicklinks and Unpaywall links, the Services page displays only the Quicklinks.
The CDI Quicklinks feature enables you to embed links to the PDF and HTML full text directly into the Services page to provide a convenient and quick way for users to access full text from CDI with a single click. Libraries often have access to several platforms for the same item. However, with Quicklinks, we show only one link for each type (PDF and HTML). Users who are familiar with the different platforms and prefer to select a link themselves can continue to do this from the full view of the record.
Instead of using a link resolver, Quicklinks use a link that is centrally generated, based on your rights.
Quicklinks appear for a record under the following conditions:
-
The record has sufficient metadata including a DOI or a provider ID to support reliable links.
-
You have full text rights for this record and at least one provider that supports Quicklinks from a collection in Alma/SFX that has a DBID. If your activation source in Alma is a collection without a DBID (for example, a locally created collection, which is displayed on the Services page as Alma/SFX local collection), the Quicklinks do not appear. This restriction is enabled to provide close quality control for Quicklinks and may be removed at a later stage.
For a list of providers who currently support Quicklinks, see Quicklinks Provider List for Alma-Summon.
Display all links in View Online section
When selected, this option instructs CDI to return all available full text links so that they are selectable on the Services page. If disabled, CDI returns only the preferred link. For more information, see Display All Links in Full Display for CDI.
-
-
Select Save and continue to save your changes and configure the other tabs on the View Configuration page.
-
Configure the Full Record Services tab:
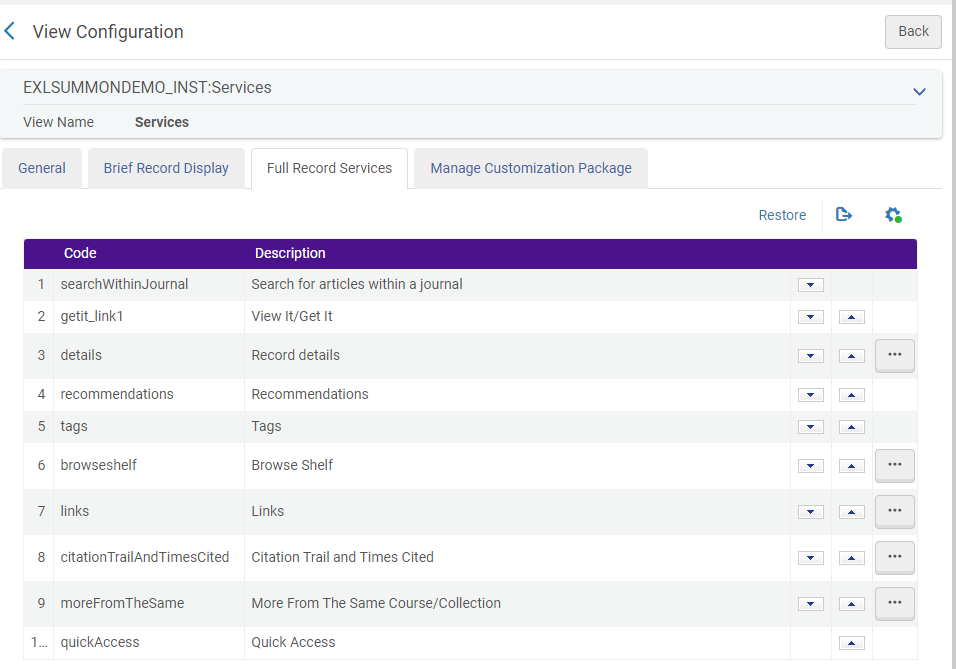 Full Record Services Tab
-
If you have not already done so, select Customize to allow you to edit the various services that appear as sections on the Services page. The following services are supported in Alma-Summon environments:
-
getit_link1 – This code defines the View It, Get It, and How to Get It sections on the Services page. These sections allow users to view online materials, request physical items in the library or partner libraries, or get materials from other sources. The How to Get It section displays only general electronic services that are delivery-related (such as an ILL service), and appears when the record has no holdings. For more details, see General Electronic Services.
-
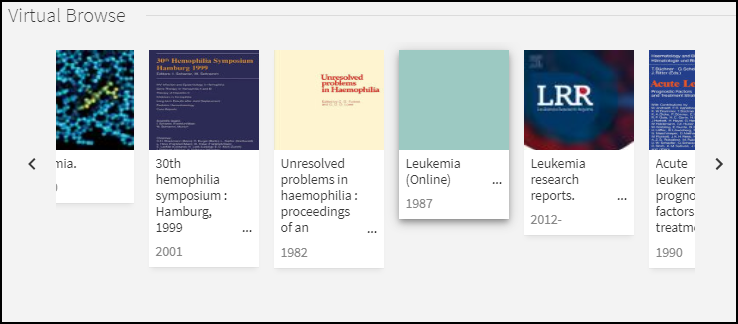
browseshelf – This code defines the Virtual Browse service, which allows users to browse items based on the location of the current item. Users will be able to navigate through items on the shelf, starting at the current item’s call number. For configuration information, see Configuring the Browse Shelf Service.
-
links – This code defines the Links section on the Services page. The Links section displays general electronic services that are not delivery-related (see General Electronic Services). In addition, you can configure the following option by selecting its Configure row action:
Display Source Record - Select this check box if you want to users to be able to view the item's source record.
This type of link appears only on the journal's full display page when accessed from Alma's Journal Search.
-
searchWithinJournal – This code enables the Search for articles within a journal section. This section appears on the Journal Search page and on the Services page when the record has an ISSN, which is attached to users' queries to allow them to search the Summon index to find articles within that journal.
-
details – This code enables the Details section only for records in your local catalog and CDI. For configuration information, see Configuring the Details Service.
-
citationTrailAndTimesCited – This service displays a record's citation information. For more information, see Configuring the Citations Service
-
Quick Access – This service allows users to visually browse a record's representation files using Alma's new digital viewer. For more information, see Configuring the Quick Access Service.
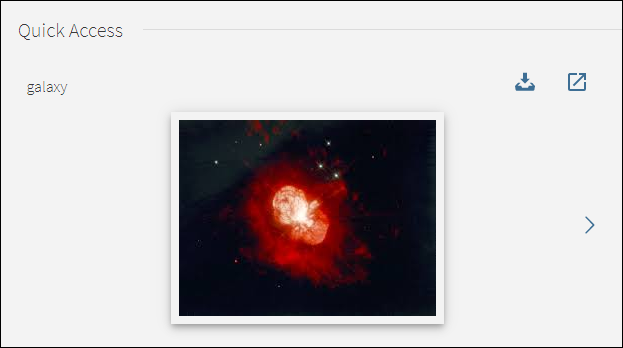 Quick Access Service
 -
More from the Same Course/Collection – This service expands the search of the current title and allows users to browse items in additional collections and courses that also contain the current title. For more details, see Displaying the More from the Same Service.
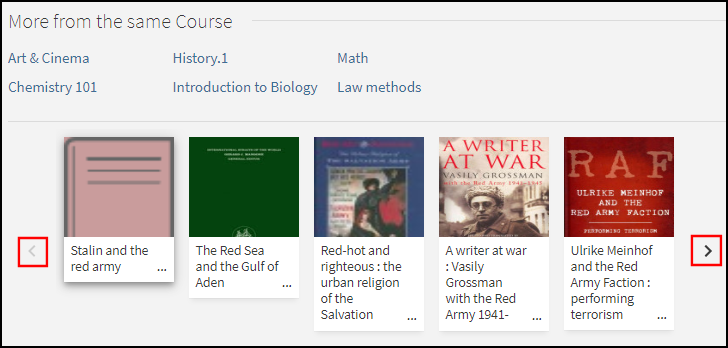 More from the Same Course Section
-
-
When customization is enabled, you can perform the following operations:
-
Change the order of the service sections by selecting the up and down arrows.
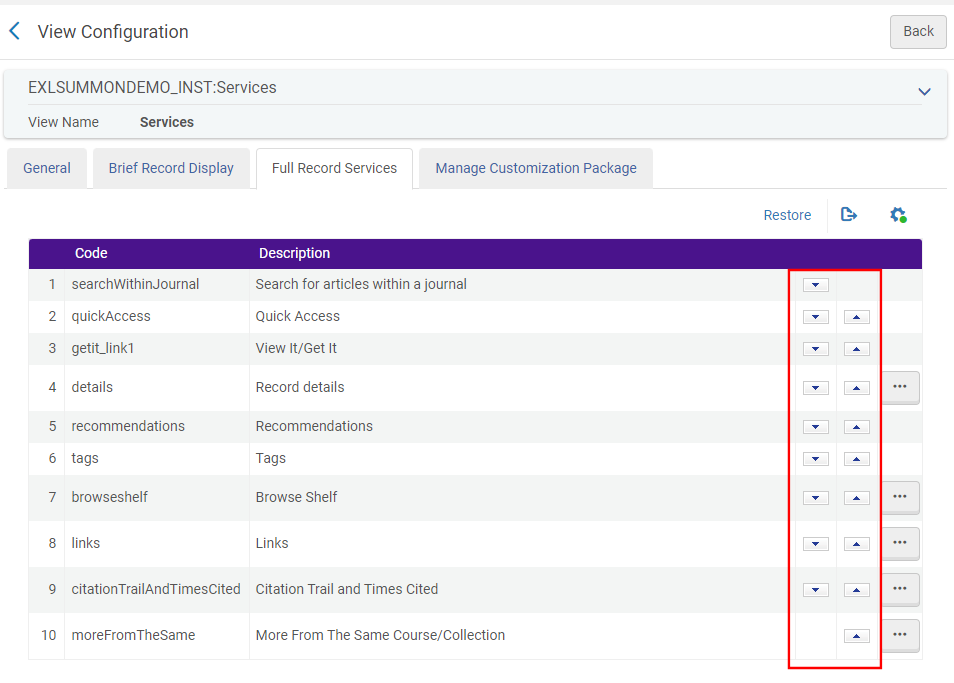 Order Service Sections
 -
Restore the out-of-the-box settings for the Actions section by selecting Restore.
 Restore Default Configuration
-
-
-
If you want to customize the look of the Services page, see Branding the Services Page.
Configuring the Full Records Services Tab
This section provides additional detail for some of the services configured in the Full Record Services Tab:
Configuring the Details Service
The Details service displays the bibliographic information for a record (such as the contributors, description, and so forth).
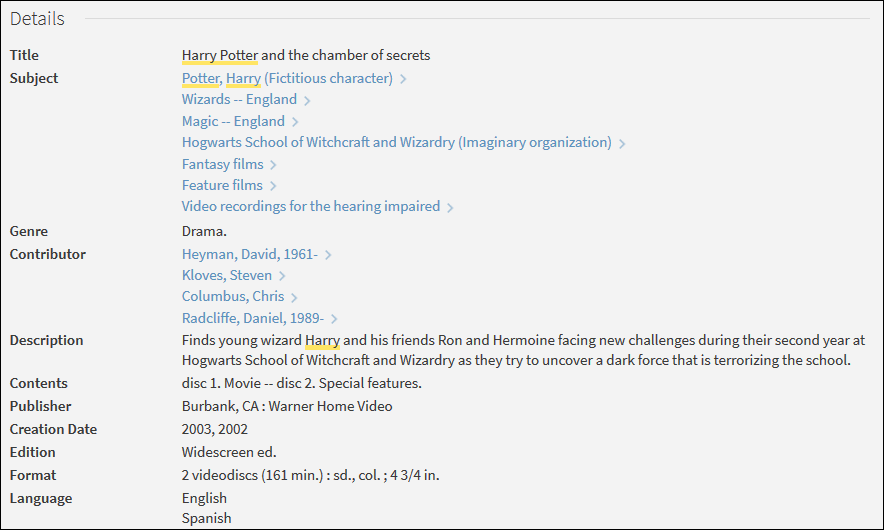
Alma allows you to configure the display lines for the Details service. The configuration is very similar to the configuration of the display lines in the record's brief display, but you are not limited to four display lines. Each display line can consist of multiple data fields that are separated by a delimiter (such as a semicolon).
-
On the Views List page (Configuration Menu > Discovery > Display Configuration > Configure Views), edit your view to open the View Configuration page.
-
Select the Full Record Services tab.
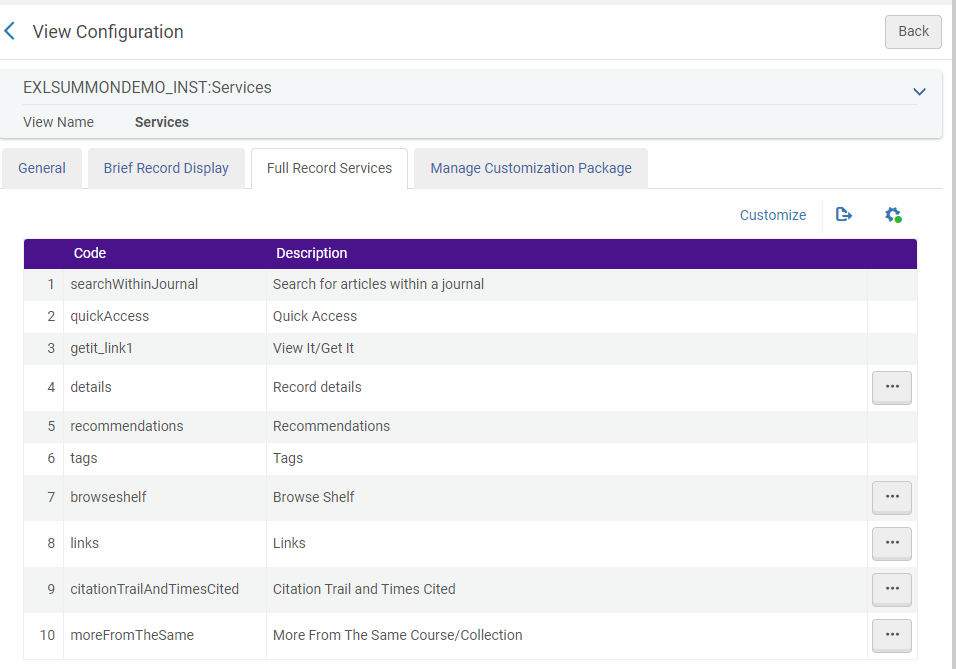 Full Record Services Tab
 -
If you have not already done so, select Customize, which appears above the list of services in the Full Record Records Services tab.
-
Select the Configure row action to modify the display fields for the Details service. The Edit Full Display Details page opens.
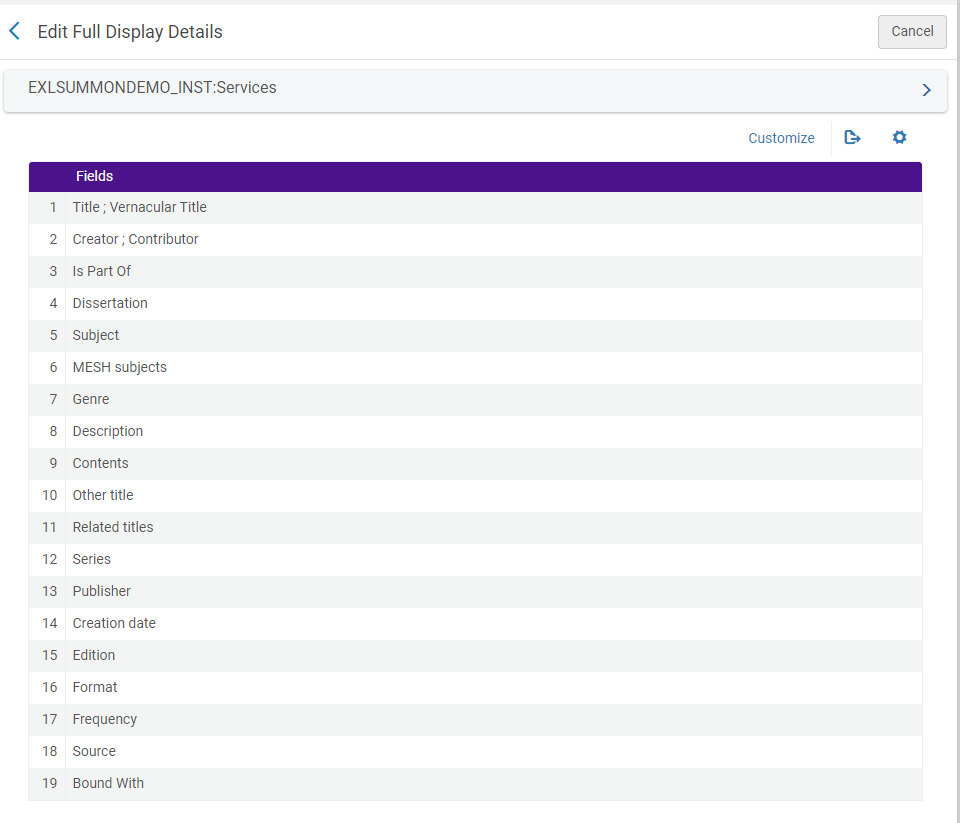 Edit Full Display Details Page
 -
If you have not already done so, select Customize, which appears above the list of fields on the Edit Full Display Details page.
-
On the Edit Full Display Details page, you can perform the following operations:
-
Add a new display line:
-
Select Add Field to open the Row Fields dialog box.
-
In the Row Fields dialog box, select Add Field.
-
Select a field from the Code drop-down list.
-
Select Add to add the new field.
-
Select Add Field to add additional fields to the display line. Otherwise, select Done to return to the Edit Full Display Details page.
-
-
Add a field to a display line:
-
Edit the row containing the display line that you want to modify. The Row Fields page opens.
-
Select Add to open the Add Field dialog box.
-
Select a field from the Code drop-down list.
-
Select Add to add the new field and to return to the Row Fields page.
-
On the Row Fields page, select Add to add additional fields to the display line.
-
Select the up/down arrows to reorder the field in the display line.
-
Select Back to return to the Display Fields page.
-
-
Delete an entire display line by deleting the row that contains the display line.
-
Delete a field from a display line:
-
Edit the row containing the display line that you want to modify. The Row Fields page opens.
-
Select the Delete row action.
-
Select Back to return to the Display Fields page.
-
-
Reorder the display lines by selecting the up/down arrows.
-
Reorder fields in a display line:
-
Edit the row containing the display line that you want to modify. The Row Fields page opens.
-
Select the up/down arrows to reorder the fields.
-
Select Back to return to the Display Fields page.
-
-
Activate/deactivate a display line by selecting the Active fields.
-
Activate/deactivate a field in a display line:
-
Edit the row containing the display line that you want to modify. The Row Fields page opens.
-
Select the Active field to activate or deactivate a field in the display line.
-
Select Back to return to the Display Fields page.
-
-
Change the delimiter that separates the fields in the display lines:
-
Select Edit Delimiter to open the Edit Delimiter dialog box.
-
In the Delimiter field, type the delimiter character.
-
Select Save to update the delimiter and to return to the Display Fields page.
-
-
When Leganto is integrated with your environment, you can configure the Course Information field to link to Leganto:
-
Edit the Course Information field.
-
In the Row Fields page, enable the Course Information field and then select a linking option from the Enable Linking to Leganto field:
-
Use a Permalink to the reading list – This option opens the Leganto My Lists page, which is prefiltered for this reading list.
-
Use a Link to the list on the Find Lists page – This option opens the Leganto Find Lists page, which preselects this reading list.
If you do not specify an option, linking to Leganto is disabled from the record's details.
-
-
Select Done.
-
-
-
Select Back to return to the Services page.
Configuring the Browse Shelf Service
By default, Browse Shelf displays physical items that appear together on a virtual bookshelf. If you prefer, you can also display electronic material, which is based on call numbers from bibliographic headings, not just the holdings (for physical items).
-
On the Views List page (Configuration Menu > Discovery > Display Configuration > Configure Views), edit your view to open the View Configuration page.
-
Select the Full Record Services tab.
-
If you have not already done so, select Customize, which appears above the list of services in the Full Record Records Services tab.
-
Select the Configure row action to configure the Browse Shelf service.
-
In the Browse Shelf Configuration dialog box, specify one of the following options and then select Done:
-
Browse Bibliographic Headings – Select this option if you want to display both physical and electronic material in Browse Shelf.
-
Browse Shelf Listing – Select this option if you want to display physical items only in Browse Shelf. This is the default option.
-
Configuring the Citations Service
The Citations service displays the citation trails for the record and also includes a link to the cited by records provided by the Web of Science and Scopus services.
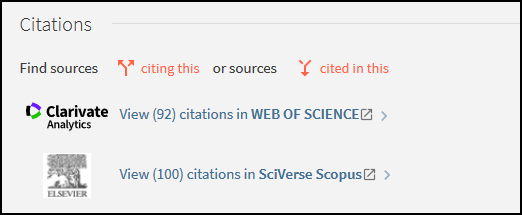
Alma allows you to configure whether citation trails and cited by links from the Web of Science and Scopus services appear in the Citations service.
-
On the Views List page (Configuration Menu > Discovery > Display Configuration > Configure Views), edit your view to open the View Configuration page.
-
Select the Full Record Services tab.
-
If you have not already done so, select Customize, which appears above the list of services in the Full Record Records Services tab.
-
Select the Configure row action to configure the Citations service.
-
In the Edit Citation Service dialog box, select the following options as needed and then select Done:
-
Citation Trail – When selected, this option displays the citation trails in the Citations section.
-
Times Cited – When selected, this option displays the times cited information from the Web of Science and Scopus services in the Citations section. Collections from these services must be activated in Alma to appear.
-
Configuring the Quick Access Service
The Quick Access service embeds Alma's new digital viewer to allow users to quickly access and view digital representations stored in Alma. From the embedded viewer, users can download the file, open the file in a new tab or window, or select the right/left arrows to view additional representation files.
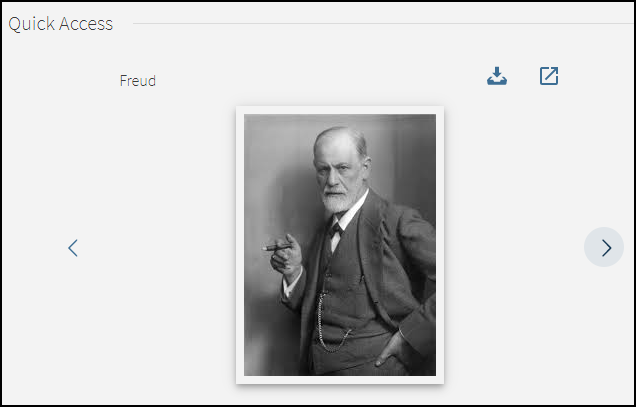
To use this service, you must have the new Digital Viewer enabled. The following table lists other configuration options associated with this service.
| Option | Description |
|---|---|
|
Change the order of the Quick Access section on the Services Page. |
For more information, see Ordering the Services. |
|
Modify the labels associated with the Quick Access section on the Full Display page. |
You can modify the following code in the GetIT! Tab1 Labels code table to modify or translate the service's label:
|
|
Enable the new Digital Viewer so that it can be embedded on the Services Page. |
On the Viewer Services page (Configuration Menu > Fulfillment > Discovery Interface Display Logic > Viewer Services), edit the Digital Viewer service and select the Use New Viewer check box. |
|
Modify the display logic rules for quick access representations. |
On the Discovery Interface Display Logic Rules page (Configuration Menu > Fulfillment > Discovery Interface Display Logic > Display Logic Rules), check the settings of the following out-of-the-box rules:
You can create additional rules to hide the embedded viewer with the new Representation Quick Access service. |
Displaying the More from the Same Service
The More from the same service is enabled by default. With this configuration, you can hide it from users.
-
On the Views List page (Configuration Menu > Discovery > Display Configuration > Configure Views), edit your view to open the View Configuration page.
-
Select the Full Record Services tab.
-
If you have not already done so, select Customize, which appears above the list of services in the Full Record Records Services tab.
-
Select the Configure row action to open the Edit More From The Same Service dialog box.
 Edit More From The Same Service Dialog Box
 -
To hide the related services from display, clear the following check boxes as needed and then select Done:
-
More from the same Course – When selected, the system enables the More from the same Course section on the Services Page.
-
More from the same Collection – When selected, the system enables the More from the same Collection section on the Services Page.
-

