
Viewing and Managing Funding Opportunities
All users can perform the following tasks, which are described on this page:
-
View and track funding opportunities
-
Enable funding alerts.
In addition, administrators can perform the following tasks:
-
Find and suggest funding opportunities to your institution's users. See Creating Curated Lists of Funding Opportunities.
-
Create and manage internal funding opportunities that are local to your institution. See Managing Internal Funding Opportunities.
-
Add a funding opportunity search widget to your website. See Adding a Funding Opportunity Search Widget to Your Website.
-
Mark funding opportunities with local notes and deadlines. See below.
-
View detailed reports about how Pivot-RP is being used by users. See Viewing Pivot-RP Reports and Statistics.
Viewing Funding Opportunities
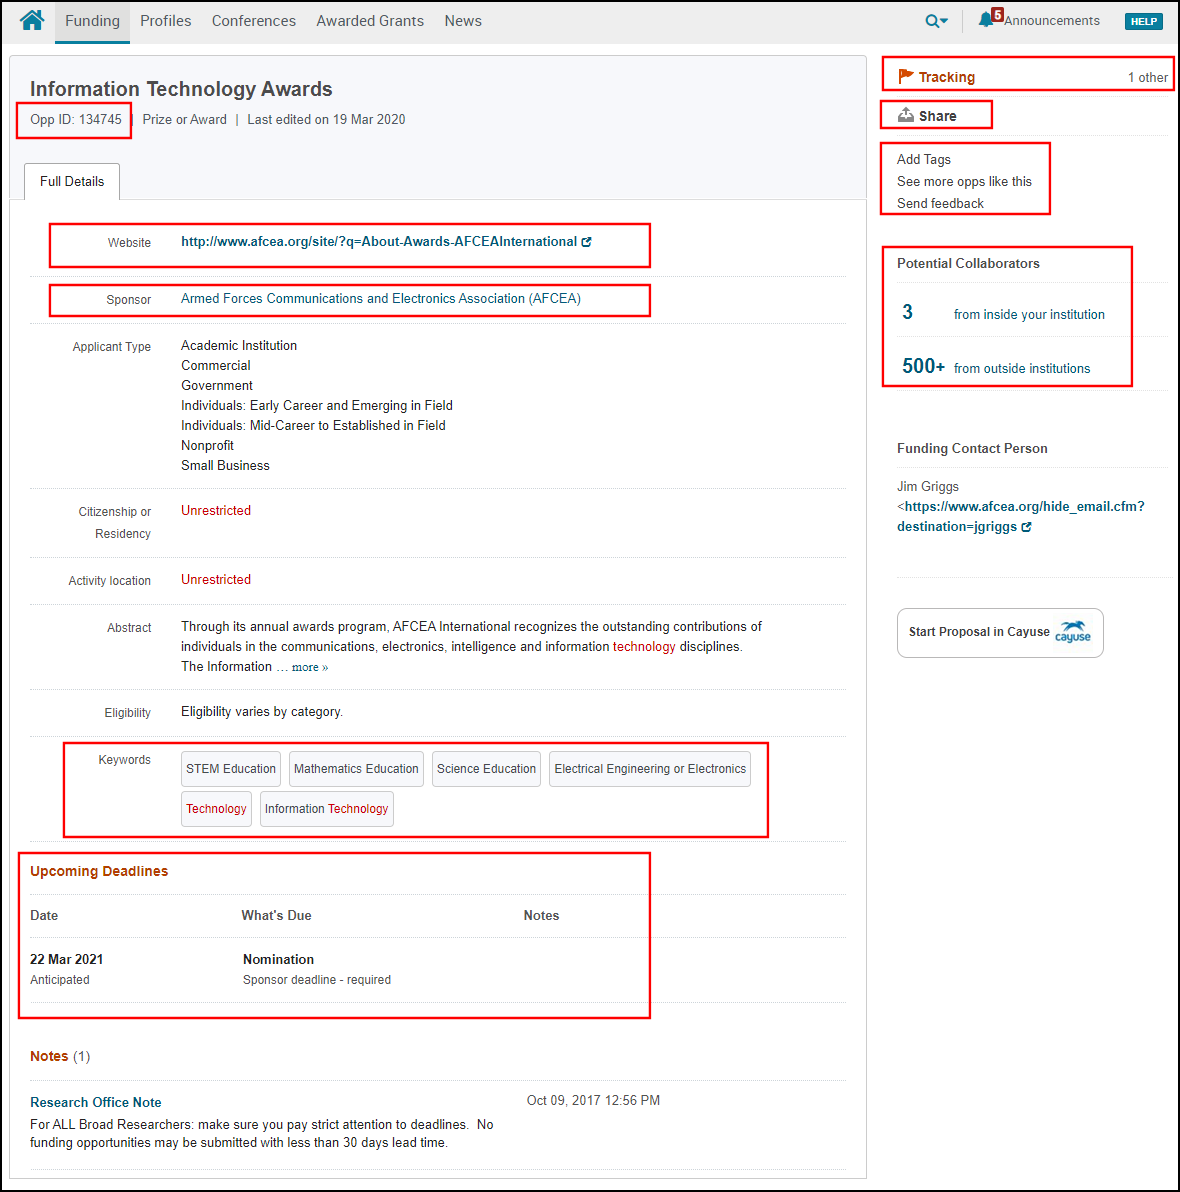
Each funding opportunity displays important information about the opportunity, as well as the following information / actions:
-
Opp ID – This ID uniquely identifies the opportunity in Pivot-RP . You can search for this ID using a basic search.
-
Website – Select to open the URL associated with this opportunity.
-
Sponsor(s) – Select a sponsor to see other opportunities by that sponsor.
-
Keywords – Select a keyword to see other opportunities that share a category with this one.
-
Upcoming Deadlines – See upcoming deadlines associated with this opportunity. For more information, see Deadlines.
-
Track / Tracking – See Tracking Funding Opportunities, below.
-
Potential Collaborators – Select to view profiles of researchers working in the area related to this funding opportunity. Select one or more of the profiles and select Share to share the opportunity with them. Sharing funding opportunities works exactly the same way that sharing saved searches works; see Saving and Rerunning Searches for Funding Opportunities, above.
-
Share – Select to share the opportunity with specific researchers or groups. Sharing funding opportunities works exactly the same way that sharing saved searches works; see Saving and Rerunning Searches for Funding Opportunities.
-
Add Tags or Edit Tags – Select to add, edit, or remove tags. Tagging tracked funding opportunities works exactly the same way that tagging saved searches works; see Saving and Rerunning Searches for Funding Opportunities, above.
-
See more opps like this – Select to view other opportunities that Pivot-RP considers similar to this one.
-
Send feedback – Select to email Clarivate any comments you have about this funding opportunity.
-
Start Proposal in Cayuse – When enabled by your institution, select to manage this grant proposal in Cayuse. See Opening Cayuse from Pivot-RP.
Administrator Capabilities While Viewing Funding Opportunities
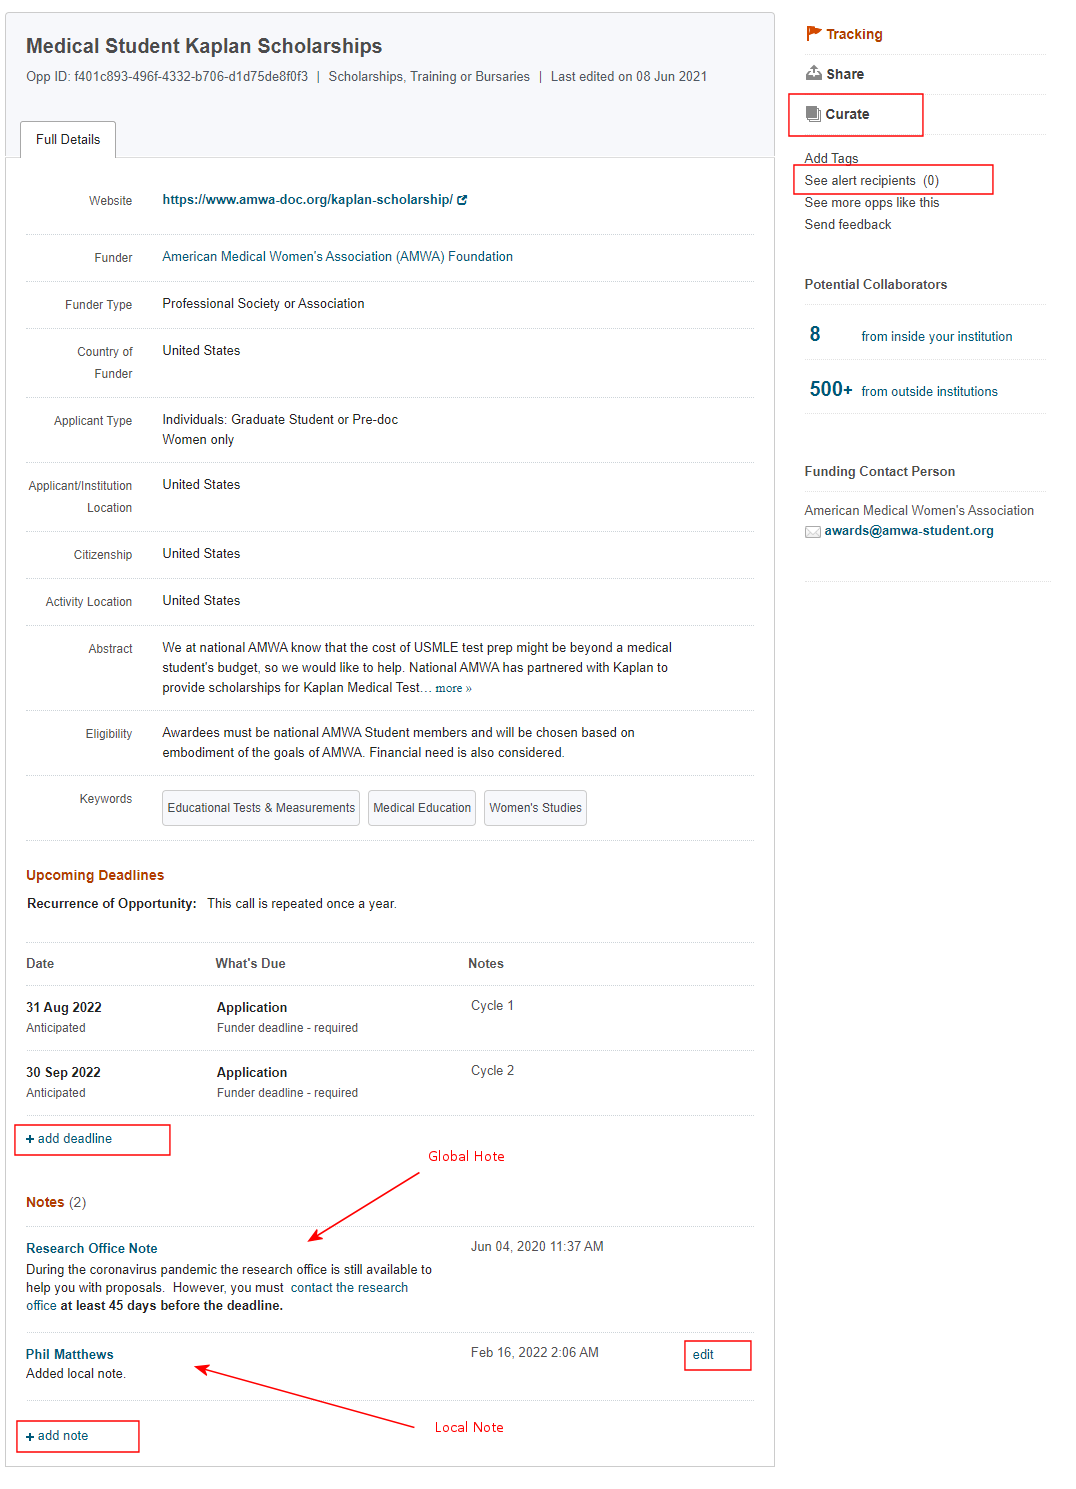
When viewing an opportunity, an administrator can perform the following activities:
-
Under the Tracking section, select Curate to add the opportunity to a curated list – See Creating Curated Lists of Funding Opportunities.
-
Under the Tracking section, select See alert recipients to see the list of users that have set alerts for the opportunity – See Enabling or Disabling Email Funding Alerts.
-
Under the Upcoming Deadlines section, select add deadline to add a deadline to the opportunity – For more information, see Managing Deadlines and Deadline Reminders.
-
Under the Notes section, select add note to add a local note to the funding opportunity.
-
Under the Notes section, select edit to either modify or delete a local note.
-
Administrators can add a global note that appears for all funding opportunities, but it cannot be added from a funding opportunity's page. For information on how to add or modify a global note, see Creating a Global Message and Site Announcements.
Exporting Funding Opportunities
You can export funding opportunities in various output formats.
- From any list of funding opportunities (search results, curated list, and so forth), select the opportunities to export and select Export (the Export option appears only after you select one or more opportunities).
 Funding Opportunities List
The Export Funding Opp Details dialog box appears.
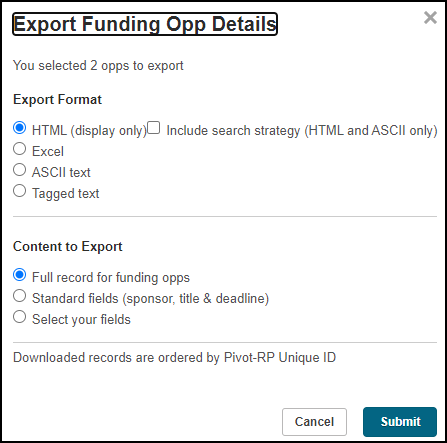 Export Funding Opp Details
 - Select the output format. If you select HTML or ASCII formats, then you can also select Include search strategy to include the search parameters and filters in your export.
- Select how much of the record content you want to export. If you select Select your field, you can select or clear specific fields from the output.
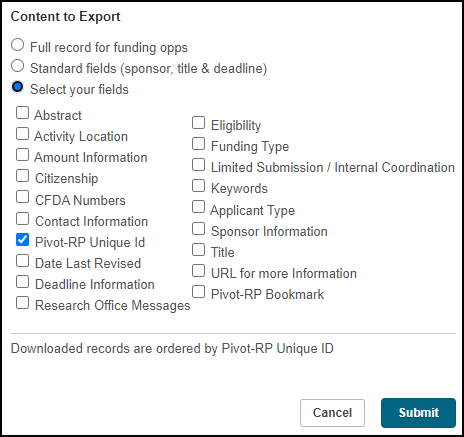 Export Funding Opp Details – Select Your Fields
 - Select Submit. If you selected HTML, the results appear in your browser. Otherwise, the results are downloaded to your computer.
Facet Filtering and Sorting
All search results include your search query, facets, and sorting options. You can select a facet as a quick way to filter the current list of results.
Your administrator may have set default filters for location or citizenship; see Configuring Institution Search Settings. You can clear these filters (select X) at the top of the facets pane.
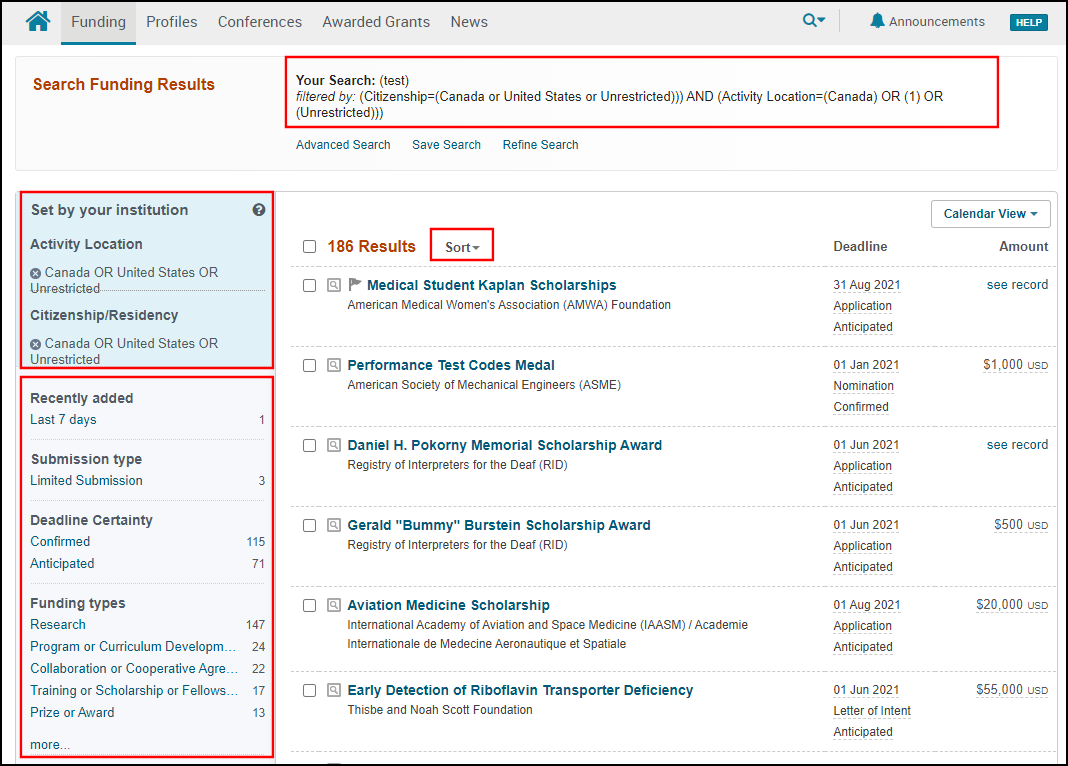
Saving and Rerunning Searches for Funding Opportunities
You can save your searches for funding opportunities. This saves you from having to enter the criteria every time you want to run this search. A saved search is, effectively, a dynamic list of opportunities that match certain criteria. Every time you run a saved search, the list of opportunities returned may change.
Saving a Search
You can share your saved searches with other users (and they can share theirs with you).
-
Perform a search to open the search results page.
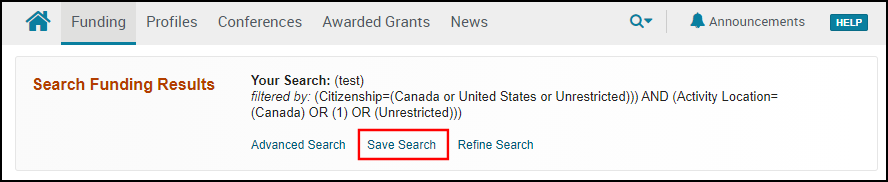 Save Search Query in Results
 -
Select Save Search to open the Save Your Search dialog box.
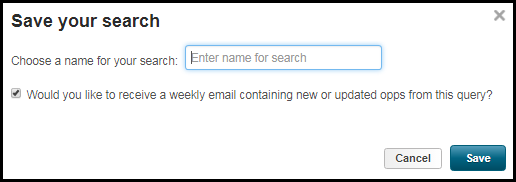 Save Your Search
 -
Enter a name for the search and select whether you would like to receive a weekly email with results of this search. Note that you can toggle the alerts setting on or off after the search is saved.
-
Select Save to save your search and click OK in the confirmation message.
Copying a Saved Search
You can copy a search from an existing search.
-
On the Saved Searches page, select a saved search.
-
Modify the search as needed.
-
Select Save Search to open the Save your Search dialog box.
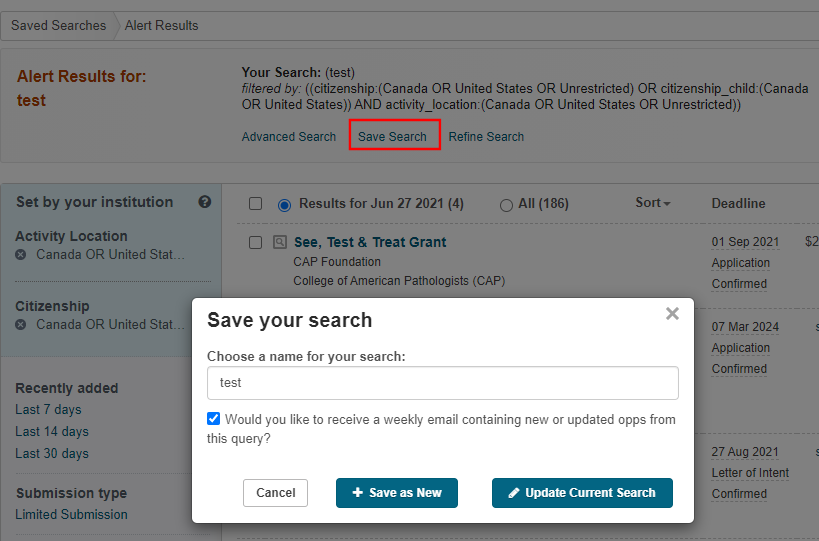 Save Your Search
 -
Specify a new name for the search and then select Save as New.
-
Select OK in the confirmation message
Modifying a Saved Search
You can modify an existing search.
-
On the Saved Searches page, select a saved search.
-
Modify the search as needed.
-
Select Save Search to open the Save your Search dialog box.
Save Your Search -
Specify a new name for the search and then select Update a Current Search.
-
Select OK in the confirmation message
Renaming a Saved Search
You can easily rename a saved search (including curated searches).
-
Select Options > Rename in a saved search row. The New Search Name dialog box opens.
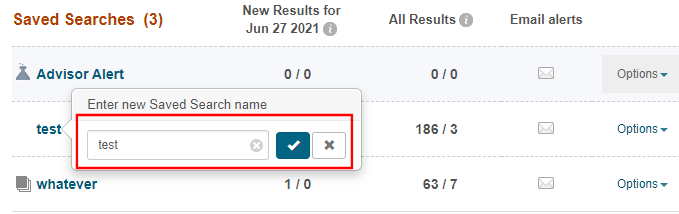 Rename Option
 -
Enter the new name and then select the Check icon.
Running or Managing Your Saved Searches
Saved searches appear on your home page; see Pivot-RP's Home Page. If you have added any tags to your saved searches, you can filter your searches by selecting the tag in the left sidebar.
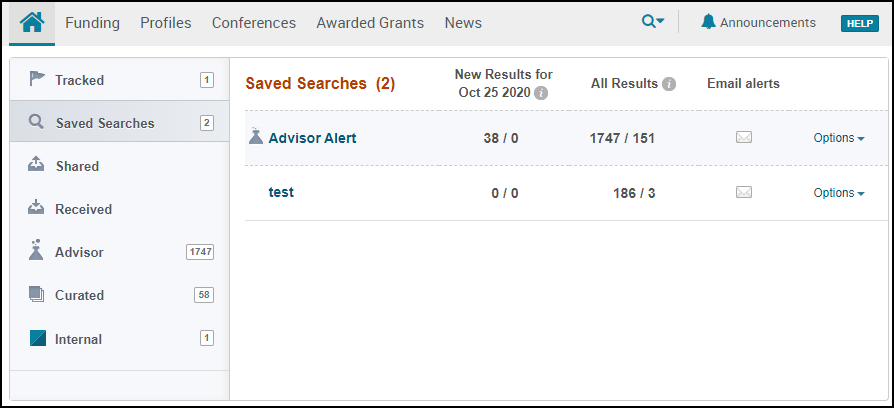
Use the Options row action to view historical results of, share, edit. tag, toggle alerts on/off for, or delete the saved search.
Viewing Historical Results of a Saved Search
Select View Archived Results in a saved search row. Pivot-RP displays search results for the saved search over the past week. Additional weeks are available in the facets in the left sidebar.
Managing Tags for Saved Searches
-
Select Add Tags or Edit Tags in a saved search row. The Add Tags or Edit Tags dialog box appears.
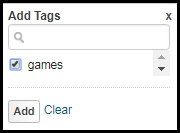 Add Tags
 -
Select from any already defined tags, or clear existing tags, and select Add or Apply. The selected tags are added and any cleared tags are removed.
To add a new tag, enter a new tag and select Create New. The New Tag dialog box appears.
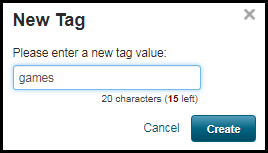 New Tag
 -
Select Create.
Sharing a Saved Search
You can share your search queries with other users.
-
Select Share in a saved search row. The Share dialog box appears.
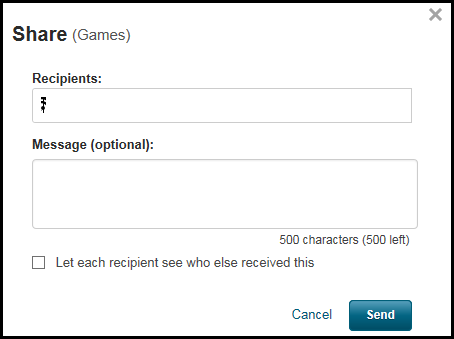 Share (User)
 -
Enter one or more recipients (users or groups) with which to share the search. This field uses auto-complete. For more information about groups, see User Groups.
-
Enter an optional message and select whether recipients can see all other recipients of your suggestion.
-
For administrators only, select the Put shared search on recipient's saved search list check box to save the search to the recipient's saved search list. These saved searches appear with an indication that it was added by an administrator.
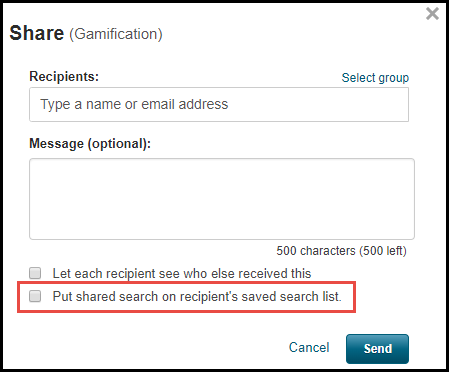 Share (Admin)
 -
Select Send.

Tracking Funding Opportunities
All users can perform the following activities:
-
Tag funding opportunities to view at a later time in Pivot-RP.
-
Enable email alerts for opportunities or saved searches.
-
Add personal deadlines to opportunities.
-
View a list of funding opportunity deadlines in a calendar and export these deadlines to a personal calendar application.
In addition, administrators can perform the following activities:
-
View the names of the users who are tracking the funding opportunity.
-
Add funding opportunities to users' tracking lists.
-
Adding local deadlines to funding Opportunities.
Tagging and Sharing Funding Opportunities
You can tag funding opportunities that you are working on, applying for, and so forth. This list is available on Pivot-RP's Home Page. For more details, see Pivot-RP's Home Page.
When viewing search results, you can select one or more opportunities and then select Track to add the selected opportunities to your Tracked list. When viewing an individual opportunity, you can similarly select Track.
When viewing either list, users can use the row actions (in the Options menu in each row) to:
-
Share an opportunity and see who you have shared the opportunity with
-
Remove the opportunity from the list
-
Move the opportunity to the other list
-
Add or edit tags
-
Add or edit deadline reminders
-
Add the opportunity deadlines to an external calendar application; see Viewing and Exporting Opportunity Deadlines in a Calendar.
-
Toggle alerts on/off
-
See how many other users have this opportunity in their Tracked list.
You can also select multiple opportunities in the list and perform some of these actions on all selected opportunities.
If an opportunity is no longer available and Clarivate does not anticipate it being offered again the next year, it is no longer searchable in Pivot-RP . If an opportunity on your Tracked list expires, it automatically moves into an Expired list. You can view the summary information of expired opportunities in this list, but it is no longer possible to view the full funding opportunity.
Sharing and tagging funding opportunities works exactly the same way that sharing and tagging saved searches works; see Saving and Rerunning Searches for Funding Opportunities, above.
Viewing Names of Users Who Are Tracking Funding Opportunities
Administrators with funding opportunities in their Tracked lists can also curate the opportunity and view the names of the users who are tracking the funding opportunity (regular users cannot see which users are tracking an opportunity, but they can see how many other users are tracking the opportunity).
To see the list of users, select the relevant link in the row actions menu.
![]()
Also see the Tracked Opportunities Report (Admin > Reports > Funding Opps > Tracked Opps).
Adding Funding Opportunities to Users' Tracking Lists
When sharing a list of funding opportunities, administrators can also add the opportunities directly to users' tracked lists. The opportunities appear with an indication that they were added by an administrator.

Enabling or Disabling Email Funding Alerts
You enable or disable weekly alerts for tracked funding opportunities and on saved searches. A weekly email is also sent for Advisor results, unless you disable it.
The alert for tracked funding opportunities is simply a reminder of what you have tracked. A saved search alert is only sent if there are new funding opportunities that appear for that search.
In the Saved Searches tab on the home page select Alert email on or Alert email off in the row.
In the Tracked tab on the home page select Turn alert email on or Turn alert email off in the row.
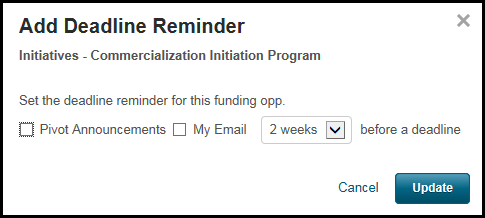
Managing Deadlines and Deadline Reminders
You can configure Pivot-RP to automatically add deadline reminders to all opportunities that you add to your Tracked list. To do this, see Managing Your Account. The following procedure can be used to manually add or edit deadline reminders.
- Select Add Deadline Reminder or Edit Deadline Reminder in the opportunity row. The Add Deadline Reminder or Edit Deadline Reminder dialog box appears.
 Add Deadline Reminder
 - Select whether to receive the reminder as an announcement in the Pivot-RP UI or as an email (or both), and select when to receive the reminder.
- When you are done, select Update.
Adding Local Deadlines to Funding Opportunities
Administrators can add an unlimited number of local deadlines to individual funding opportunities. In addition to the deadlines that are configured for the opportunity, these deadlines are visible only to your institution's users.
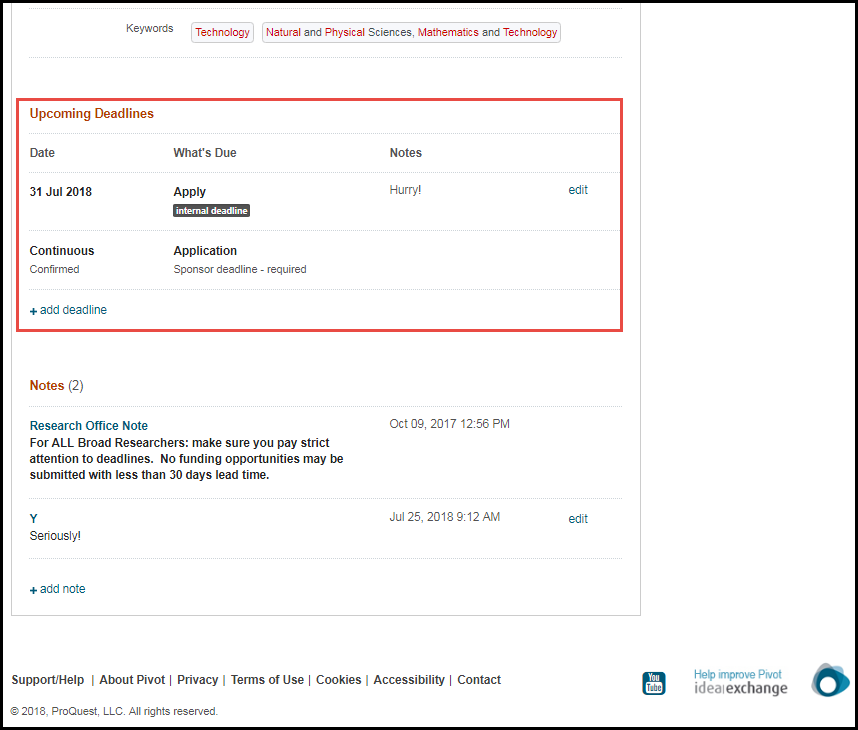
You can add, edit, and delete local deadlines. You cannot edit deadlines that are pre-configured for the opportunity.
To delete a local deadline, select Edit and select Delete.
Viewing and Exporting Opportunity Deadlines in a Calendar
You can export a tracked funding opportunity to a calendar application. In addition, from any list of funding opportunities, you can view the deadlines from one or more of these opportunities in a calendar in Pivot-RP .
While viewing opportunity deadlines in a calendar in Pivot-RP , you can export some or all of these deadlines in bulk to a calendar application. You can export them as a dynamic calendar, which means that the deadlines are updated in your calendar application when they are updated in Pivot-RP . Or you can export them as static dates, in which case changes in Pivot-RP are not reflected in your calendar application.
- When viewing the list of tracked funding opportunities, select Add to Calendar in an opportunity row. The Add to Calendar dialog box appears.
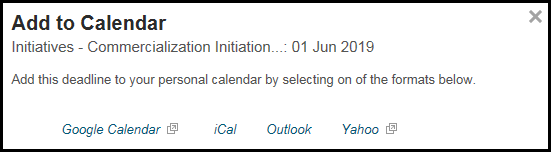 Add to Calendar
 - Select to add the deadlines to your Google, iCal, Outlook, or Yahoo calendars. The external application opens and the information is added to the application.
- On any list of funding opportunities, select Calendar View to see all deadlines of a list of funding opportunities, as follows:
- To view the deadlines of all opportunities in the list, select Calendar View > View Entire List.
- To view some of the opportunities, select the opportunities and then select Calendar View > View Selected Opp(s).
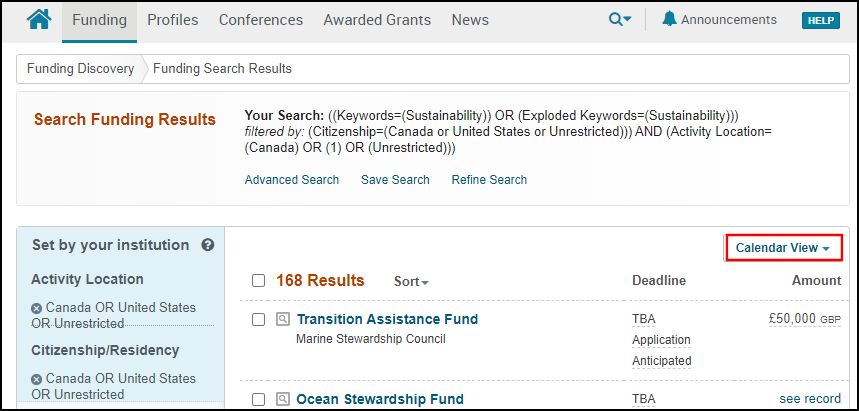 Search Funding Results
The opportunity deadlines appear in a calendar within Pivot-RP that opens in a new browser tab.
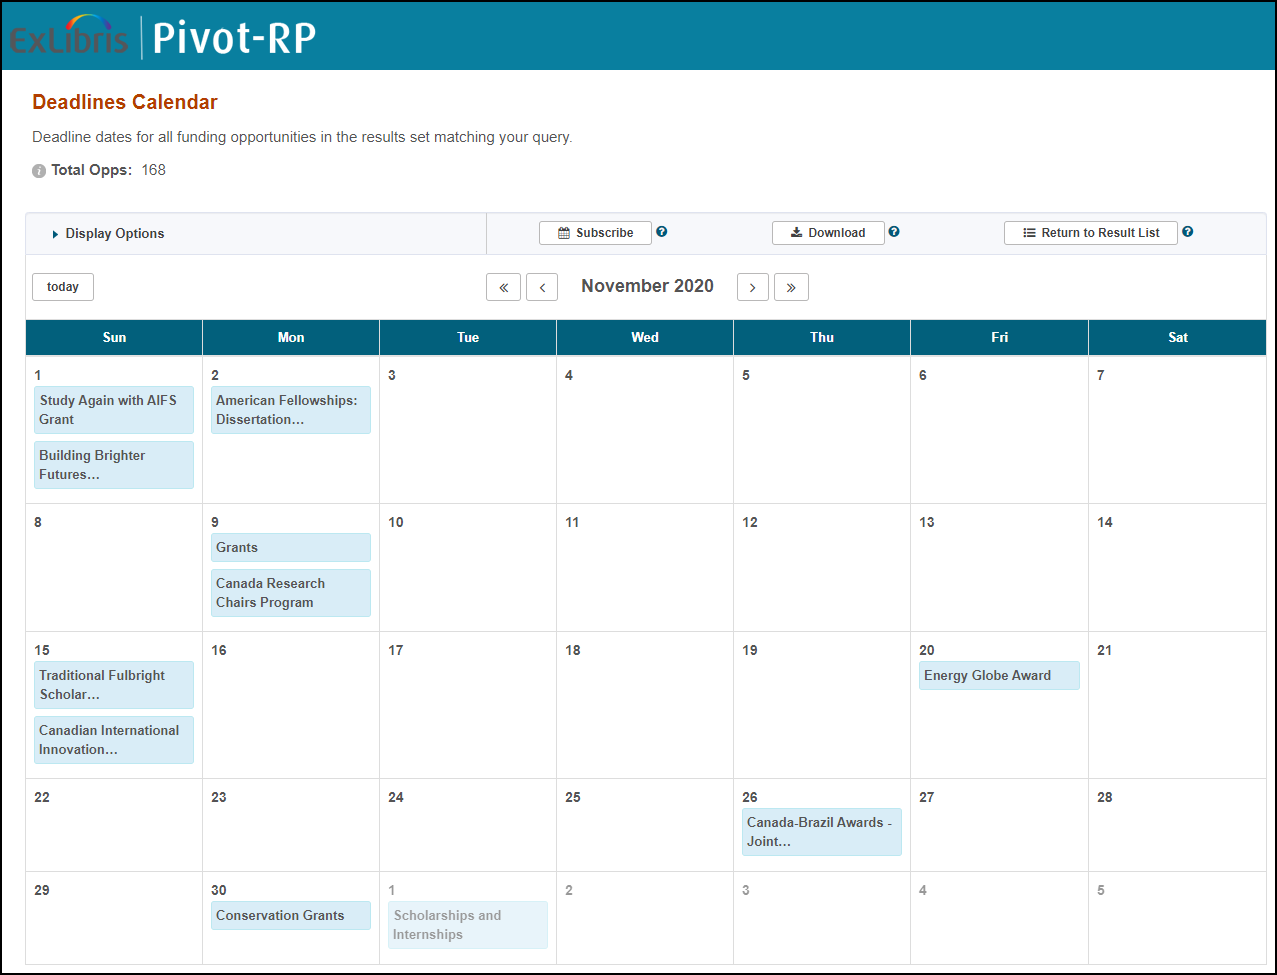 Pivot-RP Deadlines Calendar
 -
From the calendar you can perform any of the following actions:
- Select Display Options, select Show opps N days before further deadlines, enter a number of days instead of 0, and select Update Calendar to view the deadlines in the calendar earlier than the actual deadlines.
- Select Subscribe to add a calendar of these deadlines to a personal calendar application. The calendar of deadlines is updated automatically whenever the information is changed in Pivot-RP .
- Select Download to download the list of deadlines that you can then import into a personal calendar application. This list is not dynamic, and is not updated when the information is changed in Pivot-RP .
- Select Return to Result List to close this tab.
- You can navigate to previous and future months, as in any other calendar application.
- Select an opportunity in the calendar to view details about an opportunity.
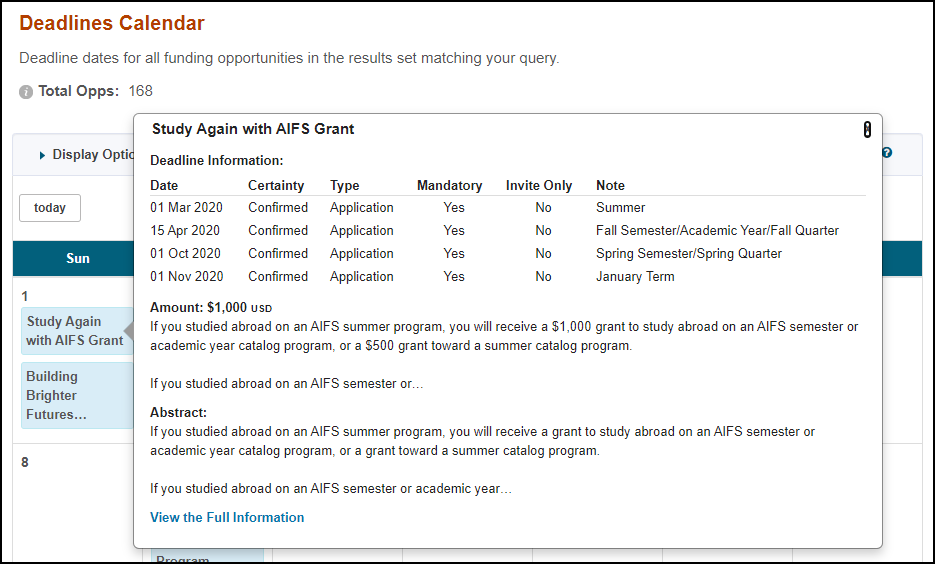 Pivot-RP Deadlines Calendar - Funding Opportunity Details
 -
Select View the Full Information to view the funding opportunity page.