
Configuring the Links Menu
The Links Menu tab on the View Configuration page enables you to define the links on the Main menu, which appears at top of the UI. Out of the box, Primo VE provides links for the following pages in Primo VE: Journal Search, Tags, Library Search, ILL Request (Blankill), Fetch Item (citationlinker), Browse Search, Collection Discovery, and Newspaper Search, Database Search, and Purchase Request. All except for Database Search and Purchase Request are enabled by default.
For each link, you can perform the following configurations:
If you want to add a link, see Adding a Link to the Links Menu.
All the out-of-the-box links open in the same browser tab, and all customer-defined links open in a new browser tab.
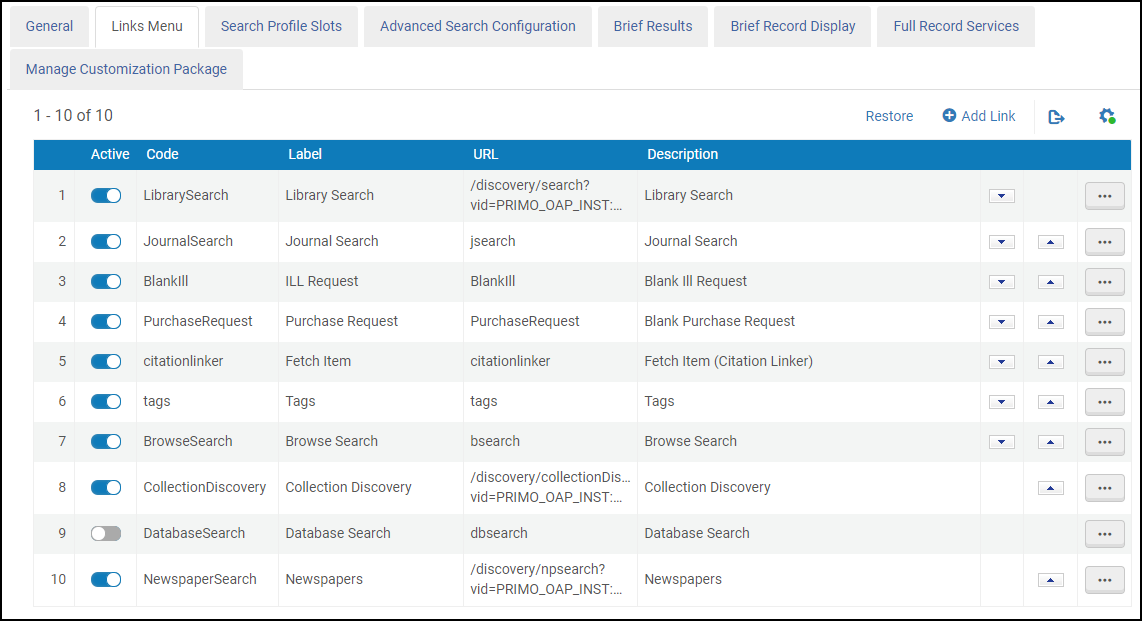
In the following example, the following links are enabled: Journal Search, Tags, Library Search, ILL Request, Fetch Item, and Browse Search:

Currently, Tags functionality is not supported in consortia environments. For information on how to delete the Tags link and other links, see Deleting a Link from the Links Menu.
Adding a Link to the Links Menu
In addition to the out-of-the-box links, you can add your own links.
-
On the Views List page (Configuration Menu > Discovery > Display Configuration > Configure Views), edit your view and select the Links Menu tab.
-
If you have not already done so, you must select Customize to enable you to add and modify links.
-
Select Add Link to open the Define Menu Link Page.
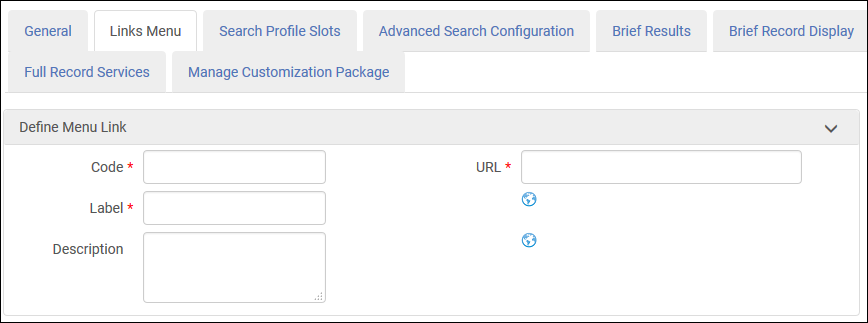 Define Menu Link Page
 -
Specify the following fields:
Fields for Define Menu Link Page Field Description Code
A unique name for this code.
Label
The default display label for this link.
Select the Globe button
 if you want to create translations for the label in the View Labels code table. For more information, see Configuring Display Labels.
URL
The page's URL. If you are adding a link to your institution's domain (such as query within your local catalog), specify a relative path and make sure that it does not start with a forward slash. For example:
discovery/search?query=any,contains,artificial%20intelligence&tab=LibraryCatalog&search_scope=MyInstitution&vid=PRIMO_OAP_INST:Alma&offset=0All other links require a full path.
Description
The text that appears when users hover their cursors over the link. The following links are supported out of the box: Library Search, Journal Search, ILL Request, Fetch Item, Tags, Browse Search, Collection Discovery, Database Search, and Newspaper Search.
Select the Globe button
if you want to create translations for the text in the View Labels code table. For more information, see Configuring Display Labels.
Deleting a Link from the Links Menu
The Links Menu tab enables you to delete user-defined links only. If you want to use a link at a later time, it is recommended that you deactivate it so that you do not have to reconfigure the link later. For more information, see Activating or Deactivating a Link on the Links Menu. Out of the box links (such as for Journal Search) cannot be deleted, only deactivated.
-
On the Views List page (Configuration Menu > Discovery > Display Configuration > Configure Views), edit your view and select the Links Menu tab.
-
If you have not already done so, you must select Customize to enable you to add and modify links.
-
Select Delete in the link's row actions list.
Activating or Deactivating a Link on the Links Menu
The Links Menu tab enables you to deactivate links that you are no longer using or are planning to use in the future. Deactivated links can be activated quickly without having to reconfigure the link. If you no longer need a user-defined link only, see Deleting a Link from the Links Menu.
Since Tags functionality is not supported in consortia environments, it is recommended that you deactivate the Tags code. In addition to the link in the Main Menu, the Tags Service is removed from the Full Display page.
-
On the Views List page (Configuration Menu > Discovery > Display Configuration > Configure Views), edit your view and select the Links Menu tab.
-
If you have not already done so, you must select Customize to enable you to add and modify links.
-
Toggle the slider in the row containing the link that you want to activate/deactivate.
Customizing and Translating a Link's Display Label and Tooltip
The Edit Menu Link page enables you to customize and translate a links display label and tooltip.
-
On the Views List page (Configuration Menu > Discovery > Display Configuration > Configure Views), edit your view and select the Links Menu tab.
-
If you have not already done so, you must select Customize to enable you to add and modify links.
-
Select Edit in the link's row actions list to open the Edit Menu Link Page.
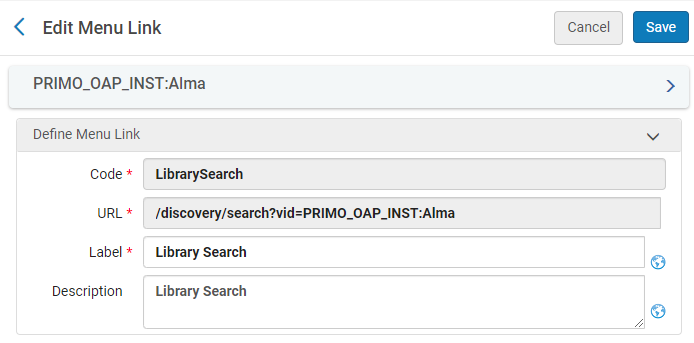 Edit Menu Link Page
 -
Specify the following fields:
Fields for Edit Menu Link Page Field Description Label
The default display label for this link.
Select the Globe button
if you want to create translations for the label in the View Labels code table. For more information, see Configuring Display Labels.Description
The text that appears when users hover their cursors over the link. The following links are supported out of the box: Library Search, Journal Search, ILL Request, Fetch Item, Tags, Browse Search, Collection Discovery, Database Search, and Newspaper Search.
Select the Globe button
if you want to create translations for the text in the View Labels code table. For more information, see Configuring Display Labels.
Ordering Links on the Links Menu
All options are performed on the Links tab of the View Configuration page: On the Views List page (Configuration Menu > Discovery > Display Configuration > Configure Views), edit your view and select the Links Menu tab. If you have not already done so, you must select Customize to enable you to add and modify links.
-
On the Views List page (Configuration Menu > Discovery > Display Configuration > Configure Views), edit your view and select the Links Menu tab.
-
If you have not already done so, you must select Customize to enable you to add and modify links.
-
Select the up/down arrows in the rows containing the slots that you want to move.
Configuring Category Browse for Journal Search
In addition to defining and activating the Journal Search link in the Links menu, you can also enable/disable Category Browse, which enables users to browse journals by category. For more details, see Configuring Journal Search for Primo VE.
-
On the Views List page (Configuration Menu > Discovery > Display Configuration > Configure Views), edit your view and select the Links Menu tab.
-
If you have not already done so, you must select Customize to enable you to add and modify links.
-
Edit the row that contains the Journal Search link to open the Edit Menu Link page.
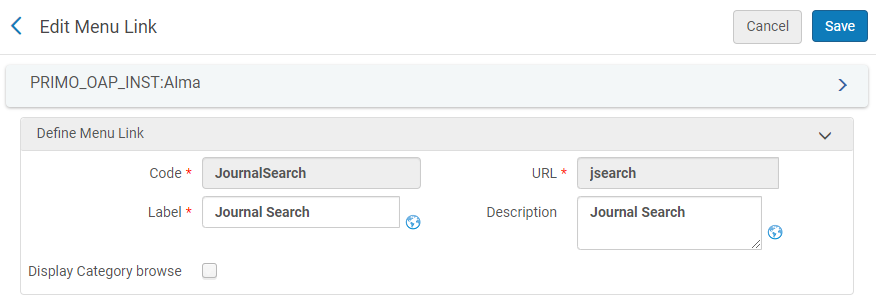 Edit Menu Link Page for Journal Search
 -
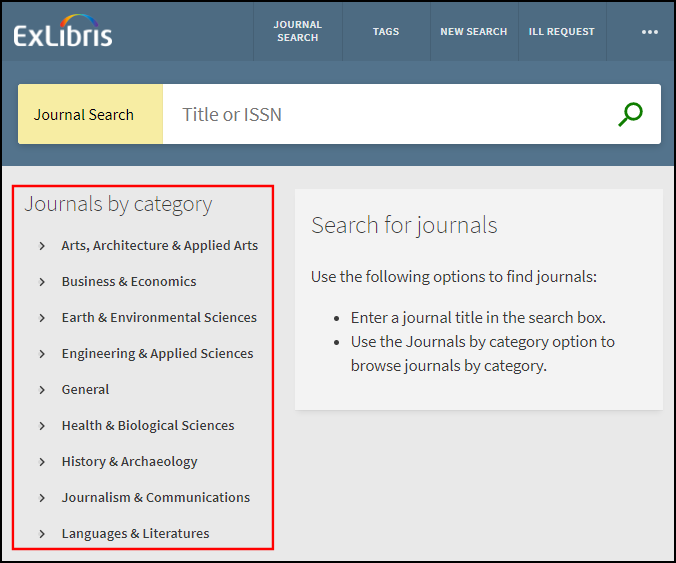
Select the Display Category browse checkbox to enable Category Browse.
When this option is enabled, the Teak your results (facets) section always appears on the left side of the page above the Journals by category section.
-
Select Save.
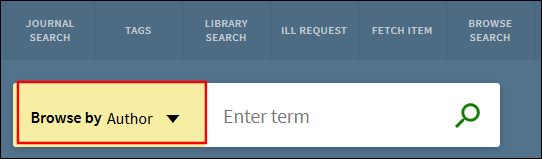
Configuring Browse Search
In addition to defining and activating the Browse Search link in the Links menu, you can also configure the browse search types and the order in which they appear in the Browse by drop-down list in Primo VE. Currently, the following types of browse searches are supported: Author, Title, Series, Subject, and Call Numbers of the following types: generic, Library of Congress (0), Dewey (1), and SUDOC (3). For more details, see Configuring Browse Search for Primo VE.
-
By default, Browse by Subjects utilizes Alma's Subjects (with MARC21 600 / 610 / 611 / 647) heading type mapping. If you prefer to exclude the 6XX fields, please open a ticket with Support.
-
Browse Search can return headings that contain records with suppressed or restricted holdings, but if the heading is selected, the suppressed records are omitted from the results and the following message is displayed:
Some records are not displayed since they are restricted / suppressed from display.
-
On the Views List page (Configuration Menu > Discovery > Display Configuration > Configure Views), edit your view and select the Links Menu tab.
-
If you have not already done so, you must select Customize to enable you to add and modify links.
-
Edit the row that contains the Browse Search link to open the Edit Menu Link page.
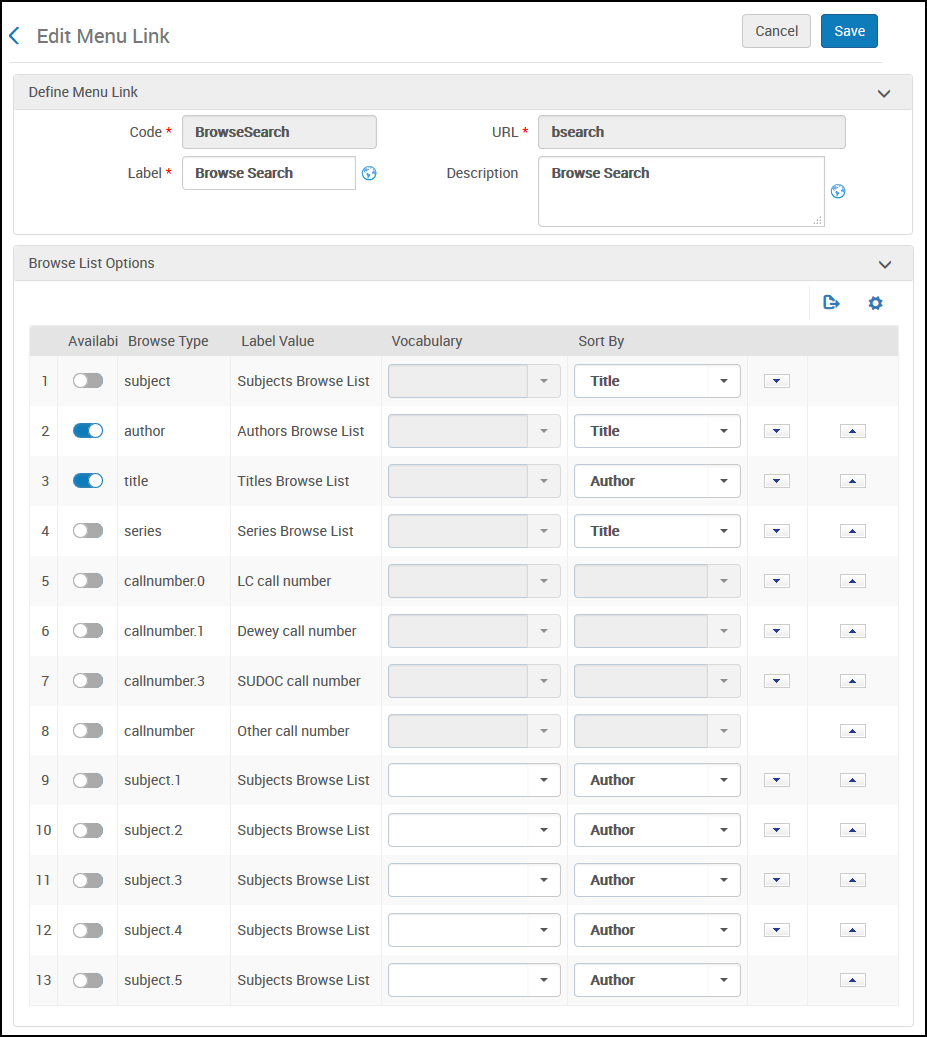 Edit Menu Link Page for Browse Search
 -
For each Browse Type that you want to display in the Sort by drop-down list, specify the following fields:
-
Availability – Select this field to activate the browse type.
-
Vocabulary – For Subject browse types only, select the vocabulary that you want to use for browse.
By default, Browse by Subjects utilizes Alma's Subjects (with MARC21 600 / 610 / 611 / 647) heading type mapping. If you prefer to exclude the 6XX fields, please open a ticket with Support. If you are looking to include missing 651 terms from the Browse Search Vocabulary LCSH results, set this field to Library of Congress name authority records for 651.
-
Sort By – Select one of the following sort options: Author, Title, Date - newest, and Date - oldest.
-
-
Select the up/down arrows as needed to order the browse types in the Browse by drop-down list.
-
Select Save.
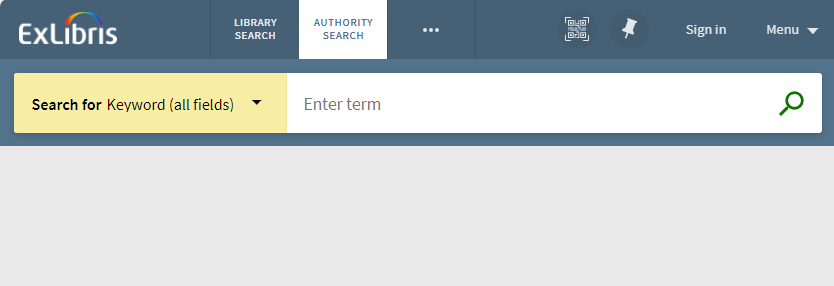
Configuring Authority Search
Primo VE's Authority Search is an enhanced user experience that is generated from the local authorities configured in the library. For this page, you can configure the search fields from which users can select in the Search for field: Keyword (any field), Personal Name, Corporate Name, Meeting Name, Name, Subject, Geographic Term, Genre/Form Term, and Uniform Title. In addition, you specify the order of these search fields. The first search field in the list is the default. For more information, see Configuring Authority Search for Primo VE.
-
On the Views List page (Configuration Menu > Discovery > Display Configuration > Configure Views), edit your view and select the Links Menu tab.
-
If you have not already done so, you must select Customize to add and modify links.
-
Edit the row that contains the AuthoritySearch code to open the Edit Menu Link page.
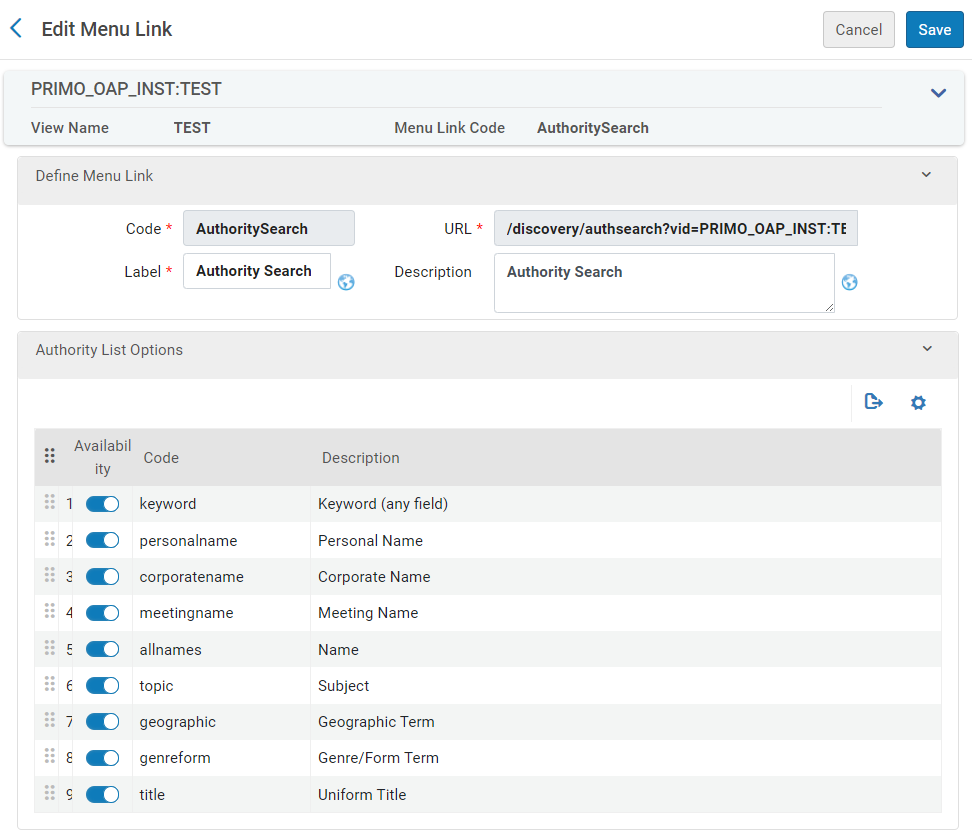 Specify Search Fields for Authority Searches
 -
In the Availability column, activate the search fields that you want to appear in the Search for drop-down field on the Authority Search page.
-
Using the row handle, drag and drop the rows to position the search fields in the Search for drop-down field on the Authority Search page. The first search field appears on the top of the list and is the default.
-
Select Save to return to the Views List page.
-
Activate the row that contains the AuthoritySearch code.