
Partners
Rapido Partners
- When joining Rapido PODs there is no need to create/add partners at the institution level.
- Once a request is created between two Rapido partners, the partner is added automatically to the partners' list for both institutions at the institutional level (no manual action is required).
- There are cases where you might want to allow resource sharing for a Rapido partner who is not part of a POD you belong to.
- In this case, you can use the Add Partner function to send the request. As a prerequisite, both sides need to download the partner record from the Community tab (Fulfillment > Resource Sharing > Partners) to the institutional level and work at a peer-to-peer level.
Setting Up Rapid
To enable Rapido document delivery setup, you need to define Rapid as a partner and load your holdings by using the Alma Holdings Harvest for RapidILL.
Beyond the Pods
Peer-to-Peer: Working with Partners Beyond the Pods
Rapido libraries can be connected with other Rapido libraries through Pods.
Mutual commitments within pods can include no transaction fees, delivery time, loan period, and more requests. To avoid overload on specific libraries, Rapido also allows load balance requests to ensure everyone lends and borrows equally. For more information, see Rapido Pods. Use this form to be added to a pod by Ex Libris.
After your library is added to the pod by the Ex Libris staff:
- Configure participating items for the pod (Configuration > Resource Sharing > Configuration > Members > Physical Items Lending Policies). When this is complete, the defined participating items are listed next to the pod name under the physical items lending policies section.
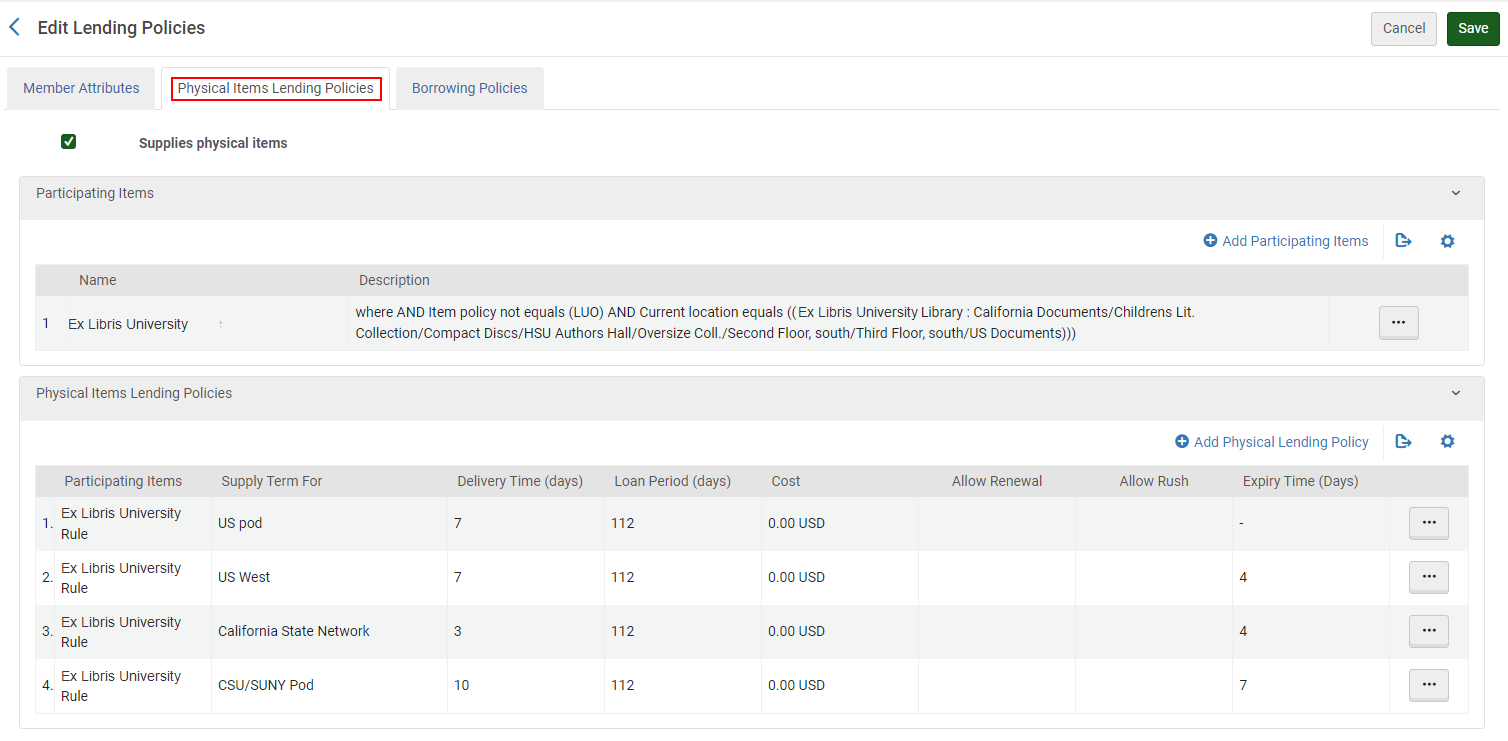 Physical Items Lending Policies configuration
 - Configure the Borrowing Policies pods order based on priority.
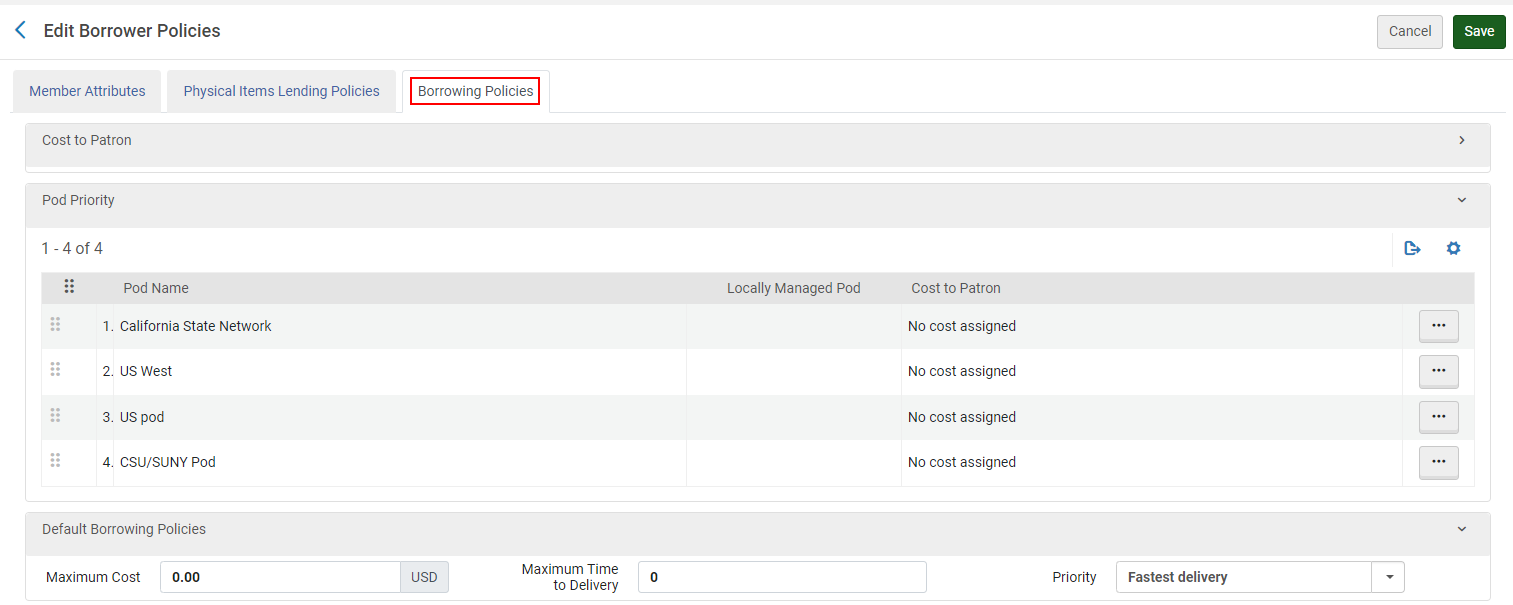 Borrowing Policies pod priority
Configuring an ALA Profile Type
From the Fulfillment > Resource Sharing > Partners > General Information tab, select ALA Email as the Profile Type. The System Type defaults to Other.
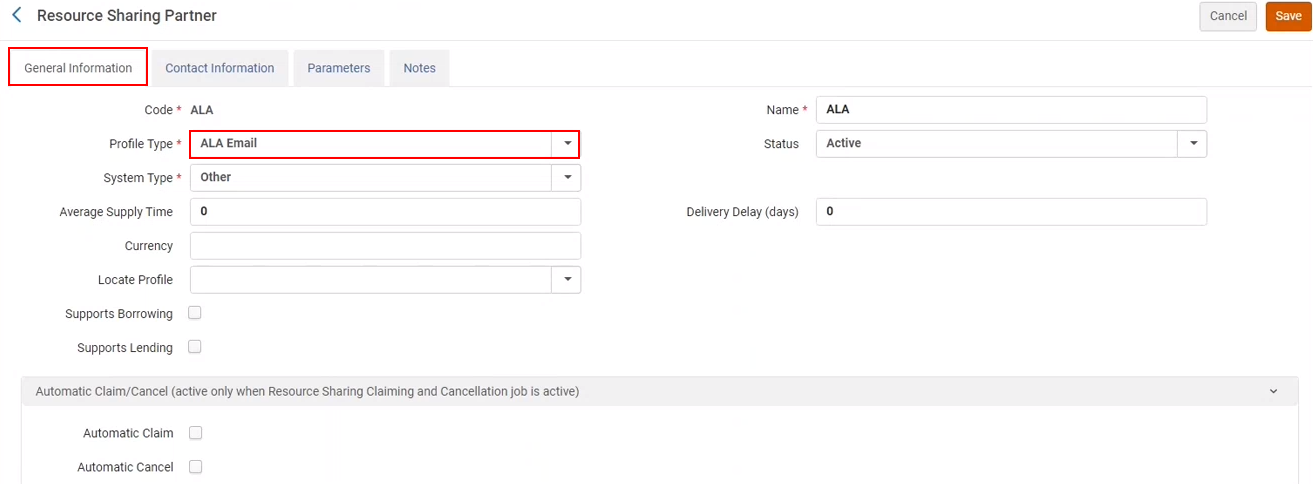
From the Parameters tab, enter the email address that should receive the ALA form.

Defining Terms for Peer-to-Peer Resource Sharing (with Non-Rapido Libraries)
When requests are not fulfilled by Rapido, the following entities are used to create a peer-to-peer workflow:
Configuring Partners
To configure the communication between Alma and resource sharing systems, you must have the following role:
- Resource Sharing Partners Manager
Resource sharing partners can be created to define the types of requests/receive communication that takes place between Alma/Rapido and a resource sharing system.
Your resource sharing partners can be other libraries or other resource sharing tools such as ILLIAD, BL, Subito, etc.
Start by creating the partners you want to work with.
From the Resource Sharing Partner List page (Fulfillment > Resource Sharing > Partners), select Add Partner.
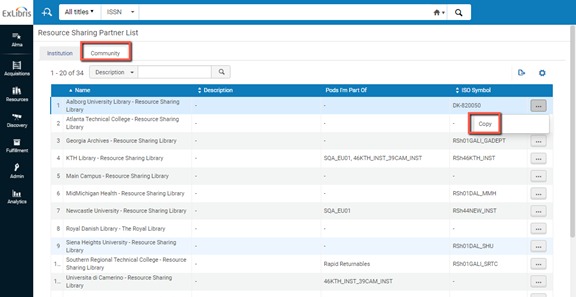
You can find some partner libraries in the Alma directory under the Community tab.
For more information, watch Working with Partners Beyond Your Pods
Enabling Self Registration for Net Lenders
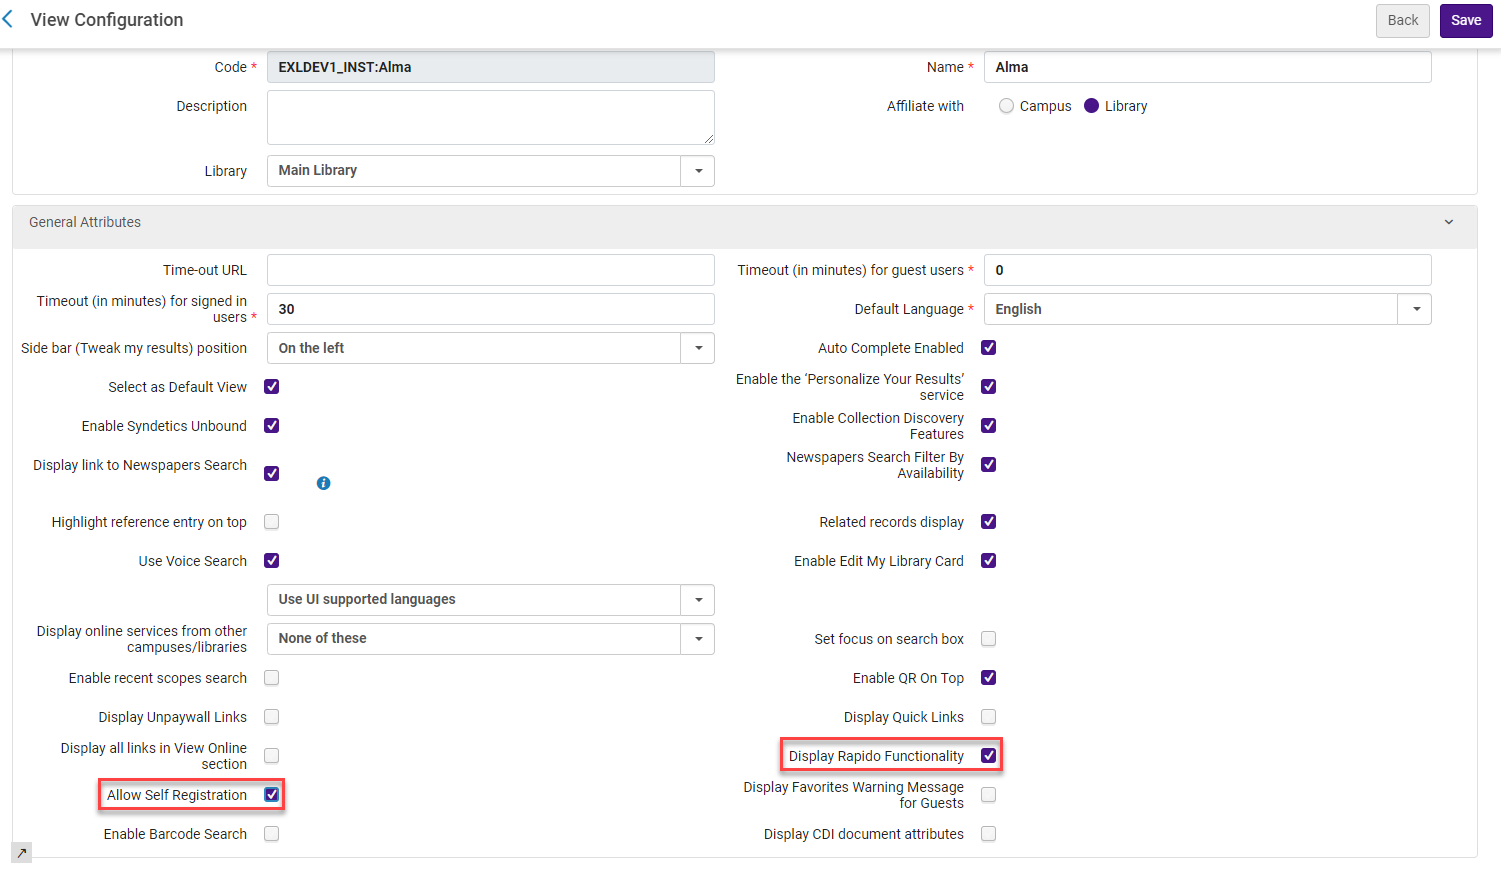
Self registration enables borrowers to register with your library and request lendable items from your library. This functionality supports patron registration and use as well as lending to organizations or institutions that do not have a resource sharing solution, such as government agencies, museums, non-profits, and independent researchers.
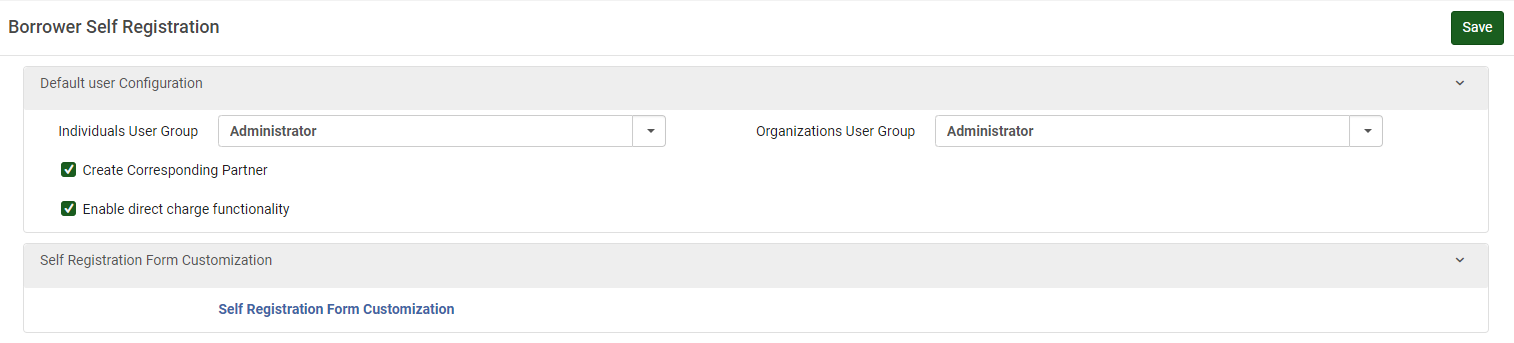
You can set the View Configuration (Discovery > Display Configuration > Configure Views) for the login form. From the General tab, when Display Rapido Functionality is checked, the Allow Self Registration checkbox is presented.

From the Borrower Self Registration form (Configuration > Resource Sharing > Configuration > Borrower Self Registration), you can select which user groups can self register from the Individuals User Group and Organizations User Group drop down lists, or select Self Registration Form Customization to enable/disable form fields or change the label Descriptions.
You can mediate by requests created by self registered users. When the mediation rule User Authorized for Resource Sharing (Configuration > Resource Sharing > Rapido Rules > Borrowing Mediation Rules) is set to No, the first request created by self registered users receives is stopped for mediation. As with other mediation rules, labels can be applied to create the relevant set to make your workflows more efficient.
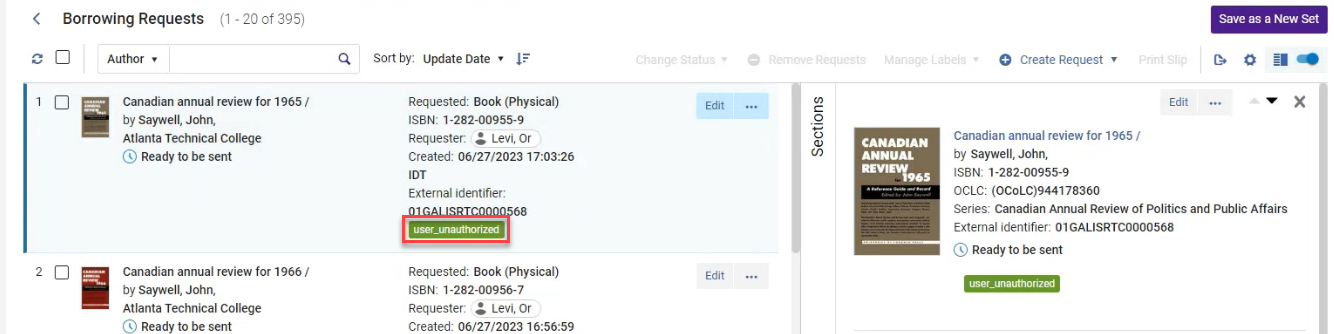
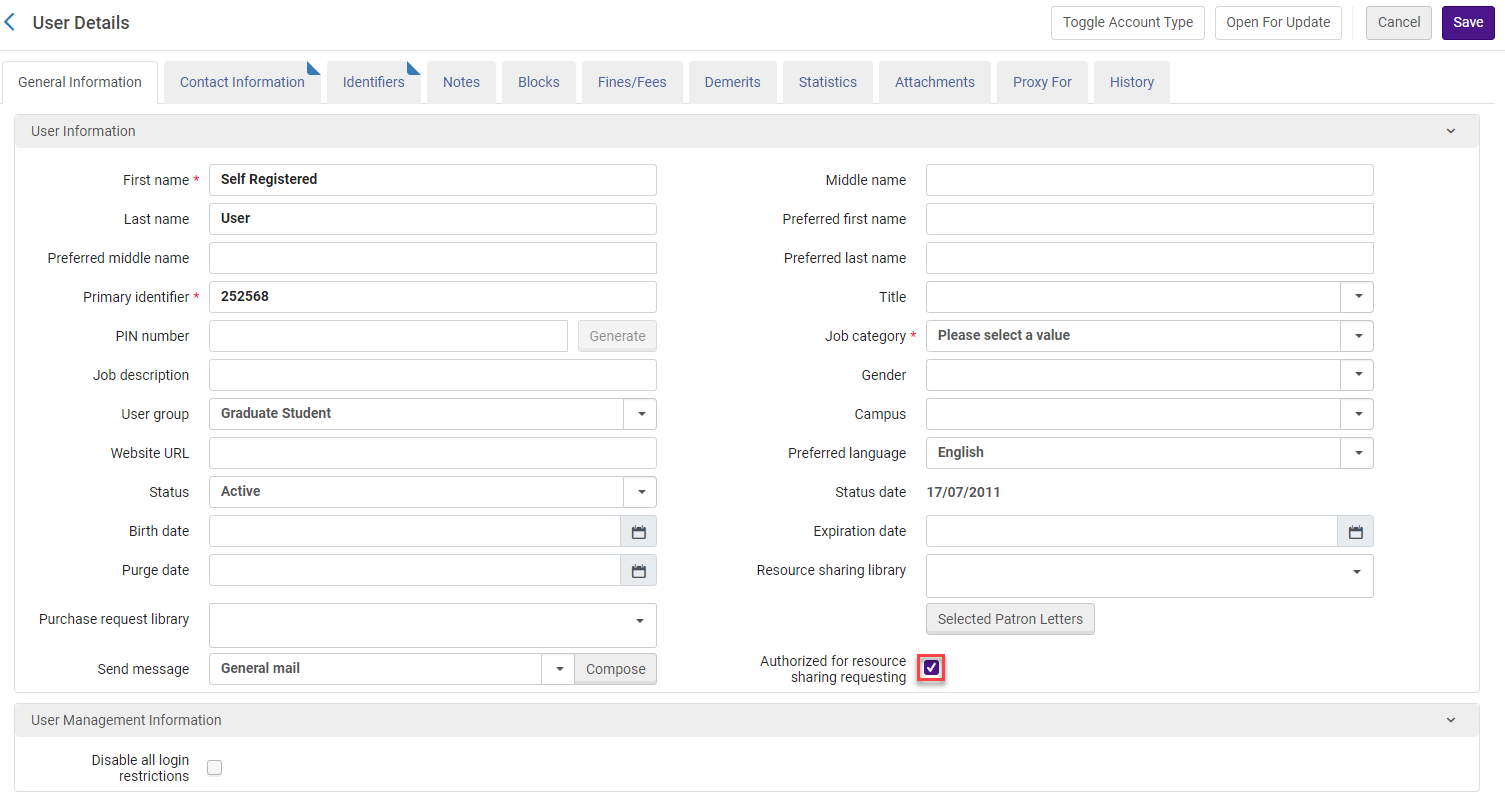
- From the User Details, check the Authorized for resource sharing requesting checkbox. Future requests from this self registered user will not be stopped for mediation.
Creating Corresponding Partners for Self Registered User Partners
When Create Corresponding Partner is selected, once this self registered user creates a request in the institution, the request is created as a lending request. The library then fulfills the request and ships it to the patron directly.
The created partner is marked as a Self Registered partner and the New Request Alert checkbox is automatically selected on the partner record, but can be deselected. This enables institutions such as net lending institutions to manage all resource sharing requests from the partner perspective consolidating all the resource sharing activity.

Charging Non-Pod Partners
Enabling Direct Charge Functionality
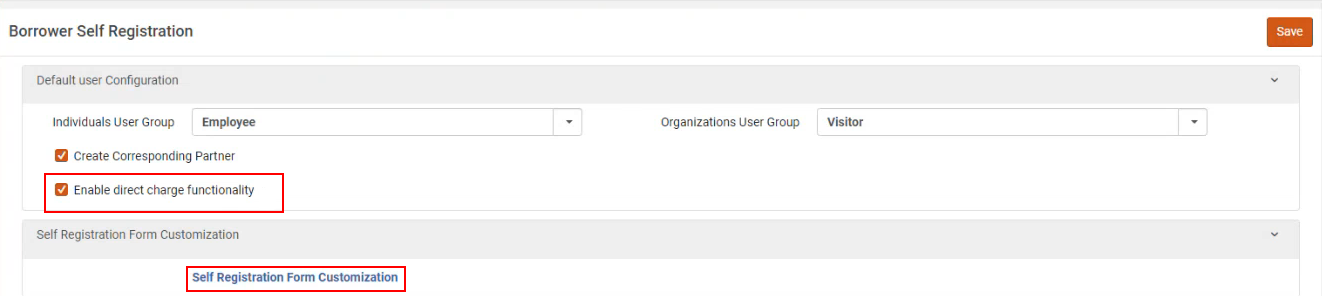
Billing fields can be enabled or disabled on the Self Registration Form Customization. The Enable direct charge functionality must be checked on the Borrower Self Registration form (Configuration > Resource Sharing > Configuration > Borrower Self Registration) for the Enable Direct Charge Functionality section to be visible on the corresponding partners created by self registration. Additionally, the field names can be modified as necessary by selecting Self Registration Form Customization.
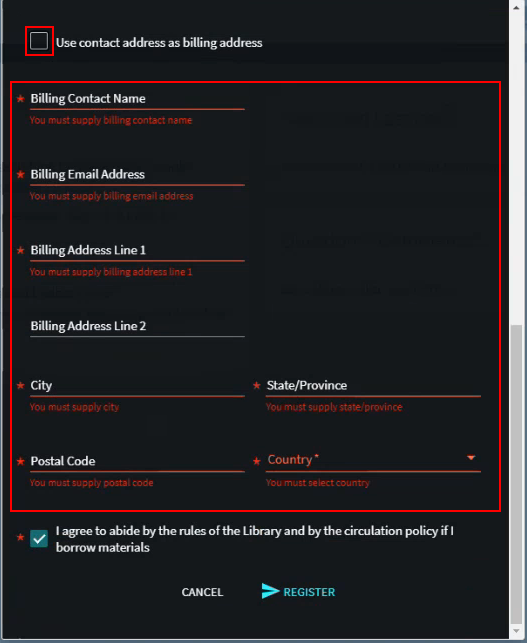
When a Maximum Request Cost is added to the self registration form, these fields are then populated on the user's Resource Sharing Partner (Fulfillment > Resource Sharing > Partners) details.

When the contact billing address is different than the contact address, users can deselect the Use contact address as billing address on the self registration form and then enter the relevant details for the billing address.
Configuring Copyright Billing Settings
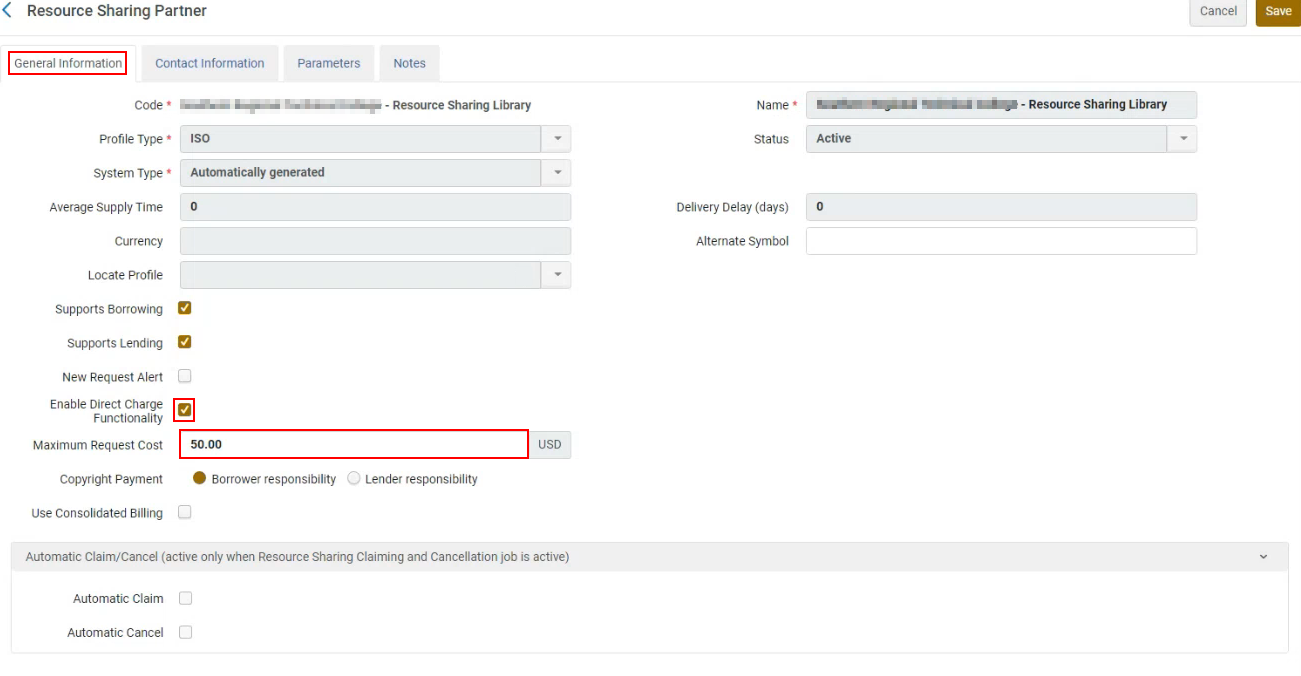
To assist with copyright billing, the Resource Sharing Partner (Fulfillment > Resource Sharing > Partners) includes an Enable Direct Charge Functionality checkbox (default unchecked). When checked, library staff can set whether the borrowing or lending partner is responsible for the Copyright Payment when payments apply. Borrower responsibility is selected by default. The field enables the customer to explicitly request the LHL pay the copyright fee on their behalf and bill them for it or to choose to handle the fee on their own.
Additionally, when the Enable Direct Charge Functionality checkbox is checked, library staff can check the Use Consolidated Billing checkbox to consolidate billing with this partner so that billing will occur monthly.

Configuring Maximum Request Costs
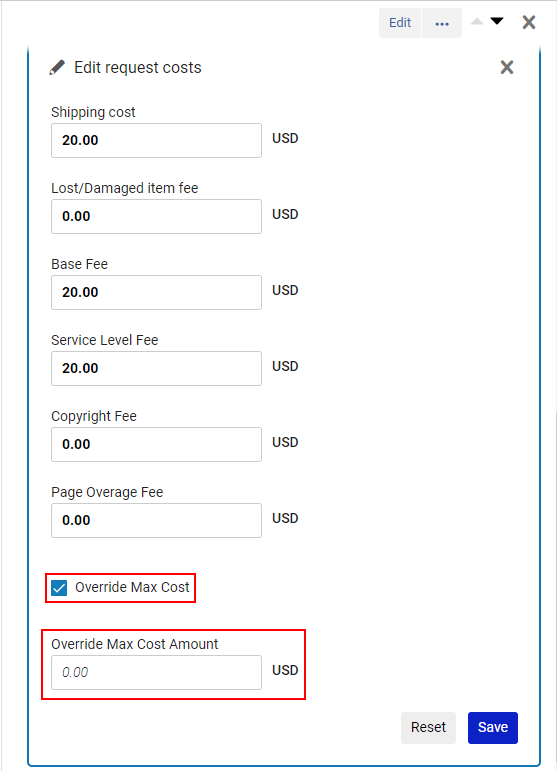
Due to the wide variance of copyright fees, the Resource Sharing Partner (Fulfillment > Resource Sharing > Partners) now includes an Enable Direct Charge Functionality checkbox (default unchecked). When checked, library staff can configure a Maximum Request Cost to apply to borrowing requests. This field enables the requestor to apply the maximum cost they accept without additional approval. If no value is added, no limit is applied to the requests.
Scanning for shipping is not supported when maximum costs are configured.
The lending rules only apply to Rapido digital requests or non-Rapido physical and digital requests. Physical Rapido requests apply the policy terms.
When changes are made to a request, the lending rules only apply when the changes are saved.
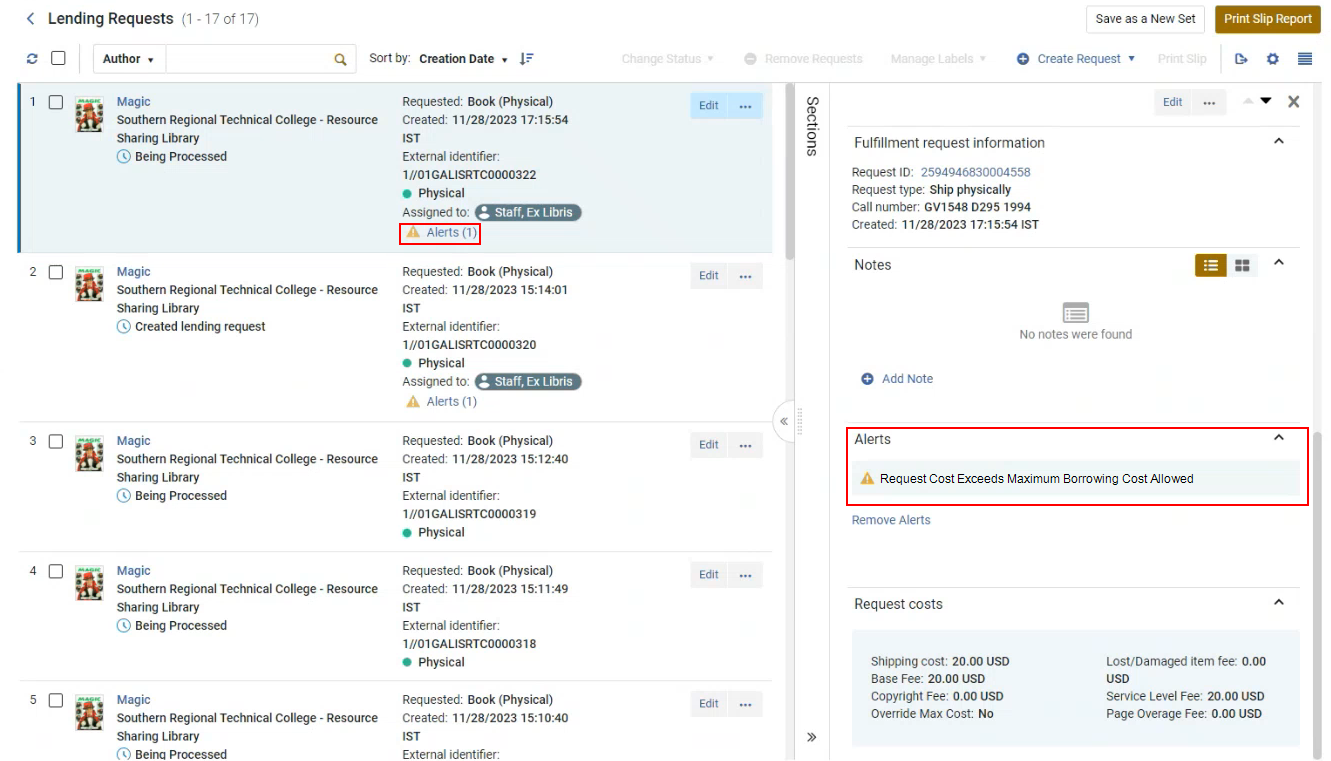
If an alert is removed, the Override Max Cost checkbox is automatically checked, and the Override Max Cost Amount remains at zero. Therefore, no limit is applied.
Partners
Configuring a Resource Sharing Partner
Establishing New Partners
The Find partners action finds partners that are in the directory and have enabled data sharing (See Data Sharing Profile). For more information, see Finding Partners.
These institutions can also be found in the Community tab (Fulfillment > Resource Sharing > Partners). where they can be copied to your partner list on the Institution tab.
For more information, watch Find Partners.
Additionally, the partner also needs to enable you as a resource sharing partner (Fulfillment > Resource Sharing > Partners).
- Select Add Partner.
- Enter a partner Code.
- Select a Profile Type.
Email partners must be configured with an Email Profile Type.
- If necessary, select a System Type.
- Enter a partner Name.
- Configure any other relevant fields/checkboxes/dropdown lists.
- Select Save.
 Add Resource Sharing Partner
Peer-to-peer requests sent outside of a pod do not use pod terms. Instead, the fulfillment unit rules determine the lending terms.
Creating Borrowing Partners Automatically
For lenders who receive borrowing requests from partners who do not share the same pod, or the request is not a Rapido request, borrowers can now be created automatically. When the parameter rapido_automatically_create_partner (Configuration > Resource Sharing > General > Other Settings) is true (default false), borrowing partners are automatically created for requests that are not Rapido requests and the partners do not share a pod. These automatically generated partners are only available for ISO 18626 and NCIP P2P.


If any required information is missing from an auto-generated partner, an alert is added to the request to indicate that information is missing that will prevent the request from being filled.
Configuring a Resource Sharing Partner
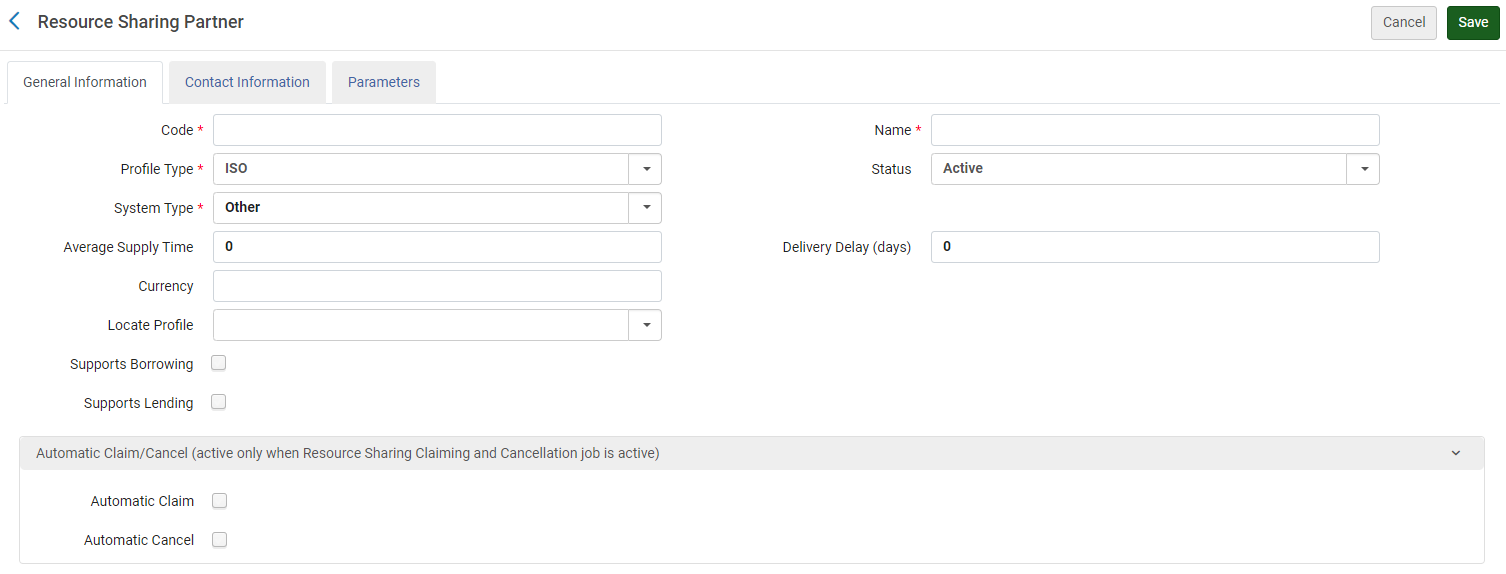
- From the Resource Sharing Partner List page (Fulfillment > Resource Sharing > Partners), select Add Partner. The Resource Sharing Partner page opens to the General Information tab.
In order to add partners of Profile Type Fulfillment Network, you must first add a dummy entry to the Fulfillment Members table (Configuration > General > Network Groups > Fulfillment Member). Only then can you add the partners to the Fulfillment Networks Groups page (Configuration > General > Network Groups > Fulfillment Network Groups). Once you have set up all the Partners in the Network Zone, you can either leave that dummy entry in the Fulfillment Members table in the Network Zone or delete it. If you decide to delete it, the partners are displayed as Profile Type Fulfillment Network (Not Listed) in the Fulfillment Partners table, but they are functional as Fulfillment Network partners.
 General Information
- Enter a code and name for the resource sharing partner. Note that the code can contain only alphanumeric characters.
- In the Profile type field, select the type of protocol you want to create. Options are:
- ARTEmail
- BLDSS
- External System
- Fulfillment Network
- Inn-Reach API
- ISO
- ISO 18626
- KERIS
- NACSIS
- NCIP
- NCIP-P2P
- RapidILL
- SLNP
The ISO parameters are the same for ISO ILL 10160/10161 and ISO 18626.
- Optionally, select Inactive from the Status dropdown list if you do not want the partner to be active.
The status affects only peer-to-peer requests, such as ISO, but does not affect broker-managed requests such as NCIP. NCIP requests are still received even if an NCIP type profile is marked inactive.
- Select the resource sharing system with which you are integrating from the System type dropdown list (for Ex Libris’ informational purposes). This is mandatory.
For a profile with an External System profile type, select CCC GetItNow as the System Type (this is the default).
When an NCIP profile is configured, the indicated broker types must be configured with the following NCIP parameters in the partner Parameters tab:
Additional Configurations Description Relais Request pushing method = OpenURL The URL is defined as follows, where the XXX and YYY values are provided to each institution by Relais:
https://h7.relais-host.com/<XXX>/loginRFT.jsp?LS=<YYY>Add User to Login = Yes
Enable Service for Guest User = No
Loan Period = <Free text, which is displayed in the Get It tab>
OCLC Navigator Request pushing method = Link The Navigator system cannot receive an OpenURL as input; the configurable link can only be a static link. To configure a dynamic link to the Navigator system, use General Electronic Services (see Adding a General Electronic Service).Enable Service to Guest User = YesNavigator requires a new login when being accessed.Loan Period = <Free text, which is displayed in the Get It tab>INN Reach Request pushing method = Link General Electronic Service creates a link with an OpenURL template, as described in Adding a General Electronic Service.Enable Service for Guest User = NoINN Reach does not trigger an authentication process, as authentication is expected to have taken place before accessing the INN Reach request form.Loan Period = <Free text, which is displayed on the Get It tab>ILLiad Request pushing method = Link General Electronic Service creates a link with an OpenURL template, as described in Adding a General Electronic Service.Add user login to URL = NoILLiad requires logging in againEnable service for guest user = Yes Loan Period = <Free text, which is displayed in the Get It tab>The configured brokers display as links on the Primo Get It tab. For more information about brokers in the Get It tab, see More Information About Resource Sharing Broker in Get It.General Electronic Services - Displays a Primo link to an external service (such as Amazon), as an additional way to retrieve resources. You can also create rules to assign different links to be used for different resources (such as for a book or DOI). For details, see Adding a General Electronic Service.Display Logic Rules - Indicates when a certain broker link will display or be hidden in Primo (see Configuring Display Logic Rules). - Enter values in the Average supply time, Delivery delay, and Currency fields.
- Select the Supports borrowing and/or Supports lending checkboxes. The workflows selected here control the actions that can be performed on the borrowing and lending request task lists for the defined partner.
Choose one of the workflows from the dropdown list predefined by an administrator (Configuration > Fulfillment > Resource Sharing > Workflow Profiles). For details on configuring workflow profiles, see Configuring Workflow Profiles. - In the Delivery delay field, enter the number of days required to deliver the item. The due date calculated when the received item is loaned to the requesting patron is automatically advanced by the number of days indicated in this field.
For example, if the due date when receiving the item is June 5, 2013 and Delivery Delay = 4, the Due Date value displays on the Patron Services page as June 1, 2013, to allow 4 days for item delivery and ensure that the item arrives by its actual due date of June 5.For more information about managing the due date for an interlibrary loan, see the Interlibrary Loan With Due Date video (7:01 mins).
- The Local Status field appears for institutions that centrally manage their partner records in the Network Zone. It enables an individual institution to locally deactivate a partner record even though the partner is active for the collaborative network.
- In the Locate profile field, select a locate profile to determine how the partner’s catalog is to be searched. The Holding code and Institution Code fields appear. Institution Code is a display field that shows the institution code that is configured for the selected locate profile. This field must be populated in order to use links (rather than attachments) for the digital shipment of a resource sharing request if the institutions are not part of the same network zone. For details on locate profiles, see Configuring Locate Profiles and Configuring Copyright Management.
- If an incoming NCIP message cannot identify the partner, the NCIP partner that has the Default Partner checkbox selected is used.
- In the Holding code field, enter a library or campus code. The locate process for the partner searches the library/campus indicated by the value in this field. Specifying a holdings code enables you to:
- Determine whether a requested resource is available at a specific campus of a potential supplier.
- Request the resource from that lender only if the resource is owned at the requested campus.
- For peer-to-peer partners, selecting the Automatic Claim field enables the Time to Claim (days) field. This triggers an automatic claim letter (RSBorrowerClaimEmailLetter) when a configured period of time is reached. For example, when the Automatic Claim checkbox is selected and the Time to Claim (days) field is set to 7, if a request was sent 7 days ago and the request's status is still Sent, a claim letter is automatically triggered and the request status is set to Claimed.
- For peer-to-peer partners, selecting the Automatic Cancel field enables the Time to Cancel (days) and Cancellation Reason fields. The cancellation uses the same workflow as the manual cancel partner option and sends an automatic cancelation notification to the partner and continues through the rota.
For the cancelation and claim action to take place, you must activate the Resource Sharing Claiming and Cancelation job using the Fulfillment Jobs Configuration page. See Configuring Fulfillment Jobs.
- In the Contact Information tab, add an address, phone number, and email information for the resource sharing partner (for informational purposes only; information for sending the resource sharing request is entered in the Parameters tab – see the following step). For instructions, see Adding User Contact Information.
- In the Parameters tab, configure the resource sharing parameters. For more information, see Partner Parameters below.
 Resource Sharing Partner Page – Parameters Tab
 - Select Save. The resource sharing partner is created and appears on the Resource Sharing Partner List page.
The partner can then be selected from the Partner dropdown list (accessible when selecting the Edit, Duplicate, or Send options on the Resource Sharing Borrowing Requests page) or Supplied to drop-down list (accessible when selecting the Edit or Duplicate options on the Resource Sharing Lending Requests Task List page).A Notes tab is available when editing the resource sharing partner (Actions > Edit).
For more information, see Broker-Based Resource Sharing.
Broker Connection Parameters
ARTEmail Parameters
NCIP Parameters
| Section | Field | Description |
|---|---|---|
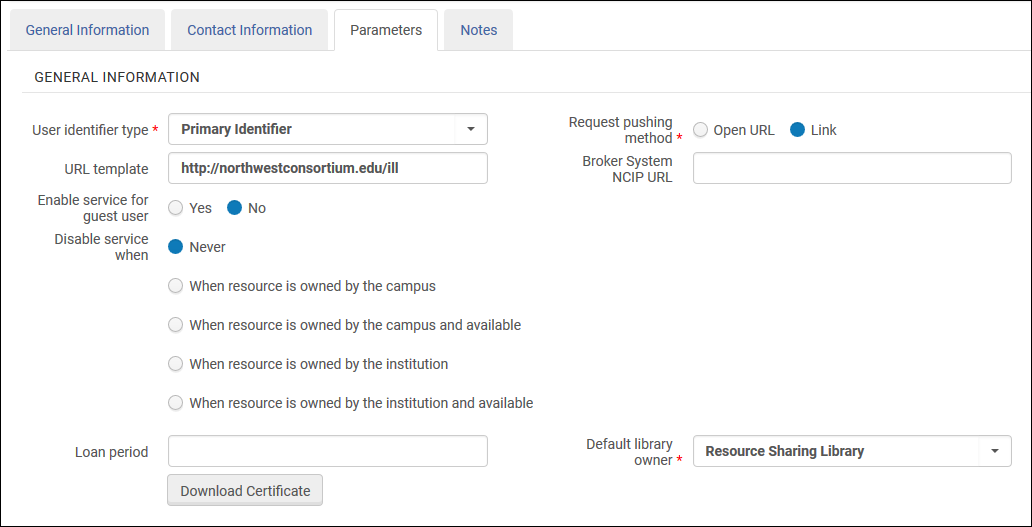
| General Information | User identifier type (Required) | The identification type used to match users when a message contains a user ID. Select one of the options predefined by an administrator. See Viewing Additional User Identifier Types. |
| Request pushing method (Required) | Select the type of link — OpenURL or Link—that is used to push the request into the resource sharing system. If you select OpenURL, the Add user auto login to URL field appears. | |
| URL template | The URL that is used to send patrons from Primo to the resource sharing library’s Web site. | |
| Broker System NCIP URL | The URL to communicate with the NCIP broker. | |
| Add user auto login to URL | Select Yes to add a user’s login credentials to the URL, thereby logging the user in automatically upon accessing the URL. This field displays only when Request pushing method = OpenURL.
Select Yes when configuring integration with a Relais system (see Configuring Alma/Broker Integration).
|
|
| Enable service for guest user | Indicates whether the link to the partner appears in Primo when the patron is not logged in. | |
| Disable service when | Select the parameters upon which the service is to be disabled. Possible values are:
When a guest user or a user without a configured campus performs any of the campus-level disabling activities, Alma disables/hides the service based on a self-ownership check done on the institution level.
|
|
| Loan period | The amount of time the user has before having to return the item to the resource sharing library. (This may be seen by patrons in Primo.) | |
| Default library owner | The resource sharing library that manages the borrowing request created by this profile. | |
| Download Certificate Button |
This button is used to authenticate the TCP communication for encrypted messages sent to Alma using the SLNP protocol. The button appears for NCIP partners after the partner has been saved the first time.
Each click on this button creates a "new" certificate and therefore can break encryption if that new certificate is not immediately installed on the partner side.
For more information on the certificate, see the Developer Network.
|
|
| Request Item
An NCIP message is sent when a lending request is registered on the borrowing side.
|
Resource sharing library | The single resource sharing library that is supported for all actions. Select from a list predefined by an administrator. |
| Bibliographic record ID type | Select a parameter by which resource sharing requests are to be searched. Possible values are:
|
|
| Support Borrowing | Use if the broker system notifies Alma about new borrowing requests at the time they are created using the Request Item NCIPmessages. Most broker systems do use this message to notify a borrower about a new borrowing request. Rather, the message is used at the point when the item is received. Leave the checkbox unselected, unless you are sure that your broker system also uses the Request Item message for notifying about new borrower requests. | |
| Check Out Item
An NCIP message is sent when an item is shipped from the lending side to the borrowing side.
|
Default library (Required) | The resource sharing library to use as the default, if there are multiple resource sharing libraries. |
| Default location
(Required)
|
The temporary location at the resource sharing library that is assigned to an item that is shipped to a resource sharing borrower. Select from a list predefined by an administrator. | |
| Default item policy
(Required)
|
The policy that is attached to an item that is shipped to a resource sharing borrower. Select from a list predefined by an administrator. | |
| Accept Item
An NCIP message is sent when the arrival of an item is registered on the borrowing side.
|
Default location (Required) | The temporary location at the receiving library. Select from a list predefined by an administrator.
This location is assigned to an item that is shipped to a resource sharing borrower, unless a different location has been assigned by a Temporary Item Creation Rule.
|
| Resource sharing library | The resource sharing library, if there are multiple resource sharing libraries. | |
| Default pickup library | The default pickup location to which temporary items are transferred when an item arrives for a borrowing request. Select from a list of libraries predefined by an administrator. | |
| Automatic receive |
Select to enable receiving resource sharing items automatically. Automatic receiving enables staff to register a Receive action in the broker system, without having to repeat the Receive action in Alma.
Enabling this option allows multiple AcceptItem requests to be processed for a single multi-item borrowing request. This is applicable if the requests contain the same request ID but different barcodes and the request ID is active. If the option is not enabled, multiple requests will be created with the same request ID.
|
|
| Receive desk | Select a desk at which the item is to be received. The available options are the desks of the library that is specified in the Default library owner field. The value you select indicates the location where the item arrives when the AcceptItem message is received.
This field displays only when Automatic receive is selected.
|
|
| Look Up User
An NCIP message is sent when a patron attempts to create a request at the resource sharing system.
|
Require authentication | Select whether authentication should or should not be required for the resource sharing library’s website. When working with a Relais broker, select No. |
| Export to Third Party | Export to third party | Used for ILLiad, Tipasa, Worldshare ILL, and Relais. See Rapido and ILLiad; Tipasa, Worldshare ILL, and Relais Parameters below. |
|
Create User Fiscal Transaction A received NCIP message can create a request fee. |
Create fee using |
|
- The NCIP URL, in the following format: https://<Alma domain>/view/NCIPServlet
- The AgencyID, which is your Alma institution code
- The ApplicationProfileType, which is the code defined on the Resource Sharing Partner page (see step 2 above)
NCIP Peer-to-Peer Parameters
- Supports ADD request – Select this box if you want to enable the ability to send requests to an alternate physical location or email address (which you can select to do in the Request Attribute section of the Creating a Borrowing Request page).
- User identifier type – The identification type that will be used to match users when a message contains a user ID. Select one of the options predefined by an administrator. See Managing User Identifiers.
- Server – Enter the partner’s server name (or IP address).
- Institution code – Enter the partner's Alma institution code.
- Partner symbol – The symbol by which the ILL partner is referred. The symbol must be unique to all other partner and ISO symbols. This includes NCIP-P2P, SLNP, and ISO partners.
- Request Expiry – Configure when the partner’s lending settings expire. Choose from the following:
- No expiry – The request does not expire
- Expire by interest date – The request expires on the date specified in the Needed by field on the Resource Sharing Borrowing Request page (displayed when creating a borrowing request).
- Expiry time – The Expiry time field appears, where you enter a number. This value indicates the number of days after the request has been sent to the lender that the request expires.
- Send requester information – Select this option to enable requests sent using the specified partner to contain information about the requesting patron, such as their name and email. It is recommended to select this option only if the third-party system requires this information in order to properly handle the request.
- Shared barcodes – Select to enable sharing item barcodes between lending and borrowing institutions.
- Email Address – Used for sending overdue notifications.
- Resending Overdue Days Interval – A whole number that indicates the number of days for recurring overdue notifications.
ISO Parameters
- Alma supports the following ISO Resource Sharing messages: ILL Request, Shipped, Received, Returned, Checked-In, Answer – Unfilled, Cancel/Cancel Reply, and General Messages.
- ISO partners can fulfill digital resource sharing requests using the link document delivery option.
- The ISO parameters are the same for ISO ILL 10160/10161 and ISO 18626.
- Supports ADD Address – Select to include the requester’s email in the ILL request, enabling the lending partner to send the shipped resource directly to the requester.
- Server – the partner’s server or IP address. If the partner also uses Alma, use the Alma domain (see Logging Into and Out of the User Interface) as the server.
- Port – the partner’s ILL port number. If the partner also uses Alma, this is port 9001.
- ISO symbol – the symbol by which the ILL partner is referred. The symbol must be unique to all other partner and ISO symbols. This includes NCIP-P2P, SLNP, and ISO partners.
- Request Expiry – configure when the partner’s lending settings expire. Choose from the following:
- No expiry – The request does not expire
- Expire by interest date – The request expires on the date specified in the Needed by field on the Resource Sharing Borrowing Request page (displayed when creating a borrowing request).
- Expiry time – The Expiry time field appears, where you enter a number. This value indicates the number of days after the request has been sent to the lender that the request expires.
- Send requester information – Select this option to enable requests sent via the specified partner to contain information about the requesting patron, such as their name and email. It is recommended to select this option only if the third-party system requires this information in order to properly handle the request.
- Shared barcodes – Select to enable sharing item barcodes between lending and borrowing institutions. If both the lending and borrowing partners have this option selected, the lending library sends a barcode with the Shipped message, and the borrowing library uses the Shipped message to determine the lender item's barcode. The barcode displays as the Temporary Barcode value on the Receiving Items page (displayed when selecting Receive for a borrowing request), and can be used for identifying the received item when accessing the Received Items page (see Receiving Items).
- Ignore Lender Shipping Cost – Select this checkbox to use the borrower's set cost. When the checkbox is not selected, the lender-side costs override the borrower's cost. Note that when the checkbox is not selected, the borrowing institution's cost is overridden even if the lender has not communicated a cost value, i.e. it is considered as if a value of 0 is communicated to the borrower.
- Resending Overdue Days Interval – A whole number that indicates the number of days for recurring overdue notifications.
Peer-to-Peer Partner Parameters
Some Ex Libris resource sharing customers have inquired about integration with OCLC resource sharing products through the open standard, ISO 18626. This integration is not currently supported and therefore, this integration cannot be implemented until further notice. Accordingly, the only method available to Ex Libris resource sharing customers who want to integrate with an OCLC resource sharing solution (i.e., WorldShare ILL or Tipasa) is the existing request transfer message method, which requires a subscription to the relevant OCLC resource sharing solution.
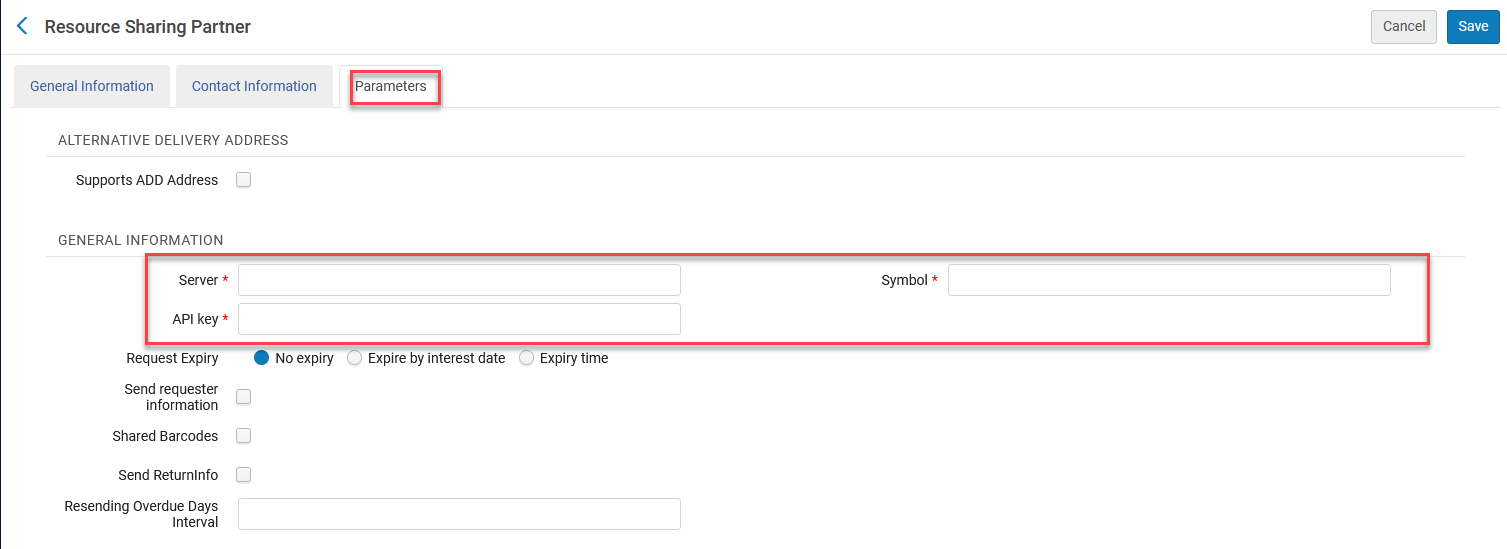
To configure peer-to-peer parameters:
- Create a partner record with the Profile Type ISO 18626.
- Select System Type Tipasa or WorldShare ILL.
- From the Parameters tab, configure the following parameters:
- The partner’s Symbol.
- The Server URL in the Server field.
- The API key.
- Save your configuration settings.
Email Parameters
- Email address - The email address to which resource sharing borrowing requests are to be sent. Note that if you are working in a sandbox environment or in a pre-”Go Live” production environment, the entered address must be added to the Email Include List Mapping Table in General Configuration > Configuration menu > External Systems > Allowed Emails. For details, see Configuring Allowed Emails).
- Resending Overdue Days Interval – A whole number that indicates the number of days for recurring overdue notifications.
Working with ILLiad Partners
Watch https://youtu.be/rzyermTvpCg.
Hybrid Pods
Overriding Pod Policies
Requests involving hybrid pods use the pod policy rather than the Terms of Use (TOU). You can configure exceptions for requests received from specific members to apply the TOU rather than the pod policy. Members who are part of a hybrid pod can add an exception to the Override Pod Policies for Specific Hybrid Pod Partners section on the Physical Items Lending Policies tab (Configuration > Resource Sharing > Configuration > Members).
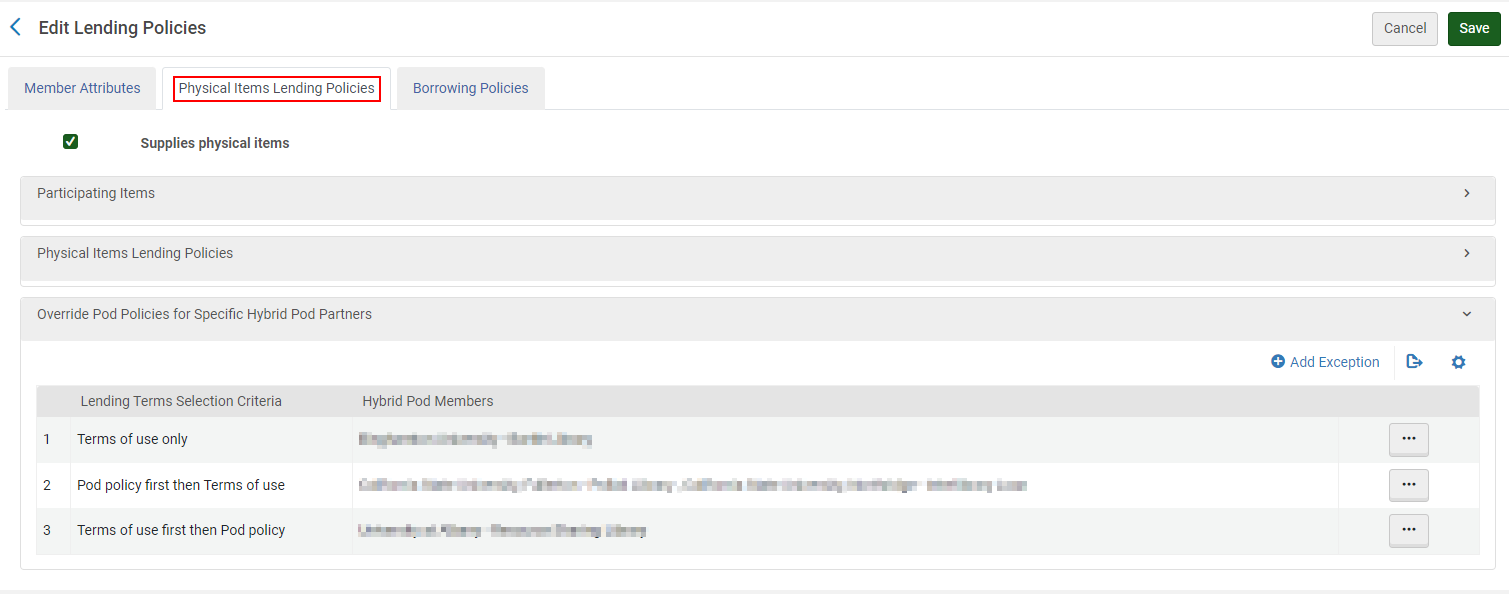
Hybrid pods can set the lending terms for requests to use:
- Terms of use only
- Pod policy first then Terms of use
- Terms of use first the Pod policy
If no exception is added, the behavior remains where the pod policy is applied to the request.
Hybrid Pods
A hybrid pod is a pod that contains libraries performing resource sharing using Alma with Rapido libraries. All libraries need to be listed in the resource sharing directory. This happens automatically for Rapido libraries while adding members can be done by Alma libraries. For more information, see Contributing to the Resource Sharing Directory.
Creating Hybrid Pods
If a library determines it wants to create a pod that consists of other libraries, or its needs are not met by existing pods, the library can inform Ex Libris of the pod terms they require. The pod terms are defined in the pod table. Ex Libris then creates the pod and notifies the libraries that the pod exists.
Rapido libraries do not need to download any libraries. Alma libraries need to download both Rapido and Alma libraries.
Hybrid Pod Tasks for Partners Using Rapido
Partners are created automatically once a borrowing or lending request with each partner is created. The Rapido libraries do not need to download or create partners.
To complete the configuration, the hybrid pod must be placed in the correct order of the pod priority list for each resource sharing member.
Hybrid Pod Tasks for Partners Not Using Rapido
Non-Rapido libraries must manually download or create partners.
When a request is sent from a Rapido partner to a non-Rapido partner, and both partners are part of the same hybrid pod, when the lender receives the request, the lender is converted to a Rapido Patner.
When a request is sent from a non-Rapido partner to a Rapido partner and both when the lender receives the request, and both partners are part of the same hybrid pod, when the lender receives the request, the borrower is converted to a Rapido Patner.
- Join the resource sharing directory (Configuration > Fulfillment > Contribute to Resource Sharing Directory > Resource Sharing Directory Member). For more information, see Contributing to the Resource Sharing Directory.
- Copy each partner in the hybrid pod from the Community tab (Fulfillment > Resource Sharing > Partners) in the partner list.
- Add partners to a rota template (see Configuring Rota Templates) and refer to the configuration of rota assignment rules to configure Rota Assignment Rules.
- Create Terms of Use (TOUs) that reflect the terms of the hybrid pod. For more information, see Fulfillment Unit and Terms of Use.
- Add lending and borrowing workflow profiles and attach them to the non-Rapido pod partners. For more information, see Basic Resource Sharing Configurations and Configuring Workflow Profiles.
- Workflow profile selection recommendations:
Borrowing:
AUTOMATIC_RENEW,AUTO_WILL_SUPPLY,CANCELLED,CANCELLED_BY_PATRON,CANCEL_NOT_ACCEPTED,CANCEL_REQUESTED,CONDITIONAL,DAMAGED_COMMUNICATED,DECLARED_LOST,LENDER_CHECK_IN,LOST_COMMUNICATED,MANUAL_RENEW,REACTIVATED,REJECT,RENEW_REQUESTED,REQUEST_ACCEPTED,WILL_SUPPLY
Lending:
CHANGE_DUE_DATE,CONDITIONAL,LENDER_CHECK_IN,PATRON_RENEWAL,REACTIVATED,RENEW_REPLY,STAFF_RENEWAL
- Workflow profile selection recommendations:
Hybrid Pod Task for Both Partner Types
Attach participating items to the pod. See Participating Items.