360 Core: Overlap Analysis
- Product: 360 Core Client Center
How do we determine the number of unique e-journal and e-book titles in each database in our Client Center profile?
Overlap Analysis is a powerful tool for assessing your subscriptions. In your library collection, many e-journal and e-book titles are available in more than one database. This is called "overlap," and some of this overlap is inevitable, due to the nature of aggregated databases. But it is most beneficial for your library to subscribe to databases with the most unique content, and Overlap Analysis can help you identify them.
The Overlap Analysis feature shows you, for each database in your collection, the number of e-journal and e-book titles that are unique to that database, and the number that are available elsewhere in your collection.
Overlap Analysis compares full-text journal titles and e-books. Zero-Titles Databases (resources in the Knowledgebase that do not display individual full-text titles) are not included in Overlap Analysis. Library-Specific (Library-Managed) Holdings Databases (databases created by the library, not maintained by our Knowledgebase team) are included in Overlap Analysis; note that it is important for these locally managed resources to have valid dates in order for Overlap Analysis to generate accurate coverage information.
-
Identify databases that deliver the most value for your library.
-
Evaluate possible changes to your collection.
-
Get the most out of your electronic resources budget.
-
Increase the depth and breadth of your e-journal and e-book collections.
See also:
-
Resource Status vs. Visibility in Various Serials Solutions Services
-
Total Number of Unique Titles: Data Summary vs. Overlap Analysis
-
Total Holdings Number on Data Summary Page vs. Data Management Page
Generate An Overlap Analysis Report
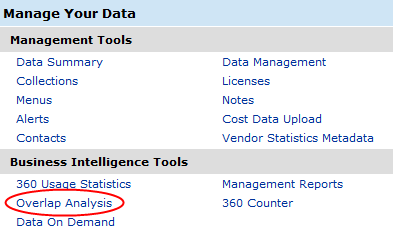
To get started with Overlap Analysis, click Overlap Analysis on the Client Center Home page:

The Overlap Analysis window will open with all of your databases with a status of Subscribed:

If you have recently added resources to Data Management, they will not display in Overlap Analysis by default until after the daily profile data (cache) refresh. However, you'll still be able to test the new resources with Overlap Analysis by adding those resources to the overlap analysis.
You can edit the default setting to always include databases with other statuses you usually want to analyze.
If you want to make temporary changes to the list of databases to analyze, you can add or remove databases.
When you're done making changes to the list of databases to analyze, select the Type (All, Books, Journals, or Videos) and then select Run Analysis. It will take a few moments for your overlap analysis to produce the Overlap Analysis Results.
Edit the Default Databases Shown (by Status) in the Overlap Analysis List
Although you can always add or remove individual databases (see instructions below) before running an analysis, by default the databases that first appear on the Overlap Analysis list are those that have status set to Subscribed. You can change that default behavior so that databases with other statuses always show up first. For example, perhaps you usually want to compare databases with statuses Subscribed and Under Review:
-
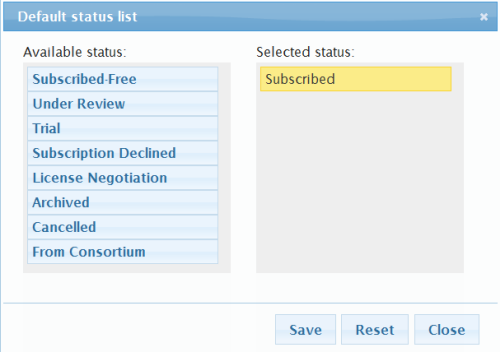
From the Overlap Analysis page, click the Edit Default List button on the upper-right side of the page. The types of statuses available at your library or institution appear in the Default Status List (pop-up) window. If you are a 360 Resource Manager client, you will see all statuses included in your Resource Status menu:

-
Click and drag any of the status types you want to the Selected status column so they appear in your Overlap Analysis list. Any database in your Client Center profile with the statuses you choose will appear in your Overlap Analysis list by default whenever you open Overlap Analysis from now on.
-
Move each of the status types you want to remove from your list to the Available status column. Any database in your Client Center profile with the statuses you remove will not appear in your Overlap Analysis list.
-
Click the Save button.
-
Click the OK button to update the list with your changes; otherwise click Cancel to return to the original list of databases.
Add Databases to the Overlap Analysis List
You can add databases to the comparison list, even ones you do not currently subscribe to:
-
From the Overlap Analysis page, click Add in the upper-right side.
-
In the Search By drop-down list, select one of the options (Database Begins With, Provider, Database Name Contains, or Status Is).
-
Enter some characters or words in the empty field and click Search.
-
In the search results list, find the databases you want to include in the Overlap Analysis and check the box on the left side of each to include them in the analysis, then click Add in the upper-right side.
-
Once the list updates, select the Type (All, Books, Journals, or Videos) and then select Run Analysis to retrieve the report.
-
Adding a database in Overlap Analysis does not add the database to your library's Data Management profile.
-
Click the Reset button in the Default Status List (pop-up) window to reset the list to the Subscribed status so only that type of database appears in your Overlap Analysis report.
Remove a Database from the Overlap Analysis List
-
From the Overlap Analysis page, click Remove on the upper-right side.
-
If the list of databases is too long to easily find the databases you want to remove from comparison, you can look at a smaller group by changing the Search By drop-down option (Database Begins With, Provider, or Status Is), add some characters or words in empty field, and search for names of particular databases.
-
The databases currently used in the analysis will appear with check boxes on the left side. Select the checkboxes for the databases you would like to remove from the analysis and click Remove.
-
Once the Overlap Analysis list updates, select the Type (All, Books, Journals, or Videos) and then select Run Analysis to retrieve the report.
-
Removing a database in Overlap Analysis does not remove the database from your library's Data Management profile.
-
Click the Reset button in the Default Status List (pop-up) window to reset the list to the Subscribed status so only that type of database appears in your Overlap Analysis report.
Reset the List of Databases
If you have added or removed databases during your current session and want to return to the original, default (by status) list of databases, click the Reset button on the main Overlap Analysis page.
Analyze Your Overlap Analysis Report
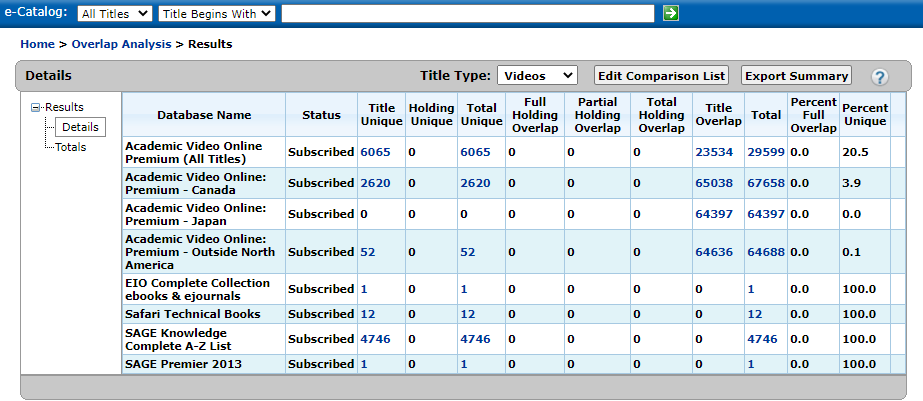
The Overlap Analysis Results page has two tabs, which are accessed by clicking either Details or Totals on the left side of each tab. At any time, if you would like to go back and make changes to the list of databases to be analyzed, you can select Edit Comparison List to add or remove resources, or reset the report and run the analysis again with all your subscribed databases.

Details Tab
The Details tab opens by default and allows you to perform the following:
-
To filter your results based on Type, select one of the following title types that appear just above the results: All, Books, Journals, or Videos.
-
If you want to print or share your Overlap Analysis, select Export Summary save the report's details to a file. For more details, see Exporting and Printing the Overlap Analysis Reports.
-
Analyze the database comparisons. See the following table for more details about each column.
Column Heading Description Title Unique
Journals and books available in only one of your databases.
Holding Unique
Journals available in more than one database, but without overlapping coverage dates.
Total Unique
The sum of the following columns: Title Unique and Holding Unique.
Full Holding Overlap
Journals and books available in more than one database. The coverage dates of the reference holdings are completely overlapped by at least one comparison holding.
Partial Holding Overlap
Journals available in more than one database. The coverage dates of the reference holdings are only partly overlapped by at least one comparison holding.
Total Holding Overlap
The sum of the following columns: Full Holding Overlap and Partial Holding Overlap.
Title Overlap
Journals with overlap, but lacking enough information to define the overlap as "full" or "partial." Title Overlap is a separate category for titles with no coverage dates.
Total
The sum of the following columns: Total Unique, Total Holding Overlap, and Title Overlap.
Percent Full Overlap
Percentage of all holdings in a database that are completely overlapped by at least one other holding from another database.
Percent Unique
Percentage of all holdings in a database that are either title unique or holding unique.
-
In addition, you can select any of the blue, hyperlinked numbers in a column to see further details of titles in that particular database and that particular overlap type. For example, here is a view of the Full Overlap List of a database:

The first row for each title contains the Title Name of the reference database (also called the "reference holding" -- in other words, the basis for comparison) that you clicked on the previous Results - Details page.
The following rows that are part of the reference holding are the "comparison holdings," which are databases (that you have included in the comparison) where the same title as the reference holding appears, in either partial or full overlap, along with the Coverage Dates for that title in each database.
This allows you to see exactly which other databases are causing the particular type of overlap.
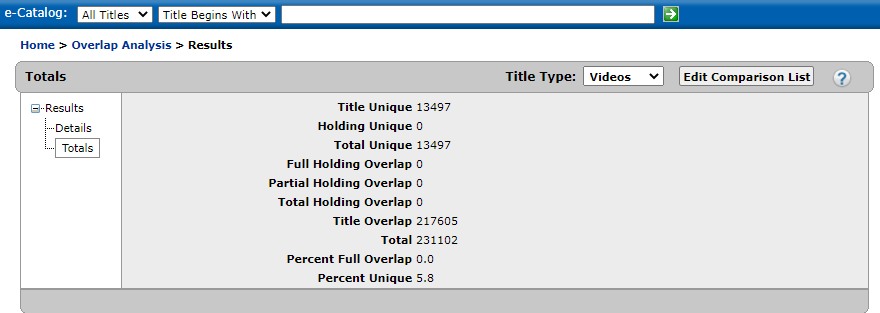
Totals Tab
On the left side, select Totals to see the report's totals of each column. To filter your totals based on Title Type, select one of the following types: All, Books, Journals, or Videos.

Exporting and Printing the Overlap Analysis Report
-
Select Export Summary (or, if you have drilled down into an item, click Export Results).
-
Save the file to your local computer. (You may wish to change the filename to be specific to the report you created.) The file will be a tab-delimited text file (.txt).
-
Open the text file in a program like Excel or Word. If you use Excel or another similar spreadsheet application, you should follow the on-screen prompts in Excel that walk you through the process to indicate that the file is delimited and, specifically, tab-delimited.
-
Print or save the report as desired.
- Date Created: 9-Feb-2014
- Last Edited Date: 22-Jan-2021
- Old Article Number: 7148

