
360 Resource Manager and 360 Counter: Cost Data Upload
- Product: 360 Counter
How do I upload or remove my acquisitions and cost data for a resource using the Cost Data Upload tool?
This Answer contains instructions for uploading many cost/payment and fund code/account entries for a resource, checking the upload status, checking the new cost data for the resource, and deleting payments and costs for multiple titles, databases, collections and providers. To add cost data to just a couple entries at time, click here.
Overview: This process includes selecting a template that matches the "level" at which you want to add costs: Provider, Collection, Database, and Journal. Downloading the template fills in either the Collections, Providers and Databases you have set up in the Client Center along with match points which will ensure a match with your cost information.
Once you have selected the appropriate template, you will then add the costs to the rest of the spreadsheet. You may have this information on a spreadsheet or may have mapped the costs over from your ILS. (See Innovative and Voyager protocols below.) Save the spreadsheet as .txt, Choose the File, then Accept and Upload the file.
Within minutes (Refresh Status) you will see the status of your upload on the grid below the upload box. Details on how to interpret upload results are explained below.
If you have further questions that are not answered by this Answer, read the Cost Data Upload Tool FAQ.
There are six sections to this Answer. Click the following links to jump to the section you want to read:
Upload Acquisitions and Cost Data
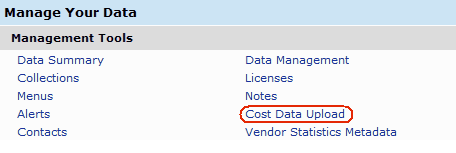
- Go to the Client Center.
- Click the Cost Data Upload link under Management Tools in the Manage Your Data section.:
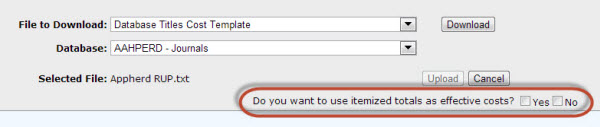
On the Cost Data Upload page, click the File to Download drop-down menu and select a template for your data. Choose from the following templates:
- Template with All Cost Fields (complete template)
- Template with Required Cost Fields Only: Includes Collection ID/Provider Code/Database Code/Title ID/Fiscal Year/Payment ID/Payment Amount
- Databases Cost Template
- Providers Cost Template
- Collections Cost Template
- Database (Journal) Titles Cost Template: you will be asked to associate the title costs with a database from "Data Management"
Once you've chosen a template, click the Download button and select a location to save the file.

- Open Excel or a similar spreadsheet application. Within the application, open the text file you have just downloaded. The file is a tab-separated text file, so in the Text Import Wizard, accept all the default suggestions (in other words, it is a delimited file, importing from row 1, and the delimiter is a Tab), until you get to the step that allows you to select the data format for each column. Here you need to change the default for the Database Code column to Text format (not General format). The remaining columns may stay as General format. Click the Finish button, and the file will open in Excel.
- Check the existing fields and enter any additional information the report may need:
- Fiscal Year: required in order for the report to upload successfully.
- Database Code, Provider Code, or Collection Id: . Costs for databases, providers, and collections require a single match point:
- Payment Id is assigned by Serials Solutions. Leave the Payment Id unchanged if you want the new cost information for that payment to replace (overwrite) the current information. On the other hand, leave this field blank if you are making a template or you are uploading the costs for the first time. (In other words, if there is no Payment Id, the system will add the new payment to the resource. And if you upload the file again later and still don't have the Payment Id, that payment will be added twice to the resource.)
- Include in Total for Year: should be Yes if you want the payment included in the total for the year, and No if you don't want to include the payment. If you leave it blank, the system will change the entry to Yes after you upload the file.
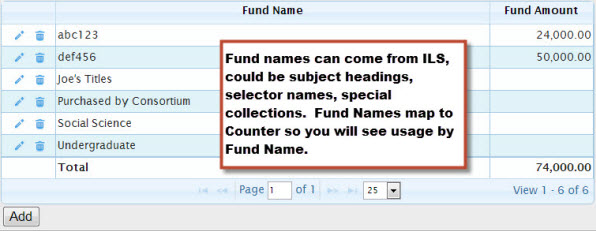
- Fund Name: If there is an entry in the field for a row, there must be an entry in the Fund Amount field for that row, even if it is just "0" (zero). Note that a "Fund Name" can be any term you wish - you have up to 500 fund options for each title or database. Think about using selector's names, subject headings - any way in which you wish to slice and dice your Counter data and see your management report.
- Use Itemized Total is required when adding individual title costs to the Database Titles Cost Template. If blank the system will assume "No". Note: Effective September 27, 2013, you will have the chance to choose a bulk "yes" or "no" after you click the UPLOAD key button, rather than including the information in the uploaded sheet.
- The order of the columns is not important; only that each required field has information.
 A prompt for Use Itemized Total is added to the File Upload workflow, because the value is almost always "yes," and the value is almost always the same for every database and/or provider in the template. This feature effectively eliminates the Use Itemized Total header as a required header in the Cost Data Upload process.
See also a spreadsheet with an explanation of Cost Data Upload Template fields, which also includes information on which fields are required and which are optional.
NOTE: Although our uploading system can handle large files, there is a limit to how large the file can be. You may need to split the file into multiple, smaller files.
3. Add your Cost Data to the spreadsheet. If you are a Voyager or Innovative ILS customer, please see documentation about how to map costs from your ILS to Serials Solutions. Save this file as a "tab-delimited" text file on your local machine:4. Return to the Cost Data Upload screen. 5. Choose your file to upload (completed spreadsheet) then click Accept File6. Choose a bulk itemize "yes" or "no" after you click the UPLOAD key button.7. Click Upload8. A pop-up window appears, confirming the successful upload of your report. Click OK.
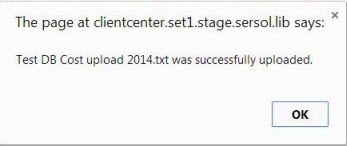
Check the Upload Status
Below the Upload area, you will see the File Upload Status grid. Your most recent upload report will be at the top of the list; the rest will be in reverse chronological order. Note: Effective September 27, 2013, an "all or nothing" processing of the data is enforced; all rows in the files must be free of errors in order to process the file. A single error will cause rejection of the entire file. Refer to All or Nothing Processing section below for more information.
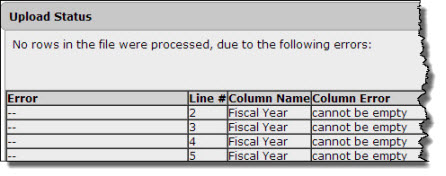 File Upload Status grid columns are:File - the name of the file uploadedErrors - the number of errors that occurred during processing (hyperlinked to error list)Warnings - the number of warning that occurred during processing (hyperlinked to warning list)Status - the processing status of the file. Values are "Successful," *In Process," or "Failure."Upload Date - the date/time the file was uploadedTotal Rows Processed - the number of rows in the files that were processed.
- Rows in the grid can be sorted ascending or descending by any of the column headers. The default sort is Upload Date, descending. The most recently loaded file is at the top.
- The number displayed in the Errors or Warnings column is a hyperlink. Clicking on the number displays a pop-up with row-by-row details of the error or warning.
Interpreting the Grid
What an Error means: one or more cost rows in the file could not be processed. Therefore, the file cannot be processed; no other rows in the file are processed.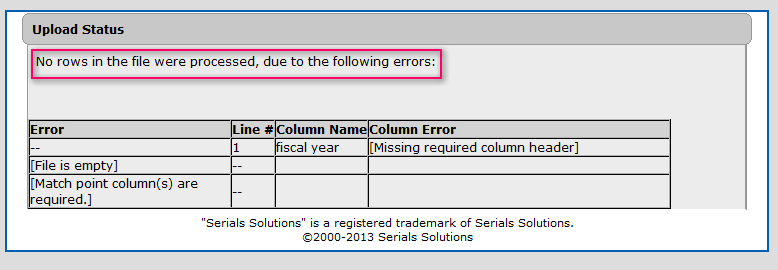 What a Warning means: the cost file was uploaded & processed, but some changes were made to the data. Warnings do not prevent file processing and do not stop processing of other rows in the file.
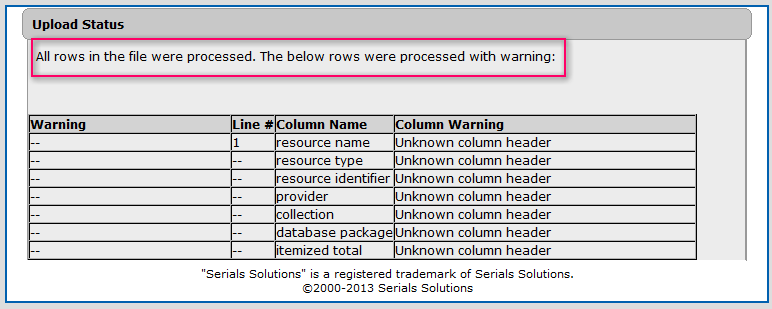
All or Nothing Processing
Effective with the 2013.Q3 release, cost upload files are processed in an "all-or-nothing" fashion. This means that if a single row in the file has an error, the entire file is rejected and no rows - even error-free rows - are processed.Since the error and warning details are often hard to decipher, this can cause confusion and uncertainty about what has been uploaded in a file. The point of all-or-nothing processing is to make it very clear to users what is processed and what is not processed. A file with ANY errors will not be processed - no rows from the file will be uploaded. Therefore, when viewing the File Upload Status grid, a file with any number of errors above zero will always show "Failure" for Status, and show 0 Total Rows Processed. A file with zero errors will always have a status of "Successful" and all rows in the file will be processed.Please note that files uploaded BEFORE September 27, 2013 release won't conform to this rule. Since files uploaded before 10/27/2013 could be partially uploaded, you will see some rows with more than zero errors that report Status of "Successful."
Check the New Cost Data for This Resource
- From the Client Center Home page, click Data Management.
- Click on the name of the resource to which you have just added payment details.
- The new cost data appears on the left side of the resource's Details page:
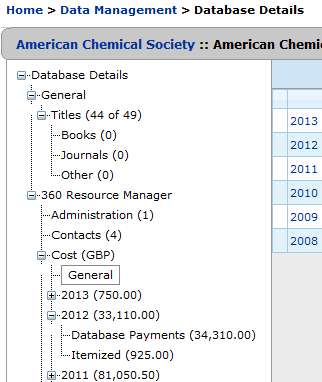
NOTE: The cost data will only appear in the left side of the resource's Details screen when the cost has been entered in the Payment Amount (Local Currency) field. - NOTE: If you have added payment details at the title level, payment information will not appear on the left side at the database level. Add a payment of 0 (zero) at the database level to display the itemized total from the title level on the left side.
5. Click on the year/cost link to view the cost data that has been loaded by this process: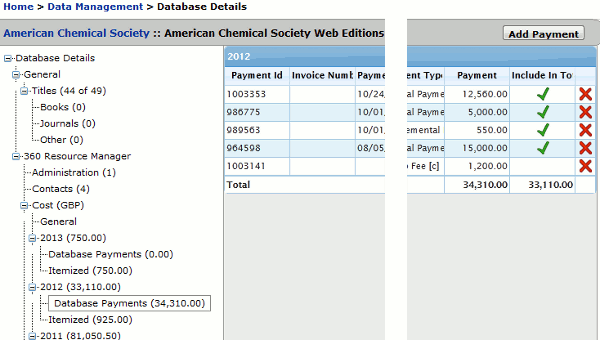
6. Click on a Payment Id to see all of the fields in the uploaded report: Note: Fund Names will appear at the bottom of the Payment Page.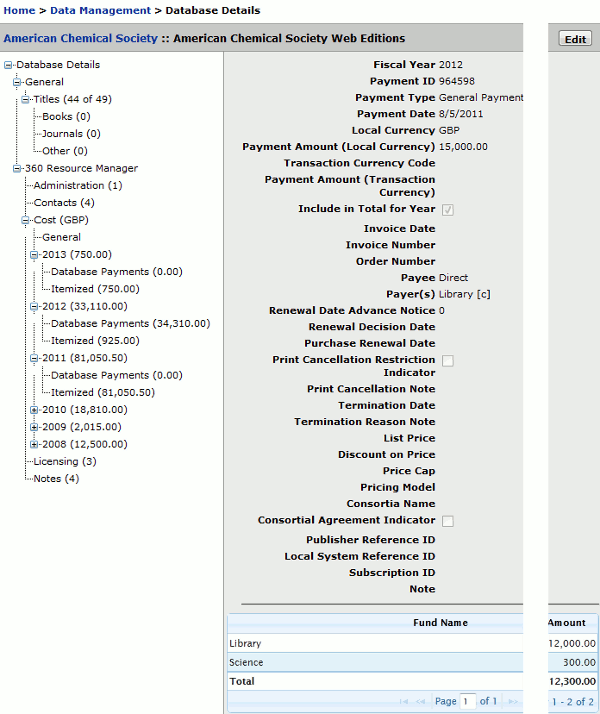
Delete Multiple Payments
- To delete multiple payments for a provider, database, title list or collection, use the Cost Data Upload feature to upload a spreadsheet that identifies one or more payments records for removal.The spreadsheet that you upload must include all of the required fields of a normal Cost Data Upload transaction. A Payment ID value must be present for any payment record that you want to delete. The easiest method to attain a source spreadsheet for the delete process is to go to Management Reports under Business Intelligence Tools and select one of the Cost reports for download.The Cost Upload Required Fields report has the fewest number of columns, comprising those fields required for uploading a spreadsheet and a Create Date column. Use the Create Date to quickly identify the payment records you want to delete if you know when the payment record was made.
- Add the Delete Payment column to the spreadsheet and type "Yes" in the cell of any payment record you want to delete as shown in the image below. The system will not attempt to delete the payment record if the Delete Payment cell is blank, or has "No" in it.

- Save the Excel spreadsheet in the .csv (comma separated value) format.
- Go to the Cost Data Upload workspace.
- Click the "Browse" button to the right of File to Upload: and select your .csv file.
- Click Upload. Check the status by finding your .csv file in the Upload Status: menu and click Get Status.
- Date Created: 9-Feb-2014
- Last Edited Date: 21-Feb-2014
- Old Article Number: 7327