
Managing Trials
This page describes how to manage trials in Alma. For a description of the workflow see Evaluation Workflow. For information on the overall purchasing workflow see Purchasing Workflow. For an overview of working with acquisitions in Alma, including links to relevant sections such as Infrastructure, Renewals, Configuration, etc., see Introduction to Acquisitions.
- Trial Operator
- Trial Manager
- Enter general details of the trial, including the title of the material, the trial start and end dates, and whether the trial is public or private.
- Create the survey form to be completed by the participants when evaluating the material.
- Enter details of the participants in the trial, if the trial is private.
Accessing Existing Trials
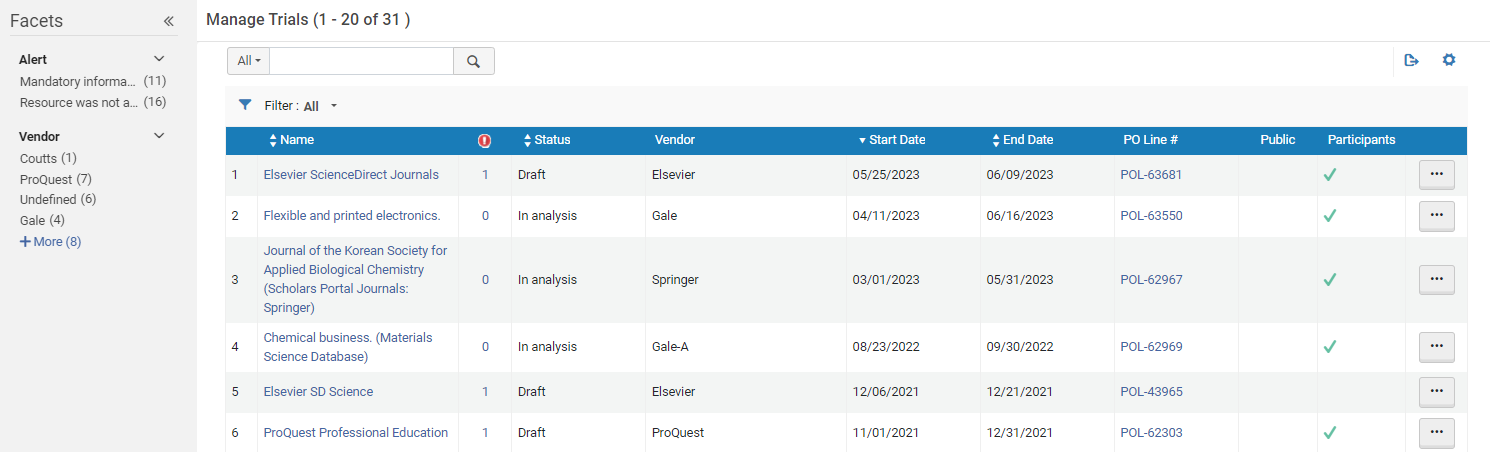
Pre-filtering the List of Trials by Status
- Analysis
- Draft
- Requested
Opening a Trial from a PO Line
You can open the Manage Trials page for a specific PO line from the PO line task list. You can also use the Facets to filter the PO line task list for PO lines whose status (workflow step) is Under Evaluation.
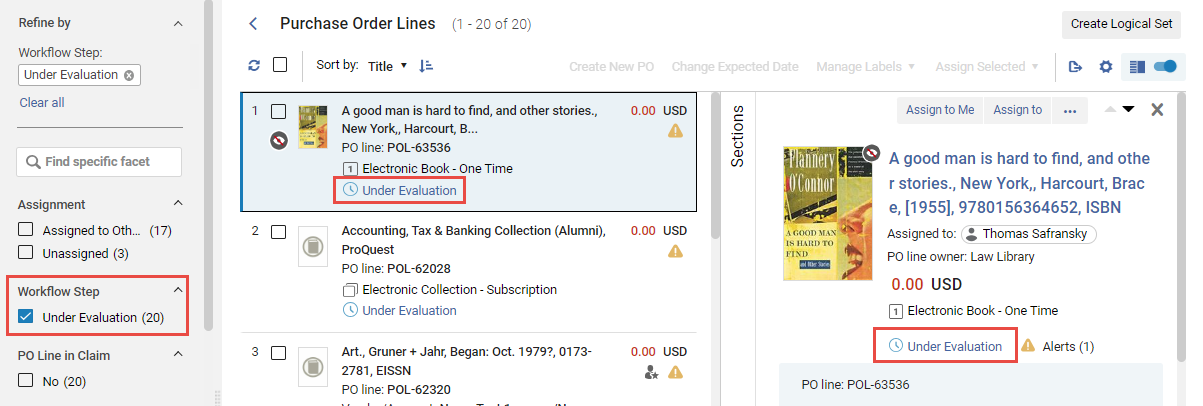
- In the PO line, select the Under Evaluation status. The Manage Trials page opens in a sliding panel, with only the PO line listed.

Available Row Actions
- Edit – Edit trial information (see Editing Trial Information, below).
- Delete – Delete the trial. Select Confirm in the confirmation dialog box.
- Edit PO Line – Edit the PO line associated with the trial. Opens the Details pane of the PO line (for additional information, see Manually Creating a PO Line).
- Activate – Activate the related resource. Opens the Activation Wizard, as described in Activating Electronic Resources.
After you activate the trial, the daily Trials – Start and Notify Participants job assumes control of the trial until the trial end date. On the trial end date, the trial once again appears in the task list, enabling the Trial Operator to study the analysis of the trial results and make a purchasing decision.
Editing Trial Information
- On the Manage Trials page (Acquisitions > Purchase Order Lines > Manage Trials), select Edit in the row actions list for the trial you want to edit. The Trial Details page appears.
- In the Summary tab, modify the displayed PO line information, as required. A description of the fields is provided in the following table.
Trial Summary Tab Fields Section Field Description Details Name (Required) The name of the trial as entered by the Purchasing Operator. Title The title of the trial material. Start date (Required) The start date for the trial, selected from the Calendar dialog box. The date must be later than the current date. The trial’s status changes to Active on this date. End date (Required) The end date for the trial, selected from the Calendar dialog box. This date must be later than the start date. The trial’s status changes to In Analysis on this date if the Trials - Start and Notify Participants job is active. Remind participants before trial ends The number of days before the end of the trial that you want an email reminder sent to trial participants. For emails to be sent, the Trials – Start and Notify Participants job must be Active; see Viewing All Scheduled Jobs. The notification sent is the Trial Letter and can be configured; see Configuring Alma Letters.Available to public When selected, indicates that the trial is available to the public (open to anyone). By default, this check box is not selected, and the trial is a private trial. This means that the trial is limited to the trial participants whom you invite to participate in the trial (in the Participants tab).Contact The name of the contact person in the institution who is responsible for the trial. Participant page URL The path to the trial survey. Filled in automatically after the start and end dates are entered, and cannot be edited. The URL for the trial includes the Participant Page URL field, as follows: https://<Alma domain>/<participant page url> Copy to Clipboard The full URL can be copied to the clipboard to use it outside of Alma without the need to copy the partial URL and add the server name.
For more information, watch the Get Full URL for Survey of an E-Resource Public Trial video (1:07 min).
View Form A link that displays the trial survey. Analysis and Results This section is completed by the Trial Operator after reviewing and analyzing the results of the trial (see Analyzing Trial Results). - In the Survey Form tab, create the questions for the survey.
In the Form Configuration section, select the Hide Portfolio Tab and/or Hide Collection Tab check boxes if you want those tabs to be suppressed from the survey form sent to the users. Select the Add Survey Prefix check box to include an explanatory message that appears at the top of the survey. Enter the message in the Prefix Message field.Add questions to the survey for either the General Information or Questions sections using one or both of the following methods:
- In Add from list, select a question from a list of existing questions. The Survey Form Question List page opens. Select the questions you want to use for the survey and select Select. The questions are added to the form.
- Select Add Question. The Add Question dialog box appears. Enter the question information as follows:
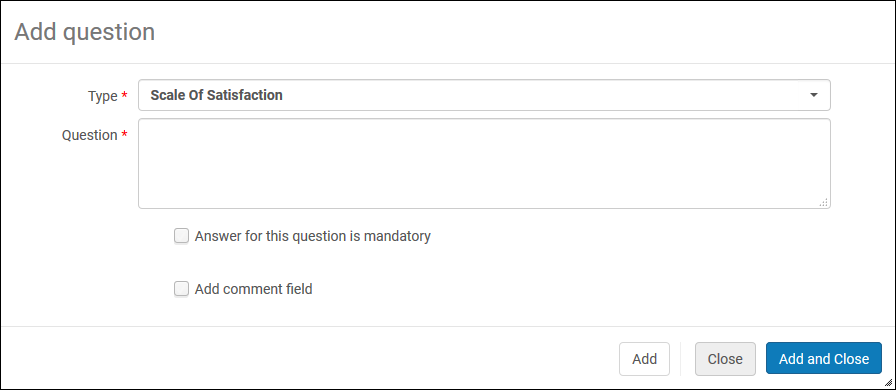 Add Question Dialog Box
- From the Type drop-down list, select one of the following types of questions: Scale of satisfied (for example, 1-5), Yes/No, Free text, Multi choice, or Single choice.
- Enter the text of the question in the Question field.
In Trials, when adding a single choice or multi-choice type of question, the value of the choice cannot include '&'; use 'and' instead.
- For Multi choice or Single choice questions, enter a Question code. This code will associate the values you enter back to the question.
- For Multi choice or Single choice questions, select Add Value. Enter a Value and select Add. Repeat this step until you have entered all the values for the question.
Values for the Multi choice and Single Choice questions can also be maintained in the Survey Question Multiple Choice mapping table. See Configuring Multiple Choice Survey Questions.
- Select the Answer for this question is mandatory check box to require the user to answer the question.
- Select the Add comment check box to add a comment field to the question. Another field appears to enter the label for the comment.
- Select Add to add the question to the survey and leave the dialog box open to add an additional question, or select Add and Close to add the question to the survey and close the dialog box. The question is added to the form.
- To edit a question, select Edit in the row actions list for the question you want to edit. Modify the question as required and select OK.
To rearrange the order of questions, use the Move Down and Move Up arrows.To delete a question, select Delete in the row actions list for the question you want to delete, and select Confirm in the confirmation box.
- If you are defining a private trial, select the Participants tab to select the participants in the trial.
Use the secondary search to search for the participants you have added to the trial.To add participants, select Select participants to search for and select users on the Find and Manage Users page (see Searching in Alma). Select the users and select Select. The selected participants are added to the trial.To load a participant from a set, select Load from a set and select a set from the set list. At the top of the Trial Details page, a message displays to indicate the number of participants that were added out of the possible set size. Duplicates and deleted users will not be loaded.If a checkmark appears in the Is Notified column, the user has already received a notification. Another notification will not be sent to the user when notifications are sent out. To reset a user so that they will receive another notification, either select Reset Notification on the row action list, or select a group of users and select Reset All Notifications from the view action list.To remove a participant, select Delete in the row actions list for the user.
- The Analysis tab appears only after the trial is created. In the Alerts tab, view the alerts generated for the trial.
- In the Attachments tab, add, update, or delete attachments for the survey. For details on working with attachments, see Attachments Tab.
- In the Notes tab, add, update, or delete notes for the survey. For details on working with notes, see Notes Tab.
- When you have modified the PO line information for the trial as required, select Save.
Analyzing Trial Results
It is not possible to edit or delete a recorded response for trials.
When answering a survey, the survey will time out after approximately 10-15 minutes of non activity.
- The trial information is normalized and validated.
- An alert is generated indicating that there is a purchasing decision for the trial.
- On the Manage Trials page (Acquisitions > Purchase Order Lines > Manage Trials), select Edit in the row actions list for the trial you want to edit. The Trial Details page appears on the Summary tab (see Editing Trial Information, above).
- Select the Analysis tab to open the Trial Analysis page.
- General Information – The number of surveys sent out to participants as well as the number of responses returned (with totals for each category of respondent).
- Questions – Grouped according to the ranges (described in Editing Trial Information, above).
- Question Number
- Question
- Responses
- Average — For Yes/No questions, the number of yes/no responses is shown. For Scale of satisfied questions, the average of all responses is shown. For questions where the answers are in free text, the number of responses is shown, as well as a list of each response.
Entering and Saving Trial Results
- On the Manage Trials page (Acquisitions > Purchase Order Lines > Manage Trials), select Edit in the row actions list for the trial you want to edit. The Trial Details page appears on the Summary tab (see Editing Trial Information).
- Enter the analysis and results of the trial in the Analysis section. A description of the fields in this section is provided in the following table.
Analysis and Results Fields Section Field Description Analysis and Results Result Select the trial result. Result date Select the date on which the trial result decision is taken from the Calendar dialog box. Result reason Select the reason for the result. To customize the list, contact Ex Libris support. Purchase decision Select No or Yes from the drop down list. - Select one of the following buttons:
- Save — Store the results of the trial. If you decided to purchase the material, the PO line continues with step 2 of the purchasing workflow (see Purchasing Workflow). If you decided not to purchase the material, the PO line can be canceled, as described in Canceling PO Lines.
- Export Survey Feedback — Exports a summary of the trial, with one tab each for the results of General Information and Questions, to an Excel spreadsheet.