
Manually Creating a PO Line
This page gives instructions for creating PO lines (physical, electronic and digital) and initiating the next stage in their processing. For editing PO lines see Editing PO Line Information.
For the overall purchasing workflow including the steps required for creating orders (whether using EOD, ordering manually, etc.), see Purchasing Workflow. For instructions on creating service subscription PO lines without inventory see Creating Service Subscription PO Lines Without Inventory.
For an overview of working with acquisitions in Alma, including links to relevant sections such as Invoicing, Renewals, Configuration, etc., see Introduction to Acquisitions.
- Purchasing Operator
- Purchasing Manager
Creating a PO Line
- You have migrated many inventory records and want to create the PO lines for them. For information on adding PO lines after migration see Best Practice Toolkit: Adding PO Lines After Implementation.
- You want to switch suppliers for a standing order.
- You create PO lines for bibliographic records – that is, something in the repository (a title, an item, a portfolio, and so forth). If the entity is not yet in the repository, you must first create a bibliographic record for it and add it to the repository; see Working with Bibliographic Records.
- An inventory item must be added to the PO line before the PO line can be sent for packaging.
- The PO line owner refers to the library creating the PO line, while the intended locations/access refers to the library for which the order is being placed.
- Once a PO line is created with a certain purchase type, the workflow and inventory/data implications are fixed and cannot be changed. This is therefore a critical step in the PO line creation process.
- See also: Acquisitions - How to handle one order to a vendor for both physical and electronic material and link them together.docx
-
Search for the title for which you want to create a PO line; see Searching in Alma.You may also use Search External Resources (Resources > Cataloging > Search Resources) to locate a title in external systems such as the OCLC or the Library of Congress (see Search External Resources). From the Search External Resources results list, select Import to open the record in the MD Editor. In the MD Editor, select Order (Ctrl+Alt+O) and the PO Line Owner and Type page (see next step) opens.
- In the row actions of the item you want to order, select Order to create a main PO line. If the item is an electronic resource and it already has a main PO line attached to it, select Additional Order to create an additional PO line, instead. The PO Line Owner and Type page opens.
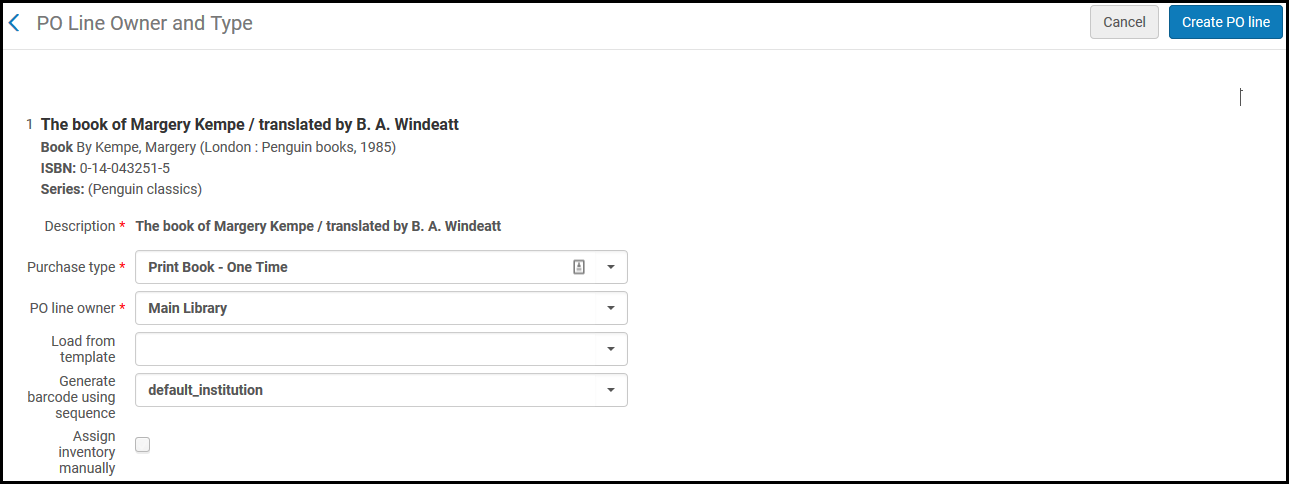 PO Line Owner and Type PageThis is also the page that opens when you select the Order icon in the MD Editor.
 -
Field Description Select the Purchase type for the PO line. Select one of the following to open a list of options:-
Recommended – Lists recommended types, which depend on the item you selected to get to this page.
-
Other – Lists all enabled purchase types (except for electronic collections and portfolios), regardless of what item you selected in the inventory to get to this page. Note, however, that when you order an item in a particular format, this does not necessarily mean that any vendor actually has the item in that format; if they do not, they may reject your order.
For an explanation of each type and how an administrator can enable/disable these types, see Enabling/Disabling PO Line Types. Also see Explanation of Purchase Types Workflow and Inventory.Digital types are not enabled by default. In order to enable them, see the row for enabling digital manual orders in the Digital Manual Order table. Digital PO lines are created with no inventory (both One Time and Continuous), and you need to manually add the representation to the PO line. For more information see Digital Manual Orders.Select the library that will own the PO line. This may be different from the library/location for which you are ordering the resource (see Ordered Items Section (Physical Resources Only) and Ordered Portfolios Section (Electronic Resources Only), below).This list is defined by a system administrator; see Adding/Editing Institution Libraries. Only options relevant to your scope as a Purchasing Operator/Purchasing Manager appear in the list.This option appears when the title that you have selected to order has multiple 856 $u entries (URLs) in the bibliographic record, and you have selected an electronic PO line type.When you select this option, a Portfolios list section appears where you can choose specifically which portfolios to order (from the URLs shown in the Portfolios list section). You may select any or all of the portfolios in the Portfolios list section. The portfolios that you select will be associated with the same PO line.The following images show an example of a bibliographic record with multiple 856 $u entries for which multiple portfolios are ordered in one PO line by selecting this option:.png?revision=1) Electronic Resource (Title/Bibliographic Record) with Multiple 856 $ Entries
Electronic Resource (Title/Bibliographic Record) with Multiple 856 $ Entries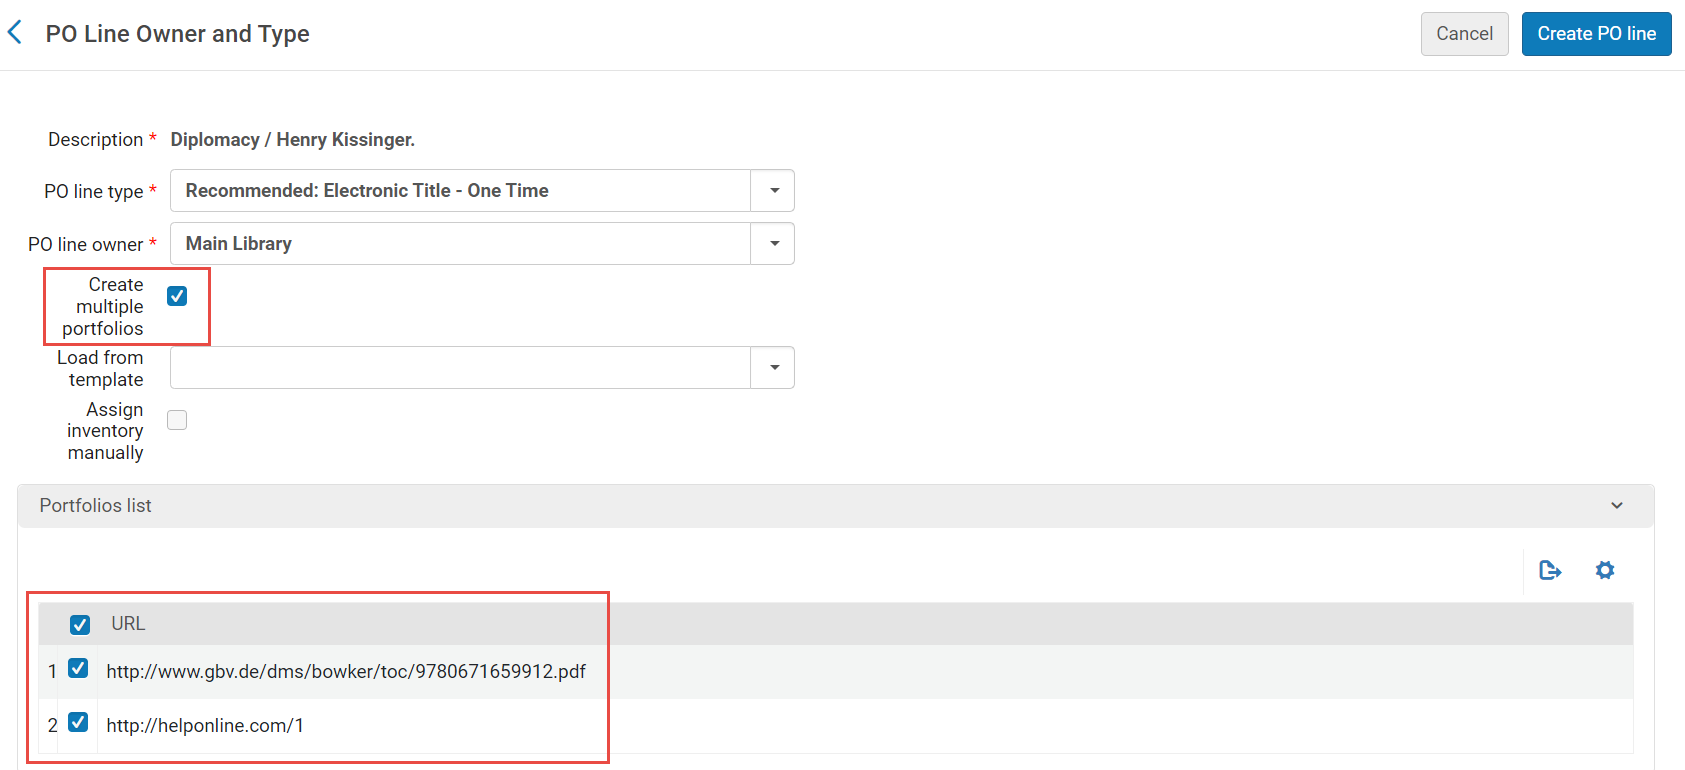 Create Multiple Portfolios Option Selected and the Portfolios List Section with Multiple Portfolios Selected
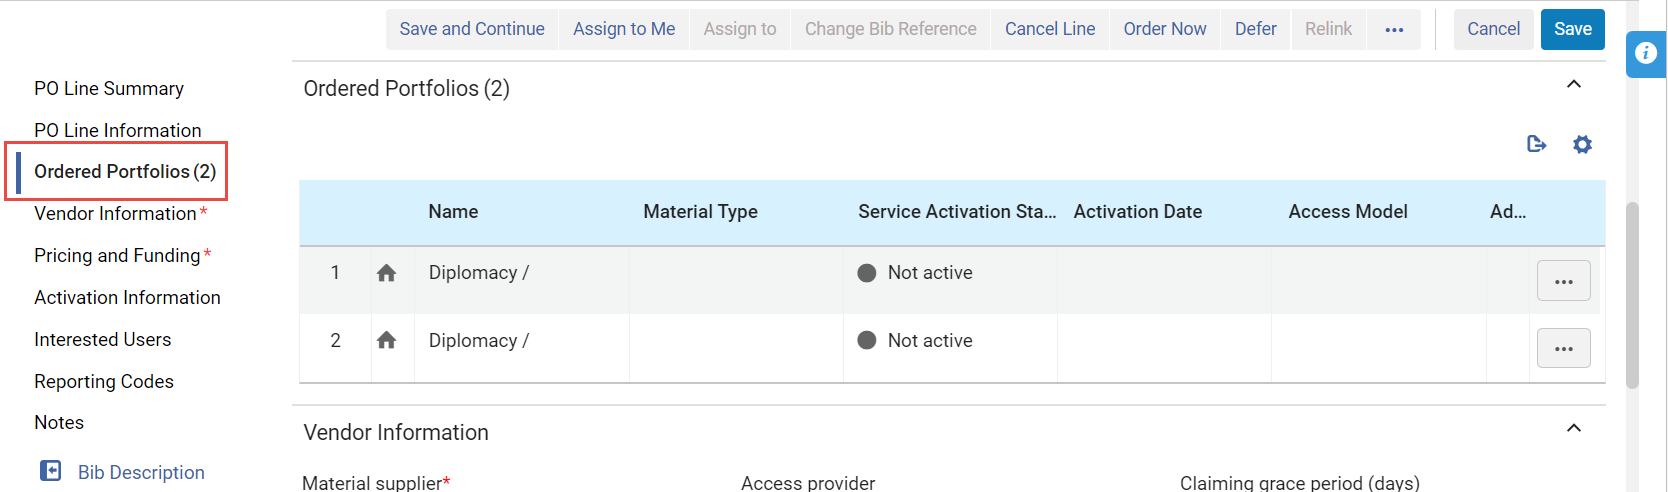 Multiple Portfolios (Associated with one PO Line) Created for PO LineIf you do not select Create multiple portfolios, and there are multiple 856 $u entries in the bibliographic record from which you are ordering, Alma randomly chooses one of the 856 $u entries for which to create a PO line.Optionally, select a template from which to load the PO line.Templates are created when you select Save as Template in the Details pane of a PO line. For more information, see Creating and Managing PO Line Templates.The template should match the PO line type.When loading a template that was saved with the Update Net Price according to item quantity field not checked, this field will be un-checked in the created PO line, even if the po_line_quantity_updated_with_items_number customer parameter is true.When Alma is configured to automatically generate barcodes (see Configuring Barcode Generation), and you select a one-time print PO line type and a library as the PO line owner, the Generate barcode using sequence field appears.This field appears for any physical PO line that creates item inventory. These are types enabled on the PO Line Type mapping table (see Enabling/Disabling PO Line Types) with Continuity = One-Time and Inventory Format = Physical.If you want Alma to automatically generate a barcode for the item, specify the sequence you want Alma to use when it generates the barcode by selecting one of the barcode-sequence profiles that appears in the dropdown list of available profiles (see Configuring Barcode Generation). The list includes all institution-level barcode-sequence profiles, and all library-level barcode-sequence profiles that are defined in Alma for the PO line owner.If you select a profile, then, after you create the PO line, Alma creates an item with the automatically generated barcode. If you do not select any sequence, the item is still created, but no barcode is assigned to it.
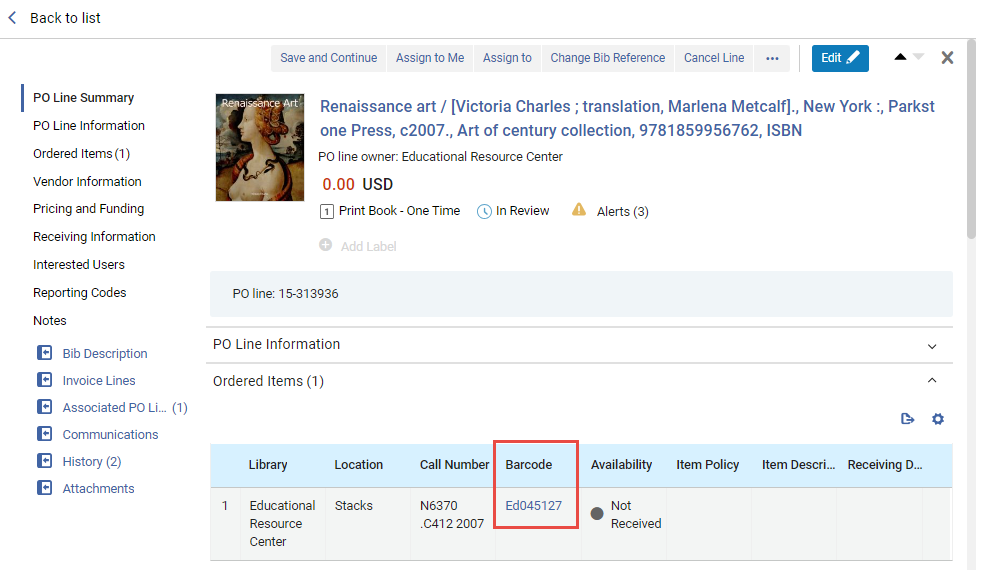 Automatically Generated Barcode for an ItemFor orders created through one of the following methods, Alma uses the institution-level default or the library-level default configured for automatic barcode-generation, depending on the library information given in the order:
-
EOD
-
From an API (real-time order)
-
Approving a purchase request
-
Receive New Items from the continuous order receiving process
Select this field to prevent Alma from automatically creating an inventory item for the new PO line.This checkbox does not appear if you are creating a PO line for a standing order (except for Physical - Standing Order Non Monograph), a PO line of type service (for example Access Service - Subscription, Database Service - One Time, etc.), or the options Digital - Non Archiving or Physical - Archiving (both of which imply an order without inventory).If you prevent Alma from creating an inventory item for the PO line, the PO line is created, but new inventory is not created. For information about attaching inventory to the PO line manually after the PO line is created, see:-
For physical inventory: Adding Inventory to an Item, below. Note that you must add inventory manually to the PO line before the PO line can proceed to packaging.
-
For electronic inventory: Adding Inventory to a PO Line for an Electronic Resource, below.
-
- Select Create PO Line.
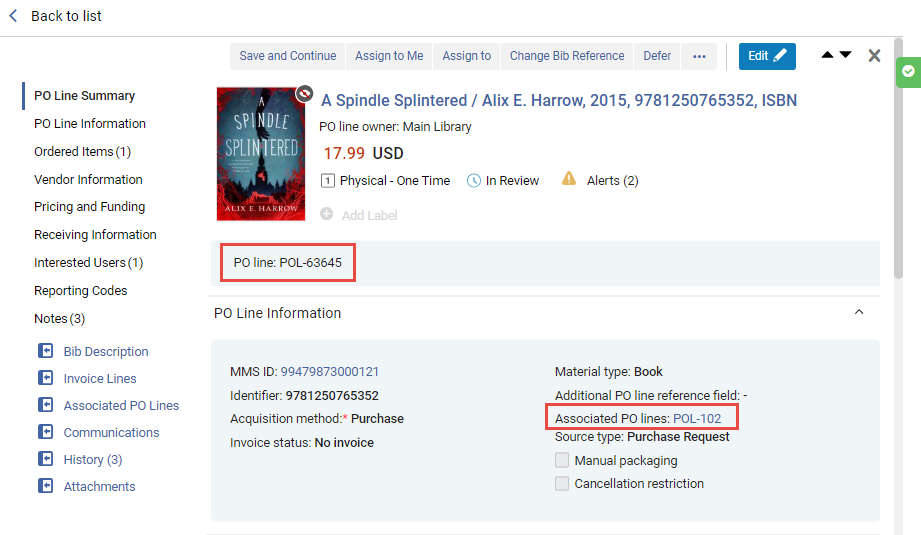
If you selected Assign inventory manually, a confirmation dialog box appears, asking you to confirm that the PO line will be created but inventory will not be created. Select Confirm to continue.The PO line is created, and opens in the Details pane in full-page view and in Edit mode, with its workflow step set to In Review. The PO Line Summary section displays basic information about the PO line, including its owner, cost (at this stage, 0.00), type, workflow step, and number. If there are any alerts for the PO line, an Alerts icon (
 ) and link appear, with the number of alerts indicated. Select the link to see the alerts. (For a complete list of the alerts that may appear in a PO line, with explanations of their meanings, see Configuring Purchasing Review Rules.) Additional details about the PO line appear in the other sections, below the PO Line Summary section. Most of the fields in these sections are blank at this stage, unless the PO line was created from a template; the blank fields should be filled in as appropriate, as explained below.
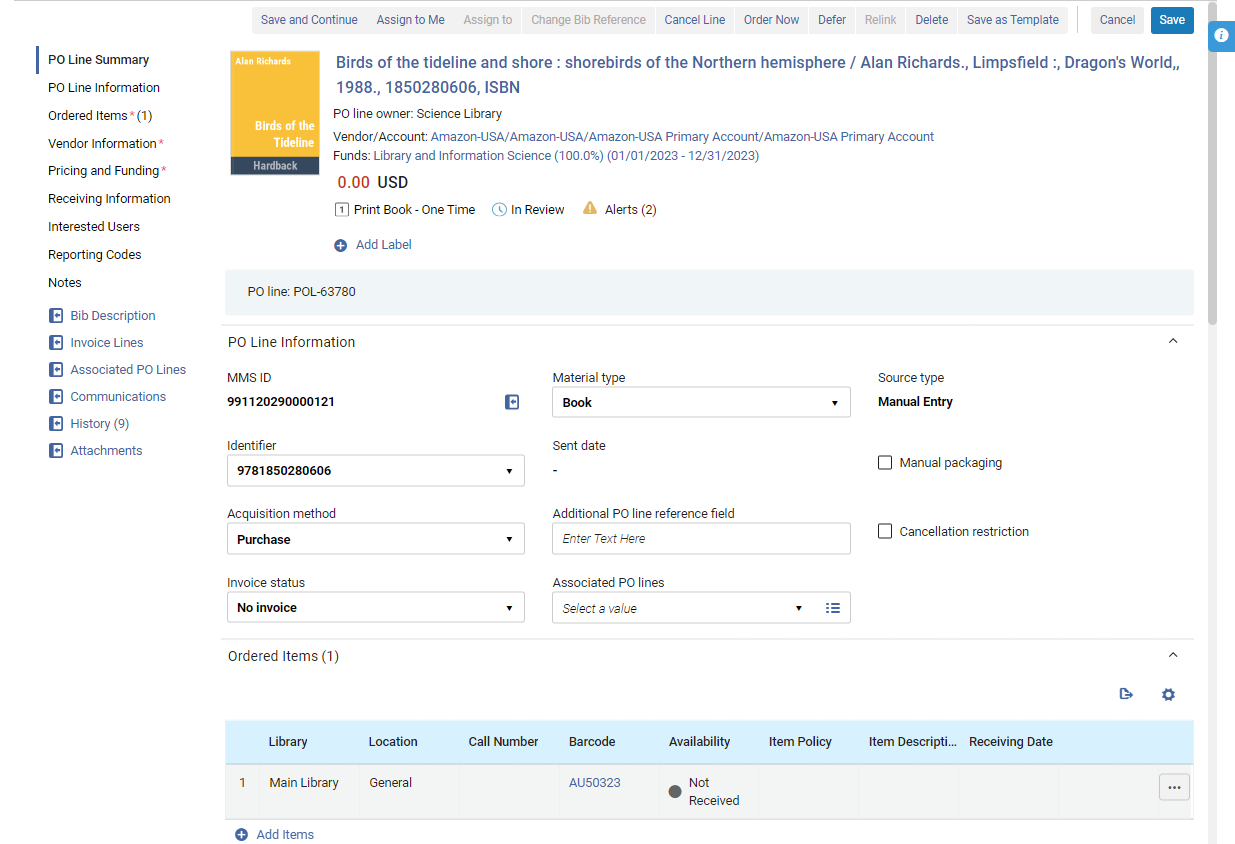 Newly Created PO Line (Created from a Template)
Adding Information to the New PO Line
Once a new PO line has been created as explained above, you can begin to enter further information about it into the PO line. You do this in the Details pane, which opens automatically when the PO line is first created, but can also be opened at any time later on by selecting the PO line in the PO-line task list. For additional information about opening PO lines from the task list, see Managing PO Lines.
When a new PO line is first created, the Details pane opens in Edit mode, so you can begin entering information into the various fields immediately. In the future, if you open the PO line from the task list, it is opened in View mode. In order to edit it, you must make sure it is not assigned to another user (i.e., it is either assigned to you or unassigned), and then select Edit ( in the task list or
  at the top of the Details pane) to switch to Edit mode. For additional information, see New Layout 2022.
Each of the sections in the Details pane, and the fields they contain, are described below. Enter the PO line information in the various sections as required. When you have finished, select Save to save the information, or Save and Continue to save your changes and send the PO line to the next workflow step. For additional information, see Initiating the Processing of the New PO Line, below.
When creating a new PO line manually in Alma, for users who finish their flow by selecting Order Now, Save or Save and continue, Alma will navigate to the list with the specific POL. This behaviour will only apply for newly created PO lines. For existing PO lines, when users edit and select one of the above three actions, the page will remain as is.
PO Line Summary Section
The only change you can make directly in the PO Line Summary section is to add labels to, or or remove labels from, the PO line (see Managing Labels in the Details Pane). However, some changes you make in other sections automatically update the information in this section when you select Save or Save and Continue; for example, if you select a vendor or a fund, or enter a price for the item, this information is added to the PO Line Summary section. When the PO line is packaged in a purchase order (PO), the number of the PO is also added to this section, beside the PO line number.

The PO Line Summary section contains the following information:
| Field | Description |
|---|---|
| Item description |
The name of the item being ordered, the authors' names and publication information Select the description to view the PO line's related institution record in a sliding panel. |
| Assigned to | If the PO line is assigned to a user, the user's name appears. |
| PO line owner | The library that owns the PO line (see PO line owner, above) |
| Vendor/Account |
The vendor and vendor account of the PO line Only shown when a vendor has been selected (see Vendor Information Section, below) and the PO line has been saved. Select the vendor information to open the Vendor Details page (see Managing Vendors) in a sliding panel. |
| Funds |
The funds associated with the the PO line, the proportion of the price that is to be covered by each fund, and the fiscal period defined for each fund Only shown when at least one fund has been selected (see Pricing and Funding Section, below) and the PO line has been saved. Select the name of a fund to open its fund record (see Managing Funds and Ledgers) in a sliding panel, with the Transactions tab selected and showing all the transactions related to this PO line that have already taken place. |
| Price | The price of the item and the currency |
| PO line type | The Purchase type (see PO line type above) |
| Workflow step | The current workflow step of the PO line (see Searching for PO Lines) |
| Alerts |
If alerts are attached to the PO line, an Alerts icon appears in this section, with the number of alerts in parentheses. Place your mouse cursor on the icon to see the alerts in a tool tip. Select the icon to open the alerts in a sliding panel. The most common alerts generated by Alma are as follows. You can see the complete list of alerts in Configuring Purchasing Review Rules.
|
| Additional Information |
Links to additional information, including:
|
| Add Label | To add a label to the PO line, select Add Label. For additional information, see New Layout 2022. |
| PO line | The PO line number |
| PO |
The purchase order in which the PO line is packaged in, and the status of the purchase order. Only shown when the PO line has been packaged into a PO; see Packaging PO Lines into a PO. |
PO Line Information Section
The PO Line Information section contains general information about the PO line, some of which you can add or modify.
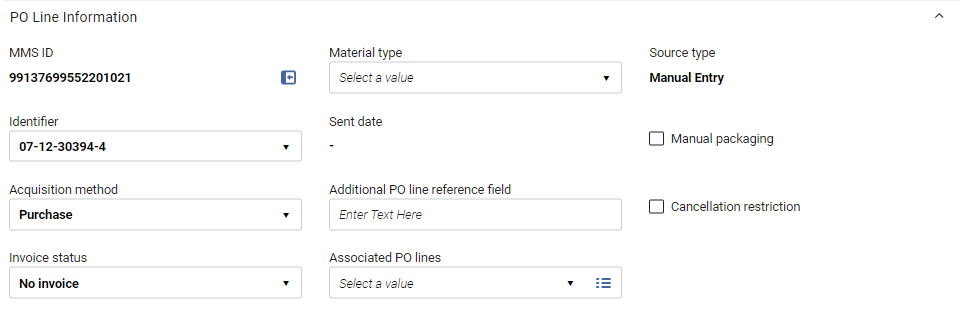
Fields in the PO Line Information Section
The PO Line Information section contains the following fields:
| Field | Description |
|---|---|
| MMS ID |
The Metadata Management System ID - the internal Alma record ID - of the item To open the bibliographic record, select the |
| Identifier |
By default, this field is populated by the first identifier listed in the bibliographic/imported record’s ISBN/ISSN (020 or 022) field, and all 020 and 022 values in the record appear in the dropdown list. You can also manually enter any text in the field. If the ISBN number is 13 digits and the display_isbn_13_in_predefined_result parameter is enabled, all 13 digits are displayed. If the parameter is disabled, the identifier will display 10 digits. See Configuring Other Settings. |
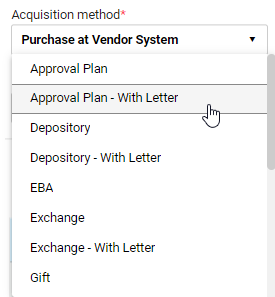
| Acquisition method |
The type of acquisition method for the PO line. For details on the available acquisition methods, see Acquisition Methods below. Depending on your system's configuration, when you select the Acquisition method for a PO line, you may be able to choose whether an order letter is sent to the vendor or not. If you can, both options appear in the dropdown list.
Acquisition Method Dropdown List with Options for Sending an Order Letter or Not
|
| Invoice status | This field is set by default to No Invoice and should not be modified. Alma automatically updates this field as required.
When an invoice arrives and the invoice line is associated with the PO line:
This impacts the PO line workflow as follows: If a one-time PO line is set to Fully Invoiced and items are received/activated, the PO line is closed. If the PO line is set to Partially Invoiced, it remains in the Waiting for Invoice Status until it is changed (manually or by receiving a new invoice) to Fully Invoiced.
The invoice status is set to Fully Invoiced when the ordered items is equal to or less than the invoiced items in all related invoice lines.
When an invoice/invoice line is deleted, or a PO line is removed from the invoice line, Alma checks if the PO line has another invoice line related to it and the PO line status. If the status is active and there are no more related invoice lines, the invoice status is set to No Invoice.
Deleting an invoice removes the expenditure and recalculates the disencumbrance. To remove the disencumbrance (when removing the only invoice associated with the PO line), manually set the PO line's Invoice Status to Partially Invoiced. See Creating an Invoice From a PO or Manually.
|
| Material type |
The type of material—such as book, electronic journal, or CD-ROM—that the item represents. The available options differ depending on whether the item is physical or electronic. For information on customizing material-type labels, see Configuring Physical Item Material Type Descriptions. When the material type in a PO line is updated, all items are updated with the material type. This field does not appear when creating a digital PO line without inventory. |
| Sent date | The date on which the order containing the PO line was sent to the vendor |
| Additional PO line reference field |
A reference code by which you want to identify the current PO line. This can be any free text or information that references the PO Line, e.g. an identifier that can used by EOD.
"Additional" here refers to the reference; this field has nothing to do with whether the PO line is a main PO line or an additional PO line.
|
| Associated PO lines |
A target PO line related to this PO line Enter a search string (e.g., a PO line number) in the text field to perform a keyword search for a PO line, or use the look-up option to the right of the field to select a PO line from a list. You can associate the current PO line with one target PO line, which is specified in this field. The relationship defined in this field is a one-way relationship: this PO line is associated with the target PO line, but not the reverse. One use-case for this field is if you are ordering multi-part serials. It is recommended that you have one main PO line (with fund information) for the subscription and an additional Technical PO line for each item that you are to receive at a different interval, each of which would be associated with the main PO line using this field. The Associated PO lines section lists PO lines that are associated with this one (the reverse relationship), and not the PO line selected in this field. And the current PO line would appear in the Associated PO lines section of the PO line selected in this field. See Associated PO Lines Section, below.
PO line associations are for informational purposes only, and have no functional effects. If you try to cancel a PO line that has an associated PO line defined in this field, a warning message appears. |
| Source type |
The source from which the current PO line originated. For imported lines, select the link to open the relevant page containing the source details; for example, the MARC Record Simple View page, or the Import Job Details page. The Rialto status appears when a PO line was created as part of the Rialto workflow (see Monitoring the Order Status). |
| Manual packaging | Whether to enable manual packaging of the PO line into a PO. For details on packaging PO lines, see Packaging PO Lines into a PO |
| Cancellation restriction | Whether to display a cancellation restriction note containing a warning upon the cancellation of a PO line. (To then continue with the cancellation of the PO line, the user must select Confirm.) If you select this option, a Cancellation restriction note field is added to the section, and a Cancellation Restriction icon |
| Cancellation restriction note |
The text of the warning to be displayed when canceling a PO line that has a cancellation restriction This field is added to the section when Cancellation restriction is selected. |
Acquisition Methods
The following acquisition methods are defined in Alma and can be selected for the Acquisition method field.
To enable or disable methods, or to configure the default method, see Configuring Acquisition Methods. The configuration settings make it possible to select, for each acquisition method, whether an order letter should be sent to the vendor or not (or that the user should be allowed to choose whether to send an order letter or not for each PO line).
| Acquisition Method | Description |
|---|---|
| Approval Plan | An agreement is in place that the vendor sends whatever the vendor determines is necessary to the institution, in EOD format. Such PO lines are not sent to the vendor, but they are packaged into POs and marked as sent until they are received/activated. Pricing and fund information is mandatory for this method.
The behavior of this method is identical to that of the Purchase at Vendor System method, with the exception of its display in a report.
|
| Depository | The institution agrees to host government publications and make them freely available.
|
| EBA | Evidence Based Acquisition: The institution deposits an EBA credit with the vendor, to be used on future eBook purchases, and subscribes for a specified period of time, at no charge, to a particular vendor collection. Towards the end of the subscription period, the vendor provides the institution with statistics describing the institution's usage of the titles in the collection. The institution then uses its EBA credit to purchase perpetual access to the eBooks in the collection that its patrons used the most during the subscription period. For additional information, see Real-Time Ordering. |
| Exchange | The institution agrees to exchange resources with another institution.
For more information on the exchange method, see Suggested Workflow for Acquisitions Exchange Program.
|
| Gift | The resource is granted as a gift from the vendor to the institution.
|
| Legal Deposit | Legal Deposits allow a zero value for a PO to coexist with a notification to the vendor, requiring neither funds nor a price to send out different versions of the PO line order letter. When this Acquisition method is selected, then the Legal Deposit Order Letter and the Legal Deposit Receipt Letter are both sent. See Working With Legal Deposits. |
| Legal Deposit - Order Letter (New for May 2026) |
When this Acquisition method is selected, only the Legal Deposit Order Letter is sent (the Legal Deposit Receipt Letter is not sent). See Working With Legal Deposits. |
| Legal Deposit - Receipt Letter (New for May 2026) |
When this Acquisition method is selected, only the Legal Deposit Receipt Letter is sent (the Legal Deposit Order Letter is not sent). See Working With Legal Deposits. |
| Legal Deposit - Without Letter | When this Acquisition method is selected, neither of the two letters (Legal Deposit Order Letter and Legal Deposit Receipt Letter) are sent. See Working With Legal Deposits. |
| Purchase | The institution purchases the resource and, when the PO is approved, sends the order and renewals to the vendor by EDI or email.
For details on managing vendors and vendor accounts, see Managing Vendors.
If the parameter po_line_send_notification_to_vendor_on_renewal is set to true on the Mapping Table page for Other Settings (Configuration Menu > Acquisitions > General > Other Settings), a PO Line Renewal Letter (see Configuring Alma Letters) is sent to a vendor when a subscription is renewed (see Configuring Other Settings).
|
| Purchase at Vendor System | A purchase is handled using an external vendor system. Such PO lines are not sent to the vendor, but they are packaged into POs and marked as sent until they are received/activated. Pricing and fund information is mandatory for this method.
The behavior of this method is identical to that of the Approval Plan method, with the exception of its display in a report.
|
| Technical | Relevant for service subscription orders without inventory or items that have migrated from an external system. Often used for multi-part orders where you pay once and receive multiple resources.
If you are ordering multi-part serials, it is recommended that you have one, main PO line (with fund information) for the subscription and an additional Technical PO line for each item that you are to receive at a different interval. You then associate each Technical PO line with the main PO line.
If you are working with a mixed print and electronic order, it is recommended that you have one, main PO line (with fund information) for the electronic inventory and an additional Technical PO line for the printed material (so that you can receive this material). You then associate the Technical PO line with the main PO line.
|
Ordered Resources Sections
PO lines for resources have a section listing each individual resource included in the PO line. Note that PO lines for services do not include a section of this type. The section name and its contents depend on the type of the ordered resource. For example, if the PO line is for a physical resource, and is for a one-time order, the section is called Ordered Items, whereas if it is for an electronic resource, it is called Ordered Portfolios.
Initial Creation
When a PO line is first created, a single item appears in the ordered resources section if an inventory item was created for it simultaneously. If no inventory item was created when the PO line was created, then no lines initially appear in the section.
Associated Items or Holdings
You can associate an item or holding to a PO line from that item/holding. The PO line then appears in the Ordered Item/Holding section.
Pagination
For ordered items, portfolios and collections, pagination appears by default when there are more than 20 rows.

In the slider, you can change the number of rows that are required to make the pagination appear.

The selected value in the slider is stored by Alma after logging out or refreshing the page.
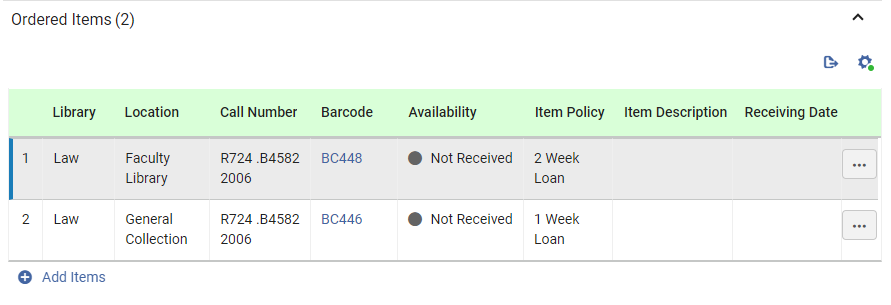
Ordered Items Sections (Physical Resources Only)
For physical resources, you can add resources to the list as required. For example, you can add additional copies of a printed book, possibly for different libraries or with different item policies, and for continuous PO lines, you can add additional holdings to the list. When multiple copies or holdings of a resource are included in a PO line, each distinct item appears in a separate line in this section.
The information in these sections cannot be edited directly. When an item in the list is received, the Availability and Receiving Date are updated automatically. You can view additional details about each resource in the PO line, edit some of the information about it, receive the resource, place a request for the item, or delete it from the PO line, using the row actions of the resources in the list.
Fields in the Ordered Items Section (One-Time Physical Items)
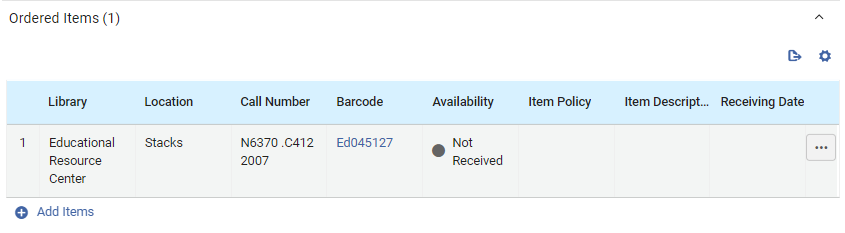
The following information is displayed in the Ordered Items section for each physical item included in a one-time PO line:
| Field | Description |
|---|---|
| Library |
The library for which the item is being ordered This may be different from the PO-line owner specified when the new PO line was created (see PO line owner above). |
| Location | The location in the library in which the item is intended to be placed. Select this link to view the holdings record in a sliding panel. |
| Call Number | The call number of the item |
|
Barcode
|
The barcode that is being assigned to the item Select the barcode to open the Physical Item Editor in a sliding panel. You can view and edit information about the item there (see Updating Item-Level Information). |
|
Availability |
Whether the item was received already or not When the item is received, the indicator is green. |
| Item Policy | The conditions under which patrons can access or borrow the item; for more information, see Updating Item-Level Information |
| Item Description | System or user-generated description as it appears in the Physical Item Editor page (see Updating Item-Level Information); normally blank for monographs and filled-in for serials. For additional information, see Description (Generate). |
| Receiving Date | If the item was received, the date on which it was received |
Fields in the Holdings for Ordered Items Section (Continuous Physical Items)

The following information is displayed in the Holdings for Ordered Items section for each continuous physical item included in a PO line:
| Field | Description |
|---|---|
| Library |
The library for which the item is being ordered This may be different from the PO-line owner specified when the new PO line was created (see PO line owner above). |
| Location | The location in the library in which the item is intended to be placed. Select this link to view the holdings record in a sliding panel. |
| Call Number | The call number of the item |
|
Copy ID |
The copy number of the item (copy 1, copy 2, and so forth) |
|
Summary |
Information about the holding that is taken from its bibliographic record. |
| Items Received |
The number of physical items that have been received already, out of the total number of items included in the PO line Select this link to open the List of Items page in a sliding panel. Additional information about each item, including its barcode, location information, and receiving date, is displayed there. Select the barcode of an item in this list to open the item in the Physical Item Editor (see Updating Item-Level Information). |
Modifying Physical-Item Information
The information in the Ordered Items/Holdings for Ordered Items sections cannot be edited directly. When the item is received, the Availability and Receiving Date are updated automatically. You can edit many of the other fields manually, receive the item, or delete it, from the row actions of the item. You can also change the resource itself.
For instructions on how to receive an item
-
In the row actions of the item, select Edit. The item information opens in a sliding panel.
-
Modify the fields as required, and select Save when you are done. The changes are saved, and the sliding panel closes. You may have to refresh the Purchase Order Lines page to see your changes reflected there.
-
In the row actions of the item, select Receive.
A dialog appears where you can update the receiving information.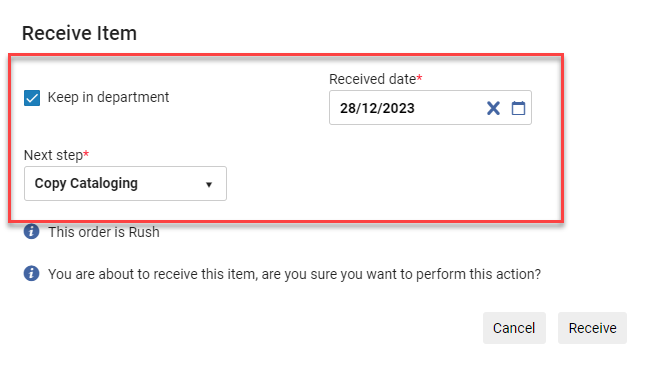 Update Receiving Information
The department listed under Currently At directly impacts the ability to receive the item from the PO line; an error occurs if the user is not in the correct department. Furthermore, the values shown in the Next step field in the dialogue window correspond to the Currently At department.
See also Receiving Physical Material.
-
In the row actions of the item, select Delete.
This performs the same action as Withdraw when receiving physical material (see Receiving Physical Material).
Adding Items or Holdings of a Physical Resource to a PO Line
You can add items to a PO line for physical resources. If the PO line is for a one-time physical resource, you can add additional copies of the resource to the PO line. If the PO line is for a continuous physical resource, you can add additional holdings to it.
If the PO line was created without inventory, no items appear in the ordered resources section. You can follow the procedure below to add the first item. If a PO line for a resource was created without an inventory item, it cannot proceed to packaging until inventory is manually added to it.
- For one-time resources, in the Ordered Items section, select Add Items. For continuous resources, in the Holdings for Ordered Items section, select Add Holdings. The Add Items or Add Holdings box opens.
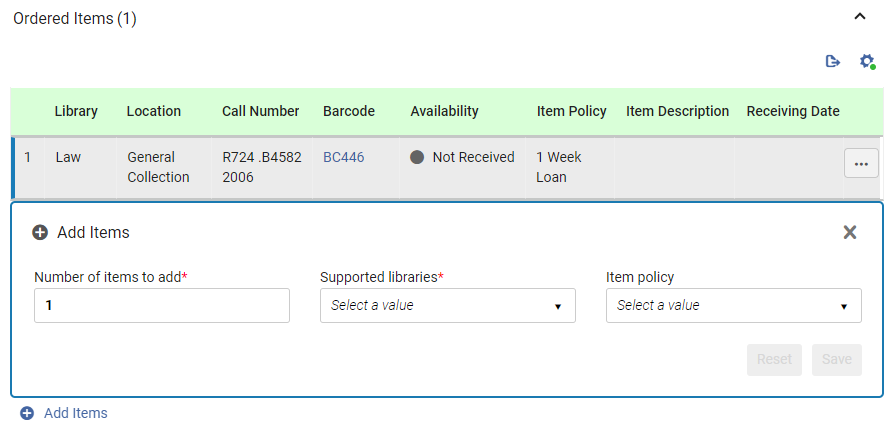
- Under Number of items to add or Number of holdings to create, enter the number of additional copies to add to the PO line for the library and location you will select in the next step.
- Under Supported libraries, select the library and location for which the items are being ordered. The list includes only those locations that can receive items of this type from the PO-line owner specified when the PO line was created (see PO line owner above).
For information about creating relationships between libraries to enable the libraries to acquire items for one another, see Configuring Fulfillment Services Between Libraries Within an Institution.
- For one-time orders, select the Item policy – the conditions under which patrons will be able to borrow or access the item (optional).
- Select Save. The items are added to the PO line, and appear in the list of resources in the Ordered Items or the Holdings for Ordered Items section. (If you added more than one copy, each copy appears in the list in a separate row.)
- To add additional copies, e.g., for a different Location, or with a different Item Policy, select Add Items again and enter the details as explained above.
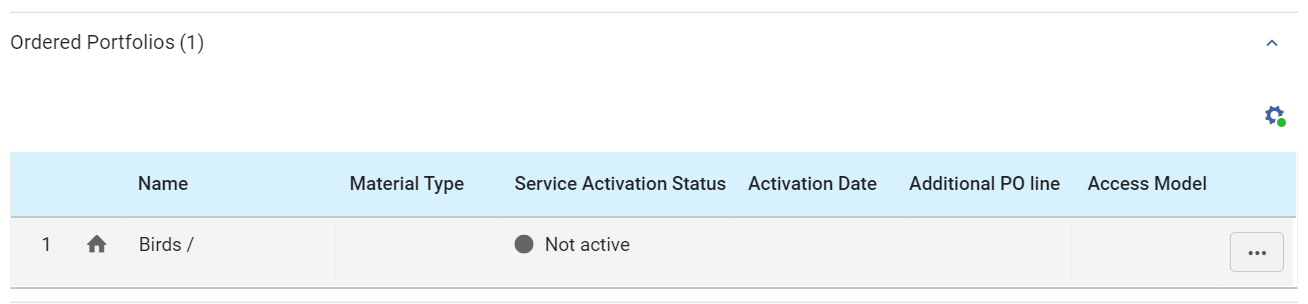
Ordered Portfolios Section (Electronic Resources Only)
The Ordered Portfolios section of the PO line appears only for orders of electronic resources. It displays information about the electronic resource being ordered in the PO line. You can view additional details, edit some of the information, or change the resource being ordered using the row actions of the table.
The Replace Resource function can be used to handle purchases of electronic resources whose distribution is handled by a Network Zone; see Managing PO Lines.
Fields in the Ordered Portfolios Section
The following information is displayed under Ordered Portfolios for the portfolio of the PO line:
| Field | Description |
|---|---|
|
Zone indicator; blue for available resources, gray for resources that are not available:
|
|
| Name |
The name of the portfolio |
| Material Type | The type of resource: book, journal, dissertation, etc. |
| Service Activation Status | Whether the portfolio is active or not |
| Activation Date | If the portfolio is active, the date on which it was activated |
| Additional PO Line | If a green checkmark appears, this PO line is an additional PO line for the portfolio. |
| Access Model | The access model defines how many concurrent end-users can access the electronic resource.
The Access Model column appears for the following types of PO lines:
You can select or modify the access model in one of two locations:
The access model can also be changed by the Update PO Line Information job. For more information, see Managing Access Models. |
Editing Portfolio Information
You can view and edit the repository information about the portfolio in the Electronic Portfolio Editor. For information about this editor, see Editing a Portfolio Using the Electronic Portfolio Editor.
- In the Ordered Portfolios section, in the row actions of the portfolio, select Edit. The Electronic Portfolio Editor opens in a sliding panel.
- Modify the information as required.
- Select Save. The repository information is updated, and the sliding panel closes.
Changing the Portfolio Being Ordered
You can change the portfolio being ordered in the PO line.
For additional information about this option, see Replacing the Resource Associated with an Electronic PO Line.
- In the Ordered Portfolios section, in the row actions of the portfolio, select Replace Resource. The Electronic Portfolios page opens in a sliding panel, with the persistent search bar at the top.
Depending on your system settings, you may be prompted to choose whether to retain the resource in the repository or delete it. If you are prompted, choose one of the options, and then select Save. Even if you choose to delete it, the resource will only be deleted from the repository if it is not associated with any other inventory.
- In the persistent search bar, search for the portfolio you want order instead of the current portfolio.
- Select the resource, and then select the Select button. The sliding panel closes, and the portfolio you selected replaces the previous one in the PO line.
Adding Inventory to a PO Line for an Electronic Resource
You can add inventory to an electronic resource PO line as required. To do so, you must add the PO line to the portfolio record. If you chose not to add inventory when you created the PO line, the Ordered Portfolios section is empty until you manually add a portfolio to the PO line.
- Search for the electronic portfolio that you want to add (see Searching in Alma).
- Select Edit Portfolio. The Electronic Portfolio Editor page appears.
- In the Acquisition tab, in the PO Line field, select the PO line.
- Select Save. The portfolio is added to the PO line and appears in the Ordered Portfolios section.
Ordered Collections Section (Electronic Resources)
The Ordered Collections section of the PO line appears only for orders of electronic resources. It displays information about the electronic resource being ordered in the PO line. You can view additional details, edit some of the information, or change the resource being ordered using the row actions of the table.
The Replace Resource function can be used to handle purchases of electronic resources whose distribution is handled by a Network Zone; see Managing PO Lines.
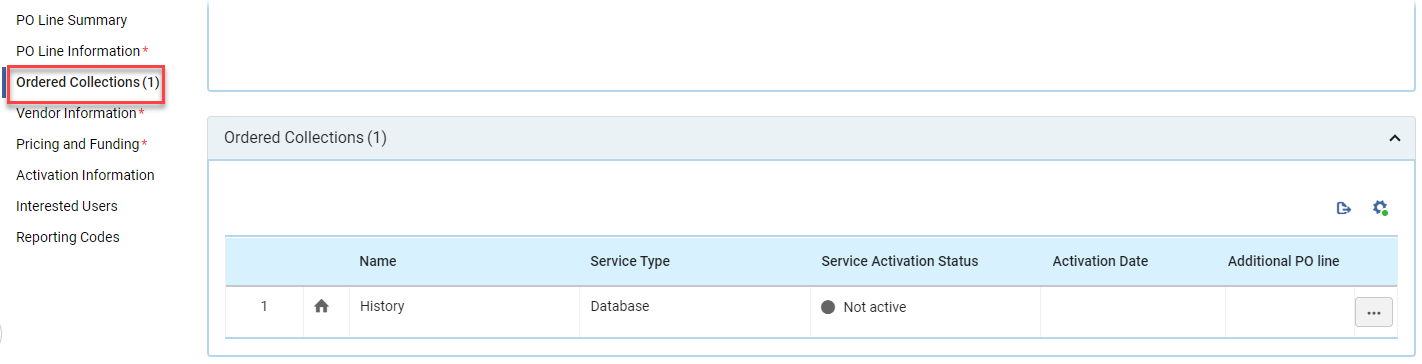
Fields in the Ordered Collections Section
The following information is displayed under Ordered Collections for the collection associated with the PO line:
| Field | Description |
|---|---|
|
Zone indicator; blue for available resources, gray for resources that are not available:
|
|
| Name | The name of the collection |
| Service Type | The type of service: database, aggregator package, selector package, etc. |
| Service Activation Status | Whether the collection is active or not |
| Activation Date | If the collection is active, the date on which it was activated |
| Additional PO Line | If a green checkmark appears, this PO line is an additional PO line for the collection. |
Editing Collection Information
You can view and edit the repository information about the collection in the Electronic Collection Editor. For information about this editor, see Managing Electronic Resources.
- In the Ordered Collections section, in the row actions of the collection, select Edit. The Electronic Collection Editor opens in a sliding panel.
- Modify the information as required.
- Select Save. The repository information is updated, and the sliding panel closes.
Changing the Collection Being Ordered
You can change the collection being ordered in the PO line.
For additional information about this option, see Replacing the Resource Associated with an Electronic PO Line.
- In the Ordered Collections section, in the row actions of the collection, select Replace Resource. The Electronic Collections page opens in a sliding panel, with the persistent search bar at the top.
Depending on your system settings, you may be prompted to choose whether to retain the resource in the repository or delete it. If you are prompted, choose one of the options, and then select Save. Even if you choose to delete it, the resource will only be deleted from the repository if it is not associated with any other inventory.
- In the persistent search bar, search for the collection you want to order instead of the current collection.
- Select the resource, and then select the Select button. The sliding panel closes, and the collection you selected replaces the previous one in the PO line.
Adding Inventory to a PO Line for an Electronic Collection
You can add inventory to an electronic collection PO line as required. To do so, you must add the PO line to the collection record.
- Search for the electronic collection that you want to add (see Searching in Alma).
- Select Edit Collection. The Electronic Collection Editor page appears.
- In the General tab, in the PO Line field, select the PO line number.
- Select Save. The collection is added to the PO line and appears in the Ordered Collections section.
Ordered Representations Section (Digital Resources Only)
The Ordered Representations section of the PO line appears only for orders of digital resources - one time or continuous orders that are fulfilled by supplying files that the institution will then own and store in its own repository. The section displays information about the digital resource being ordered in the PO line. Initially, all digital PO lines are created without inventory. In order to save the PO line and continue processing it, you must associate it with a collection, and upload one or more files to it.
For additional information about working with digital representations, see Adding Representations and Editing Representation Metadata and Content.
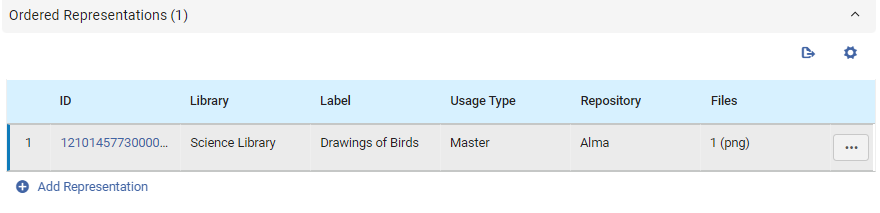
Fields in the Ordered Representations Section
The following information is displayed under Ordered Representations for each representation in the PO line:
| Field | Description |
|---|---|
| ID |
An identification number assigned to the representation by Alma |
| Library |
The owning library |
| Label | An optional label identifying the representation; this label appears in the repository search results when selecting View It. |
| Usage Type | Options are Derivative, Master, or Auxiliary (The master is the original copy, the derivative is, for example, a copy with a lower resolution, and auxiliary is a representation that is supplementary to the main representation, for example, a table of contents). |
| Repository | Where the representation file is stored |
| File | The name of the representation file |
Adding Inventory to a PO Line for a Digital Representation
You must add at least one file to a digital PO line. You can add additional files as required. The Ordered Representations section is empty until you manually add a representation to the PO line. By default, Alma stores the representation files in its own repository. You can choose to store them in a remote repository, instead.
- In the Ordered Representations section, select Add Representation. The Representation Details page opens in a sliding panel. The Title, Library and PO Line are pre-populated as they are inherited from the PO Line.
- Select a Collection with which to associate the representation. Note that you cannot add files to the PO line until you select a collection in which to include them.
- If you want to store the representation files in a remote repository, under Representation Details, select Remote. A Remote Representation Details section is added to the page. Enter the information about the repository in this section.
- Fill in the other fields as required.
- Under File Details, select the representation file. The file is uploaded to the repository.
- Select Save. The representation is attached to the PO line, the sliding panel closes, and the PO line's Details pane is once again fully visible.
- Select Save and Continue. The PO line is saved. Depending on the type of PO line, its status (workflow step) is updated in one of the following ways:
- One Time PO Line: The PO line moves directly from In Review to Closed.
- Continuous PO Line: The PO line moves from In Review to either Recurring Renewal (if it is configured for automatic renewal) or Waiting for Manual Renewal (if it is configured for manual renewal). When additional representations are received for the PO line, they must be added manually to the inventory.
Viewing Digital-Representation Information
You can open the Digital Representation Resource Editor from the row of a representation, and view information about the representation. You can also deliver or download the representation from the Files tab of the editor. For information about this editor, see Editing Representation Metadata and Content.
- In the Ordered Representations section, in the row of the representation, select the ID of the representation. The Digital Representation Resource Editor opens in a sliding panel.
Items in Claim Section
The Items in Claim section appears in the Details pane when any of the items in the PO line are in claim. You can also receive items, modify the receiving information and place a request for the item in this section. Since this section never appears in a newly created PO line, it is documented under Processing Claims.
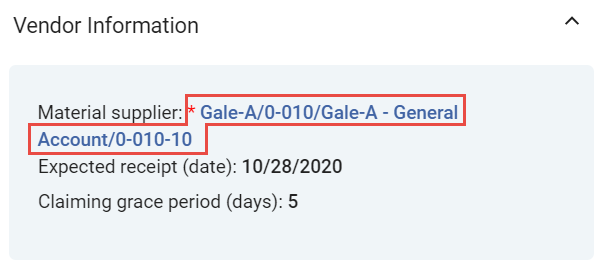
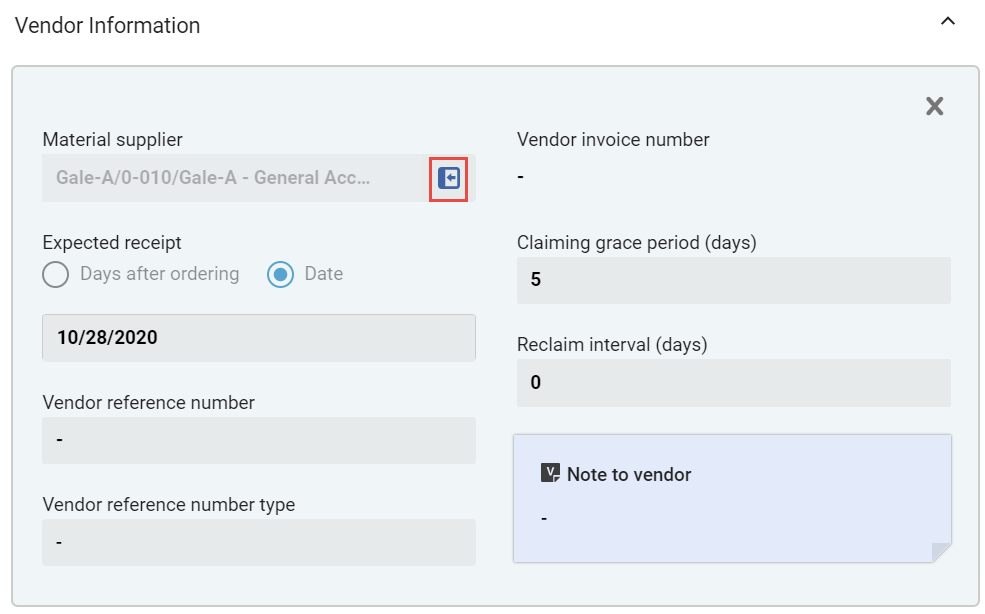
Vendor Information Section
You can enter information about the intended supplier of the item, vendor reference information, the terms of the purchase, as well as a note to the vendor, in the Vendor Information section.
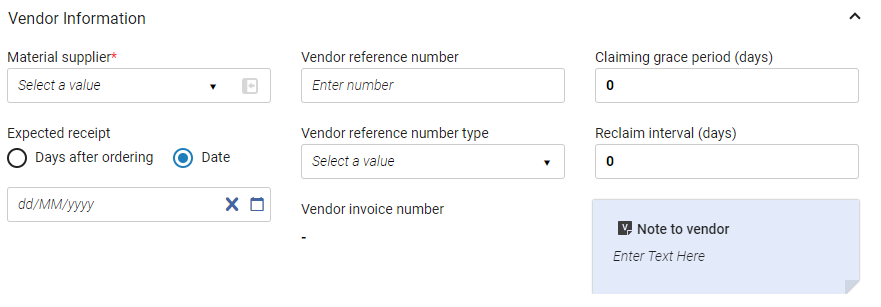
The Vendor Information section contains the following fields:
| Field | Description |
|---|---|
|
Material supplier (Required) |
The vendor supplying the material being ordered; select from the quick pick list. When a vendor is selected in this field, you can open its Vendor Details page (see Managing Vendors) in a sliding panel, as follows:
|
|
(for electronic items only) |
The vendor interface of the material being ordered; select from the quick pick list. See Editing Vendor Interface Information. |
| Claiming grace period (days) | A grace period (in days) after the expected receipt/activation date, after which the PO line is sent to the claims task list (see Processing Claims). The default value is taken from the Claiming grace period field on the Vendor Account Details page (Acquisitions > Acquisitions Infrastructure > Vendors) for one-time PO lines, and from the Subscription grace period field on the Vendor Account Details page for continuous PO lines. |
| Expected receipt/activation |
When the order is expected to be received (for physical items) or activated (for electronic items) Select one of the following, and then fill in the field below the options accordingly:
This value is used to calculate the claim date (see Processing Claims). This field does not appear when creating PO lines without inventory.
Impact on Primo Get It:
When a value is entered in this field, the c.uresolver.getit2.item_list..ACQ.with_expected_date label is invoked in the Primo Get It tab and appears as On order until <date>.
When no value is entered in this field, the c.uresolver.getit2.item_list..ACQ.with_no_expected_date label is invoked in the Primo Get It tab and appears as On Order.
You can customize the values that appear by using the Discovery Interface Labels Code Table page (see Configuring Labels).
To invoke the labels for continuous orders, create a holdings record with a prediction pattern. See Prediction Patterns.
|
|
Activation due after ordering (days) (for electronic items only) |
The number of days after ordering that the activation task is due. When the due date passes, the Notify E-Activation Due letter is sent to the user that is assigned the e-resource activation task and an alert is displayed in the user’s list of tasks. For information on creating a default due date, see Configuring Other Settings. For more information, see Managing Electronic Resource Activation.
For more information, see the Activating Electronic Resources video (6:40 mins).
|
|
Subscription interval (for continuous physical items only) |
The receipt interval, in days, of the continuous order (such as 30 for monthly, 90 for quarterly, and so forth). This value is used to calculate the claim date, unless prediction patterns are in use (see Processing Claims; Prediction Patterns). When using Prediction Patterns, the Subscription Interval should be the best estimate of the number of days, relative to the date of publication, that the issue arrives in-house. For information on handling items with different receiving intervals, see the explanation for the Technical acquisition method in the Acquisition Methods table.
|
| Reclaim Interval (days) | When populated, Alma will send reclaim letters at the defined interval after the initial claim letter is sent. If the field is not populated, a reclaim letter will not be sent. When this field is populated on the Vendor Account Details page, it is automatically copied to this field in the PO line page when the specific vendor account is selected. If the value in Reclaim Interval (days) field in the PO line details page is modified, that value takes precedence and becomes the actual value. |
| Vendor reference number | A reference number for the PO line in Alma, as provided by the vendor. Serves as a matching point for identifying a PO line in Alma.
When communicating with an EDI vendor, the SLI field is the Vendor reference number matching point. The LI field is the matching point for the PO line reference number.
This field is also used as a matching point for Update Inventory import profiles.
|
| Vendor reference number type | The type of vendor reference number. The available options are predefined by Ex Libris. |
| Vendor invoice number | This field is filled in automatically when the PO line was uploaded from an EOD file. See Importing Records Using an Import Profile. This field is not in use for other types of PO lines. |
| Note to vendor | Enter any notes you may want to pass on to the vendor along with the PO line. |
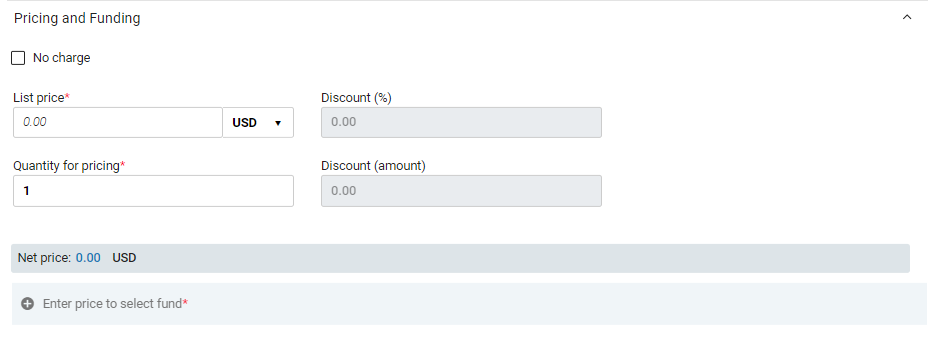
Pricing and Funding Section
The Pricing and Funding section contains information about the price of the item being ordered, the total cost of the order, and the funds that will be paying for the purchase.
.png?revision=1)
The Pricing and Funding section contains the following fields:
| Field | Description |
|---|---|
| No charge |
If you need to create a PO line without any charge, but the Acquisition method is one that normally requires pricing and funding information, select this checkbox. When this option is selected, the Pricing and Funding section is hidden, and Alma does not allow encumbrances to be created for the order. The following acquisition methods normally require pricing and funding information, and therefore provide the No charge option: EBA, Purchase, Approval Plan, and Purchase at Vendor System. If this option is selected after an order is created and encumbrances are recorded for the PO line, these transactions are deleted. |
| Update "Net price" according to item quantity | (Relevant only for physical PO lines)
This affects the number of ordered items in the Quantity for pricing field. When the checkbox is selected, the Quantity for pricing amount is updated automatically when the user adds or removes items, and as a result, the Net Price field is also updated. The Update "Net price" according to item quantity checkbox is selected by default when creating new PO lines. To clear this checkbox by default for newly created PO lines, go to Configuration Menu > Acquisitions > Other Settings, customize the po_line_quantity_updated_with_items_number parameter, and set it to False. PO lines created by EOD, API, or purchase requests do not have this checkbox selected by default. |
| List price (Required) | Enter the list price for a single copy of the item, and select the currency from the field to the right of this field. For values less than 1, enter a leading 0. For example, 0.44, not .44. |
| Quantity for pricing | The number of items to be paid for. Indicate a number between 1 and 100. The total price for the PO line equals the quantity for pricing multiplied by the list price.
Note that the Quantity for pricing and the Number of items to add (when adding items to the PO line in the Ordered Items section) may be different if you have obtained discounted pricing through a deal such as "buy two items and get a third item at no additional charge." |
| Discount (%) | The discount, if any, to be applied. Alma automatically calculates the total price for the PO line based on the list price for each copy, the discount, and the number of copies being ordered. The total price of the PO line is displayed in the Net price field.
This value is pre-filled if the vendor has a defined Account discount percent. See Adding a Vendor and Vendor Account. Note that updating the parameters of the vendor account only impacts PO lines created after the change is made; it does not automatically update all existing PO lines from this vendor account. |
| Discount (amount) | This field enables users to insert a specific discount amount that is automatically calculated and reflected in the Discount (%) field.
Alma always looks at the Discount (%) field in order to reflect the actual Net Price. When a user populates the Discount (amount) field, a 0.01 difference between the net price and the list price may occur. |
| Amount Paid in Current FP | The total amount paid so far during the current fiscal period. This field is only filled in when you are viewing or editing the PO line after it was created, and only for subscription orders. It is a calculated on the fly when the PO line is opened for editing and is not stored in Alma; it is therefore not searchable. |
| Click here to add a fund |
Select this link to add a fund to the PO line. An Add Fund box opens. it contains the following fields: Fund name, Percent, Amount. Fill in the fields as explained below. When you have finished, at the bottom of the box, select Save. The fund information is added under Funds. While the default option is one fund with 100 percent allocation, you can distribute the cost of a PO line among several funds. To add additional funds to the PO line, repeat this process for each fund you want to add, stipulating the part of the cost to be covered by each fund in its Percent or Amount fields, as explained below. See also Redistribute Lines, below. Once the funds are added, they are listed under Funds, with information about the cost they are covering. The fund names in the list are links that can be selected to open a sliding panel in which information about transactions related to the PO line for that fund is displayed. When the PO line is saved, an encumbrance transaction is created for each fund in accordance with the information entered here. |
| Fund name | Select the fund from the quick pick list.
A fund is available for a PO line if it serves the library of the PO line owner, is active, allocated, and is covered by the current fiscal period, or if fund rules allow encumbrance outside of the fiscal period. The fund may not necessarily have money in its balance at the time of ordering.
When a fund is selected in this field, select its name to open its fund record (see Managing Funds and Ledgers) in a sliding panel, with the Transactions tab selected and showing all the transactions related to this PO line for this fund. The link is available in both View and Edit modes.
|
| Percent | The percentage of the List price value still available for fund allocation. When the Amount field is updated, the value of this field updates accordingly. |
| Amount | The amount of the List price value still available for fund allocation. When the Percent value is updated, the value of this field updates accordingly. |
| Local currency | The value in the Amount field, given above, in the local currency (converted, if necessary) |
| Redistribute Lines | If an amount other than 100% is allocated to funds, select Redistribute Lines to re-allocate the fund amount percentages, based on each fund’s relative portion of the current total amount. For example, if there are two funds, and each is configured to cover 80% of the total cost of the PO line, so that, together, they cover 160% of the cost, Redistribute Lines would correct each to cover 50% of the total. Alternatively, if one of the funds is configured to cover 50%, and the other 25%, for a total coverage of 75%, Redistribute Lines would correct the first to 66.67% and the second to 33.33%. |
| Net price | Shows the total cost of the PO line, based on the information in the previous fields in this section. |
| Total funds | Shows the total amount of the selected funds. |
| Funds cover | The percentage of the Net price which the selected funds cover. |

Receiving Information Section (Physical Resources Only)
The Receiving Information section is where you add information about the receiving process to the PO line of a physical resource, so that the user receiving the item will be aware of any requirements or issues. You can also mark the resource as Rush in this section.

You can can receive items and modify the receiving information from the Ordered Items section (see Modifying Physical Item Information) and from the Items in Claims section (see Items in Claims Section).
The Receiving Information section contains the following fields:
| Field | Description |
|---|---|
| Rush |
Select this option if you want to rush the order of this item. The rush icon In addition, the item is marked as Rush ( |
| Routing during receiving | If selected, a confirmation message appears when receiving the PO line, informing the librarian that the order is marked for routing and the librarian must print the list of interested users. For details on receiving physical material, see Receiving Physical Material. |
| Binding during receiving | If selected, a confirmation message appears when receiving the PO line, informing the librarian that the order is marked for binding and must be sent for binding. For details on receiving physical material, see Receiving Physical Material. Also see Binding (Merging) Items. |
| Receiving note |
Enter any information that the person receiving the item should be aware of. For example, indicate the intended location of serial or standing order items for which no inventory items are created. The contents of the receiving note is displayed both in the PO line and in the Receive New Material page (Acquisitions > Receiving and Invoicing > Receive; see Receiving Physical Material). The note is limited to 4000 characters, but can be modified at any time. When migrating PO lines without inventory, this field contains the library/location information for the permanent location of the item.
You can enter multiple lines of text for this field, however note these lines appear as one block of text, without line breaks.
|
Activation Information Section (Electronic Resources Only)
The Activation Information section is where you add information about the license and access model of an electronic resource. You can also mark the resource as Rush, and add an Activation note for the Activation Operator to see when they are activating the resource, if you wish.

The Activation Information section contains the following fields:
| Field | Description |
|---|---|
| Rush | Select this option if you want to rush the order of this item. The rush icon |
| License | Select a license from the quick pick list to associate with the resource, displayed in the inventory list. For more information on licenses, see Managing Licenses and Amendments. |
| Access model |
The access model specifies how many concurrent end-users can access the electronic resource. Select the correct access model for the resource from the dropdown list. For additional information, see Access Model and Managing Access Models. |
| Activation note | Enter any information that the staff member performing the activation of the resource should be aware of. There is no limit on the length of the note, and the note can be modified at any time. Activation notes are displayed in the Electronic Resource Activation Task List page (Resources > Manage Inventory > Manage Electronic Resource Activation; see Activating Electronic Resources and Activation Task List), where electronic resources are activated. |
Renewal Information (Continuous Orders Only)
For continuous orders like subscriptions, order-renewal information is configured in the Renewal Information section.

For information about managing renewals, see Processing Renewals.
The Renewal Information section contains the following fields:
| Field | Description |
|---|---|
| Renewal type |
Select one of the following options: Manual renewal – When the date earmarked by the Renewal reminder period (days) arrives, the PO Line renewal job changes the Workflow Step of the PO line from Recurring Renewal to Waiting for Manual Renewal. To renew the subscription, the operator must manually edit the PO line to change the renewal date to a future date. Automatic renewal – When the renewal date arrives, the PO Line renewal job automatically changes the renewal date to the previous renewal date plus the period of time specified under Renewal cycle. The status of the PO Line remains Recurring Renewal.
|
|
Renewal reminder period (days) (Manual renewals only - Required) |
For manual renewals, the number of days before the renewal date that the operator wants to be reminded about the renewal (that is, the number of days before the renewal date that the operator wants the renewal to be added to the task list (Acquisitions > Purchase Order Lines > Renew). For example, if the renewal date is the 10th of May and the Renewal reminder period is 5, the renewal is added to the task list on the 5th of May.).
The maximum number of days that can be entered in this field is 120.
|
| Renewal cycle | For automatic renewals, the period of time after which each renewal should take place — for example, 1 year. |
| Subscription from date | The date that the subscription for the PO line began. |
| Renewal date (Required) |
The next date on which the PO line should be renewed:
Renewal date is not mandatory for the following purchase methods, because they do not represent a regular purchasing workflow:
|
| Subscription to date |
The last day of the subscription:
This date indicates the last day of the subscription and must not be confused with the Renewal date. For example, if you take out a subscription for five years that must be renewed annually (Renewal cycle = one year), the Subscription to date is the last day of the five-year period.
|
Interested Users Section
In the Interested Users section, you manage the users interested in the acquisition. Interested users are always notified about changes in the PO line. You can configure whether an interested user is also notified when the item is received or activated, renewed, or cancelled, and whether a hold is placed on the item for the user. The notification is sent as an Interested In letter (see Configuring Alma Letters).
When the PO line was created from an approved purchase request, the requester is automatically defined as an interested user. In this case, the requester's notification settings are initially set based on the configuration of the following customer parameters (in Configuration Menu > Acquisitions > General > Other Settings): po_line_hold_item_for_interested_users, po_line_notify_interested_users_upon_cancellation, po_line_notify_interested_users_upon_receiving_activation, po_line_notify_interested_users_upon_renewal. For additional information, see Configuring Other Settings (Acquisitions).
The item’s request date is the same as the order date. If other requests exist for the item, request priority is handled according to role, as configured by the institution. The pickup location is the circulation desk of the item’s location, as specified in the PO line.
- The Interested Users section appears only in PO lines that have inventory. PO line types defined with a material type of Generic in the PO line type mapping table do not have this section. For information on the PO line type mapping table, see Enabling/Disabling PO Line Types.
- To delete interested users on closed and canceled PO lines, use the po_line_remove_interested_users parameter (see Configuring Other Settings (Acquisitions)). When the weekly PO Line - Delete interested users system job runs, all applicable interested users are removed (see Viewing Scheduled Jobs).
- Select Add interested users.
- In the box that opens, search for the user, and then select their name. The user is added as an interested user, and a pop-up opens in which you can select various options and see the user's contact information.
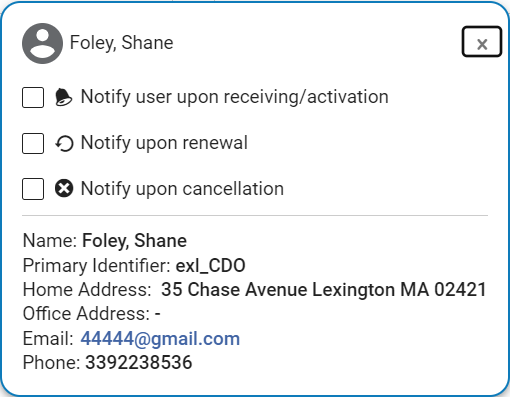
- In the pop-up, select any or all of the following options (when available):
- Notify user upon receiving/activation – When selected, Alma sends an email to the user when the item arrives at the library's receiving department. An email is sent only if this is selected and an email address is configured for the user. Note that only activation via the activation task list triggers notification for the interested user (see Activating Electronic Resources and the Activation Task List).
- Hold item – This option appears only when working with physical items. When selected, Alma will create a hold request when the item leaves the Acquisition Department, but not before. If the item is kept in the department (a work-order request for the Acquisitions department exists), the hold request will be created when the post-receiving processing is completed. When the hold request is created, the Requester will be the interested user from the PO line and the Creator will be the receiving operator. The item’s request date is the same as the PO line's order date. If other requests exist for the item, request priority is handled according to role, as configured by the institution. The pickup location is the circulation desk of the item’s library, as specified in the PO line. This library must have a circulation desk with a hold shelf.
- Notify upon renewal – This option appears only for continuous orders. When selected, Alma sends the Notify Upon Renewal letter to the user when the order is sent to manual renewal. An email is sent only if this is selected and an email address is configured for the user. This option is clear by default.
- Notify upon cancellation - When selected, Alma sends an email to the user when the order is cancelled. An email is sent only if this is selected and an email address is configured for the user. This option is clear by default.
- Select Close (
 ) or click outside the box, to close the pop-up. The user is added as an interested user.

To reopen the pop-up in order to view the contact information or change the settings, select the user icon
 .
.
Reporting Codes Section
The Reporting Codes section contains fields in which you can select values for additional acquisitions classifications that are defined in your institution. These reporting codes can be used in analytics for analyses of acquisitions data. Up to five reporting codes may be configured for your institution:
- 1st reporting code
- 2nd reporting code
- 3rd reporting code
- 4th reporting code
- 5th reporting code
For additional information, see Configuring Reporting Codes.
Notes Section
In the Notes section, you can add, update, or delete notes for the PO line. For details, see New Layout 2022.
Bib Description Section
This section opens in a sliding panel, rather than in the Details pane itself (as indicated by the link icon ![]() ). In the future, it will be moved into the Details pane.
). In the future, it will be moved into the Details pane.
The Bib Description section contains additional information about the resource being ordered. All fields except Identifier Type are free text and for informational purposes only. Which fields appear depends on the Purchase type that was selected when the PO line was created, as specified in the table below.
The PO line description is an entity that is created at the time of the PO line creation and is not connected to, or influenced by, the bibliographic information of the related record. This means, for example, that if a PO line is created for a title Introduction to Chemistry, the PO line description title will be Introduction to Chemistry. If, at a later point in time, the title is changed to Introduction to Organic Chemistry, the PO line description title will not automatically change. If you want to have the PO line description title updated as a result of a changed bibliographic record title, you may do so In one of the following ways:
- In the row actions of the PO line, select Change Bib Reference.
- In the Bib Description section, select the Reload Bib Data button. You can configure Alma to automatically update the Bib Description (and related PO line description) by enabling the po_line_description_update_upon_bib_change parameter (see Other Settings).
To edit the Bib Description, the PO Line needs to be in View mode (before selecting Edit or after selecting Save).
| Purchase Types | Bib Description Fields |
|---|---|
|
|
|
|
|
|
|
|
|
|
|
|
|
|
Invoice Lines Section
This section opens in a sliding panel, rather than in the Details pane itself (as indicated by the link icon ![]() ). In the future, it will be moved into the Details pane.
). In the future, it will be moved into the Details pane.
The Invoice Lines section contains information about any invoice lines associated with the PO line, which can be viewed, added, or edited. When the PO line is first created, it is, of course, blank. For information on invoice lines, see Creating an Invoice From a PO or Manually.
- The available options depend on your privileges.
- A PO line may be associated with many invoice lines, but an invoice line may be associated with only one PO line.
Associated PO Lines Section
This section opens in a sliding panel, rather than in the Details pane itself (as indicated by the link icon ![]() ). In the future, it will be moved into the Details pane.
). In the future, it will be moved into the Details pane.
The Associated PO Lines section contains information about the PO lines that are associated with the current PO line. PO line associations are for informational purposes only, and have no functional effects. PO lines can appear in the list for one of the following reasons:
- They were associated automatically with this PO line by Alma – for example, other PO lines for the same title.
- They were manually associated with the current PO line in their Associated PO line fields in their PO Line Information sections.
If the current PO line is associated with a target PO line (which is the reverse of the relationship of the PO lines appearing in this section), the target PO line appears in the Associated PO lines field in the PO Line Information section of the current PO line.
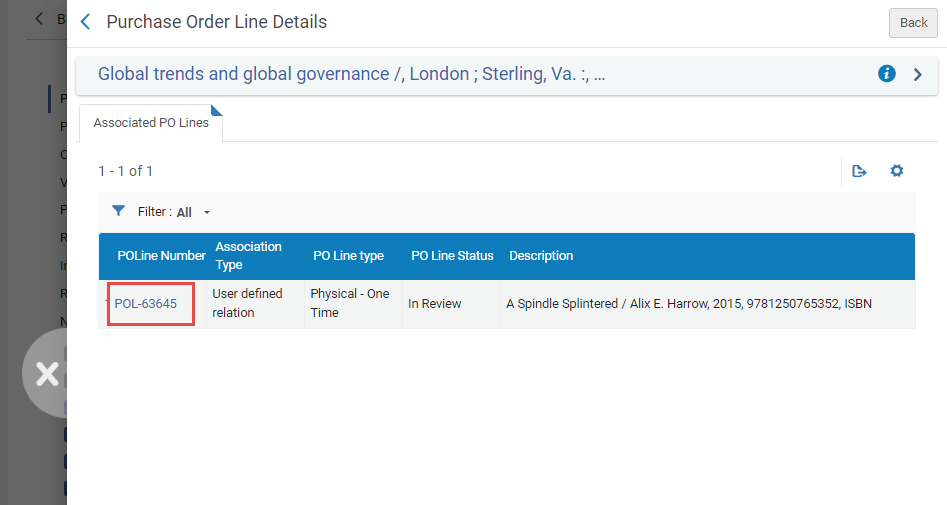
- All - Display all associated PO lines, regardless of the user’s scope. This is for information purposes only. Note that only those which are in the users scope can be managed in the PO lines list.
- Same title - Display only those associated PO lines that are for resources with the same title as the resource of this PO line.
- Same Inventory Resource - Display only those associated PO lines that are for the same item (or portfolio or representation) as this PO line.
- User defined relation - Display only those associated PO lines that were manually associated with this PO line by a user.
Communications with Vendor Section
This section opens in a sliding panel, rather than in the Details pane itself (as indicated by the link icon ![]() ). In the future, it will be moved into the Details pane.
). In the future, it will be moved into the Details pane.
The Communications section is where you can start a new communication with the vendor or, if a communication already exists, you can enter details of the reply from the vendor and/or follow up on the communication with your reply to the vendor. For details on this section, see Managing PO Lines.
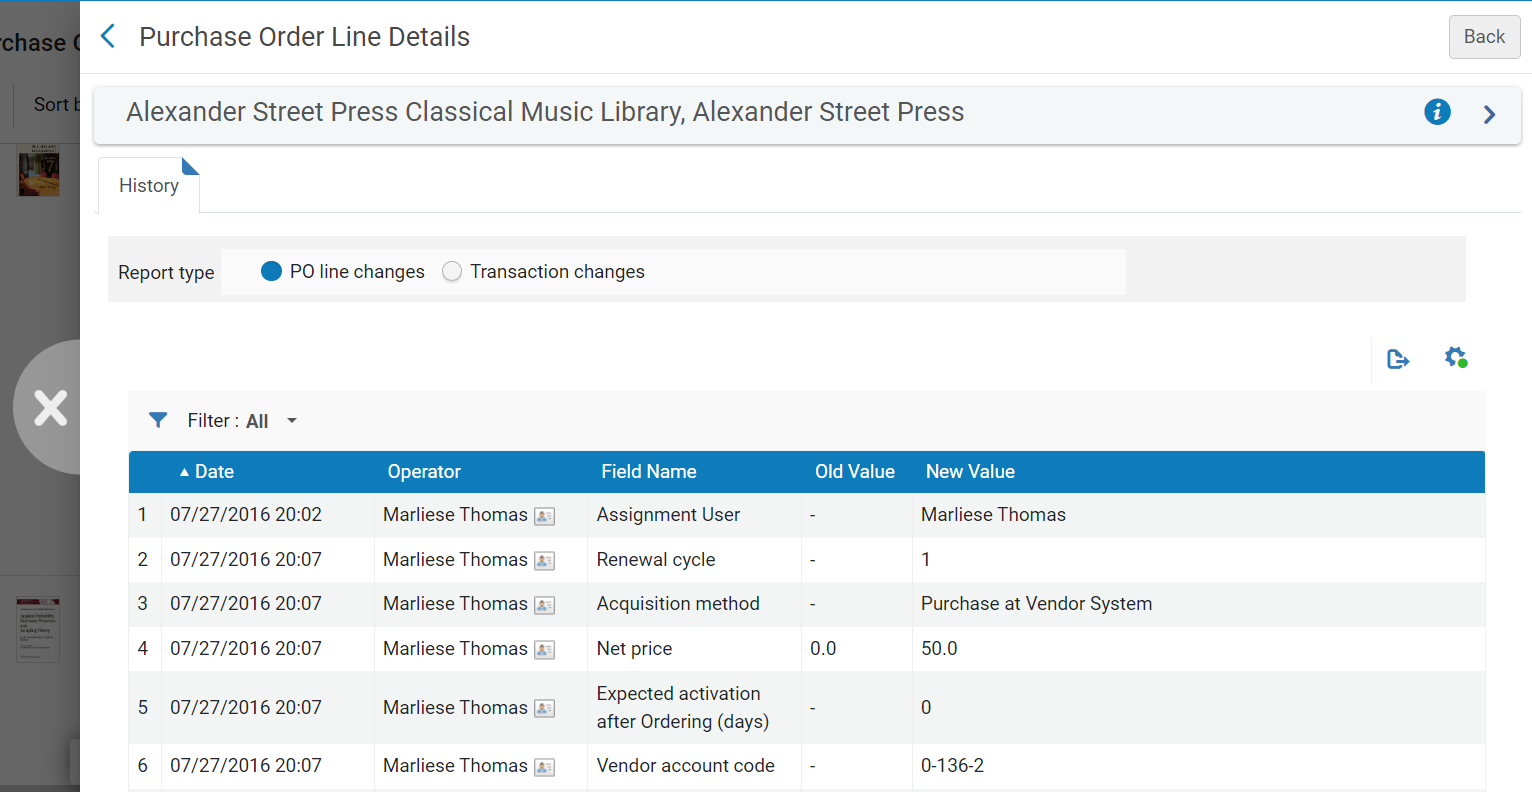
History Section
This section opens in a sliding panel, rather than in the Details pane itself (as indicated by the link icon ![]() ). In the future, it will be moved into the Details pane.
). In the future, it will be moved into the Details pane.
The History section contains a list of the changes that have been made to the fields of the PO line after it was first created and saved. Whenever the existing value of a field is modified or removed, the change appears in the history. Notes or attachments that are added to the PO line are not listed in the tab.
Under Report type, you can choose from two types of lists:
- PO line changes – Changes to the values of fields, and changes in status (Workflow Step) or assignment.
Integrated with vendor system is seen in the history even if no data/values were changed. This field is relevant for OASIS Orders where the vendor is defined with an Integrated system. In this case, the Integrate with OASIS button is displayed, and when the user selects it the PO Line is created in the vendor's system and the Integrated with vendor system becomes true.
- Transaction changes – Changes to a fund, price, fund percentage, or anything else that affects the transaction (encumbrance, expenditure, disencumbrance). These may be the results of system processes, such as a rollover.
Attachments Section
This section opens in a sliding panel, rather than in the Details pane itself (as indicated by the link icon ![]() ). In the future, it will be moved into the Details pane.
). In the future, it will be moved into the Details pane.
In the Attachments section, you can add, update, or delete files related to the PO line. The maximum attachment size is 25 MB.
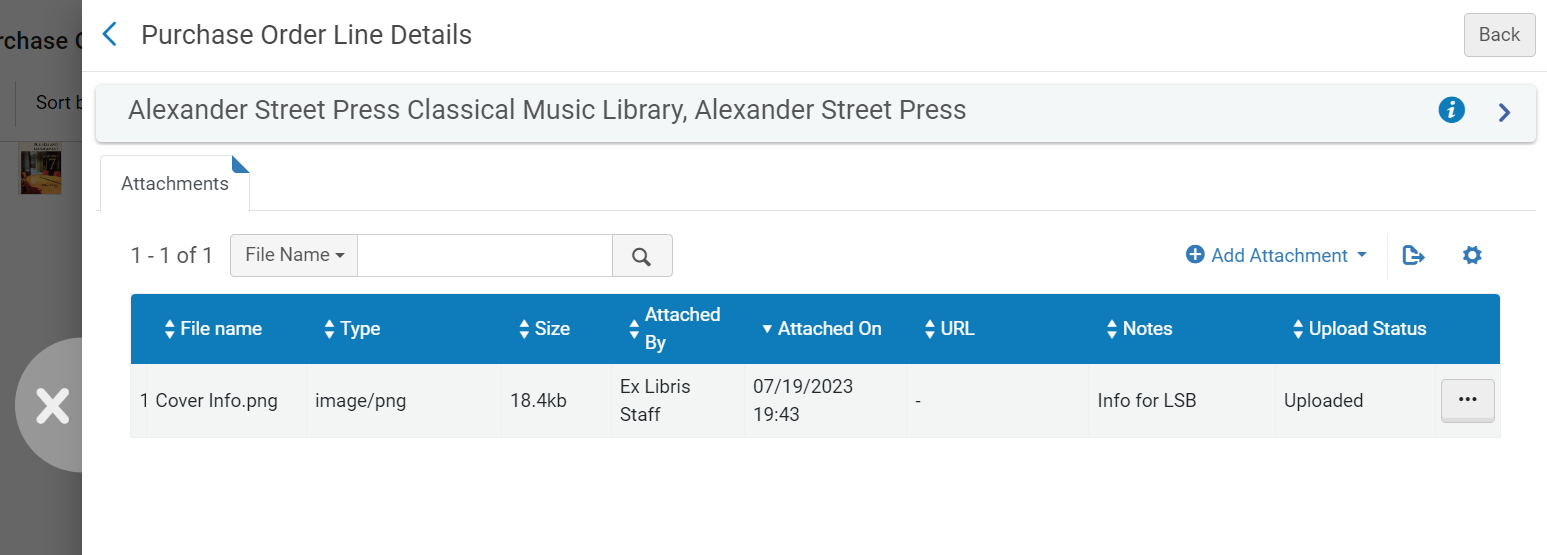
- To add an attachment, select Add Attachment. Browse for a file, add a URL and/or note, if required, and select Add Attachment.
- To edit an attachment, select Edit in the row actions menu.
- To delete an attachment, select Delete in the row actions menu, and then select Confirm in the confirmation dialog box.
- To download a file, select Download in the row actions menu, browse to the download folder, and then select OK.
Continuing the Processing of the New PO Line
When you have finished entering all the information you have available about the PO line, you can initiate the next stage of its processing by selecting options from the Actions menu. Depending on the type of PO line, some or all of the following options are available:
- Save – The information you entered is saved, and the PO line remains in its current workflow stage (if you just created the PO line manually, it remains In Review). Use this option, if you are unsure if you want the PO line to continue to the following stage of the purchasing workflow, or if you are editing PO lines that are in claim (see Processing Claims) or marked for renewal (see Processing Renewals).
- Save and Continue – The information you entered is saved and the PO line continues to the following stage of the workflow (review rules are not checked). For more information on the purchasing workflow, see Purchasing Workflow. If there are any alerts for the PO line, they appear in a confirmation dialog box. For a complete list of alerts that may appear in this context, see Configuring Purchasing Review Rules.
When the "PO Line - Packaging" job is enabled, "Manual packaging" is not checked in the PO Line and the PO Line package job configuration is setup (Configuration Menu > Acquisitions > General > Acquisitions Jobs Configuration), selecting Save and Continue changes the PO line status to Auto Packaging.
Afterwards, when the scheduled "PO Line - Packaging" job runs, it checks all of the PO lines in that status and packages them together based on Vendor account, Owner, Currency, Acquisition method, Fund and so forth, into a single PO.
- Assign to Me – Assign the PO line to yourself.
- Assign to – Open a dialog box in which you can assign the PO line to another user. (If you do not have the necessary roles, you will not see this option.)
- Release Assignment – For PO lines that are assigned to you, release the assignment and leave the PO line unassigned.
- Save and Request Evaluation – The information you entered is saved and a trial is requested. Use this option if the PO line is assigned to you but you do not have the Trial Operator/Trial Manager role. The PO line’s status changes to Under Evaluation and the PO line moves to the Manage Trials page with the status Requested, where the Trial Operator/Trial Manager can access it and continue with the evaluation workflow (see Evaluation Workflow). This option is available only for electronic PO lines that create inventory.
- Save and Start Trial – The information you entered is saved and a trial is started. Use this option if you have the Trial Operator/Trial Manager role, the PO line is assigned to you, and you want to start the trial. The PO line’s status changes to Under Evaluation and the Trial Details page opens (continue with the evaluation workflow at step 3). This option is available only for electronic PO lines that create inventory.
- Order now – Initiate the processing of the order for the PO line, by moving the PO line to the purchasing workflow where it is normalized and validated before being packaged (step 4 in the Purchasing workflow) and sent. For more information on packaging PO lines, see Packaging PO Lines into a PO. If you select Order Now, an Order Now Letter is sent to you after the order is sent for processing, and the vendor receives the order as an Order List Letter. For information on these letters, see Configuring Alma Letters.
- Cancel line – The PO line is cancelled (see Canceling PO Lines).
- Defer – The PO line is deferred and appears in the Review Deferred task list until it is either reactivated (moved back to step 2 of the regular purchasing workflow) or canceled. For more information on deferring PO lines, see Deferring PO Lines.
- Integrate with OASIS - For a PO line that has OASIS in the Material Supplier field, you can select this button to automatically send the order to OASIS. See Check Availability and Pricing.
- Relink – Change the bibliographic record to which the PO line is linked (see Relinking PO Lines).
- Request Title – Place a request on the title (see Creating a Request from the Institution). The action is visible only for PO lines with the Physical inventory format and with any continuity type.
- Delete – Delete the PO line (see Deleting PO Lines).
- Change Bib Reference – Change the bibliographic record of the PO line. See Changing Bibliographic Reference.
- Save as template – Save the current settings as a template. See Creating and Managing PO Line Templates.
- Change Currency – Change the currency of PO lines that were packaged. See Changing Currency in PO Lines.