
Access Rights Policies for Digital Objects
Configuring Access Rights Policies for Digital Objects
- General System Administrator
- Fulfillment Administrator
- Patrons from a specified user group, such as post-graduate students
- Patrons who access the resource from within the university computer system, based on IP addresses
- Patrons with specific user IDs

- Add access rights policies, including configuring rules to restrict access to specific digital resources (see Adding an Access Rights Policy)
- Edit access rights (select Edit from the row actions list)
- Duplicate an access rights policy (select Duplicate from the row actions list and modify the relevant fields)
- Delete an access rights policy (select Delete from the row actions list)
- Find related digital titles with the same access rights
Adding an Access Rights Policy
- On the Access Rights List page, select Add Access Rights. The Access Rights Policy page appears.
 Access Rights Policy Page
 - Enter a name for the access rights policy (mandatory).
- In Copyrights, select a copyright statement to associate with the access rights policy. When a user requests to view the object, this declaration appears. For information on configuring copyrights, see Configuring Digital Resource Copyright Declarations.
Only copyright statements in the /copyrights folder are available to select here.
- Enter a description.
- In the Denied Note field, enter the note you want to appear when access is denied. (A separate note can be configured for unregistered users in the next field.)
- In the Denied Note (override for unregistered users) field, enter the note that you want to appear when access is denied for unregistered users. If no note is configured, the note configured in the previous field is displayed.
- If you want to configure access rights for long-term digital loans, select the Long-Term Digital Loan checkbox. (Only appears if long-term digital loans is enabled.)
- In the Digital Loan Users Limit Reached Note field, enter the note that you want to appear when users are denied access, because the number of allowed concurrent users was reached. (Only appears if long-term digital loans is enabled.)
If you want to configure Long-Term Digital Loans, you must request that this feature be enabled by contacting Ex Libris support.
- Select Add Rule. The Access Rights Rule page appears. For more information about rules tables, see Rules Tables.
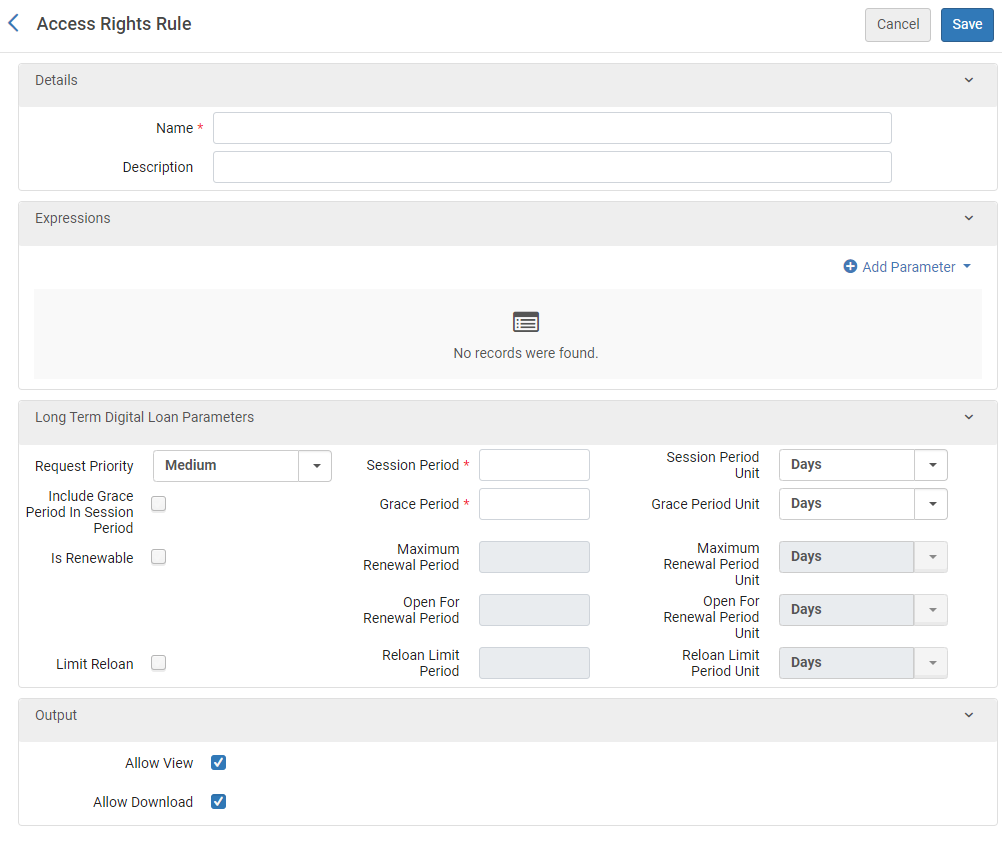 Access Rights Rule Page
- Enter a name (mandatory) and a description (optional) for the rule.
- Under Expressions, select Add Parameter and specify the components of the parameter (Name, Operator, and Value). A parameter may look like this: User group = Graduate student or Embargo before 31/12/2010.
The available Name parameters include the following:
- Concurrent User – Access is permitted for the number of users in the specified time frame. Select the hourglass icon to display the time remaining in your session.
You can add additional rules that enable you to configure the concurrent users restriction to apply to only specific patrons. For example, you can configure a user group rule to enable patrons with print disabilities to access a digital representation without concurrent usage restrictions, but apply the concurrent usage restriction to all other users. The access rights rule that enables free access must be placed before the concurrent usage rule to implement this functionality.
You can configure a waitlist for patrons who are blocked from accessing a digital resource because the limit of concurrent users is reached. For more information, see Configuring a Patron Waitlist.
- DNS – Access is permitted only for the specified domain name. The value must contain a valid regular expression, for example: /.*google(bot)?\.com$/
- Embargo – Access is denied relative to a specified date. Select one of the following values for the base date:
- Additional Publication Year
- Fixed Date
- MMS Creation Date
- Publication Year
- Representation Creation Date
- Expiration – Access is permitted/denied based on a time period after the date selected, such as one year after the Publication Year.
- IP Range – Access is permitted/denied based on the specified IP address or range of addresses. Select = or Not Equals and enter one of the following values.
- A single IPv4 or (New for August!) IPv6 address (such as 2001:db8:3333:4444:5555:6666:7777:8888)
- An IP range, separated by a hyphen, for example:
- For IPv4: 172.0.0.0 - 173.0.0.0
- For IPv6: 2001:db8:3333:4444:CCCC:DDDD:EEEE:FFFF
- Leganto User – Access is permitted/denied based on whether the user is a Leganto user (logged in to Leganto at least once). Select = and select True or False for the value.
- Registered – Access is permitted/denied based on whether the user is registered and authenticated (= True is the same as Not Equals False).
- User Group – Access is permitted/denied based on the specified user group. Select an operator and then select one or multiple user groups.
When using this condition with a not in operator, it is recommended to add a Registered=True condition if you want to prevent guest access.
- User ID – Access is permitted/denied based on the primary user identifier. Select an operator and enter a matching ID.
For InList and NotInList operators, use the comma (,) as the delimiter to separate between the IDs.
- Concurrent User – Access is permitted for the number of users in the specified time frame. Select the hourglass icon to display the time remaining in your session.
- Select Add Parameter. The parameter is added to the list of parameters for the access rights rule.
- Repeat the previous two steps to add all the required parameters for the rule.
All of the parameters must be fulfilled in order for the rule to be applied. If all of the parameters are not fulfilled, the default rule is applied.
- If you are configuring access rights for long-term digital loans, the Long-Term Digital Loan Parameters section is available. For a description of the parameters, see Long-Term Digital Loans.
- Select Save.
- Under Output, clear the Allow Download check box to prevent the display of the Download button in the viewer.
- Select Save to save the rule.
- Repeat the steps for adding a rule to add all of the required rules to the policy.
If you define more than one rule, the order of the rules is important: only the first (and only the first) appropriate, enabled rule applies. If no appropriate rule is found, the default rule (If no match) applies.
- Select Save to save the policy.
Configuring a Patron Waitlist
You can configure a waitlist for patrons when applying concurrent users access rights to support controlled digital lending flows. When the access rights block a patron from accessing a digital resource because the limit of concurrent users is reached, the patron is given the opportunity to join a waitlist. When a slot opens, the patron is notified that the resource is now available.
You configure this feature from the Waitlist Management section when configuring concurrent users access rights:
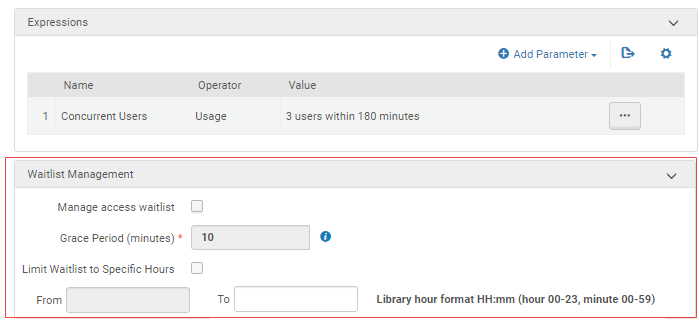
From this section you can:
- Select the Manage access waitlist checkbox to enable the patron waitlist
- Select a grace period during which patrons must access the resource or lose their place in line
- Limit the waitlist to specific hours outside which the functionality is first come, first serve
When a waitlist is configured and the maximum number of concurrent users was reached, the following appears to the patron:

The patron selects Join the Waitlist to be notified when the resource is available.
Alma sends emails to notify the patron when the patron joins the waitlist, when a resource becomes available, and when the grace period expires.
When the patron selects the Receive availability notification via SMS checkbox, a notification is sent by SMS to the phone number in the user's profile when the resource is available. To configure this option, you must enable the Delivery Registration Status Letter that is sent by SMS. For more information, see Configuring Alma Letters.
After the patron receives access to the resource, the patron can return the resource before the time available is over by selecting Return Early.
