
Activating Electronic Resources and the Activation Task List
- Electronic Inventory Operator
- Repository Manager

- Electronic collection – Requires completion of the Activation Wizard before the resource is activated
- Portfolio – Requires only a confirmation that the resource can be activated
For more information about activation workflows, see the Activating Electronic Collections from the Community Zone video (9:00 min.) and the Activating Electronic Portfolios from the Community Zone video (3:00 min.).
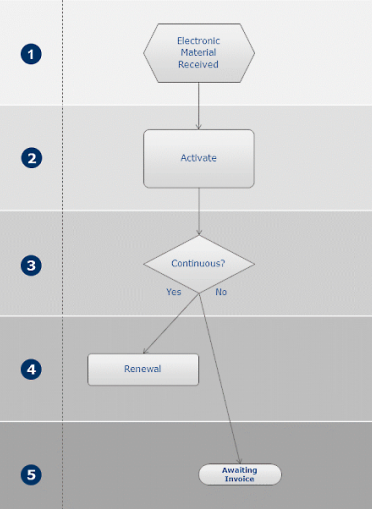
- The institution receives from the vendor access to the electronic material that was ordered and it is processed in Alma.
- The electronic material is activated.
- After a user indicates that the electronic activation is done, Alma checks whether the PO line type of its main PO line is continuous. If the type is continuous, the PO line is marked Recurring Renewal and Alma proceeds to step 4. If the type is not continuous, Alma proceeds to step 5.
- The renewal is processed (see Renewals).
- The final step in the receiving workflow is to await the invoice from the vendor or create the invoice in Alma (see Invoicing).
Assigned and Unassigned Electronic Resources
- Assigned: Only the person assigned to the electronic resource can edit the resource information. A resource for activation is assigned to you by your supervisor. For details on assigning resources, see below.
Repository Managers can view the electronic resources assigned to other library staff in the Assigned to Others tab. However, note that electronic resources cannot be edited from the Assigned to Others tab. - Unassigned: Any staff person with review permissions is authorized to edit unassigned electronic resources.
- Electronic resources - activation - assigned to you
- Electronic resources - activation - unassigned
- Electronic resources - activation - passed due date - assigned to you
- Electronic resources - activation - passed due date - unassigned
- Select Assign To from the row actions list for a resource. The Assign To dialog box appears.
- From the Assign To drop down list, select a user to whom you want to assign the resource.
- In the Note area, enter a note, as needed.
- Select Send as E-mail to send a notification to the user through email.
- Select Assign To to assign the resource to the indicated user.
- Select Release assignment from the row actions list for a resource. The resource appears in the Unassigned tab.
Activation Task List Statuses
The Activation Task List displays the default out-of-the-box statuses.
Your institution can configure these statuses via the E-Activation Task Status code table (Configuration Menu > Resources > General > E Task Statuses), to include any statuses that are more meaningful to your institutional workflow. For details, see Configuring E-Task Statuses.
Managing Electronic Resource Activation
The following diagram illustrates the workflow for activating electronic portfolios:

Activation from the Community Zone does not set the library defined in the user role scope onto the activated electronic resource. Creation of a local electronic resource does not force the user's role scope's library on the created electronic resource. This means that if a user with role's scope of Library X activates a resource or creates a local resource, and that user did not set a library matching that user's role scope to this electronic resource, this resource is created/activated in Institution-level, and user will not be able to edit it (as the user role's scope is defined for only Library X).
- The following actions under the various tabs are disabled for resources whose library does not match the user scope of your role (for details, see Library set on electronic resource): Edit, Edit Resource, Activate, Done, Delete (enabled only for the Electronic Inventory Operator Extended role), Unsuppress, Change Status.
- In addition, when you select resources, the selection checkboxes do not appear for resources whose library (set either explicitly or by inheritance from the electronic collection) does not match the library set in your role scope.
| Action | Description |
|---|---|
| View | View the activation task. |
| Edit | Edit the activation task. You can change the status and due date and add attachments (files, URLs, and related notes) and notes (to describe activation task actions and progress, for example).
The value displayed in the Notes tab for the task and the resource’s URL are both exported to Excel when exporting information on electronic resources.
For more information, see the Due Date Added to Activation Tasks List video (6:35 mins).
|
| Edit Resource | Edit the e-resource. This opens the Electronic Collection Editor page enabling you to edit the e-resource in the various tabs. For information on the various tabs in the Electronic Collection Editor, see Adding a Local Electronic Collection. (In particular, note the Library-Specific Parameters table for an explanation of the parameters required for some electronic collections.) |
| Test Access | Test Alma's access to the database resource.
If the electronic collection has a BIB and URL associated with it OR if the electronic collection has services associated with it, this option will appear.
If the electronic collection has a BIB/URL with no services, this shows the View It page as was previously done for databases.
If the electronic collection has services associated with it and no BIB/URL, this shows the Portfolio List.
If the electronic collection has both, this shows the Portfolio List as was previously done for packages.
|
| Activate (Deactivate) | Activate the e-resource. This makes the e-resource available for publishing for discovery (Primo). This is the mechanism that reveals or suppresses (Deactivate) the MARC bibliographic record linked to the database e-resource.
For information about queuing e-resource activation jobs, see the Queuing E-Resource Activation Jobs video (2:02 mins).
Note that a continuous PO line is not marked as Recurring Renewal until you select Done in the task list.
|
| Assign To | Manage operator assignments in the Electronic Resource Activation Task List.
The Repository Manager role is required to assign tasks to others.
|
| Release Assignment | Release an assignment in the Electronic Resource Activation Task List. Released assignments appear on the Unassigned tab. |
| Done | Change the activation task status to Done. When this option is selected:
|
| Delete | Remove the electronic resource management task. |
- Select View from the row actions list for a resource. The E-Activation Task Details page appears in view-only mode.
- Select Edit from the row actions list for a resource. The E-Activation Task Details page appears in edit mode.
- Select the status to which you want to change the resource using the Status drop down list. The available options are:
- Access Confirmed
- Check Access
- Done
- Not Yet Online
- Select the calendar icon and select a new due date. When the due date passes, a notification is sent to the user that is assigned to the e-resource activation task and an alert appears in the user’s list of tasks. For information on creating a default due date, see Configuring Other Settings. For more information, see Manually Creating a PO Line.
For more information, see the Due Date Added to Activation Tasks List video (6:35 mins).
- Select Save.
- Use the Attachments tab. For more information, see Attachments Tab.
- Use the Notes tab. For more information, see Notes Tab.
- Select Edit Resource from the row actions list for a resource. The Electronic Collection Editor page appears. For details on the Electronic Collection Editor page, see Adding a Local Electronic Collection. (In particular, note Library-Specific Parameters for an explanation of the parameters required for some electronic collections.)
- Select Test Access from the row actions list for a resource.
- If the resource does not contain a portfolio, the Electronic Services page appears with a link to the resource’s full text.
If the resource contains a portfolio, the Portfolios List page appears. See Working with the Portfolio List for more information. - Select Back to return to the Electronic Resource Activation Task List page.
- Select Activate from the row actions list for a resource.
- If the selected PO line is for a standalone or single title, a confirmation box appears. When you select Confirm to activate the resource, the Activation Feedback dialog box appears, asking if you want to edit the resource. Select Confirm to open the Electronic Collection Editor page and edit the resource, or select Cancel. For details on the Electronic Collection Editor page, see Adding a Local Electronic Collection.
- If the selected PO line is for an electronic collection, the Activation Wizard: Electronic Collection and Services Setup page appears.
The Activation Note column displays notes that were left by the creator of the PO line to provide information or instructions to the person activating the resource. As of the February 2023 release, activation notes cannot yet be created in Alma (although they will be supported in the future – see New Unified PO Line Task List), but if a PO line for an electronic resource was migrated from another system, and it had a receiving note attached to it in the previous system, the content of that receiving note appears under Activation Note in the Electronic Resource Activation Task List page.
- After activating the resource, select Done in the activation tasks list to complete the activation and to allow Alma to renew the resource, as required.
- Select Done from the row actions list for a resource. The PO line continues to the next stage of the workflow, as follows:
- If the PO line is One Time, it closes when fully invoiced. If it is not fully invoiced, it is marked as Waiting for Invoice in the Invoice status field of the PO Line Summary page, and awaits invoicing (see Invoicing).
- If the PO line is Continuous, its status is changed to Recurring Renewal.
After you select Done, you may receive one of the following confirmation dialog boxes or error messages:Electronic Activation Done Confirmation Messages Message Reasons (ALL must be true) You are about to complete an activation of an Electronic collection that does not have an unsuppressed bibliographic record; Are you sure you want to continue? - There is a suppressed bibliographic record that has a URL.
- There is an active service.
- There are active portfolios.
You are about to complete an activation of an electronic resource that does not have a collection level URL; Are you sure you want to continue? - There is an unsuppressed bibliographic record that does not have a URL.
- There is an active service.
- There are active portfolios.
You are about to complete an activation of an electronic collection that does not have a bibliographic record; Are you sure you want to continue? - There is no bibliographic record.
- There is an active service.
- There are active portfolios.
Electronic Activation Done Error Messages Message Reasons (ALL must be true) The resource has a suppressed bibliographic record without a collection level URL. Please unsuppress and add a URL before setting to Done. - There is a suppressed bibliographic record that does not have a URL.
The Resource has a suppressed bibliographic record with a URL. Please unsuppress before setting to Done. - There is a suppressed bibliographic record that has a URL.
The resource has an unsuppressed bibliographic record without a collection level URL. Please add a URL before setting to Done. - There is an unsuppressed bibliographic record that does not have a URL.
In order to complete the activation, the resource must have an active service/portfolio OR an unsuppressed bibliographic record with a collection level URL - There is no bibliographic record.
- There is no active service.
- There are no active portfolios.
The resource has an inactive service/portfolio. Please activate before Done. - There is no bibliographic record.
- There is an active service and no active portfolios OR there is an inactive service.
Activating an Electronic Collection Using the Activation Wizard
- Local electronic collection information such as public name, library, electronic collection-level URL, additional descriptive information (bibliographic record information), a bibliographic suppression option, and proxy information.
- Full text service information such as the option to activate the electronic collection and make the service available, activation date information (from/until), the option to automatically activate new portfolios, notes, and proxy setup.
- Activation type such as manual activation where you manually select portfolios or activate all (the complete electronic collection of portfolios).
- Complete an Electronic Collection Repository Search from the Community tab to locate the electronic collection that you want to activate.
- Select Activate. The Activation Wizard: Electronic Collection and Services Setup page appears.
- Enter the required information in the Activation Wizard: Electronic Collection and Services Setup page. See the table below for more information.
Activation Wizard: Electronic Collection and Services Setup Field Description Electronic Collection Information: Electronic Collection name The electronic collection name displayed from the Community Zone. Type The type of package as identified in the Community Zone. Number of portfolios The number of portfolios contained in the electronic collection in the Community Zone. Electronic Collection Level URL This is the URL identified for the electronic collection in the Community Zone. This can be overridden with a local URL (see the Electronic Collection Level URL field in the Local Electronic Collection Information section on the Activation Wizard: Electronic Collection and Services Setup page). See Working with Electronic Collection Bibliographic Records and URLs Added to the Community Zone for more information. Additional descriptive information This is the default bibliographic record information available for the electronic collection in the Community Zone. This can be overridden in the Additional descriptive information field in the Local Electronic Collection Information section on the Activation Wizard: Electronic Collection and Services Setup page. Local Electronic Collection Information: Public name If you want to override the electronic collection name that is exposed to the public, enter a new name in this field. Library Select the Find icon to see a list of available libraries and select one. Electronic Collection Level URL The URL for accessing the electronic collection. Use to specify the local URL that you want to override the URL provided in the Community Zone as identified in the Electronic Collection Level URL parameter in the Electronic Collection Information section on the Activation Wizard: Electronic Collection and Services Setup page. See Working with Electronic Collection Bibliographic Records and URLs Added to the Community Zone for more information. When publishing portfolio bibliographic records, Alma checks for a URL from this field. If no URL is found in this field, the portfolio bibliographic record is not published.Additional descriptive information This field displays content indicating that a bibliographic record is available for the electronic collection that you are activating. To change the bibliographic record information, browse for a bibliographic record. Any relevant changes to the electronic collection in the Community Zone will be reflected in the bibliographic record and harvested/distributed.Mark bib as suppressed Use this check box to indicate if you want the bibliographic record to be suppressed. The default for this option is to suppress the bibliographic record. Remove this check box selection if you want the bibliographic record to be viewable/published to the discovery system. Unsuppressed bibliographic records are published to the discovery system if there is available URL information, and any available URL information for the electronic collection will be discoverable. If there is no URL, the bibliographic record will not be published. In order for a Database Type of Electronic collection to be discoverable in CDI, the conditions defined in step 1 AND (step 2 OR step 3) must be met:
- The database collection has CDI settings: Provider coverage: Yes.
AND - The bib record for the collection is unsuppressed and the collection has a collection-level URL.
OR - The CDI-only full text activation option on the CDI tab is selected.
Electronic Collection Proxy Enabled Identifies whether a proxy has been enabled (Yes/No). See Resolver Proxies for information regarding proxy relationships among portfolios, electronic collections, and services.Electronic Collection Proxy Selected A proxy profile option. When you specify Yes for Electronic Collection Proxy Enabled, you must identify which proxy profile to use for authentication (of users outside the library’s network) to access the online database you have created. If you specify Yes for Electronic Collection Proxy Enabled and you make no selection from the Electronic Collection Proxy Selected drop-down list (that is, you leave the option blank), Alma automatically uses the default proxy you have configured. See Resolver Proxies for information regarding how to create a proxy profile. The procedure To configure a resolver proxy definition type of integration profile describes how to configure a default proxy profile.Central Discovery Index Information: CDI Search activation status (only available when the CDI model is Fully Flexible) When set to Active, display all collections that have been activated for search in CDI. When set to Not Active, display all collections that have not been activated for search in CDI. We subscribe to only some titles in this collection Select Yes to indicate a selective subscription or No to indicate a non-selective collection. Selecting No for non-selective collections will cause the Full Text Available indicator to appear for non-selectively subscribed collections, and improve the full text availability indication for non-ID (ISSN/ISBN) content that is harder to match to customer subscriptions. Do not show as Full Text available in CDI even if active in Alma Select this option to suppress this collection when publishing holdings information to CDI. Full Text Service / Selected Full Text Service: If there are several electronic collection services available for the resource being activated, this section will appear for each of them. Each electronic collection service is listed separately, and its fields must be completed for each electronic collection service that you want to activate.Activate this electronic collection service Activate an electronic collection service. If the electronic collection has more than one service, selecting this check box enables you to indicate the service you want to activate. (You also must select this check box even when there is only one service for the electronic collection.) Make service available Make the service available via Alma Link Resolver Staff may select Activate this service and keep unselected Make service available in order to test the service before making it available for publishing to patrons.Activate from date Select to select the required date from the Calendar dialog box. If you do not enter an Activate from date, the activation starts from the current date (today). Activate until date Select to select the required date from the Calendar dialog box. If you do not enter an Activate until date, the activation continues indefinitely. Access rights Restrict access to the electronic collection to users with specific access rights. The types of access rights are predefined by an administrator and can be selected from the Access rights drop-down list. Automatically activate new portfolios (added through Community Zone updates) associated with this electronic collection. The option to automatically activate new portfolios associated with a service is available for selective as well as aggregator electronic collections.
(This option can be configured from both the Activation Wizard for new services and in the Electronic Service Editor for existing services.)When you use this option, the resulting automatically activated portfolios can be retrieved by using the Portfolio added to auto-active package report type in the Community Zone Updates Task List (Resources > Manage Inventory > Community Zone Updates Task List). See Portfolio added to auto-active package for more information.If any auto holding integration profile is being used, do not use auto-active = yes in the service level. If this field is set to yes, it will lead to incorrect portfolios being activated.Automatically delete portfolios removed from the service This setting determines how to handle portfolios deleted from the Community Zone. If set to "Yes," the portfolio will be deleted from the Institution Zone, as well as the Community Zone; if set to "No," the portfolio will be unlinked and deactivated.
For existing activated services, the auto-delete setting automatically inherits the value of the auto-active setting, ensuring that the current behavior remains unchanged. (such that, an existing service that had 'Activate new portfolios associated with the service automatically' set to 'Yes' will now have 'Automatically delete portfolios removed from the service' set to 'Yes' as well, and vice versa. Each of the settings can be modified at any time using the Service Editor, the Change E-Collection Information job, the API, or the E-Collection Quick Update application.
As always, all Community Zone updates are recorded in the Community Zone Updates Task List.
Service public name This field is not in use Service public note Service notes for the electronic collection (to display in the discovery system). Service authentication note Service authentication-related notes for the electronic collection. These notes appear in the discovery system. - The database collection has CDI settings: Provider coverage: Yes.
- Select Next and complete the linking information (such as ID and password/authentication) and proxy setup information on the Activation Wizard: Linking Information page. For detailed information, see the Library-Specific Parameters table above and the Alma and SFX Linking Parser Parameters Guide.
- Select Next. The Activation Wizard: Select Activation Method page appears.
- In the Activation Type area, select one of the following:
- Activate all – Activate all the portfolios in the electronic collection. If the number of portfolios is large (> 200), this will be done in the background using the job Portfolios activation job.
-
Activate electronic collection and selected portfolios via Excel file upload
For information on the fields of the Excel file, see Portfolio Loader.When this option is selected, the search for portfolios in the Community Zone is done using the ISSN or ISBN (from the Excel file) that can result in the following outcomes:- The portfolio is found in the Community Zone. When this occurs, Alma activates the Community Zone portfolio locally in the Institution Zone.
- The portfolio is not found in the Community Zone. When this occurs, Alma checks locally in the Institution Zone for a bibliographic record that has the same ISSN or ISBN. If one is found, the portfolio is attached to that bibliographic record. Note that the existing local bibliographic record may have physical inventory attached to it.
- The portfolio is not found in the Community Zone and its ISSN or ISBN is not found in a local bibliographic record. When this occurs, a brief bibliographic record is created with the title and publisher information from the input file; and the portfolio is attached to this bibliographic record.
When you select this option, additional validation options are provided on the next page of the Activation Wizard. - Manual activation – Activate the electronic collection and manually select the portfolios you want
- Select Next.
- If you selected Activate electronic collection and selected portfolios via Excel file upload for the activation type, complete the options on the Activation Wizard: File Upload page. Otherwise, skip to the next step.
- For a member institution of a Network Zone, complete the Bibliographic section. To indicate the bibliographic record location, select Institution or Network for the Select catalog parameter.
- In the Select File section, enter the name of the Excel file containing the records that you want to load/validate. For information on fields of the Excel file, see Portfolio Loader.
- In the Select Format section, select the record format such as MARC 21 or UNIMARC from the drop-down list.
- In the Select Action section, select the Add local portfolios option if you want to add local portfolios as part of the file upload process.
- In the Select Validation Policy section, select one of the following options:
- Validate online – When you select this option and select Next, validation is processed immediately. If errors are found, Alma prompts you to fix the validation errors before it allows you to continue to the next page of the Activation Wizard where you can select Activate.
- Validate offline – Recommended for large files – When you select this option, select one of the following Validate offline options and select Next:
- Load file if there are no errors – If the validation completes (offline) with no errors, the portfolio records in the Excel file are uploaded and activated. If any lines have errors, the job completes successfully but no lines are uploaded or activated.
- Load file – ignore lines with errors – If the validation completes (offline) with errors, the portfolio records in the Excel file with errors are ignored and the remaining portfolio records are uploaded and activated.
- Analysis only – Select this option to have Alma complete a validation of the records in the Excel file and do no further processing of the portfolio records in the Excel file.
- On the Activation Wizard: Activation Summary page, verify that the information displayed is correct.
If you want to change any information in the wizard, select Back to take you to the page you want to change and modify the information as needed.
- Select Activate. Selecting Activate causes an Inventory Electronic Collection Activation/Deactivation job to run. The results of the activation job can be viewed by selecting Report from the row actions list on the Monitor Jobs page for the job that ran. This report identifies the validation policy that you selected and provides a link to the file that was analyzed, that is, the file that was selected for loading in the Activation Wizard when you selected the Activate electronic collection and selected portfolios via Excel file upload option.
Activating an Electronic Collection through the Network Zone
Below are best practices for activating an Electronic Collection from the Community Zone so that it is published through the Network Zone centralized publishing:
- When the institution is managing the e-resource:
Activate the e-resource when you are logged in to the Institution Zone, and locate the required resource in the Community Zone tab.
Alma automatically copies the resource to the Network Zone.
- When a consortium is managing the e-resource on the network level:
Activate the e-resource when you are logged in to the Network Zone, and locate the required resources in the Community Zone tab. There is no need to copy or link anything to the Institution Zone.
Deactivating an Electronic Resource
Deactivation of an electronic resource is achieved by changing the availability status of the resource.
- For an individual portfolio, change the 'Portfolio availability' to Not Available.
 Portfolio availability = Not Available
 - For deactivating a complete electronic collection, change the electronic collection 'Service activation status' to Not Available.
 Service activation status = Not Available