
Adding Staff-Mediated Research Deposits for Performances
Overview
When adding or editing research deposits, different information appears depending on the deposit type. For general information on adding research deposits see Working with Research Deposits. This page describes the information required when adding a deposit of type Performance in the Creative Work category.
Updating the Information for Performances
The Performance form appears when you select one of the following Creative Work asset types in Deposit Research Asset (Repository > Asset Deposits > Deposit Asset):
- Creative Work: Dance
- Creative Work: Drama
- Creative Work: Film
- Creative Work: Musical performance
- Creative Work: Theater
With this form, you can document non-written work asset characteristics such as event name, date, location, and type. The Performance form has a specific section for entering these details.
Enter or configure the following information. When you are finished, select Save Draft to finish the form at a later time; or select Approve when the form is completed with all the necessary details. For more information, see Managing Research Deposits.
Files Section
Add any additional files, as required. You can assign access rights and/or licenses of one or more files. Note that it is also possible to assign access rights and/or licenses at the asset level, instead of for each file; for more information about this option and about access rights and licenses, see the Access Rights and Licenses section.
To configure access rights and licenses, see Configuring Esploro Access Rights and Configuring Esploro Licenses.
Adding a License to One or More Files
Select the files, select Manage license, select the relevant access license to apply to the selected files, and select Set License. You can also manage the license when editing the file information.
Editing File Information
You can edit file information as follows:
-
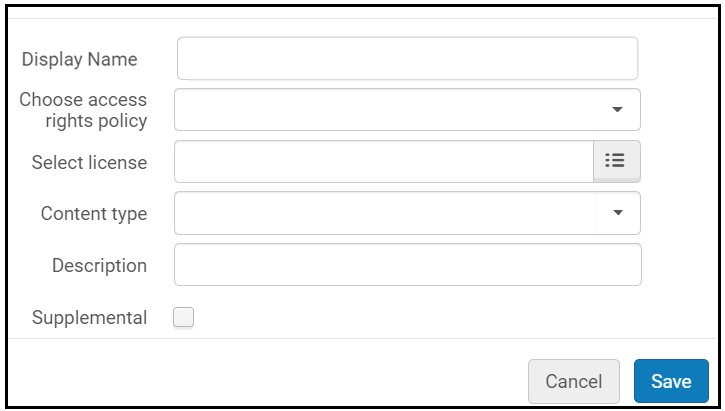
Select Edit File Information in the row actions list for a file. A pane to edit the file information appears.
 File Information Pane
 - Enter a display name if you want the name of the file displayed on the research portal to be different than the file name.
- Select the access rights policy for the file. See below for additional options that may appear.
- Select the license for the file.
- Optionally select the content type of the file's contents in Content Type. To configure these options, see Configuring Research Asset File and Link Types.
- Enter an optional description.
- Select the Supplemental checkbox to indicate that the file is supplemental, which prevents these files from being taken into consideration when determining the open access status of the asset. When this checkbox is selected, an icon
 appears next to the file.
 - Select Save.
Adding an Access Rights Policy to One or More Files
You can add an access rights policy to one or more files as follows:
- Select the files and select Manage access rights in the table actions list.
- Select the relevant access right policy to apply to the selected files. After selecting the policy, you may see additional fields to complete:
- Open – The file is immediately available.
- Open with Embargo – The file will be available after an embargo period. Select the end date for the embargo, or select a relative time period for the embargo, starting from the publication date. The date that the embargo expires is displayed in the Embargo Expiry Date column to help calculate the open access indicator and to help you determine until when the embargo is in force.
- Restricted – The file is visible to associated researchers but not available, except by request. Enter a reason for the restriction.
- Closed – The file is not available to researchers. Enter a reason for the restriction.
- Locally defined – Select a local access policy and enter a reason.
- Select Set Access Rights.
You can also manage the access rights when editing the file information.
Generating a Temporary Link to a File
Repository managers can generate a temporary link to an access-restricted file, which grants access to the file for a certain period of time to the requester.
To create a temporary link, in the Asset Details > Files tab, select a file(s) and select Generate Temporary Link, or select the ellipsis menu of an individual file and select Generate Temporary Link. Then choose an expiry date and select Generate.
For a video showing how to generate a temporary access link to a file see here.
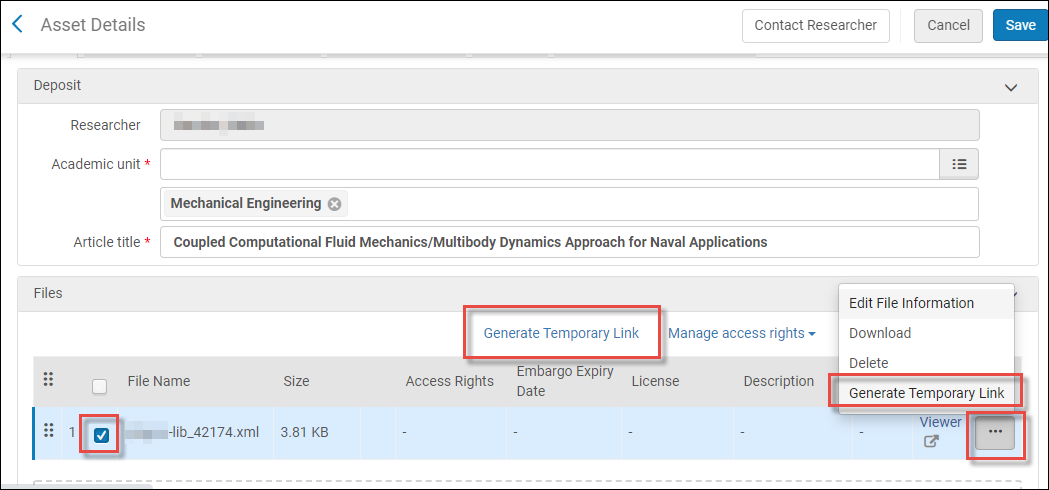
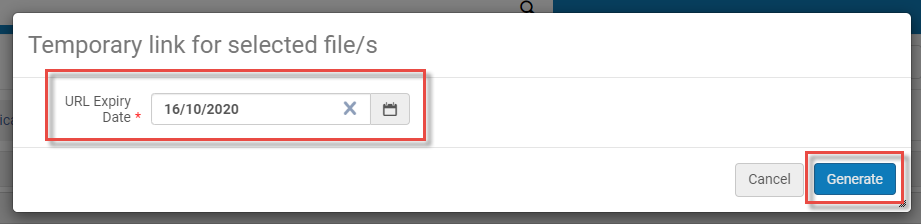
When the link is generated, it appears in a pop-up. If more than one file was selected, the link will be to a zip file containing the links to the individual files.
For a video showing how to generate a temporary link to restricted files see here.
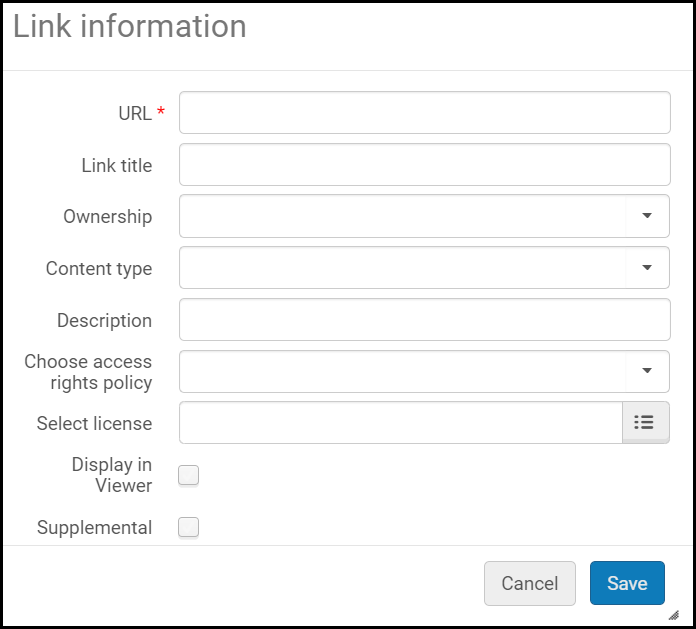
Links for Remote Access Section
Add any links, as required. When adding a link, you can select a type for the link. To configure these options, see Configuring Research Asset File and Link Types.
When adding or editing a link, enter the following fields:
- URL – The link to the output.
- Link title – The text to display for the link.
- Ownership – Select Institution for a link to a local resource or External for a link to an external resource.
- Content type – Optionally select an output status. To configure these types, see Configuring Research Asset File and Link Types.
- Description – Optionally enter a description.
- Choose access right policy – Apply an asset right to the link.
- Open – The file is immediately available.
- Embargo – The file will be available after an embargo period. Select the end date for the embargo, or select a relative time period for the embargo, starting from the publication date. The date that the embargo expires is displayed in the Embargo Expiry Date column to help calculate the open access indicator and to help you determine until when the embargo is in force.
- Restricted – The file is visible to associated researchers but not available, except by request. Enter a reason for the restriction.
- Closed – The file is not available to researchers. Enter a reason for the restriction.
- Locally defined – Select a local access policy and enter a reason.
- Select license – Apply a license to the link. See Configuring Esploro Licenses.
- Display in Viewer – opens the link in a viewer. If cleared, the link displays in the browser.
- Supplemental – select to indicate that the link is supplemental, which prevents these links from being taken into consideration when determining the open access status of the asset. When this checkbox is selected, an icon appears next to the link.
Creators and Contributors Section
Adding Academic Units or Other Groups as Creators or Contributors
You can add a locally defined or external research academic unit or any other group as a creator or contributor.
- Select Add group creator / Add group contributor. A pane appears.
- Enter the organization in Affiliation.
- Select the type of contribution. This list can be configured by an administrator; see Configuring Contributor Types.
- Select Add and close. Your addition appears in the list of creators in the Creators and Contributors section.
For affliated creators in the list, the Display in profile option may be used to hide the asset from appearing in the researcher's profile. The default is to show the asset in the researcher's profile. To hide the asset, deactivate the Display in profile option.
Adding a Locally Defined Researcher as a Creator or Contributor
You can add a locally defined researchers as a creator or contributor.
- Select Add creator / Add contributor. A pane appears.
- Select Search existing.
- Enter or select the researcher in Choose researcher.
- To add and use a name variant for the researcher, select Update researcher name on asset and enter at least the last name.
- Select the type of contribution.
- Select Add and close.
Adding Any Other Person as a Creator or Contributor
You can add any other person as a creator or contributor as follows:
- Select Add creator / Add contributing. A pane appears.
- Select Create non-affiiated.
- Enter the user's first and last name (mandatory). Optionally add a middle name and/or a name suffix.
- Optionally select an external research organization in Affiliation.
- Optionally enter the person's ORCID number.
- Select the type of contribution.
- Select Add and close.
Editing a Creator or Contributor
You can edit a creator or contributor as follows:
- Select Edit in the row actions list of the person. The Edit creator / Edit contributor dialog box appears.
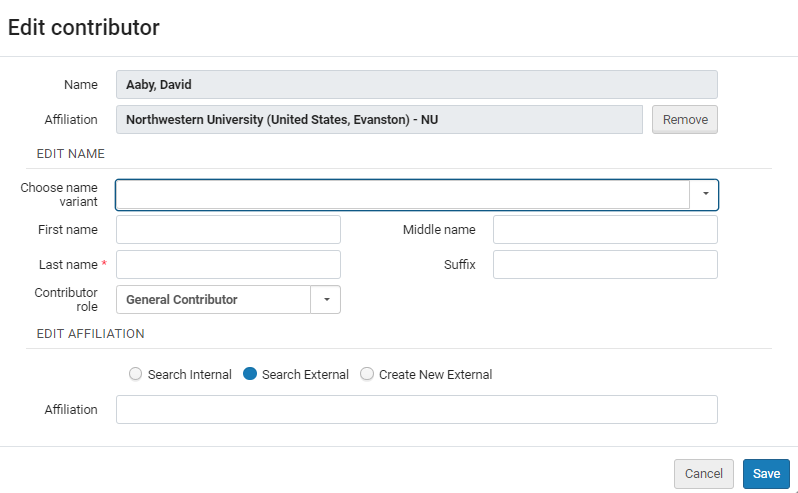 Edit Creator
 - To remove an affiliation, select Remove.
- Optionally select from an existing name variant, or add a new name variant, to display in the asset instead of the primary name. When adding a name variant, last name is mandatory.
- Optionally select a new role.
- Optionally select another internal or external affiliation, to display in the asset instead of the primary affiliation. You can also create a new external affiliation.
- Select Done.
Once you have one row in the table, you can replace a researcher by selecting Replace in the row actions list for that researcher.
Once you have more than one row in a table, you can move one or more of them. Either drag and drop a row by selecting and dragging the drag and drop icon, or perform the following steps:
- Select one or ore rows in the table
- Select Move selected. A dialog box appears.
- Select whether to move the selected rows to the top or bottom of the table, or before a specific other row in the table.
- Select Move Selected.
If this asset was imported, some of the creators or contributors may have been matched by the import process. In this case, these people are considered only tentatively matched until you approve them .Two columns related to this feature appear for each person : Match status, indicating the certainty of the match, and Approve match.
- To approve a single creator or contributor match, indicate this in the Approve match column.
- To match all creators/contributors, select Approve all creator matches / Approve all contributor matches.
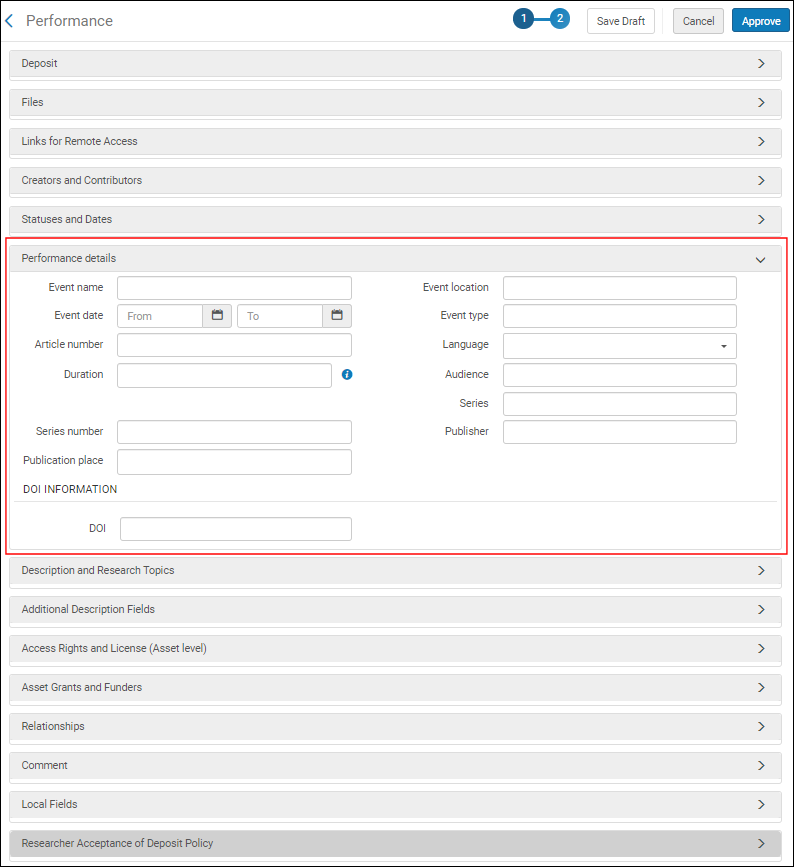
Performance Details
Advanced work in the performing arts generally requires performance-based metadata. The Performance Details section of the research asset deposit form is where you can document this information to be saved in the research output database.
-
Add the performance details identified in the Performance details section of the form. Since these parameters are optional, you may enter information for each one or a subset of these parameters depending on the information that is available. See the table below for more information.
Parameter Description Event name Enter the name of the performance event. Event location Enter the location of the performance event. Event date Enter the from / to date range of the performance event. Event type Enter the type of performance event that took place. Article number If there is an article related to the performance event, enter the article number. Language From the drop-down list, select the language of the performance event. Duration Enter an amount of time or time interval of the performance event. Audience Enter the audience of the performance event. Series If the performance event is part of a series, enter the series information. Series number If the performance event is part of a series and there is a number associated with the series, enter the series number. Publisher Enter the publisher information if the event has a publisher or sponsor behind it. Publication place Enter the publisher location if the event has a publisher or sponsor behind it. - Enter the DOI, if one is available.
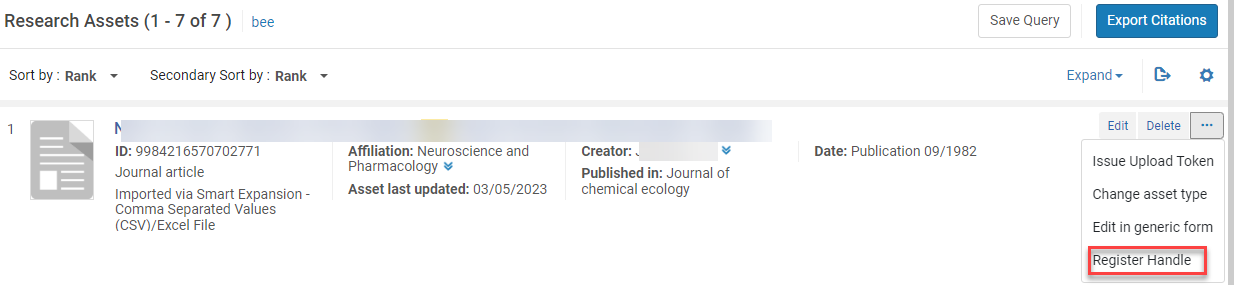
- Enter the Handle identification number to the asset. You can add one manually or select the Generate Handle PID button to add an identifier automatically. Note that after generating the handle, you still need to register it. You can register handles individually (by selecting Register Handle on the row actions menu), or in bulk with the Esploro register handles job.
For more information, see Configuring Handle Server Integration.
Asset Grants and Funders Section
Select existing grants or add a new grant or funder to associate with this asset.
- Select Add Grant or Funder.
- Select Select Grant.
- Enter or select the grant in Researcher Grants (if the owner of the asset is not listed on a grant, there are no suggestions; see Managing Grant Information), or in All grants.
- Select Add and close.
If a grant does not exist, you can create a new one and associate it with the asset.
- Select Add Grant or Funder.
- Select Create Grant.
- Enter the grant ID (mandatory) and grant name (optional).
- Enter or select the funder (mandatory).
- Enter the grant URL (optional).
- Enter the grant type (optional) – see Working with Grant Information.
- Select Add and close.
To enter a funder only, select Add Grant or Funder, select Select Funder Only,
If you do not have specific grant information, you can associate the asset only to a funder. Select Add Grant or Funder, select Funder Only, select the funder (mandatory), and select Add and close.
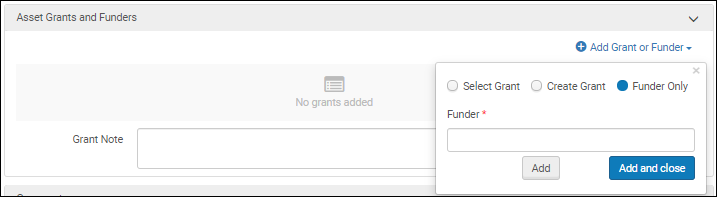
You can also optionally add a note relevant to all grants in Grant Note.