Adding and Working with Research Deposits
This page describes how to add new research assets (deposits) to Esploro. For a quick guide showing how to access and get more information on the various features in Esploro see here. For configuring research deposits, see here. For working with research assets after they have been approved (e.g., editing assets, bulk update, citation metrics, etc.), see here. For working with student deposits, see here.
Overview
The first time you add an asset to Esploro it is called a deposit. After approval, the deposit becomes an Esploro asset (see Working with Research Assets).
For information about configuring research deposits, see Configuring Deposits. Researchers can also add deposits to Esploro from their personal profiles in the portal; see Adding Output to a Profile. Assets can also be added automatically into Esploro using Smart Harvesting - see Smart Harvesting Framework for more details. For information on the asset matching algorithm that is invoked after adding assets to Esploro, see Esploro Asset Matching Rules.
Watch the Depositing New Research Assets training video (6:46).
- Research Assets Curator
- Research Assets Manager (can delete and assign deposits)
- Research Observer (view only)
Before working with research deposits, ensure that your administrator has configured research organization units and researchers. See Configuring Research Organization Units and Managing Researchers.
For information on the deposit workflow, see Workflow and Terminology. For information on configuring asset details see here.
Once a research deposit has been approved, it becomes an Esploro asset. For information on working with Esploro assets, see Working with Research Assets.
Adding Staff-Mediated Research Deposits

- On the Deposit Research Asset page, optionally enter or select the name of one of the researchers in the Researcher field. You will be able to add additional names later in the process (on page 2 of the wizard, under Creators and Contributors). If you select a researcher, select whether this researcher is a Creator or Contributor for the deposit.
If you do enter a researcher, that researcher will appear as the Owner on the right panel after approving the asset. If you don't select a researcher, no Owner will be displayed.

- Select the organization academic unit (mandatory).
- In Asset type, select the deposit type (mandatory). Note that you can change the asset type at a later time. For the list of asset categories and types see Research Asset Categories and Types.
- After selecting the type, additional fields that are relevant to the selected type appear. Enter as much information as you can in the fields that appear. Esploro copies the values that you enter to the next step of the wizard.
Research Deposit Fields Category > Type Fields Conference > <any> none Patent Patent Number Publication > Book - DOI
- ISBN
Publication > Book chapter - Chapter DOI
- Book DOI
- ISBN
Publication > Conference proceeding - DOI
- PMID
Publication > Journal article - DOI
- PMID
any other type - DOI
- Using the Files area, upload the file containing the research output (if any). You can upload additional files or add links to external sites in the next page of the wizard.
Due to PDF generation software, PDF thumbnails may sometimes appear with a black background. This can sometimes be changed by creating the thumbnail manually or by replacing the PDF. If the thumbnail is empty, running the Handle Empty Thumbnails job (Configuration -> General -> Research Jobs Configuration) may sometimes resolve that. For issues with PDF thumbnails contact Support.
- Select Next. Page 2 of the wizard appears. If a match was found in Ex Libris' Summon Index based on the information you made in the previous step or the metadata within the file that you uploaded, then some of the fields on this page are prefilled. These fields are marked with a blue background and border.
- Enter or configure the information, according to the asset category and type. See the following pages:
If you save the page as a draft and return to work on the deposit, select Contact Researcher to send an email message to the researcher in order to ask for more information or clarify any issues. When you first create a deposit, the action Contact Researcher does not appear on the page. The Manage creators link also does not display until the deposit has been saved.
- Conference/Events
- Presentation and Poster – Adding Staff-Mediated Research Deposits - Conference: Presentation and Poster
- All other conference/event types – Adding Staff-Mediated Research Deposits - Conference.
- Creative Work – For performance-related creative work, see Adding Staff-Mediated Research Deposits - Performance. For all other types of creative work, see Adding Staff-Mediated Research Deposits - Generic.
- Dataset
- Interactive Resource – All types use the generic form. See Adding Staff-Mediated Research Deposits - Generic.
- More – All types use the generic form. See Adding Staff-Mediated Research Deposits - Generic.
- Patent – See Adding Staff-Mediated Research Deposits - Patent.
- Posted Content – All types use the generic form. See Adding Staff-Mediated Research Deposits - Generic.
- Publication
- Adding Staff-Mediated Research Deposits - Publication - Abstract
- Adding Staff-Mediated Research Deposits - Publication - Book
- Adding Staff-Mediated Research Deposits - Publication - Book Chapter
- Adding Staff-Mediated Research Deposits - Publication - Conference Proceeding
- Adding Staff-Mediated Research Deposits - Publication - Journal Article
- All other publication types use the generic form. See Adding Staff-Mediated Research Deposits - Generic.
- Software – All types use the generic form. See Adding Staff-Mediated Research Deposits - Generic.
- Teaching and Learning – See Adding Staff-Mediated Research Deposits - Teaching and Learning Assets.
- Conference/Events
- When you are done, submit the deposit to the research repository: select the page action Approve to save as an asset (already approved, so it does not become a deposit; when editing the deposit, approving the deposit changes the deposit to be an asset), or Save Draft to save as a deposit and mark it as Draft. On approval, an email is sent to the asset's researchers (who have not opted out). Drafts can be managed on the Research Deposits page (see Managing Research Deposit Using the Research Deposits Page). See Working with Research Assets to see the actions available for assets after being deposited.
For all assets of category "Publication," a deposit cannot be approved unless at least one date is specified under Statuses and Dates.
Adding Electronic Theses and Dissertations (ETD) Deposits
ETDs (Electronic Theses and Dissertations) showcase the activities and roles of research faculties (advisor, committee member) and students. ETDs also provide background on researchers, especially early in their career. For more information see Working with ETDs.
Adding Non-Researcher Deposits
Non-researchers (e.g., students) can deposit assets via a customized form. Students can access these forms by a dedicated URL.
- Go to Configure > Repository > Manage Student Deposit Profiles.

- By default, the Undergraduate ETD Submissions profile appears.
- To add a new profile, select Add New Profile. The Student Deposit Profile Details page appears.

- Fill the fields and select Save.
- You can edit or view the form from the row actions menu.

The Profile description is internal and does not display on the form, but the Instructions do display on the form. The Asset type includes the types that are relevant to non researchers.For configuring the deposit policy, see Configuring Esploro Deposit Policies. Note that only forms with the Status marked as Active will display for users.
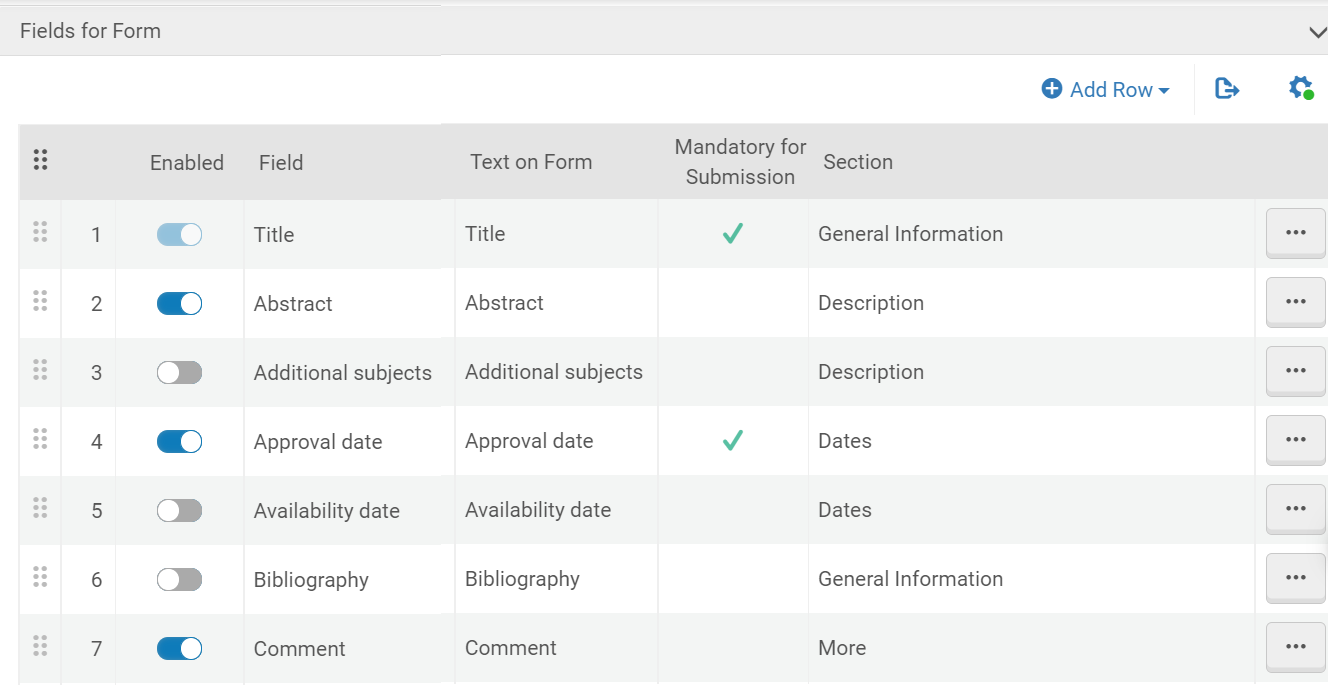
- In the Fields for Form section that display under the Profile Details, you can configure the fields that will appear on the form.

- Select Edit from the row actions menu to edit a field.

For the Title field, only the Text on Form can be edited. This field is not open to configuration by the administrator - it will always appear on the form.
- Enable the field for display on the form by toggling the button in the Enabled column. The list of fields depend on the asset type that was selected.
.png?revision=1)
The value added to the Text on Form field is the label that will appear on the form. - In the Fields for Form section you can drag and drop the fields to change their order, but this will only impact fields within their specific section.
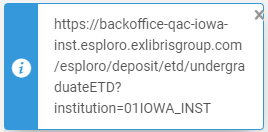
- To send the user a URL to the form or make it available to them on a website, on the profile select URL from the row actions menu.

-
The URL will be displayed for you to copy and send to the user or to make available via a website.

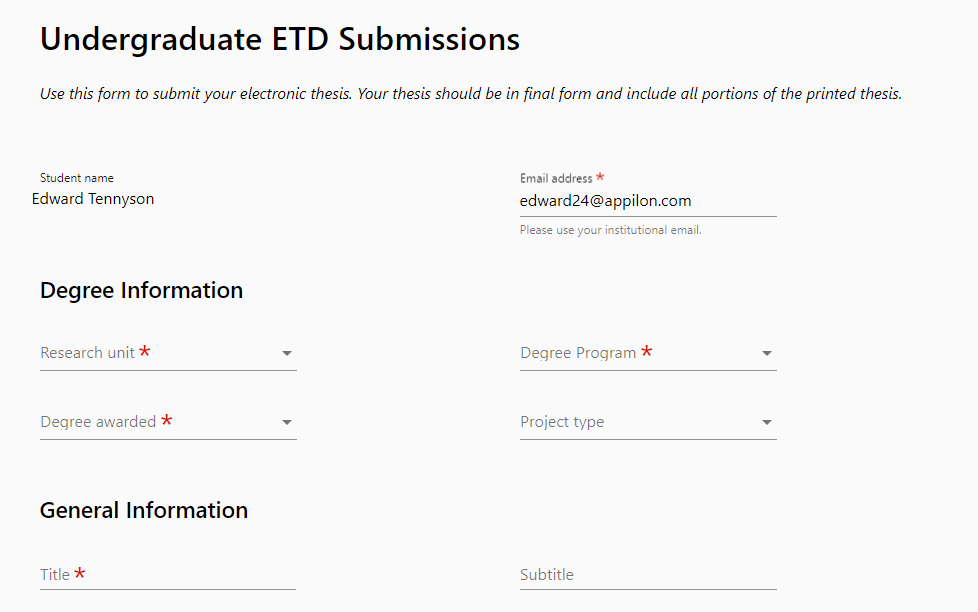
- To view the form in the profile (in a browser), on the profile select Go to Form from the row actions menu. Only users that are signed into the institution platform will be able to use the URL.

The form opens in the profile.
After the user selects Submit on the form, the deposit is added to the repository for management and approval. It can be accessed from Repository > Asset Deposits > Manage Asset Deposits (see Managing Research Deposits Using the Research Deposits Page, below). - You can configure Esploro to automatically send an email to students upon approval of their submission form. This email contains a link to the output on the portal. The DOI is also included in the email. The link in the email goes directly to the form.
The letter, Student Deposit Approval Letter, is enabled by default and can be configured from Configuration Menu > General > Letters Configuration. See Configuring Esploro Letters for more information.
If advisors were added to the form, they receive copies of the email (CC field). This only applies to advisors that have an email address associated with them in the system.
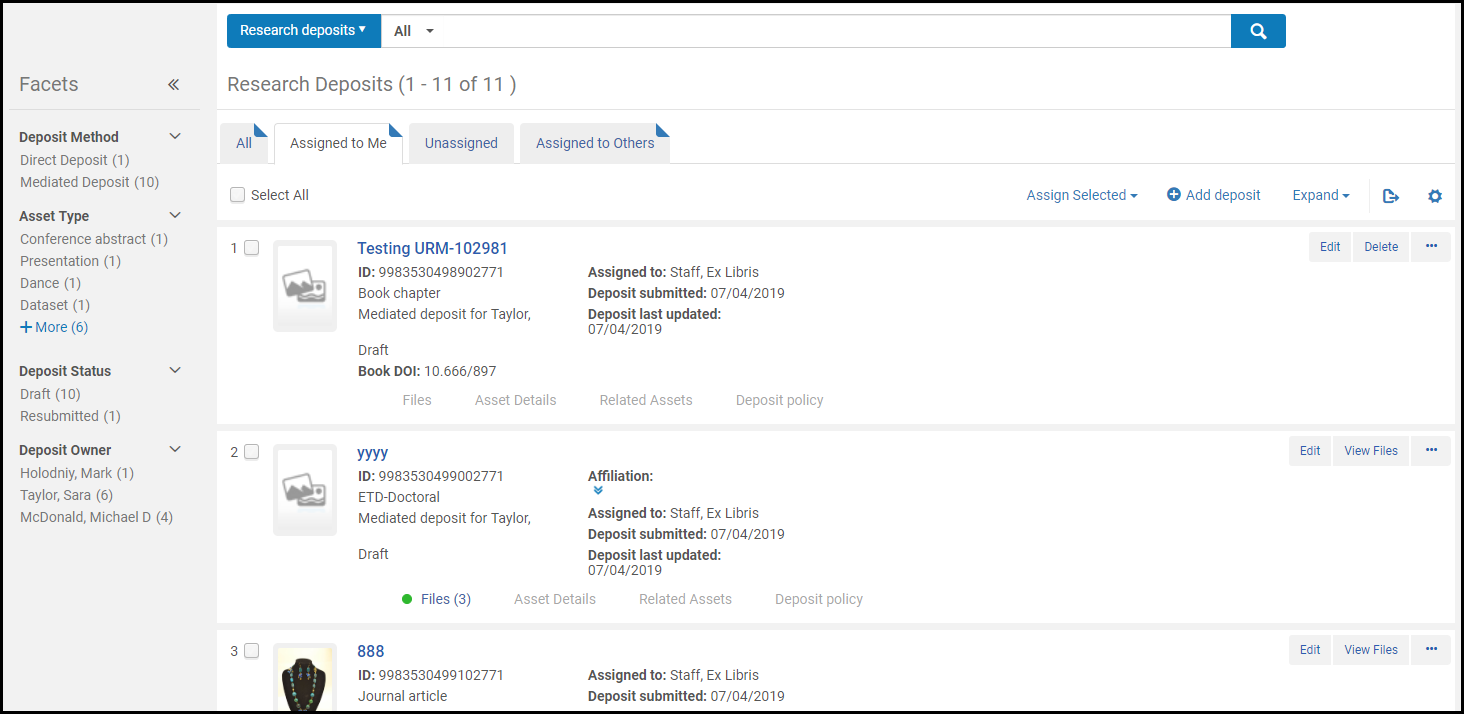
Managing Research Deposits Using the Research Deposits Page

Performing Actions on Deposits
- View additional details about the deposit in the tabs beneath each deposit. See Viewing Additional Asset Details.
- Assign / unassign a research deposit – Select one or more deposits and select Assign Selected > Assign to to assign the deposits to a specific administrator or Assign Selected > Release assignment to unassign the deposits. Alternatively, to assign or unassign a single deposit, in the row actions list for that deposit, select Assign to or Release assignment. When assigning deposits to a specific administrator, you can select to send a notification email to that administrator (see note, below).
- Edit – Approve, return, or view or modify the deposit record; see Editing a Deposit, below.
- Change asset type – Change the asset category and/or type (not available for an ETD). When you select this action, the Change asset type pane appears. Select the new category and type and select Change to save your changes. You can also select Change and open in the generic form to immediately edit the asset.
 Change Asset Type PaneWhen you change as asset type, some settings may not appear when you edit or view the asset if these settings are not relevant to the new type. Nevertheless, these settings are retained in the asset's metadata. You can view and/or edit these settings in the generic form.
For the list of asset categories and types see Research Asset Categories and Types.
- Edit in generic form – Edit the asset in the generic form (not available for an ETD). See Adding Staff-Mediated Research Deposits - Generic. See the above note.
- Link ETD to a researcher (ETD only) – Use this action to link an existing local student or researcher to the ETD. If the ETD is already linked to an existing local student or researcher, you can select Unlink ETD to a researcher.
This option is not available if the ETD has multiple authors. If the ETD has multiple authors, you need to edit the ETD from the row actions menu.
- View a research deposit's file – Select View Files in the row actions list, or View File for any file in the Files tab, to open the Viewer to view all files.
- Register the research deposit's DOI – When configured by an administrator, Esploro auto-generates a DOI for a deposit. Select Register DOI in the row actions list and select Confirm in the confirmation dialog box to have Esploro attempt to register the deposit's DOI with a DOI agency. If mandatory information is missing, Esploro notifies you to enter this information before you can register the DOI. For Crossref registration, the status of the registration request may be pending in CrossRef, in which case any changes to the status are sent by email to the email address that is configured for Crossref. For more information, see Digital Object Identifier (DOI) Registration and Configuring DOI Agencies.
For records that have a locally generated DOI or handle, it is used for the permalink. Otherwise, the permalink uses the record identifier. For information on configuring DOI agencies see here. For information on configuring handles, see Configuring Handle Server Integration. For a video showing how to create a DOI see here. - Return a research deposit (direct deposit only) – Select Return in the row actions list for that deposit. The status of the deposit changes to Returned and an email is sent to the researchers with the reason and an optional note. The researchers should make corrections or add additional information and resubmit the deposit.
- Delete a research deposit (Research Manager only) – To delete a deposit without sending an email, select Delete in the row actions list.
Editing a Deposit
You can open a deposit's Asset Details page in order to view more details about it, perform other actions, and edit its fields. To open this page, from the deposit's row actions, select Edit.

A number of options are available at the top of the page, and additional information and options are available in the various tabs.
The following options are located at the top of the Asset Details page:
- Approve – Select Approve to approve the deposit. The asset is now part of the repository and discoverable, depending on its access rights policy.
- Return – To ask the researcher to make corrections or add additional information, and then resubmit the deposit, select Return (direct deposit only). The status of the deposit changes to Returned and an email is sent to the researchers with the reason and an optional note.
- Contact Researcher – To send an email message to the researcher, select Contact Researcher.
- Save Draft – Save any changes you have made to the record, but do not approve it – leave it as a deposit and mark it as Draft.
The Asset Details page includes the following tabs:
- Asset – Displays the asset details.
The Abstract, Additional Subjects, and Additional Description fields can be maintained in multiple languages. When a default language has been defined in the Multi-Lingual Data Elements configuration page, a globe icon appears next to the fields. Selecting the icon displays a window where you can input values in up to five languages.
- Attachments – Displays additional attachments to the asset that do not represent the content of the asset, such as additional signed policy documents, mail correspondence with the researcher, etc. You can add, edit, and delete attachments on the asset.
- Internal Notes – Displays certain events that occurred with the deposit or any other manual notes added by Staff. You can add, edit, and delete notes.
- Communications – Displays all communications with the researcher on the asset. These are also viewable in the Researcher Profile. You can filter this list in the tab by the Created By, Action, or Subject/Reason fields.
- To create a new email to send to the researcher, select Contact Researcher.
- To respond to a message from the researcher, in the row actions of the message, select Reply.

- History – Displays all notes generated upon status changes on the asset.
- Assessment Profile (if configured) – Displays fields that can be used for reporting of assessments. For more information, see Assessment Profile Configuration. (In the illustrations above, the tab is labeled Peer Review. This is configurable.)
Duplicate Deposits/Assets
An indicator on the deposit screen informs you when a deposit/asset has a potential duplicate, as well as how many potential duplicates there may be. You can click on the number of potential duplicates to view them. This helps you avoid working on duplicate deposits/assets. Duplicates are identified by DOI or title, so that the duplicate indicator is triggered when there is another deposit/asset with the same DOI and title.
The same alert appears when a researcher deposits a new asset. The depositor can select to preview the asset in order to establish if this is indeed the asset they want to deposit. Based on this knowledge, the depositor can do one of the following:
- Can select "Ignore" to ignore the warning and proceed with the deposit.
- If the depositor is not a creator/contributor, can select "End Process" to abandon the depositing process.
- If the depositor does not appear as a creator/contributor, can select "Add to output list" to request that the administrator adds this work to the depositor's output list.
If the depositor selects this option, you will find this request in the Task List under Research Assets > Add to Researcher Output List. Click the task to open the Asset Details page. On the Communications page, you can add this asset to the researcher's output list.


