
Peer to Peer Resource Sharing
Peer to Peer Resource Sharing — Borrowing

Creating a Resource Sharing Borrowing Request
- The request may be created from:
- A local search
 Borrowing Request Local Search
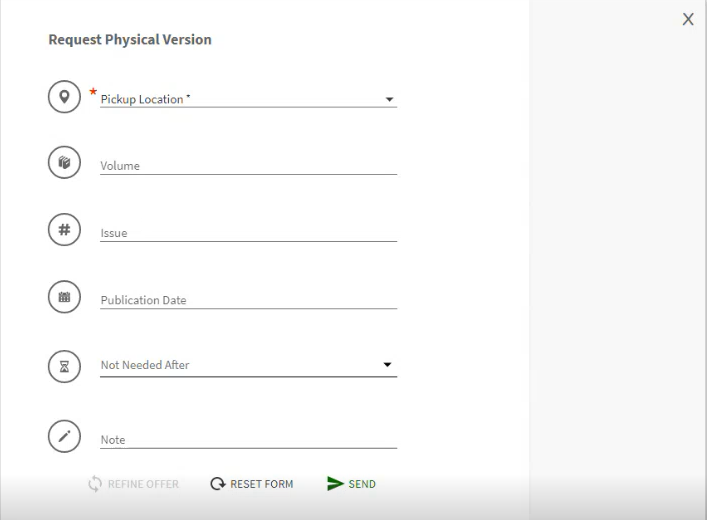
 - A blank form
 Manual Borrowing Request
 - From an external source
 Borrowing Request External Search
- A local search
- Rapido Offer
-

- A blank form
-
-
A customized local form (via an API) -A form may be created by the institution using the borrowing request API. For more information, see the Developer Network.
Rota Management
- Create rota — Define the list of partners whose collections are searched for the item availability
- Rota may be created manually using the Send Directly to Partner button on the request.
 Add Partners to a Borrowing Request
 - Rota may be created automatically using the rota assignment rules and the rota templates.
- Rota may be created manually using the Send Directly to Partner button on the request.
-
Verify rota (also known as the Locate process) - Verify that potential lenders are relevant. Partners that don't meet the verifications are automatically removed from the rota. Verifications may be done on various attributes, such as:
- Does the partner have the requested item?
- Is the item currently available?
- Is the item available for resource sharing requests?
Verification of item availability and eligibility for resource sharing is only relevant if the partner is another Rapido institution.
Canceling a Resource Sharing Request
- The request may be canceled from a row action. This option fully cancels the request. The current partner is removed. All pending partners are also removed so that the request does not move on to another partner.
 Cancel Action on the Borrowing Requests Task List
 - The request may be canceled from the front end. This option fully cancels the request.
 Cancel Action on front end Requests List
 - Edit the request and select the Rota tab. Select Cancel next to a partner. This option cancels only this partner but leaves the request active. A cancelation message is sent to the partner and if there are more partners, the next partner in the rota is activated.
 Cancel Action on Partner List
Rejecting a Resource Sharing Request
Receiving an Item from a Resource Sharing Request
- A temporary BIB record, which is automatically suppressed
- A temporary holding
- A temporary item
- A hold request linked to the temporary item


The Document Delivery Notification Letter also supports social login options. For more information, see here.
Managing a Resource Sharing Loaned Item
Returning a Resource Sharing Item to the Lender
Receiving and Shipping Resource Sharing Items
Receiving Items
- Fulfillment Services Operator (for the resource sharing library)
- Fulfillment Services Manager (for the resource sharing library)
Receiving Physical Items
- On the Received Items page (Fulfillment > Resource Sharing > Receiving Items), select a format for the received items in the Received format field that you want to view (Digital, Physical, or Physical non-returnable), regardless of which method you use to receive resource sharing materials.
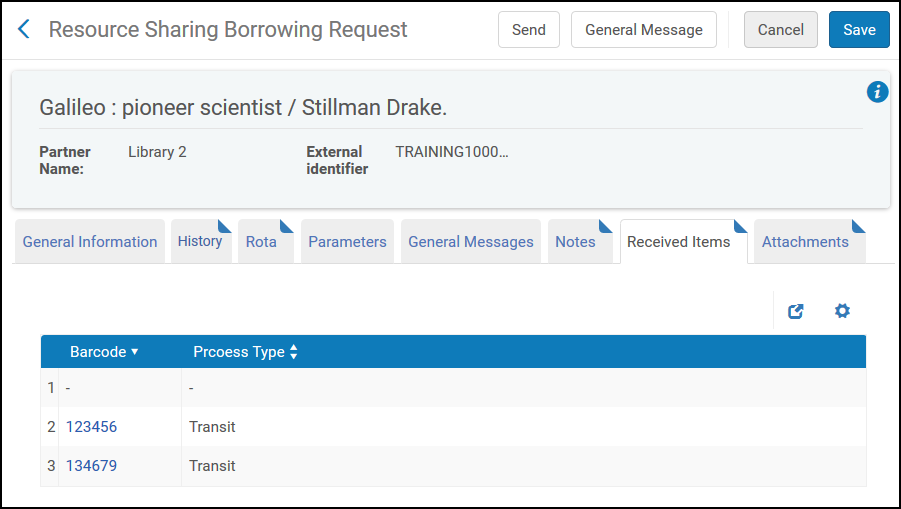
 Received Items Page
 - Select an Identifier type by which received items are to be identified:
- Barcode
- External identifier
-
Clear the Automatically notify patron checkbox to prevent Rapido from sending a notification email to the requesting patron when the item arrives at the resource sharing library. This can be useful for Resource Sharing Borrowing Requests with the format Physical non-returnable, when the receive operation is used to notify Rapido that an item has already been supplied directly to the patron so that no additional item ready for collection notification to the patron is required. By default, this checkbox is selected.
- When the Automatically notify patron check box is selected, the On Hold Shelf letter is the letter type generated for the notification.
- This notification is relevant only for physical resources.
- Optionally, add a note in either or both of the following fields: This note appears in the following format:
<Name of partner><Note text>
- Internal note: A note that appears only on the side from which it is sent (for example, when configuring a note from the borrower, the note appears only in the list of borrowing requests. When configuring a note from the lender, the note appears only in the list of lending requests). These notes do not appear on the History tab and are to be used for notes not intended to be publicized (for example, they are not sent to the peer partner). An example of a note would be a borrower writing: This lender has historically been difficult to deal with.
- Note to partner: The note that is sent to the partner. This note appears in the Notes tab of both the sender of the note and the receiver of the note, and on the request’s History tab (i.e. – Only in reading room).
- Enter a barcode or an external identifier for the received resource in the Barcode or External identifier field and select OK. The field that appears corresponds to the Identifier type selection, performed in step 2.
- If you selected Physical as the received format, a dialog box opens where you configure receiving information for the item:
 Receiving a Physical Item – Dialog BoxConfigure the fields in the dialog box fields, as described in the following table:
Receiving a Physical Item Dialog Box Fields Field Description Automatically print slip Select Yes to automatically print the Resource Sharing Receive Slip Letter, the option defaults to No. The selection is remembered for the duration of the session. When set to Yes, if multiple items are being scanned, a print slip is generated for each barcode. For more information on configuring the letter, see Configuring Rapido Letters. Multiple Items Select the check box if multiple items were received from the lender for this request. Temporary barcode Enter the item’s temporary barcode. Item policy Select an item policy for the item. For details on item policies, see Configuring Item Policies. Location Select the location of where the item is to be received. When receiving an item from an NCIP partner, the value of this field is the value specified in the Default Location field on the Resource Sharing Partner page Parameters tab (see NCIP Parameters).Fulfillment note Enter a note, as required. Due date Configure a due date for the item. If the NCIP Resource Sharing Borrowing Request message contains a due date, the date is displayed in this field. A due date that is in the past or is for a date by which the item cannot be delivered (for example, the item is due tomorrow and delivery takes 3 days for the item to arrive), the item must be handled accordingly (see Receiving Items).Internal note As described in step 4 above. Note to partner As described in step 4 above. Shipping Cost The shipping cost is defined in the relevant policy. It may be overridden by changing the value at this point. For Reading-Room Use Only Select to restrict access to a reading room. The values of the Item policy and Location fields are populated with the values of the Temporary Item Creation Rule for the item. If no rule is configured, the Item Policy field is empty and the Location field contains the current location of the item, based on the library and institution default settings. - If you selected Digital as the received format, the received item displays at the bottom of the page.
 Received Items Page – Digital ItemSelect Complete the request when you have completed the request to mark it as closed. If you do not select this option, the resource's status is listed in the Resource Sharing Borrowing Requests list as Digitally received by library.
- If you selected Physical as the received format, a dialog box opens where you configure receiving information for the item:
- When working with a Physical non-returnable request, select Complete the request to change the item's status to Request Completed and mark the request as Closed. If you do not select Complete the request, the resource's status is listed on the Resource Sharing Borrowing Requests page as Physically received by library. If Automatically Print Slip is set to Yes, the Receiving Slip Letter (code: ReceivingSlipLetter) is printed for physical and physical non-returnable items. For more information on the receive slip, see Configuring Rapido Letters.
For more information about non-returnable requests, see the Non-Returnable Borrowing Requests video (4:26 mins).
- If the lender is an ISO or NCIP partner, the request’s status is updated, and the Received message is sent.
- Select Cancel to return to the Received Items page and modify the due date. When you fix the due date, the item displays on the Resource Sharing Borrowing Requests page with the status Physically Received by Library.
- Select OK to retain the insufficient due date. The item is displayed on the Resource Sharing Borrowing Requests page with the status Received - not for loan, indicating that the item has been received by the Resource Sharing Borrowing Library, but cannot be loaned.
Receiving Digital Files
A lending institution may send a digital request directly to the patron if the request included a patron email address.
If the borrowing and receiving libraries are both Rapido libraries, the lender can trigger a direct email to the patron with a link to the digitized resource even if the request did not include the patron email address
The lender may send an email with the digitized resource attached. The operator on the borrower side verifies the digital item and sends it to the patron, closing the request at the same time. Sending the file to the patron is done by using the Upload File action. This action uploads the file to the Rapido cloud storage and enables sending the file to the patron. The patron receives an email with a secure link to the resource and must authenticate before gaining access to the resource. The file remains in the Rapido storage for a configurable period (default 30 days).
The staff can also view the file and resend it using the Show File and Send File to Patron actions.
For more information about digital document delivery of resource sharing requests, see the More Information About Digital Fulfillment of Resource Sharing Requests video (18:43 mins) and More Information on Article Requesting (16:54 min).
Shipping Items
- Fulfillment Services Operator (for the resource sharing library)
- Fulfillment Services Manager (for the resource sharing library)
- The Shipping address type is mandatory for ISO or NCIP enabled resource sharing libraries. When an ISO/NCIP request is sent, it includes the Shipping address as the address to which the request should be shipped. The lending institution, when shipping digitally, ships to this address.


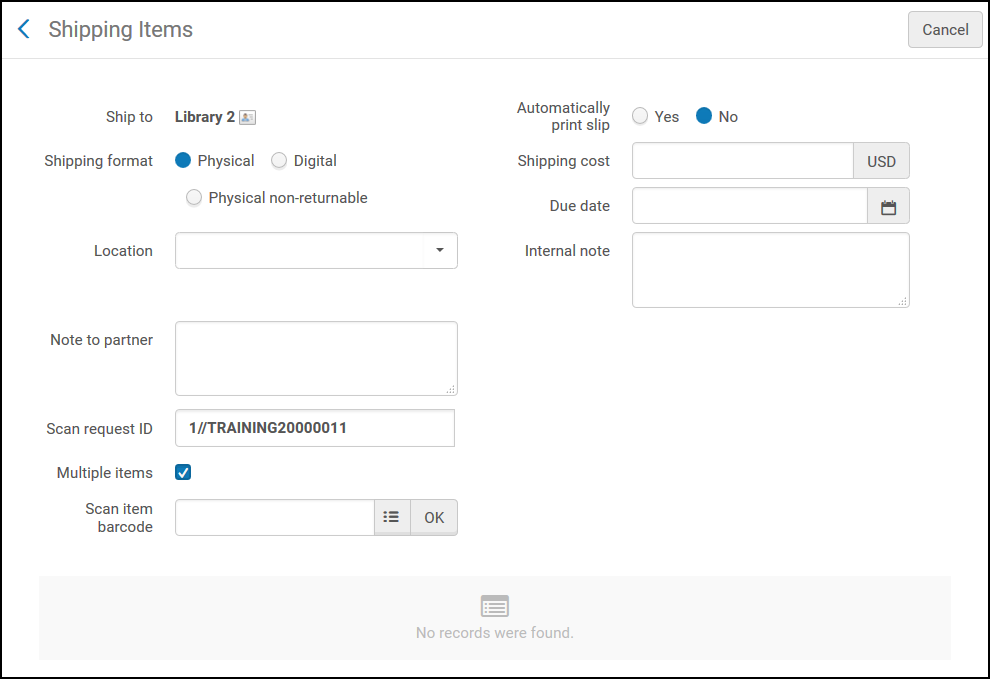
- On the Shipping Items page, in the Automatically Print Slip field, select Yes (the default is No). The selected option in this field is persistent for a user during a single session. This option automatically sends a print a Resource Sharing Shipping Slip Letter when shipping an item. The shipping print slip is sent for the item specified in the Scan request ID and Scan item barcode fields. The slip contains information that is specific to the item being shipped. For information about configuring the Resource Sharing Shipping Slip letter, see Configuring Rapido Letters.
You can manually print a shipping slip by selecting the Print Slip link on the Resource Sharing Lending Requests Task List page (see the Print Slip description in the Request Sharing Lending Requests Task List Links table in Managing Resource Sharing Lending Requests).
- In the Shipping Format field, select the format in which the request is shipped.
- In the Shipping cost field, enter the shipping cost for the item.
- In the Due date field, enter a date by which the item must be shipped. This field appears only when Shipping format = Physical.
- Optionally, add a note in either or both of the following fields: This note appears in the following format:
<Name of partner><Note text>
- Internal note: A note that appears only on the side from which it is sent (for example, when configuring a note from the borrower, the note appears only in the list of borrowing requests. When configuring a note from the lender, the note appears only in the list of lending requests). These notes do not appear on the History tab and are to be used for notes not intended to be publicized (that is, they are not sent to the peer partner). An example of a note would be a borrower writing, This lender has historically been difficult to deal with.
- Note to partner: The note that is sent to the partner. This note appears in the Notes tab of both the sender of the note and the receiver of the note, and on the request’s History tab (i.e. – Only in reading room).
- In the Scan item barcode field, enter the item's barcode. This field displays only when Shipping format = Physical. When shipping an itemless request, leave this field blank.
- Select the Complete the request check box to change the item's status to Request Completed and mark the request as Closed. This check box displays only when Shipping format = Digital or Physical non-returnable.
- In the Scan request ID field, enter the item's external identification number.
- Select OK next to either the Scan item barcode or Scan request ID fields. The item is located and appears at the bottom of the page.
Repeat step 7 and step 9 for all items you want to ship. The items appear in the table at the bottom of the page, and the configured shipping cost and due date are applied to each of the items.If an item is scanned in twice, the item will be added to the list, displaying data from the initial ship, but no additional action is taken. This is to prevent mistakes when an item for shipping is scanned twice.
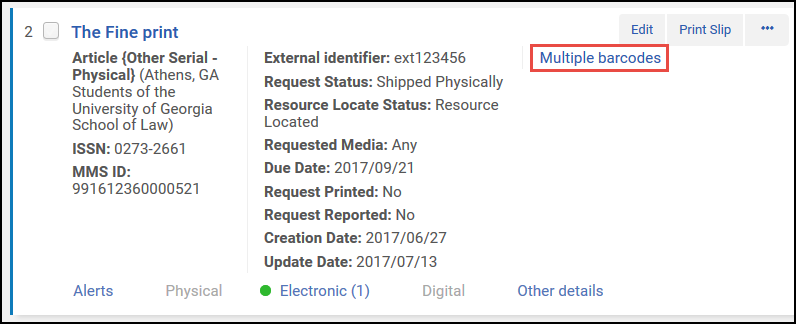
Receiving or Shipping Multiple Items for a Single Request
Borrowing Requests

- No barcodes are empty
- No barcodes are duplicated
- No barcodes are already used (in the repository)


- On the Received Items page (Fulfillment > Resource Sharing > Receiving Items), enter the External Identifier and select OK. A pop-up appears indicating that the request is already received.
- Select Confirm. A pop-up appears to enter the barcodes. Enter the barcodes one at a time and select OK after each one. (See Receive Multiple Items above.)
When accessing the pop-up after the original receive, the multiple items check box, due date and costs are view-only, taking their values from the original receive.
- Select Done when all barcodes are entered.
- Renew and recall messages received from the lender update all loans under the parent request.
- In the front end, only one item appears for the request on the Requests List of the My Account tab.
Lending Requests


Peer to Peer Resource Sharing — Lending
Lending Workflow
Creating a Resource Sharing Lending Request
-
Create Lending Request Manually - Add a lending request, either manually (see Adding a Resource Sharing Lending Task Manually) or using search (see Adding a Resource Sharing Lending Task From a Search).
 Manual Lending Request
 - Create Lending Request Automatically - from an ISO, NCIP Peer to Peer, or SLNP message.
- The request may also be created at the time of shipping when the item is scanned.