RefWorks Administration Guide
RefWorks institutional administrator can configure institution-wide settings, provide help for users, and view usage.
RefWorks Admin Pages
Administrators have access to pages to control institutional settings and access user information. Admin pages are accessed by selecting Admin from the user menu.

User Menu - Admin link
Following Admin areas are available in the left navigation menu:
- Users (selected by default) – Manage users. See Managing Users.
- Settings – Configure institution-wide settings. See Configuring Institutional Settings.
- Account Creation – Customize the options available to users in your institution. See Creating Accounts.
- Analytics – View information about RefWorks usage. See Viewing RefWorks Usage Analytics
Inviting Users and Account Creation
There are several ways to invite users and allow creation of new accounts:
- Authorizing institutional email domains: Your users can create an account on RefWorks Signup page using their institutional email address. To add or remove authorized email domains, contact RefWorks Tech Support.
- Using a unique URL and access code, which are included in your Welcome Letter.
If you do not have your unique URL or access code or need to change the code, contact RefWorks Tech Support.
Do not post the access code publicly as it allows anyone access to RefWorks.
- Send an invitation to users via the in-app Invite Users feature – recipients receive an email with a registration URL.
- SSO (Single Sign-on) set up, using Shibboleth or OpenAthens authentication. To set up SSO at your institution refer to Shibboleth/OpenAthens and RefWorks.
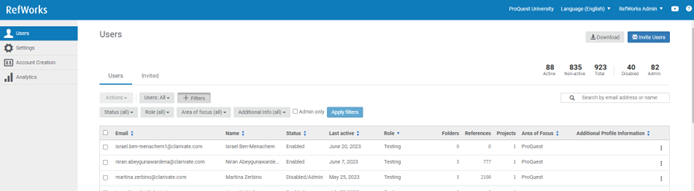
Managing Users
Manage users and invitations in the Users area (see above).
- Users tab
- View user's status: Enabled, Disabled, Enabled/Admin, Disabled/Admin.
- Using the Actions menu in a specific row, you can assign or revoke Admin privileges or enable or disable a user.
- When disabled user logs in to RefWorks, they will see a screen notifying them their account is disabled:
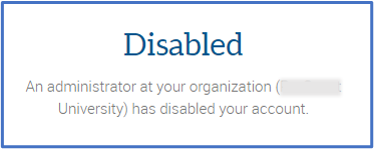
Disabled user message
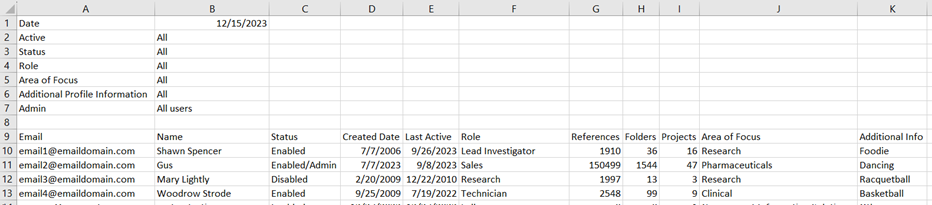
- If you select one or more users, page actions become available in the Actions menu at the top of the table. Use these actions to manage users in bulk.To export the list of users in CSV format, click Download while on Users tab. The following information is exported:
- Email address.
- First name, if provided.
- Last name, if provided.
- Role, if provided.
- Created – date the account was created.
- Status:
- Enabled: user access is unrestricted.
- Disabled: user access is restricted by an Admin.
- Enabled/Admin: user access is unrestricted, with Admin privileges.
- Disabled/Admin: user access is restricted, with Admin privileges; when the user is again enabled, Admin privileges will persist.
- Last Active – date the account was last accessed.
- Area of Focus
- Additional Profile Information, if configured.
- Folders – includes folders created by user and folders created by another user in the same project; does not include folders shared with the user.
- References – includes references created by the user, references created by another user in the same project, and references in trash; does not include references in folders shared with the user.
- Invited tab
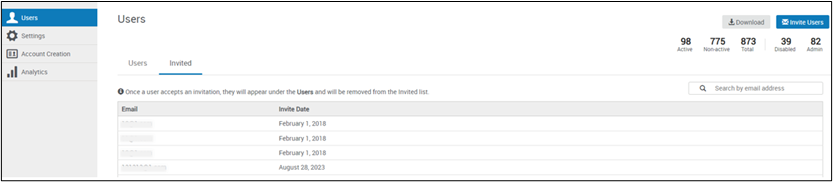
Invited Users page- View email list of invitations sent and when they were sent.
- Emails in list are not yet registered users. These can be managed only once they are registered and appear under the Users tab.
- Invitations which have been accepted and an account was created, will no longer be listed under the Invited tab. Those users can be managed under Users tab.
- Invitations which have not yet been accepted and an account has not been created, will remain under the Invited tab until an account is created.
- To invite users, click on the Invite Users button. The Admin / Invite Users page appears. Follow the on-screen instructions. When finished, select Back to admin to return to the Admin / Users page.

Admin / Invite Users Page
Configuring Institutional Settings
To configure institutional preferences, click on Admin > Settings.
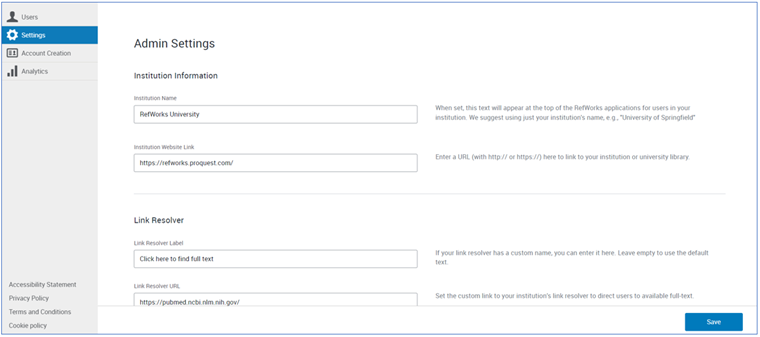
On this page, you can configure the following (see the on-screen text for more information):
- Institution Information
- Institution name
- Institution URL (Institution Website Link)
- Link Resolver
- Link Resolver Label – Enter a label for the link resolver if it has a custom name.
- Link Resolver URL– If your institution subscribes to a link resolver service, configure the link resolver URL. If you do not configure a URL, the link to the link resolver does not appear.
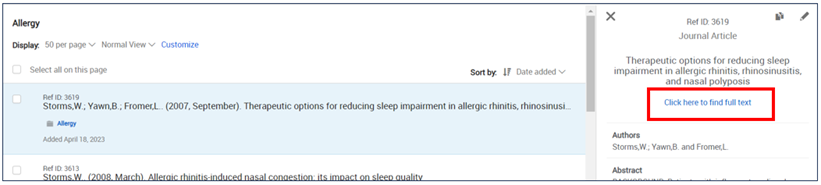 Link Resolver – Reference Preview Modal
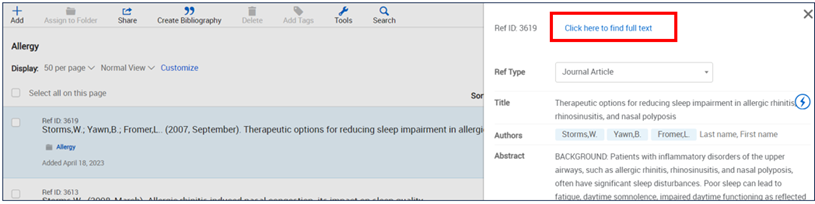
Link Resolver - Reference Editor Modal
- WAYFless Login — When a URL is added, it enables users to directly access their RefWorks accounts via the institutional login (if they are signed in to their institution's website), bypassing the RefWorks login screen.
- Full-text sharing — Enables/disables whether users can share full-text references with users outside your organization. Sharing with other users inside your organization is always allowed. When disabled, RefWorks hides the attachment icon and any attached files.
- Show Search Databases – Enables/disables whether the Search Databases option appears in the Reference Organization area for users at your institution.
- Sync with Dropbox – Enables/disables whether users can synchronize their full-text references with Dropbox.
- Show Unpaywall Link – Enables/disables whether users at your institution can access full text available via Unpaywall.
- Show Plagiarism and AI content checker (Pilot) - Enables/Disables whether users at your institution can access Plagiarism and AI Content checker feature in RefWorks and RefWorks Citation Manager (RCM) for Word and Google Docs.
- Show Preflight Pre-submission Check - Enables/disabled whether users at your institution can access Preflight checked in RefWorks Citation Manager (RCM) for Word and Google Docs.
When enabled, Unpaywall link appears in the reference preview and editor panes.
Admin Preferences Options

Unpaywall Link – Reference Preview Modal
Unpaywall Link – Reference Editor Modal- The Unpaywall link appears for references where the DOI is present and located in the Unpaywall database.
- Depending on the reference in Unpaywall, the link will offer a new webpage with information or start PDF download.
- Citation Styles for My Institution – List of default bibliographic styles available in the Recent Styles menu when creating a bibliography or choosing a style in Citation View. You can select up to six styles. These styles appear under Recent Styles for new users. (For more information, see As an admin, how do I customize citation style lists?).
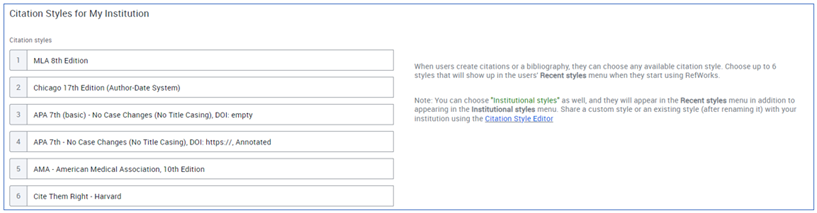
Admin Citations Styles for My Institution SettingsYou can also configure Institutional styles, which appear in the Recent Styles menu in addition to appearing in the Institutional Styles menu. - Additional Profile Information – This an optional setting. Adds a custom drop-down field displayed to users during account creation. When configured, these are required fields. At least two possible answer choices must be listed.
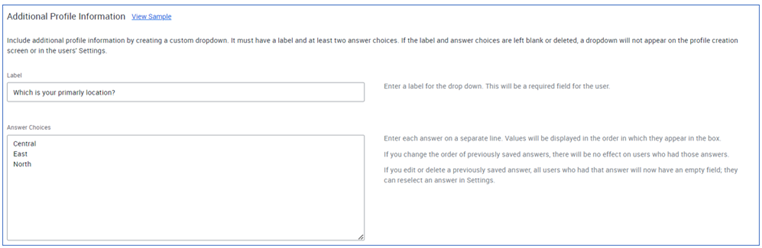
Admin Additional Profile Information Settings - Profile Creation Message – add text that displays on a user's Profile Creation page.
After making any change on this page, select Save.
Click here for the YouTube Video for RefWorks Administration Settings Checklist.
Sharing Personal Citation Styles as Institution Styles
As an administrator, you can share a personal citation style as an institution style.
While editing the style (see Editing Non-CSL Citation Styles), select Options > Share with my institution. Other users at your institution can now use and/or duplicate the style.
To stop sharing a style, select Options > Stop sharing with my institution.
For more information, see the following articles:
Creating Accounts
When users create a RefWorks account, they select a Role and (if defined by the institution) an Area of Focus. These can be updated at any time from the user Settings page. Admins can customize the options that are available to users in their institution.
Select Admin > Account Creation. The options currently available at the institution are listed.
Use Select from available roles or Select from available areas of focus to add options to the institution's list. Admins can also manually enter options in the textbox and edit or remove options.
The lists defined in the Account Creation section are reflected in the User Settings and in the Admin Analytics.
Viewing RefWorks Usage Analytics
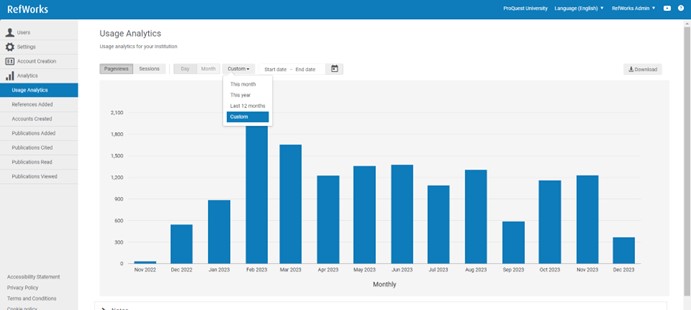
Administrators can view information about RefWorks usage on the Admin / Analytics / Usage Analytics page.
Usage Analytics Page
The following areas are available when viewing RefWorks usage analytics. Each report can be downloaded.
-
Usage Analytics – Total page views and sessions in a specified period. May be viewed by day or month. Information is aggregated anonymously, and no user filters are available. Historical (prior to March 2023) Pageview and Session reports are available in Admin Usage Analytics for download only. The full 12 months of data, starting March 2023 and after, is available through in-app graphs and as a download.
-
A page view is counted each time a user moves to another page of RefWorks or refreshes a page.
-
A session is a visit to the RefWorks website, regardless of duration on the site or activities completed; a session can include multiple page views.
-
In the following areas, metrics may be filtered by Roles, Areas of Focus and Additional Profile Information (where enabled). They may be viewed for a preset or custom time frame.
-
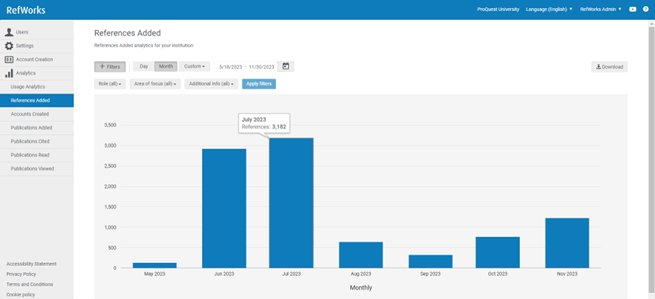
References Added – Trend showing how many references were added. References which were deleted by user after adding are not included in the trend.
-
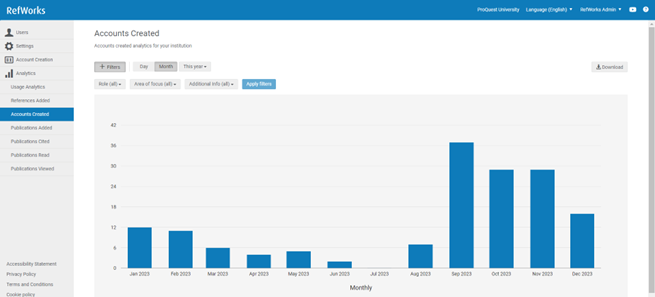
Accounts Created – Trend showing how many accounts were created. Accounts which were deleted by user after creation are not included in the trend.
In the following areas, metrics may be filtered by Role, Discipline and Area of Focus. These can be viewed for a preset time frame.
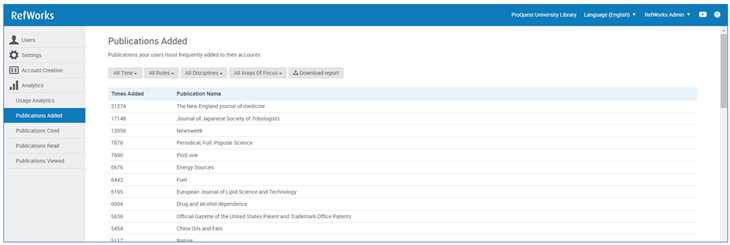
- Publications Added – Publications added most often to accounts at your institution.
- Publications Cited – Publications most frequently cited in RefWorks Citation Manager (RCM) for Word and Google Docs at your institution.
- Publications Read – Publications with full text most often read by users at your institution.
- Publications Viewed – Publications whose metadata was most often viewed by users at your institution.